Note
Access to this page requires authorization. You can try signing in or changing directories.
Access to this page requires authorization. You can try changing directories.
Azure DevOps Services
Azure Pipelines can automatically build and validate every pull request and commit to your Bitbucket Cloud repository. This article describes how to configure the integration between Bitbucket Cloud and Azure Pipelines.
Bitbucket and Azure Pipelines are two independent services that integrate well together. Your Bitbucket Cloud users do not automatically get access to Azure Pipelines. You must add them explicitly to Azure Pipelines.
Access to Bitbucket repositories
You create a new pipeline by first selecting a Bitbucket Cloud repository and then a YAML file in that repository. The repository in which the YAML file is present is called self repository. By default, this is the repository that your pipeline builds.
You can later configure your pipeline to check out a different repository or multiple repositories. To learn how to do this, see multi-repo checkout.
Azure Pipelines must be granted access to your repositories to fetch the code during builds. In addition, the user setting up the pipeline must have admin access to Bitbucket, since that identity is used to register a webhook in Bitbucket.
There are 2 authentication types for granting Azure Pipelines access to your Bitbucket Cloud repositories while creating a pipeline.
| Authentication type | Pipelines run using |
|---|---|
| 1. OAuth | Your personal Bitbucket identity |
| 2. Username and password | Your personal Bitbucket identity |
OAuth authentication
OAuth is the simplest authentication type to get started with for repositories in your Bitbucket account. Bitbucket status updates will be performed on behalf of your personal Bitbucket identity. For pipelines to keep working, your repository access must remain active.
To use OAuth, login to Bitbucket when prompted during pipeline creation. Then, click Authorize to authorize with OAuth. An OAuth connection will be saved in your Azure DevOps project for later use, as well as used in the pipeline being created.
Note
The maximum number of Bitbucket repositories that the Azure DevOps Services user interface can load is 2,000.
Password authentication
Builds and Bitbucket status updates will be performed on behalf of your personal identity. For builds to keep working, your repository access must remain active.
To create a password connection, visit Service connections in your Azure DevOps project settings. Create a new Bitbucket service connection and provide the user name and password to connect to your Bitbucket Cloud repository.
CI triggers
Continuous integration (CI) triggers cause a pipeline to run whenever you push an update to the specified branches or you push specified tags.
YAML pipelines are configured by default with a CI trigger on all branches, unless the Disable implied YAML CI trigger setting, introduced in Azure DevOps sprint 227, is enabled. The Disable implied YAML CI trigger setting can be configured at the organization level or at the project level. When the Disable implied YAML CI trigger setting is enabled, CI triggers for YAML pipelines are not enabled if the YAML pipeline doesn't have a trigger section. By default, Disable implied YAML CI trigger is not enabled.
Branches
You can control which branches get CI triggers with a simple syntax:
trigger:
- main
- releases/*
You can specify the full name of the branch (for example, main) or a wildcard (for example, releases/*).
See Wildcards for information on the wildcard syntax.
Note
You cannot use variables in triggers, as variables are evaluated at runtime (after the trigger has fired).
Note
If you use templates to author YAML files, then you can only specify triggers in the main YAML file for the pipeline. You cannot specify triggers in the template files.
For more complex triggers that use exclude or batch, you must use the full syntax as shown in the following example.
# specific branch build
trigger:
  branches:
    include:
    - main
    - releases/*
    exclude:
    - releases/old*
In the above example, the pipeline will be triggered if a change is pushed to main or to any releases branch. However, it won't be triggered if a change is made to a releases branch that starts with old.
If you specify an exclude clause without an include clause, then it is equivalent to specifying * in the include clause.
In addition to specifying branch names in the branches lists, you can also configure triggers based on tags by using the following format:
trigger:
  branches:
    include:
      - refs/tags/{tagname}
    exclude:
      - refs/tags/{othertagname}
If you didn't specify any triggers, and the Disable implied YAML CI trigger setting is not enabled, the default is as if you wrote:
trigger:
  branches:
    include:
    - '*'  # must quote since "*" is a YAML reserved character; we want a string
Important
When you specify a trigger, it replaces the default implicit trigger, and only pushes to branches that are explicitly configured to be included will trigger a pipeline. Includes are processed first, and then excludes are removed from that list.
Batching CI runs
If you have many team members uploading changes often, you may want to reduce the number of runs you start.
If you set batch to true, when a pipeline is running, the system waits until the run is completed, then starts another run with all changes that have not yet been built.
# specific branch build with batching
trigger:
  batch: true
  branches:
    include:
    - main
Note
batch is not supported in repository resource triggers.
To clarify this example, let us say that a push A to main caused the above pipeline to run. While that pipeline is running, additional pushes B and C occur into the repository. These updates do not start new independent runs immediately. But after the first run is completed, all pushes until that point of time are batched together and a new run is started.
Note
If the pipeline has multiple jobs and stages, then the first run should still reach a terminal state by completing or skipping all its jobs and stages before the second run can start. For this reason, you must exercise caution when using this feature in a pipeline with multiple stages or approvals. If you wish to batch your builds in such cases, it is recommended that you split your CI/CD process into two pipelines - one for build (with batching) and one for deployments.
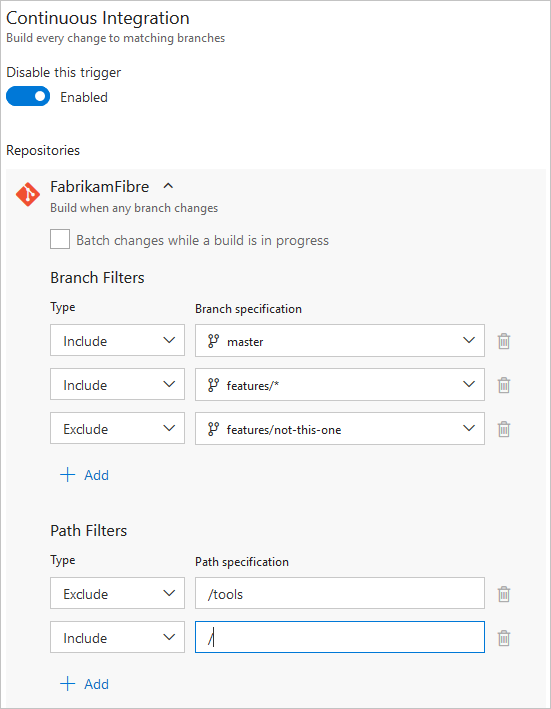
Paths
You can specify file paths to include or exclude.
# specific path build
trigger:
  branches:
    include:
    - main
    - releases/*
  paths:
    include:
    - docs
    exclude:
    - docs/README.md
When you specify paths, you must explicitly specify branches to trigger on if you are using Azure DevOps Server 2019.1 or lower. You can't trigger a pipeline with only a path filter; you must also have a branch filter, and the changed files that match the path filter must be from a branch that matches the branch filter. If you are using Azure DevOps Server 2020 or newer, you can omit branches to filter on all branches in conjunction with the path filter.
Wildcards are supported for path filters. For instance, you can include all paths that match src/app/**/myapp*. You can use wildcard characters (**, *, or ?) when specifying path filters.
- Paths are always specified relative to the root of the repository.
- If you don't set path filters, then the root folder of the repo is implicitly included by default.
- If you exclude a path, you cannot also include it unless you qualify it to a deeper folder. For example if you exclude /tools then you could include /tools/trigger-runs-on-these
- The order of path filters doesn't matter.
- Paths in Git are case-sensitive. Be sure to use the same case as the real folders.
- You cannot use variables in paths, as variables are evaluated at runtime (after the trigger has fired).
Note
For Bitbucket Cloud repos, using branches syntax is the only way to specify tag triggers. The tags: syntax is not supported for Bitbucket.
Opting out of CI
Disabling the CI trigger
You can opt out of CI triggers entirely by specifying trigger: none.
# A pipeline with no CI trigger
trigger: none
Important
When you push a change to a branch, the YAML file in that branch is evaluated to determine if a CI run should be started.
Skipping CI for individual commits
You can also tell Azure Pipelines to skip running a pipeline that a push would normally trigger. Just include [skip ci] in the message or description of any of the commits that are part of a push, and Azure Pipelines will skip running CI for this push. You can also use any of the following variations.
[skip ci]or[ci skip]skip-checks: trueorskip-checks:true[skip azurepipelines]or[azurepipelines skip][skip azpipelines]or[azpipelines skip][skip azp]or[azp skip]***NO_CI***
Using the trigger type in conditions
It is a common scenario to run different steps, jobs, or stages in your pipeline depending on the type of trigger that started the run. You can do this using the system variable Build.Reason. For example, add the following condition to your step, job, or stage to exclude it from PR validations.
condition: and(succeeded(), ne(variables['Build.Reason'], 'PullRequest'))
Behavior of triggers when new branches are pushed
It is common to configure multiple pipelines for the same repository. For instance, you may have one pipeline to build the docs for your app and another to build the source code. You may configure CI triggers with appropriate branch filters and path filters in each of these pipelines. For instance, you may want one pipeline to trigger when you push an update to the docs folder, and another one to trigger when you push an update to your application code. In these cases, you need to understand how the pipelines are triggered when a new branch is created.
Here is the behavior when you push a new branch (that matches the branch filters) to your repository:
- If your pipeline has path filters, it will be triggered only if the new branch has changes to files that match that path filter.
- If your pipeline does not have path filters, it will be triggered even if there are no changes in the new branch.
Wildcards
When specifying a branch, tag, or path, you may use an exact name or a wildcard.
Wildcards patterns allow * to match zero or more characters and ? to match a single character.
- If you start your pattern with
*in a YAML pipeline, you must wrap the pattern in quotes, like"*-releases". - For branches and tags:
- A wildcard may appear anywhere in the pattern.
- For paths:
- In Azure DevOps Server 2022 and higher, including Azure DevOps Services, a wildcard may appear anywhere within a path pattern and you may use
*or?. - In Azure DevOps Server 2020 and lower, you may include
*as the final character, but it doesn't do anything differently from specifying the directory name by itself. You may not include*in the middle of a path filter, and you may not use?.
- In Azure DevOps Server 2022 and higher, including Azure DevOps Services, a wildcard may appear anywhere within a path pattern and you may use
trigger:
  branches:
    include:
    - main
    - releases/*
    - feature/*
    exclude:
    - releases/old*
    - feature/*-working
  paths:
    include:
    - docs/*.md
PR triggers
Pull request (PR) triggers cause a pipeline to run whenever a pull request is opened with one of the specified target branches, or when updates are made to such a pull request.
Branches
You can specify the target branches when validating your pull requests.
For example, to validate pull requests that
target master and releases/*, you can use the following pr trigger.
pr:
- main
- releases/*
This configuration starts a new run the first time a new pull request is created, and after every update made to the pull request.
You can specify the full name of the branch (for example, master) or a wildcard (for example, releases/*).
Note
You cannot use variables in triggers, as variables are evaluated at runtime (after the trigger has fired).
Note
If you use templates to author YAML files, then you can only specify triggers in the main YAML file for the pipeline. You cannot specify triggers in the template files.
Each new run builds the latest commit from the source branch of the pull request. This is different from how Azure Pipelines builds pull requests in other repositories (e.g., Azure Repos or GitHub), where it builds the merge commit. Unfortunately, Bitbucket does not expose information about the merge commit, which contains the merged code between the source and target branches of the pull request.
If no pr triggers appear in your YAML file, pull request validations are automatically enabled for all
branches, as if you wrote the following pr trigger. This configuration triggers a build when any
pull request is created, and when commits come into the source branch of any active pull request.
pr:
  branches:
    include:
    - '*'  # must quote since "*" is a YAML reserved character; we want a string
Important
When you specify a pr trigger, it replaces the default implicit pr trigger, and only pushes to branches that are explicitly configured to be included will trigger a pipeline.
For more complex triggers that need to exclude certain branches, you must use the full syntax as shown in the following example.
# specific branch
pr:
  branches:
    include:
    - main
    - releases/*
    exclude:
    - releases/old*
Paths
You can specify file paths to include or exclude. For example:
# specific path
pr:
  branches:
    include:
    - main
    - releases/*
  paths:
    include:
    - docs
    exclude:
    - docs/README.md
Tips:
- Wild cards are not supported with path filters.
- Paths are always specified relative to the root of the repository.
- If you don't set path filters, then the root folder of the repo is implicitly included by default.
- If you exclude a path, you cannot also include it unless you qualify it to a deeper folder. For example if you exclude /tools then you could include /tools/trigger-runs-on-these
- The order of path filters doesn't matter.
- Paths in Git are case-sensitive. Be sure to use the same case as the real folders.
- You cannot use variables in paths, as variables are evaluated at runtime (after the trigger has fired).
Multiple PR updates
You can specify whether additional updates to a PR should cancel in-progress validation runs for the same PR. The default is true.
# auto cancel false
pr:
  autoCancel: false
  branches:
    include:
    - main
Opting out of PR validation
You can opt out of pull request validation entirely by specifying pr: none.
# no PR triggers
pr: none
For more information, see PR trigger in the YAML schema.
Note
If your pr trigger isn't firing, ensure that you have not overridden YAML PR triggers in the UI.
Informational runs
An informational run tells you Azure DevOps failed to retrieve a YAML pipeline's source code. Source code retrieval happens in response to external events, for example, a pushed commit. It also happens in response to internal triggers, for example, to check if there are code changes and start a scheduled run or not. Source code retrieval can fail for multiple reasons, with a frequent one being request throttling by the git repository provider. The existence of an informational run doesn't necessarily mean Azure DevOps was going to run the pipeline.
An informational run looks like in the following screenshot.
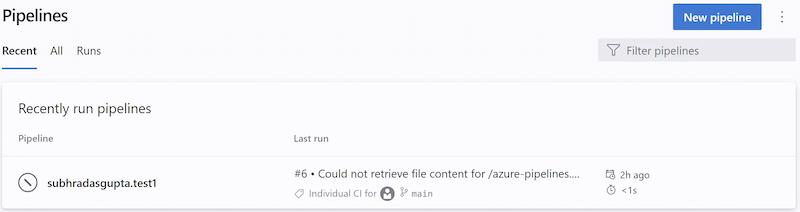
You can recognize an informational run by the following attributes:
- Status is
Canceled - Duration is
< 1s - Run name contains one of the following texts:
Could not retrieve file content for {file_path} from repository {repo_name} hosted on {host} using commit {commit_sha}.Could not retrieve content for object {commit_sha} from repository {repo_name} hosted on {host}.Could not retrieve the tree object {tree_sha} from the repository {repo_name} hosted on {host}.Could not find {file_path} from repository {repo_name} hosted on {host} using version {commit_sha}. One of the directories in the path contains too many files or subdirectories.
- Run name generally contains the BitBucket / GitHub error that caused the YAML pipeline load to fail
- No stages / jobs / steps
Learn more about informational runs.
Limitations
Azure Pipelines loads a maximum of 2000 branches from a repository into dropdown lists in the Azure Devops Portal, for example into the Default branch for manual and scheduled builds setting, or when choosing a branch when running a pipeline manually. If you don't see your desired branch in the list, type the desired branch name manually.
FAQ
Problems related to Bitbucket integration fall into the following categories:
- Failing triggers: My pipeline is not being triggered when I push an update to the repo.
- Wrong version: My pipeline runs, but it is using an unexpected version of the source/YAML.
Failing triggers
I just created a new YAML pipeline with CI/PR triggers, but the pipeline isn't being triggered.
Follow each of these steps to troubleshoot your failing triggers:
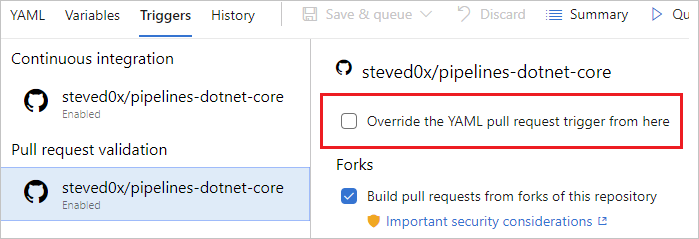
Are your YAML CI or PR triggers overridden by pipeline settings in the UI? While editing your pipeline, choose ... and then Triggers.
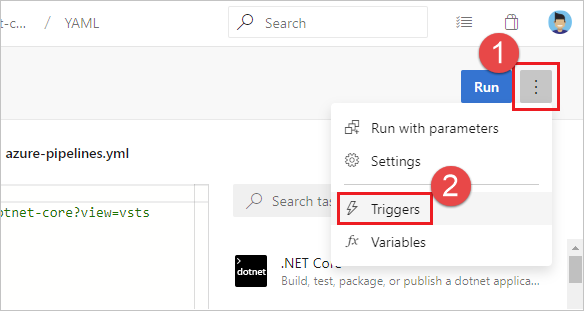
Check the Override the YAML trigger from here setting for the types of trigger (Continuous integration or Pull request validation) available for your repo.
- Webhooks are used to communicate updates from Bitbucket to Azure Pipelines. In Bitbucket, navigate to the settings for your repository, then to Webhooks. Verify that the webhooks exist.
Is your pipeline paused or disabled? Open the editor for the pipeline, and then select Settings to check. If your pipeline is paused or disabled, then triggers do not work.
Have you updated the YAML file in the correct branch? If you push an update to a branch, then the YAML file in that same branch governs the CI behavior. If you push an update to a source branch, then the YAML file resulting from merging the source branch with the target branch governs the PR behavior. Make sure that the YAML file in the correct branch has the necessary CI or PR configuration.
Have you configured the trigger correctly? When you define a YAML trigger, you can specify both include and exclude clauses for branches, tags, and paths. Ensure that the include clause matches the details of your commit and that the exclude clause doesn't exclude them. Check the syntax for the triggers and make sure that it is accurate.
Have you used variables in defining the trigger or the paths? That is not supported.
Did you use templates for your YAML file? If so, make sure that your triggers are defined in the main YAML file. Triggers defined inside template files are not supported.
Have you excluded the branches or paths to which you pushed your changes? Test by pushing a change to an included path in an included branch. Note that paths in triggers are case-sensitive. Make sure that you use the same case as those of real folders when specifying the paths in triggers.
Did you just push a new branch? If so, the new branch may not start a new run. See the section "Behavior of triggers when new branches are created".
My CI or PR triggers have been working fine. But, they stopped working now.
First go through the troubleshooting steps in the previous question. Then, follow these additional steps:
Do you have merge conflicts in your PR? For a PR that did not trigger a pipeline, open it and check whether it has a merge conflict. Resolve the merge conflict.
Are you experiencing a delay in the processing of push or PR events? You can usually verify this by seeing if the issue is specific to a single pipeline or is common to all pipelines or repos in your project. If a push or a PR update to any of the repos exhibits this symptom, we might be experiencing delays in processing the update events. Check if we are experiencing a service outage on our status page. If the status page shows an issue, then our team must have already started working on it. Check the page frequently for updates on the issue.
I do not want users to override the list of branches for triggers when they update the YAML file. How can I do this?
Users with permissions to contribute code can update the YAML file and include/exclude additional branches. As a result, users can include their own feature or user branch in their YAML file and push that update to a feature or user branch. This may cause the pipeline to be triggered for all updates to that branch. If you want to prevent this behavior, then you can:
- Edit the pipeline in the Azure Pipelines UI.
- Navigate to the Triggers menu.
- Select Override the YAML continuous Integration trigger from here.
- Specify the branches to include or exclude for the trigger.
When you follow these steps, any CI triggers specified in the YAML file are ignored.
Wrong version
A wrong version of the YAML file is being used in the pipeline. Why is that?
- For CI triggers, the YAML file that is in the branch you are pushing is evaluated to see if a CI build should be run.
- For PR triggers, the YAML file resulting from merging the source and target branches of the PR is evaluated to see if a PR build should be run.