Note
Access to this page requires authorization. You can try signing in or changing directories.
Access to this page requires authorization. You can try changing directories.
Azure DevOps Services | Azure DevOps Server 2022 - Azure DevOps Server 2019
The default branch is the first branch that Git will check out on a fresh clone. Also, pull requests target this branch by default.
We'll walk through the process of changing the default branch. We'll also cover other things you must consider and update when making this change. Finally, we'll look at a tool for easing the transition.
Prerequisites
| Category | Requirements |
|---|---|
| Project access | Member of a project. |
| Permissions | - View code in private projects: At least Basic access. - Clone or contribute to code in private projects: Member of the Contributors security group or corresponding permissions in the project. - Set branch or repository permissions: Manage permissions permissions for the branch or repository. - Change default branch: Edit policies permissions for the repository. - Import a repository: Member of the Project Administrators security group or Git project-level Create repository permission set to Allow. For more information, see Set Git repository permissions. |
| Services | Repos enabled. |
| Tools | Optional. Use az repos commands: Azure DevOps CLI. |
Note
In public projects, users with Stakeholder access have full access to Azure Repos, including viewing, cloning, and contributing to code.
| Category | Requirements |
|---|---|
| Project access | Member of a project. |
| Permissions | - View code: At least Basic access. - Clone or contribute to code: Member of the Contributors security group or corresponding permissions in the project. |
| Services | Repos enabled. |
Set a new default branch
You can use a branch other than main for new changes or change your main line of development in your repo. To change the default branch name for new repositories, see All repositories settings and policies.
To change your repo's default branch for merging new pull requests, you need at least two branches. If there's only one branch, it's already the default. You must create a second branch to change the default.
Note
Changing the default branch requires you to have Edit policies permission. For more information, see Set Git repository permissions.
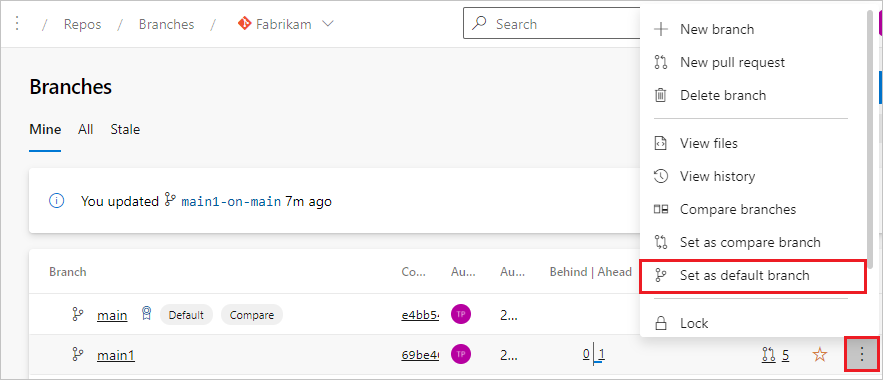
Under your project repo, select Branches.
On the Branches page, select More options next to the new default branch you want, and choose Set as default branch.
After you set the new default branch, you can delete the previous default if you want.
There are other aspects you should consider before making this change.
Choose a name
Git 2.28 added the ability to choose an initial branch name.
At the same time, Azure Repos, GitHub, and other Git hosting providers added the ability to choose a different initial branch name.
Previously, the default branch was almost always named master.
The most popular alternative name is main.
Less common options include trunk and development.
Absent any restrictions from the tools you use or team you're on, any valid branch name will work.
Update other systems
When you change to a different default branch, other parts of your workflow may be affected. You'll need to take these parts into account when you're planning a change.
Pipelines
Update the CI triggers for all pipelines. Designer pipelines can be edited in the web. YAML pipelines can be edited in their respective repositories.
In-flight pull requests
Retarget each open pull request to the new default branch.
Existing clones
New clones of the repository will get the new default branch.
After the switch, everyone with an existing clone should run git remote set-head origin -a (replacing origin with the name of their remote if it's something else) to update their view of the remote's default branch.
Future new branches should be based on the new default.
Incoming links
Some bookmarks, documents, and other non-code files that point to files in Azure Repos will need to be updated. The branch name for a file or directory can appear in the URL.
If a URL contains a querystring for version, for example &version=GBmybranchname, then that URL should be updated.
Fortunately, most links to the default branch won't have a version segment and can be left as-is.
Also, once you delete the old default branch, attempts to navigate to it will be taken to the new default anyway.
Temporary mirroring
A Git repository can only have one default branch. However, for a while, you can set up ad-hoc mirroring between your old default and your new default. This way, if your end users continue pushing to the old default, they won't need to redo the work on their end. We'll use Azure Pipelines to set up this temporary mirroring.
Note
This section uses language which is at odds with Microsoft's perspective.
Specifically, the word master appears in several places consistent with how it's been used in Git.
The purpose of this topic is to explain how to switch to more inclusive language, such as main.
Avoiding all mention of master would make the directions much harder to understand.
The mirroring pipeline
Note
These instructions are not fool-proof, and your repository setup may require additional changes such as loosening permissions and policies.
Warning
If the old and new default branches are both updated before this pipeline runs, then the pipeline won't be able to mirror the changes. Someone will have to manually merge the old default branch into the new default branch to get it running automatically again.
For all existing CI builds, update them to trigger against your new default branch instead of the old one.
Grant the build identity Contribute permission to your repo. Navigate to Project Settings > Repositories > (your repo) > Permissions. There may be up to two identities, one for the project collection build service and the other for the project build service. Make sure the Contribute permission says Allow.
If the new default branch has branch policies, also grant the build identity the Bypass policies when pushing permission. This permission is a security risk since a malicious user could craft a pipeline to sneak code into a repository in your project. When mirroring isn't needed anymore, be sure to remove this permission.
Add a new file,
mirror.ymlto your repository in the new default branch. In this example, we assume the old default branch wasmasterand the new one ismain. Update the triggering branches and thegit pushline if your branch names are different.
trigger:
  branches:
    include:
    - main
    - master

pool: { vmImage: ubuntu-latest }
steps:
- checkout: self
  persistCredentials: true
- script: |
    git checkout $(Build.SourceBranchName)
    git push origin HEAD:master HEAD:main
  displayName: Mirror old and new default branches
- Create a new pipeline, choosing "Azure Repos Git" and "Existing Azure Pipelines YAML file" in the wizard.
Choose the
mirror.ymlfile you added in the previous step. Save and run the pipeline.
Troubleshooting
This pipeline will run every time there's a push to master or to main.
It will keep them in sync as long as new commits don't arrive on both branches simultaneously.
If the pipeline begins failing with an error message like "Updates were rejected because a pushed branch tip is behind its remote", someone will have to merge the old branch into the new branch by hand.
- Clone the repository and
cdinto its directory. - Check out the new default branch with
git checkout main(ifmainis your new default branch). - Create a new branch for integrating the two branches with
git checkout -b integrate. - Merge the old default branch with
git merge master(ifmasteris your old default branch). - Push the new branch, then open and complete a pull request into the new default branch.
- The mirroring pipeline should then take care of mirroring the merge commit back to the old default.