Note
Access to this page requires authorization. You can try signing in or changing directories.
Access to this page requires authorization. You can try changing directories.
Azure DevOps Services | Azure DevOps Server 2022 - Azure DevOps Server 2019
When you have many people collaborating in a repository, the number and names of branches can quickly get out of control.
Hierarchical branch folders are an effective way to organize the structure.
Azure DevOps and Visual Studio treat / as a folder separator and automatically collapse folders by default.
This way, you don't have to review every single branch to find the one you're looking for.
You don't have to rely on everyone to get it right, either.
Azure Repos can enforce the correct use of branch folders.
Planning
Decide on the folder structure you want to allow. As an example, we configure our repository to enforce the following rules:
- Only
maincan exist at the repository root. - All users are allowed to create branches under the
feature/andusers/folders. - Administrators can create branches under the
release/folder.
Note
For more examples and information about branch naming strategies, see Adopt a Git branching strategy.
Prerequisites
Before you begin, ensure you have the following items:
| Requirement | Description |
|---|---|
| Team Foundation command-line tools | You need the Team Foundation version control command (tf.exe). |
| Azure DevOps information | You need the URL of your Azure DevOps organization, the name of your project, and the name of your repository. For this example: https://dev.azure.com/fabrikam-fiber, FabrikamProject, and FabrikamRepo. |
| Appropriate permissions | You need administrative permissions in your Azure DevOps project to modify Git repository permissions. |
| Authentication | Ensure you're signed in to Azure DevOps or have cached credentials, which avoids authentication prompts during command execution. |
Note
The command tf.exe is installed by default with Visual Studio.
You can access it via the Developer Command Prompt.
For more options, download Team Explorer.
Enforce permissions
Run the following commands in the Developer Command Prompt, under Start > Visual Studio > Developer Command Prompt. Each command includes an explanation of what it's doing. If you don't have a token cached, for example by signing in to the Azure DevOps Services web portal, you're prompted to sign in.
- Block the Create Branch permission at the repository root for the project's contributors:
tf git permission /deny:CreateBranch /group:[FabrikamProject]\Contributors /collection:https://dev.azure.com/fabrikam-fiber/ /teamproject:FabrikamProject /repository:FabrikamRepo
Allow contributors to create branches under
featureandusers: a. Feature:tf git permission /allow:CreateBranch /group:[FabrikamProject]\Contributors /collection:https://dev.azure.com/fabrikam-fiber/ /teamproject:FabrikamProject /repository:FabrikamRepo /branch:featureb. Users:
tf git permission /allow:CreateBranch /group:[FabrikamProject]\Contributors /collection:https://dev.azure.com/fabrikam-fiber/ /teamproject:FabrikamProject /repository:FabrikamRepo /branch:usersAllow administrators to create branches under
release:
tf git permission /allow:CreateBranch /group:"[FabrikamProject]\Project Administrators" /collection:https://dev.azure.com/fabrikam-fiber/ /teamproject:FabrikamProject /repository:FabrikamRepo /branch:release
- Allow administrators to create a branch called
main, in case it ever gets accidentally deleted.
tf git permission /allow:CreateBranch /group:"[FabrikamProject]\Project Administrators" /collection:https://dev.azure.com/fabrikam-fiber/ /teamproject:FabrikamProject /repository:FabrikamRepo /branch:main
Note
For more information, see tf git permission. You can also access help for these commands from the command line by running tf git /? and tf git permission /?.
Rename old branches
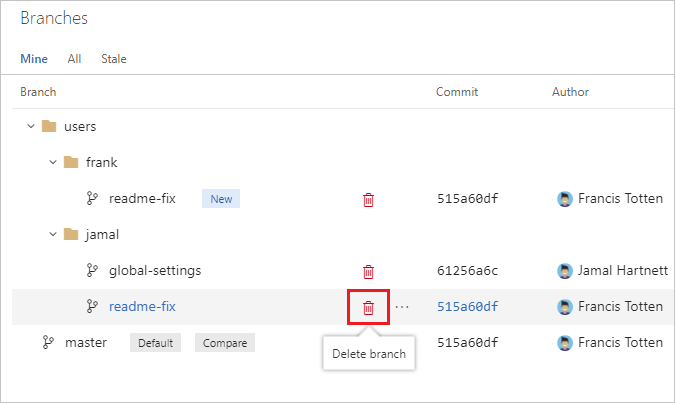
Open your repo on the web and select the Branches view.
Locate your existing branch. If you don't see it, you might need to look on the All tab.
Choose its context menu (the
...button) and choose New branch.
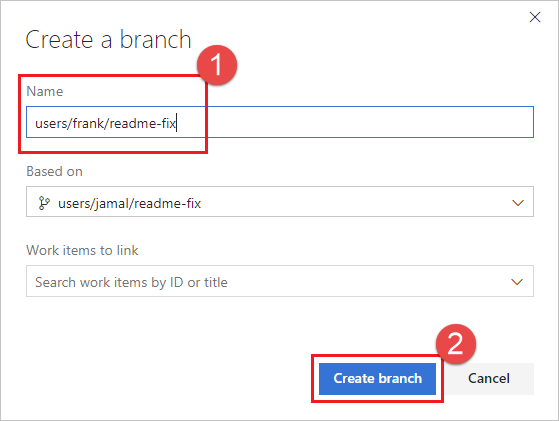
Type the new name of the branch, for example users/frank/readme-fix. Choose Create branch.
Choose the red trashcan icon next to the old branch name to delete it.
Note
Any custom permissions or branch policies don't migrate.