Note
Access to this page requires authorization. You can try signing in or changing directories.
Access to this page requires authorization. You can try changing directories.
Azure DevOps Services | Azure DevOps Server | Azure DevOps Server 2022
Visual Studio 2019 | Visual Studio 2022
Most changes that you make to your files are queued as pending changes. As you work, you can organize, manage, and get details about what you've changed.
Work in Visual Studio
From the Visual Studio Team Explorer home page, which you can open by pressing Ctrl+0, H, you can begin coding in a new or existing solution.

After you open a solution, you can open Solution Explorer by pressing Ctrl+Alt+L.
![]()
When you use Solution Explorer to open and modify a file that's under source control, the file is automatically checked out for you. Icons appear to indicate which files you haven't changed  , those you have checked out
  , and those you've added to the solution
  .
.
If you're working in a solution that contains a lot of files, you'll probably find it convenient to filter the Solution Explorer view to show only the files you've changed  , or press Ctrl+[, P.
Use the My Work page to manage work
You can open the My Work page in Team Explorer or press Ctrl+0, M to manage your work.
Note
Visual Studio My Work and Code Review features are available with the following editions:
- Visual Studio 2022: Visual Studio Community, Visual Studio Professional, and Visual Studio Enterprise
- Visual Studio 2019: Visual Studio Professional and Visual Studio Enterprise
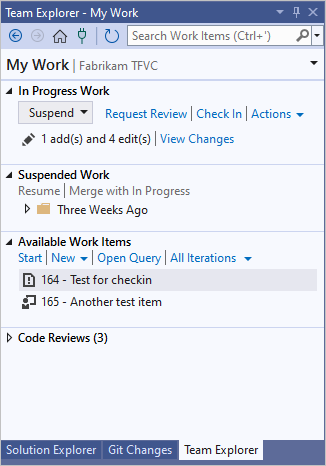
You can use My Work to:
- Assign work to yourself.
- Track your work against work items.
- Suspend and later resume your work, including file changes, associated work items, and Visual Studio state such as window positions and breakpoints.
- Request a code review.
For step-by-step examples, see Day in the life of a DevOps developer: Write new code for a user story and Day in the life of a DevOps developer: Suspend work, fix a bug, and conduct a code review.
Tips
You can control the kinds of work items that appear in the Available Work Items section. Choose one of the default options or any queries that are contained in the root Shared Queries folder. To work with these queries, use the Work Items page in Team Explorer.
When you move a work item to Available Work Items, In Progress Work, or Suspended Work, the work item state or comments update so your team can be automatically advised on the status of your work. For example, the task board for your team updates to show your status. See Track work with Visual Studio.
If your project contains customized work item type definitions, you might have problems using My Work, unless an administrator for your project has taken certain steps. See Configure and customize Agile planning tools for a project and Update a customized process template to access new features.
Use the Pending Changes page to manage work
You can use the Pending Changes page in Team Explorer to manage your work. To open Pending Changes, select Check In under In Progress Work on the My Work page, or press Ctrl+0, P.

Tip
- You can undock
 the Pending Changes page from Team Explorer to open it in a new window.
 - You can toggle between list and tree views from the View Options link under Included Changes.
Almost every change that you make to the files on your dev machine is stored in your workspace as a pending change until you check it in. Changes include:
- add
- branch
- delete
- edit
- rename, including moving items
- properties
- rollback
- type, or file encoding
- undelete
Work with automatically detected changes
If you're working in a local workspace, Visual Studio can detect changes that you make outside the system. If you edit a file outside Visual Studio, for example in Notepad, the change automatically appears under Included Changes on the Pending Changes page.
If you add or remove a file outside Visual Studio, for example in File Explorer, the file appears under the Detected link in the Excluded Changes section. If you want to include these changes, select the Detected link.
The Promote Candidate Changes dialog box appears. You can right-click items and choose Browse in Windows Explorer to display them, or Delete from disk to delete them. Select items and then select Promote to add the items to Included Changes.
Note
Empty folders won't appear.
If items that you don't need to check in appear regularly in the Promote Candidate Changes dialog box, you can right-click the item and choose Ignore this local item to ignore the item. You can also choose Ignore by extension, Ignore by file name, or Ignore by folder to create a file that will cause Visual Studio to systematically ignore this kind of file. For more information on .tfignore files, see Add files to the server.
To exclude changes, see Choose the files you want to check in.
Associate work items
It's a best practice to associate work items, such as tasks or bugs, with your changes. Under Related Work Items, drag work items from a query or add a work item by ID.
See what you changed
You can review what you've changed in a file.
Use Pending Changes to view what you changed
On the Pending Changes page, right-click the item and choose:
- Compare with Workspace Version to see what you've changed from the version in your workspace.
- Compare with Latest Version to see how your changes compare to the latest version of the file in your team's codebase.
Use Solution Explorer or Source Control Explorer to view what you changed
- Locate and select the item in Solution Explorer or in Source Control Explorer.
- Right-click the item, and then choose Compare.
- In the Compare dialog box, from the Type menu, choose:
- Workspace Version to see what you've changed from the version in your workspace.
- Latest Version to see how your changes compare to the latest version of the file in your team's codebase.
- One of the other options: Changeset, Date, or Label.
- Choose OK.
The Diff window appears. To use this window, see Compare files.
Undo your pending changes
You can discard one, some, or all of the pending changes in your workspace.
Note
Other options:
- You can first put the changes away in a shelveset on your server before removing them from your workspace.
- If you've already checked in the change and want to revert it, see Roll back changesets.
To undo some of your pending changes
Open the Undo Pending Changes dialog box:
- In Solution Explorer, right-click the items and choose Source Control > Undo Pending Changes.
- In the Pending Changes page of Team Explorer, right-click the items and choose Undo.
- In Source Control Explorer, right-click the items and choose Undo Pending Changes.
Tip
To undo all changes you've made in your solution or a code project, right-click the solution or project, and then choose Undo Pending Changes.
In the Undo Pending Changes dialog box, make sure the changes you want to undo are selected, and then choose Undo Changes.
To undo all your pending changes
On the Pending Changes page in Team Explorer, select the Actions link, and then choose Undo All.
Use the command prompt
The Status command displays pending changes in the command prompt.
The Checkin command opens pending changes in the Check In dialog box.
The Undo command undoes pending changes.
Tip
You can use the
Undocommand to undo another user's check-out if you have sufficient permissions.The Difference command shows what you've changed in a file.
Next steps
When you're finished making your changes:
To request a code review of your pending changes, on the Pending Changes page, under Actions, choose Request Review. For more information, see Day in the life of a DevOps developer: Suspend work, fix a bug, and conduct a code review.
If you need to set aside your changes, see Suspend your work and manage your shelvesets.
To check in and add your changes to the team's codebase, see Check in your work to the team's codebase.
Tips
If you're new to developing an app with Visual Studio and TFVC, see Day in the life of a DevOps developer: Write new code for a user story.
When you begin a new work item, it's a good idea to download the latest files from the server before you check out files and begin your work.
Use Source Control Explorer to manage your files in version control.