Events
Mar 17, 9 PM - Mar 21, 10 AM
Join the meetup series to build scalable AI solutions based on real-world use cases with fellow developers and experts.
Register nowThis browser is no longer supported.
Upgrade to Microsoft Edge to take advantage of the latest features, security updates, and technical support.
Azure DevOps Services | Azure DevOps Server 2022 - Azure DevOps Server 2019
Visual Studio 2019 | Visual Studio 2022
Are you planning to implement the Team Foundation Version Control (TFVC) feature isolation strategy in Azure DevOps? You probably have a few questions, such as:
This article aims to answer those questions, and give you a clear perspective on feature isolation in TFVC. For guidance on TFVC branch strategies overall, read Branching strategies with TFVC.
Note
This article covers TFVC. For Git, refer to adopt a Git branching strategy.
The feature isolation strategy allows you to work on features or fix bugs in feature branches, also known as topic branches, based off a parent branch. This strategy isolates your changes from the rest of your team to:
Note
This use of feature is unrelated to the Feature work item type. This strategy can be used with Epic, Feature, Program Backlog Item, User Story, or whatever work item type you've defined in your process.
It's typical to create one feature branch per feature or bug, but in this strategy, you can create a miscellaneous feature branch to isolate a couple of low-risk features.

Unlike Git branches, which are repository-scoped, TFVC branches are path-scoped and therefore not as lightweight. To work around this, limit the number and the lifetime of your TFVC feature branches. Optimize your workspace by using explicit, implicit, cloaked, and non-recursive folder mappings, to improve performance and to reduce required disk space on your machine.
Tip
Your workspace should contain only the files you need. Consider creating multiple workspaces to isolate and switch among multiple feature branches. To avoid confusing yourself, use a consistent naming convention for both your workspace and feature branch.
Use a consistent naming convention for your feature branches. Branches should be self-describing and easily identified by your users. Some suggestions:
Create a feature branch when you need to work on a feature, typically within the context of a sprint or iteration.
To protect your parent branch and minimize merge conflicts, regularly forward integrate (FI) changes from the parent branch to your feature branch. FI ensures that you resolve merge conflicts on your feature branch, not the parent branch.

This strategy also keeps features from getting out of sync with the parent branch. Remember to FI before you reverse integrate (RI) your changes back to the parent branch.
Tip
Keep your feature branches short-lived.
Unlike main or other central branches, feature branches have a limited lifetime. They're scoped to features, bugs, and hot fixes, which are typically developed within a sprint or iteration. Consider removing your feature branch once your feature has met your team's definition of done (DoD) and changes have been merged with the parent branch.
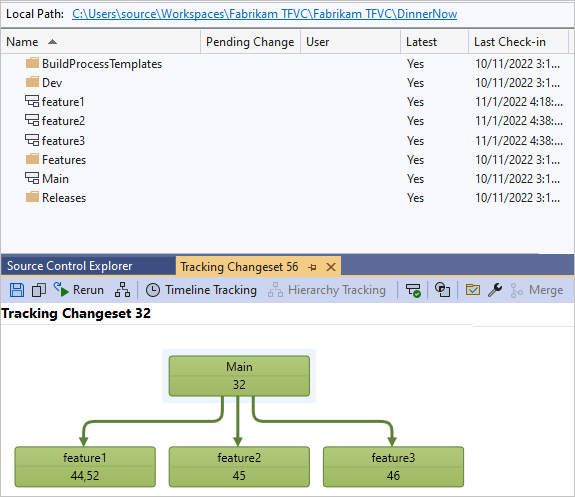
As the number of your feature branches increases, your storage requirements and branch hierarchy visualization noise increases. With only five feature branches, the diagram is already noisy and rapidly losing its monitoring qualities. Can you imagine the impact of your team creating hundreds of feature branches?

Similarly, the Visual Studio Source Control Explorer view becomes noisy and impractical as the number of branches increases. Unless you have a consistent naming convention, finding a specific feature branch among hundreds of feature branches is challenging.

Tip
Delete your feature branches when you're done.
By deleting feature branches, you minimize noise and focus on active feature development.

Remember it's a soft delete and your history isn't lost. Deleted branches can be unhidden.
Or, toggle the Show/Hide Deleted Items icon in the Source Control Explorer menu bar.

If needed, you can also restore deleted branches and associated items.

If no one in your team has destroyed a branch by using the destroy command, you'll have the complete history needed for auditing and migration tools that rely on replaying history.
Note
Use the destroy command with caution. It's a permanent deletion.
By keeping your branches short-lived and adopting a consistent naming convention, you can keep the feature isolation strategy effective for small and large teams.
Now that you're using feature isolation, you should explore continuous integration, feature toggles, and other complementary strategies.
Events
Mar 17, 9 PM - Mar 21, 10 AM
Join the meetup series to build scalable AI solutions based on real-world use cases with fellow developers and experts.
Register nowTraining
Module
Design and implement branch strategies and workflows - Training
Design and implement branch strategies and workflows
Certification
Microsoft Certified: DevOps Engineer Expert - Certifications
This certification measures your ability to accomplish the following technical tasks: Design and implement processes and communications, design and implement a source control strategy, design and implement build and release pipelines, develop a security and compliance plan, and implement an instrumentation strategy.
Documentation
Manage branching strategies in TFVC for DevOps - Azure Repos
Learn to manage branching strategies with a DevOps mindset in Team Foundation Version Control (TFVC)
Branch strategically - Azure Repos
Branch strategically
Version Control - Branching strategies with TFVC - Azure Repos
Learn about branching strategies for Team Foundation Version Control (TFVC) and how to select an effective strategy