Note
Access to this page requires authorization. You can try signing in or changing directories.
Access to this page requires authorization. You can try changing directories.
Developer Community | System Requirements | License Terms | DevOps Blog | SHA-1 Hashes
In this article, you will find information regarding the newest release for Azure DevOps Server.
To learn more about installing or upgrading an Azure DevOps Server deployment, see Azure DevOps Server Requirements. To download Azure DevOps products, visit the Azure DevOps Server Downloads page.
Direct upgrade to Azure DevOps Server is supported from Azure DevOps Server 2020, Azure DevOps Server 2019 or Team Foundation Server (TFS) 2015 or newer. If your TFS deployment is on TFS 2010 or earlier, you need to perform some interim steps before upgrading to Azure DevOps Server 2019. To learn more, see Install and configure Azure DevOps on-premises.
Safely Upgrade from Azure DevOps Server 2019 to Azure DevOps Server 2020
Azure DevOps Server 2020 introduces a new pipeline run (build) retention model that works based on project-level settings.
Azure DevOps Server 2020 handles build retention differently, based on pipeline-level retention policies. Certain policy configurations lead to pipeline runs being deleted after the upgrade. Pipeline runs that have been manually retained or are retained by a release will not be deleted after the upgrade.
Read our blog post for more information on how to safely upgrade from Azure DevOps Server 2019 to Azure DevOps Server 2020.
Azure DevOps Server 2019 Update 1.2 Patch 12 Release Date: February 10, 2026
| File | SHA-256 Hash |
|---|---|
| devops2019.1.2patch12.exe | 362BD842B077FE8576E1FB4CFD0723ED9097835FE1991D3AACBA8B17FDE82A79 |
We have released Patch 12 for Azure DevOps Server 2019 Update 1.2 to include the following:
- Fixed an issue caused by Chrome’s deprecation of the unload event.
Azure DevOps Server 2019 Update 1.2 Patch 11 Release Date: April 8, 2025
| File | SHA-256 Hash |
|---|---|
| devops2019.1.2patch11.exe | B931F1A38F09F8B341B82FCE14C1FF136713D98A6AA5A7DB778C7F89FAD94CDF |
We have released Patch 11 for Azure DevOps Server 2019 Update 1.2 that includes the following:
Important
The CDN Domain URL change for Agents in Pipelines blog provides steps to follow before installing this patch.
- Previously, the Azure DevOps Agent used the Edgio CDN with endpoint
vstsagentpackage.azureedge.net. As part of Edgio's retirement, the*.azureedge.netdomain is being decommissioned. To ensure continued availability, we have migrated to an Akamai-backed CDN with a new endpointdownload.agent.dev.azure.com. This patch includes the necessary changes to fetch the Agent binaries from the new CDN endpoint, thereby migrating away from the previous CDN endpoint.
Azure DevOps Server 2019 Update 1.2 Patch 10 Release Date: March 11, 2025
| File | SHA-256 Hash |
|---|---|
| devops2019.1.2patch10.exe | EDCE91E3F92A2E60FB9BA9BE6977B47BC794817A13766C728B97D4B83039B789 |
We have released Patch 10 for Azure DevOps Server 2019 Update 1.2 that includes the following:
- Update tasks due to Edgio CDN deprecation. Check out the Switching CDN providers blog post for more details.
Azure DevOps Server 2019 Update 1.2 Patch 9 Release Date: May 28, 2024
| File | SHA-256 Hash |
|---|---|
| devops2019.1.2patch9.exe | 4A3F41BBE00174DE964667878766EBF7F4D292526CBC1D885180B55D994B4D81 |
We have released Patch 9 for Azure DevOps Server 2019 Update 1.2 that includes the following:
- Streamline the deployment of agent and tasks updates from previous patches (Patch 5 and 6).
Note
It is not necessary to follow the steps in patches 5 and 6; those can be skipped, and this patch can be applied instead.
Install patches
Important
This patch updates the available Pipeline agent, the new version of the agent after installing Patch 9 will be 3.225.0.
Pipeline Requirements
To apply the new behavior to validate command line arguments, a variable AZP_75787_ENABLE_NEW_LOGIC = true must be set in pipelines that use the affected tasks. See here for more information on the enabled behavior:
On classic:
Define the variable in the variable tab in the pipeline.
YAML example:
variables:
- name: AZP_75787_ENABLE_NEW_LOGIC
  value: true
Azure DevOps Server 2019 Update 1.2 Patch 8 Release Date: March 12, 2024
| File | SHA-256 Hash |
|---|---|
| devops2019.1.2patch8.exe | 67E78EA7D67A09A6EE06309614F92E6D8495DEF52FF442E4E7C7979244FAD20A |
We have released Patch 8 for Azure DevOps Server 2019 Update 1.2 that includes fixes for the following:
- Resolved an issue where the Proxy Server stopped working after installing Patch 7.
Azure DevOps Server 2019 Update 1.2 Patch 7 Release Date: February 13, 2024
| File | SHA-256 Hash |
|---|---|
| devops2019.1.2patch7.exe | 8C67C72A83C9215302BDEFB752A7C4E3F876D4D17FCFA63A02B955FCFB5455AA |
We have released Patch 7 for Azure DevOps Server 2019 Update 1.2 that includes fixes for the following:
- Fixed a bug where the disk space used by the proxy cache folder was calculated incorrectly and the folder was not properly cleaned up.
- CVE-2024-20667: Azure DevOps Server Remote Code Execution Vulnerability.
Azure DevOps Server 2019 Update 1.2 Patch 6 Release Date: November 14, 2023
We have released a patch for Azure DevOps Server 2019 Update 1.2 that includes fixes for the following.
- Extended the PowerShell tasks allowed list of characters for Enable shell tasks arguments parameter validation.
Note
To implement fixes for this patch you will have to follow a number of steps to manually update tasks.
Install patches
Important
We released updates to the Azure Pipelines agent with Patch 5 released on September 12, 2023. If you didn't install the agent updates as described in the release notes for Patch 5, we recommend that you install these updates before you install Patch 6. The new version of the agent after installing Patch 5 will be 3.225.0.
Configure TFX
- Follow steps in the upload tasks to project collection documentation to install and login with tfx-cli.
Update tasks using TFX
| File | SHA-256 Hash |
|---|---|
| Tasks20231103.zip | 389BA66EEBC32622FB83402E21373CE20AE040F70461B9F9AF9EFCED5034D2E5 |
- Download and extract Tasks20231103.zip.
- Change directory into the extracted files.
- Execute the following commands to upload the tasks:
tfx build tasks upload --task-zip-path AzureFileCopyV1.1.230.0.zip
tfx build tasks upload --task-zip-path AzureFileCopyV2.2.230.0.zip
tfx build tasks upload --task-zip-path AzureFileCopyV3.3.230.0.zip
tfx build tasks upload --task-zip-path AzureFileCopyV4.4.230.0.zip
tfx build tasks upload --task-zip-path AzureFileCopyV5.5.230.0.zip
tfx build tasks upload --task-zip-path BashV3.3.226.2.zip
tfx build tasks upload --task-zip-path BatchScriptV1.1.226.0.zip
tfx build tasks upload --task-zip-path PowerShellV2.2.230.0.zip
tfx build tasks upload --task-zip-path SSHV0.0.226.1.zip
tfx build tasks upload --task-zip-path WindowsMachineFileCopyV1.1.230.0.zip
tfx build tasks upload --task-zip-path WindowsMachineFileCopyV2.2.230.0.zip
Pipeline Requirements
To use the new behavior, a variable AZP_75787_ENABLE_NEW_LOGIC = true must be set in pipelines that use the affected tasks.
On classic:
Define the variable in the variable tab in the pipeline.
YAML example:
variables:
- name: AZP_75787_ENABLE_NEW_LOGIC
  value: true
Azure DevOps Server 2019 Update 1.2 Patch 5 Release Date: September 12, 2023
We have released a patch for Azure DevOps Server 2019 Update 1.2 that includes fixes for the following.
- CVE-2023-33136: Azure DevOps Server Remote Code Execution Vulnerability.
- CVE-2023-38155: Azure DevOps Server and Team Foundation Server Elevation of Privilege Vulnerability.
Important
Please deploy the patch to a test environment and ensure that the environment’s pipelines work as expected before applying the fix to production.
Note
To implement fixes for this patch you will have to follow a number of steps to manually update the agent and tasks.
Install patches
- Download and install Azure DevOps Server 2019 Update 1.2 patch 5.
Update the Azure Pipelines agent
- Download the agent from: https://github.com/microsoft/azure-pipelines-agent/releases/tag/v3.225.0 - Agent_20230825.zip
- Use the steps outlined in the self-hosted Windows agents documentation to deploy the agent.
Note
The AZP_AGENT_DOWNGRADE_DISABLED must be set to “true” to prevent the agent from being downgraded. On Windows, the following command can be used in an administrative command prompt, followed by a reboot. setx AZP_AGENT_DOWNGRADE_DISABLED true /M
Configure TFX
- Follow steps in the upload tasks to project collection documentation to install and login with tfx-cli.
Update tasks using TFX
- Download and extract Tasks_20230825.zip.
- Change directory into the extracted files.
- Execute the following commands to upload the tasks:
tfx build tasks upload --task-zip-path AzureFileCopyV1.1.226.3.zip
tfx build tasks upload --task-zip-path AzureFileCopyV2.2.226.2.zip
tfx build tasks upload --task-zip-path AzureFileCopyV3.3.226.2.zip
tfx build tasks upload --task-zip-path AzureFileCopyV4.4.226.2.zip
tfx build tasks upload --task-zip-path AzureFileCopyV5.5.226.2.zip
tfx build tasks upload --task-zip-path BashV3.3.226.2.zip
tfx build tasks upload --task-zip-path BatchScriptV1.1.226.0.zip
tfx build tasks upload --task-zip-path PowerShellV2.2.226.1.zip
tfx build tasks upload --task-zip-path SSHV0.0.226.1.zip
tfx build tasks upload --task-zip-path WindowsMachineFileCopyV1.1.226.2.zip
tfx build tasks upload --task-zip-path WindowsMachineFileCopyV2.2.226.2.zip
Pipeline Requirements
To use the new behavior, a variable AZP_75787_ENABLE_NEW_LOGIC = true must be set in pipelines that use the affected tasks.
On classic:
Define the variable in the variable tab in the pipeline.
YAML example:
variables:
- name: AZP_75787_ENABLE_NEW_LOGIC
  value: true
Azure DevOps Server 2019 Update 1.2 Patch 4 Release Date: August 8, 2023
We have released a patch for Azure DevOps Server 2019 Update 1.2 that includes fixes for the following.
- CVE-2023-36869: Azure DevOps Server Spoofing Vulnerability.
- Update SSH service to support SHA2-256 and SHA2-512. If you have SSH config files hard coded to use RSA, you should update to SHA2 or remove the entry.
- Fixed infinite loop bug on CronScheduleJobExtension.
Azure DevOps Server 2019 Update 1.2 Patch 3 Release Date: June 13, 2023
We have released a patch for Azure DevOps Server 2019 Update 1.2 that includes fixes for the following.
- Fixed a bug that interfered with pushing packages when upgrading from 2018 or earlier.
Azure DevOps Server 2019 Update 1.2 Patch 2 Release Date: December 13, 2022
We have released a patch for Azure DevOps Server 2019 Update 1.2 that includes fixes for the following.
- Fixed failures in the "Account Parallelism Sync Analytics Job".
Azure DevOps Server 2019 Update 1.2 Patch 1 Release Date: July 12, 2022
We have released a patch for Azure DevOps Server 2019 Update 1.2 that includes fixes for the following.
- In Test Runs APIs, the continuation token being returned was greater than the “maxLastUpdatedDate” value that was specified.
- While editing a classic pipeline, the retention tab was blank after discarding changes on a different tab.
Azure DevOps Server 2019 Update 1.2 Release Date: May 17, 2022
Azure DevOps Server 2019 Update 1.2 is a roll up of bug fixes. You can directly install Azure DevOps Server 2019 Update 1.2 or upgrade from Azure DevOps Server 2019 or Team Foundation Server 2013 or newer.
Note
The Data Migration Tool will be available for Azure DevOps Server 2019 Update 1.2 about three weeks after this release. You can see our list of currently supported versions for import here.
This release includes fixes for the following:
- Revoke all personal access tokens after a user's Active Directory account is disabled.
Azure DevOps Server 2019 Update 1.1 Patch 13 Release Date: January 26, 2022
We have released a patch for Azure DevOps Server 2019 Update 1.1 that includes fixes for the following.
- Email notifications were not sent when using the @mention control in a work item.
- Preferred email address was not getting updated in user profile. This resulted in emails being sent to the previous email address.
- Addressed Elasticsearch vulnerability by removing the jndilookup class from log4j binaries.
Installation steps
- Upgrade the server with Patch 13.
- Check the registry value at
HKLM:\Software\Elasticsearch\Version. If the registry value is not there, add a string value and set the Version to 5.4.1 (Name = Version, Value = 5.4.1). - Run the update command
PS C:\Program Files\{TFS Version Folder}\Search\zip> .\Configure-TFSSearch.ps1 -Operation updateas provided in the readme file. It may return a warning like: Unable to connect to the remote server. Don't close the window, as the update is performing retries until it is completed.
Note
If Azure DevOps Server and Elasticsearch are installed on different machines, follow the steps outlined below.
- Upgrade the server with Patch 13.
- Check the registry value at
HKLM:\Software\Elasticsearch\Version. If the registry value is not there, add a string value and set the Version to 5.4.1 (Name = Version, Value = 5.4.1). - Copy the content of the folder named zip, located on
C:\Program Files\{TFS Version Folder}\Search\zipto the Elasticsearch remote file folder. - Run
Configure-TFSSearch.ps1 -Operation updateon the Elasticsearch server machine.
SHA-256 Hash: DB762E391F9DF8E71E58D6FAA169CA44DFBE996AE6567B55F772CBA9E3DA2AB3
Azure DevOps Server 2019 Update 1.1 Patch 12 Release Date: September 15, 2021
Patch 12 for Azure DevOps Server 2019 Update 1.1 includes fixes for the following.
- Fix work item macro for queries with "Contains Words". Previously, queries were returning incorrect results for values that contained a line break.
- Localization issue for custom work items layout states.
- Localization issue in email notification template.
- Issue with NOTSAMEAS rules evaluation when multiple NOTSAMEAS rules were defined for a field.
Azure DevOps Server 2019 Update 1.1 Patch 11 Release Date: September 14, 2021
Patch 11 for Azure DevOps Server 2019 Update 1.1 includes fixes for the following.
- Resolve the issue reported in this Developer Community feedback ticket.
Azure DevOps Server 2019 Update 1.1 Patch 10 Release Date: August 10, 2021
Patch 10 for Azure DevOps Server 2019 Update 1.1 includes fixes for the following.
- Fix issue with email delivery jobs for some work item types.
Azure DevOps Server 2019 Update 1.1 Patch 9 Release Date: June 15, 2021
Patch 9 for Azure DevOps Server 2019 Update 1.1 includes fixes for the following.
- Fix issue with data import. Data import was taking a long time for customers that have lots of stale test cases. This was due to references which increased the size of the
tbl_testCaseReferencestable. With this patch, we removed references to stale test cases to help speed the data import process.
Azure DevOps Server 2019 Update 1.1 Patch 8 Release Date: April 13, 2021
We have released a patch for Azure DevOps Server 2019 Update 1.1 that fixes the following.
- CVE-2021-27067: Information disclosure
- Resolve the issue reported in this Developer Community feedback ticket | Unable to register test result iteration details on Azure DevOps Server 2019
To implement fixes for this patch you will have to follow the steps listed below for general patch installation and AzureResourceGroupDeploymentV2 task installations.
General patch installation
If you have Azure DevOps Server 2019 Update 1.1, you should install Azure DevOps Server 2019 Update 1.1 Patch 8.
Verifying Installation
Option 1: Run
devops2019.1.1patch8.exe CheckInstall, devops2019.1.1patch8.exe is the file that is downloaded from the link above. The output of the command will either say that the patch has been installed, or that is not installed.Option 2: Check the version of the following file:
[INSTALL_DIR]\Azure DevOps Server 2019\Application Tier\Web Services\bin\Microsoft.VisualStudio.Services.Feed.Server.dll. Azure DevOps Server 2019 is installed toc:\Program Files\Azure DevOps Server 2019by default. After installing Azure DevOps Server 2019.1.1 Patch 8, the version will be 17.153.31129.2.
AzureResourceGroupDeploymentV2 task installation
Note
All the steps mentioned below need to be performed on a Windows machine
Install
Extract the AzureResourceGroupDeploymentV2.zip package to a new folder on your computer. For example: D:\tasks\AzureResourceGroupDeploymentV2.
Download and install Node.js 14.15.1 and npm (included with the Node.js download) as appropriate for your machine.
Open a command prompt in administrator mode and run the following command to install tfx-cli.
npm install -g tfx-cli
Create a personal access token with Full access privileges and copy it. This Personal access token will be used when running the tfx login command.
Run the following from the command prompt. When prompted, enter the Service URL and Personal access token.
~$ tfx login
Copyright Microsoft Corporation

> Service URL: {url}
> Personal access token: xxxxxxxxxxxx
Logged in successfully
- Run the following command to upload the task on the server. Use the path of the extracted .zip file from step 1.
~$ tfx build tasks upload --task-path *<Path of the extracted package>*
Azure DevOps Server 2019 Update 1.1 Patch 7 Release Date: January 12, 2021
We have released a patch for Azure DevOps Server 2019 Update 1.1 that fixes the following. Please see the blog post for more information.
- Test run details do not display test step details for test data migrated using OpsHub Migration
- Exception on initializer for 'Microsoft.TeamFoundation.TestManagement.Server.TCMLogger'
- Unretained builds are immediately deleted after migration to Azure DevOps Server 2020
- Fix data provider exception
Azure DevOps Server 2019 Update 1.1 Patch 6 Release Date: December 8, 2020
We have released a patch for Azure DevOps Server 2019 Update 1.1 that fixes the following. Please see the blog post for more information.
- CVE-2020-1325: Azure DevOps Server Spoofing Vulnerability
- CVE-2020-17135: Azure DevOps Server Spoofing Vulnerability
- CVE-2020-17145: Azure DevOps Server and Team Foundation Services Spoofing Vulnerability
- Fix issue with TFVC not processing all results
Important
Please read the full instructions provided below before installing this patch.
General patch installation
If you have Azure DevOps Server 2019 Update 1.1, you should install Azure DevOps Server 2019 Update 1.1 Patch 6.
Verifying Installation
Option 1: Run
devops2019.1.1patch6.exe CheckInstall, devops2019.1.1patch6.exe is the file that is downloaded from the link above. The output of the command will either say that the patch has been installed, or that is not installed.Option 2: Check the version of the following file:
[INSTALL_DIR]\Azure DevOps Server 2019\Application Tier\Web Services\bin\Microsoft.VisualStudio.Services.Feed.Server.dll. Azure DevOps Server 2019 is installed toc:\Program Files\Azure DevOps Server 2019by default. After installing Azure DevOps Server 2019.1.1 Patch 6, the version will be 17.153.30723.5.
AzurePowerShellV4 task installation
Note
All the steps mentioned below need to be performed on a Windows machine
Prerequisites
Install Azure PowerShell Az module Azure Powershell on your private agent machine.
Create a pipeline with the AzurePowerShellV4 task. You will only see one Fail on Standard Error in the task.
Install
Extract the AzurePowerShellV4.zip package to a folder named AzurePowerShellV4.
Download and install Node.js 14.15.1 and npm (included with the Node.js download) according to your machine.
Open a command prompt in administrator mode and run the following command to install tfx-cli.
npm install -g tfx-cli
Create a personal access token with Full access privileges and copy it. This Personal access token will be used when running the tfx login command.
Run the following from the command prompt. When prompted, enter the Service URL and Personal access token.
~$ tfx login
Copyright Microsoft Corporation

> Service URL: {url}
> Personal access token: xxxxxxxxxxxx
Logged in successfully
- Run the following command to upload the task on the server. The path of the extracted package will be D:\tasks\AzurePowerShellv4.
~$ tfx build tasks upload --task-path *<Path of the extracted package>*
Azure DevOps Server 2019 Update 1.1 Patch 5 Release Date: September 8, 2020
We have released a patch for Azure DevOps Server 2019 Update 1.1 that fixes the following. Please see the blog post for more information.
- DTS 1713492 - Unexpected behavior while adding AD groups to security permissions.
Azure DevOps Server 2019 Update 1.1 Patch 4 Release Date: July 14, 2020
We have released a patch for Azure DevOps Server 2019 Update 1.1 that fixes the following. Please see the blog post for more information.
- CVE-2020-1326: Cross-site Scripting Vulnerability
- Build pipeline shows incorrect connection for unauthorized users when selecting Other Git source.
- Fix error when changing changing Inheritance to On or Off in XAML build definition.
Azure DevOps Server 2019 Update 1.1 Patch 3 Release Date: June 9, 2020
We have released a patch for Azure DevOps Server 2019 Update 1.1 that fixes the following. Please see the blog post for more information.
- CVE-2020-1327: Ensure that Azure DevOps server sanitizes user inputs.
Azure DevOps Server 2019 Update 1.1 Patch 2 Release Date: April 14, 2020
We have released a patch for Azure DevOps Server 2019 Update 1.1 that fixes the following. Please see the blog post for more information.
SVN commits do not trigger pipeline
Adding support for SHA2 in SSH on Azure DevOps
Azure DevOps Server 2019 Update 1.1 Patch 1 Release Date: March 10, 2020
We have released a security patch for Azure DevOps Server 2019 Update 1.1 that fixes the following bugs. Please see the blog post for more information.
CVE-2020-0700: Cross-site Scripting Vulnerability
CVE-2020-0758: Elevation of Privilege Vulnerability
CVE 2020-0815: Elevation of Privilege Vulnerability
Azure DevOps Server 2019 Update 1.1 RTW Release Date: December 10, 2019
Azure DevOps Server 2019 Update 1.1 is a roll up of bug fixes and security updates. It includes all fixes in the Azure DevOps Server 2019 Update 1 patches previously released. You can directly install Azure DevOps Server 2019 Update 1.1 or upgrade from Azure DevOps Server 2019 or Team Foundation Server 2012 or newer.
Note
The Data Migration Tool will be available for Azure DevOps Server 2019 Update 1.1 about three weeks after this release. You can see our list of currently supported versions for import here.
This release includes fixes for the following bugs:
Azure Boards
- When creating a new work item from the product backlog, the Title field is not initialized with the default value in the process template.
- Slowness and timeouts when using Azure Boards.
- The Revised By value is incorrect on work item links.
Azure Pipelines
- In Pipelines notifications, fields such as Duration may be null in some locales.
- Template path may not point to a valid JSON file in a Pipeline that includes an Azure Resource Group Deployment.
- The collection-level retention settings page appears in the project settings pages.
Azure Test Plans
- Editing fields in Test Plans is slow.
- In a Test Case, when opening from Boards (as opposed to Test Plans), the Shared Step details do not open.
General
Administration
- High memory usage.
- Servers with load balancer configurations had to explicitly add their public origin to the AllowedOrigins registry entry.
- Customers who install on SQL Azure do not see the Complete Trial dialog.
- Installing extensions give the error "Error message Missing contribution (ms.vss-dashboards-web.widget-sdk-version-2)".
- When setting up Elastic Search, there is an error: "User is unauthorized".
- Indexing and query failures in Elastic Search when upgrading from TFS 2018 Update 2 or newer.
- "Create Warehouse" step fails when configuring Azure DevOps Server.
This release includes the following update:
- Support for SQL Server 2019.
Azure DevOps Server 2019 Update 1 Patch 1 Release Date: September 10, 2019
We have released a security patch for Azure DevOps Server 2019 Update 1 that fixes the following bug. Please see the blog post for more information.
- CVE-2019-1306: Remote code execution vulnerability in Wiki
Azure DevOps Server 2019 Update 1 Release Date: August 20, 2019
Note
The Data Migration Tool will be available for Azure DevOps Server 2019 Update 1 about three weeks after this release. You can see our list of currently supported versions for import here.
RC2 Release Date: July 23, 2019
RC2 includes several bug fixes since RC1 and is the final planned prerelease.
RC1 Release Date: July 2, 2019
Summary of What's New in Azure DevOps Server 2019 Update 1
Azure DevOps Server 2019 Update 1 introduces many new features. Some of the highlights include:
- New Basic process
- Query for work relative to the start of the day, week, month, or year
- Accept and execute on issues in GitHub while planning in Azure Boards
- Rerun expired build for auto-complete pull requests
- New merge types for completing pull requests
- Trigger YAML pipelines with tags
- Task assistant for editing YAML files
- Web editor with IntelliSense for YAML pipelines
- Manage GitHub releases using pipelines
- Test result trend (Advanced) widget
- Provenance information on packages
- Support for Python Packages
- Upstream sources for Maven
- Embed Azure Boards query results in Wiki
- Permalinks for Wiki pages
- Notifications on wiki pages
- Analytics extension no longer needed to use Analytics
You can also jump to individual sections to see the new features:
General
Dark Theme
The dark theme has been a popular feature on Azure DevOps Services and it is now available in Azure DevOps Server. You can turn on dark theme by selecting Theme from the menu underneath your avatar in the top right of every page.
Boards
New Basic process
Historically, Agile has been the default process for new projects, offering a robust and flexible set of work item types and states to suit a variety of project delivery methods. For some teams, who are more familiar with other tools or who are growing and want to adopt a more powerful tool set, want to get started quickly using terminology they are more familiar with.
The new Basic process provides three work item types (Epics, Issues, and Tasks) to plan and track your work. We recommend that you use Issues to track things like user stories, bugs, and features while using Epics to group Issues together into larger units of work. As you make progress on your work, move items along a simple state workflow of To Do, Doing, and Done.

See the track issues and tasks documentation to help you get started with your new project.
State value order on work item form
Previously, the state value on the work item form was ordered alphabetically. With this update we changed how the state values are ordered to match the workflow order in the process settings. You can also change the order of the states in each category in the state customization settings.
Feature Enablement is no longer available
Customers will need to manually update the XML for each project in order to enable new features after upgrading their collection.

Refer to the documentation to learn how to enable specific features.
Organize reference materials with richer work item attachments
Attaching files to work items allows you and your team to centralize reference materials so they are always close by when you need them. It's now easier to add a new attachment by simply dragging and dropping the file anywhere on the work item form. You can continue viewing the attachments as a list or switch to a grid view to show a thumbnail preview. Double-click on the file to open a preview and cycle through them to quickly find the information you need.

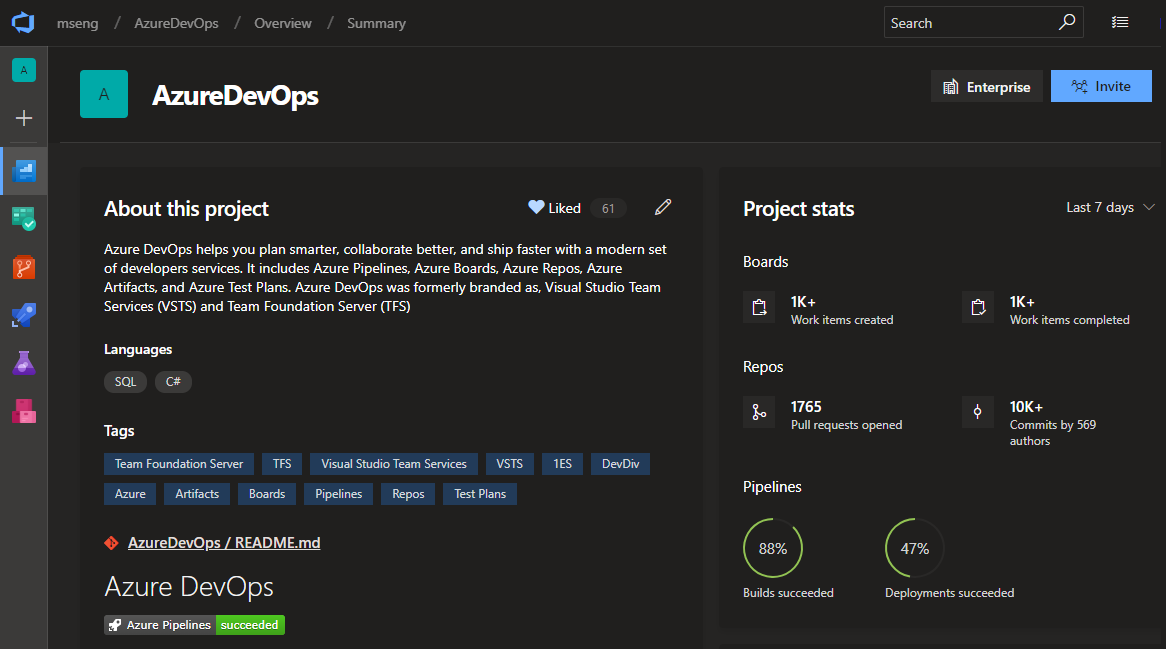
Share your team's board using a badge
The repository's README is often the home that your project team turns to for information about how to contribute to and use your solution. Now, like you can with a build or deployment status in Azure Pipelines, you can add to your README a badge for your team's board in Azure Boards. You can configure the badge to show only the In Progress columns or all columns, and even make the badge visible publicly if your project is open source.

If your README is based on Markdown you can simply copy the sample Markdown from the status badge settings page and paste it into your file.

Query for work relative to the start of the day, week, month, or year
While teams often focus on work within the context of what's coming up next or based on sprint iterations, it's often interesting to look back at work through the lens of the calendar to report on all the work that happened last month or in the first quarter of the year. Now you can use the following new set of @StartOf macros along with any date-based field to query based on the start of the day, week, month or year:
- @StartOfYear
- @StartOfMonth
- @StartOfWeek
- @StartOfDay
Each of these macros also accepts a new modifier string that lets you shift the data by different date units. For example, you can write a query to find all work items completed in the first quarter of this year by querying on State Change Date >= @StartOfYear and State Change Date <= @StartOfYear("+3M"). See the query macros documentation for more information.

Edit and delete discussion comments
We're excited to announce the availability of a highly voted Developer Community feature, edit and delete of comments in your work item's discussion in Azure Boards. To edit your comment, simply hover over any comment that you own, and you will see two new buttons. If you click the pencil icon, you will enter in to edit mode and can simply make your edits and press the "Update" button to save your edits.

When you click the overflow menu, you will see the option to delete your comment. Once you click this, you will be prompt again to confirm that you want to delete this comment, and the comment will be deleted.

You will have a full trace of all the edited and deleted comments in the History tab on the work item form. You will also see that we've updated the UI of our discussion experience to make it feel more modern and interactive. We've added bubbles around comments to make it clearer where individuals comments start and end.
Export query results to a CSV file
You can now export query results directly to a CSV format file from the web.

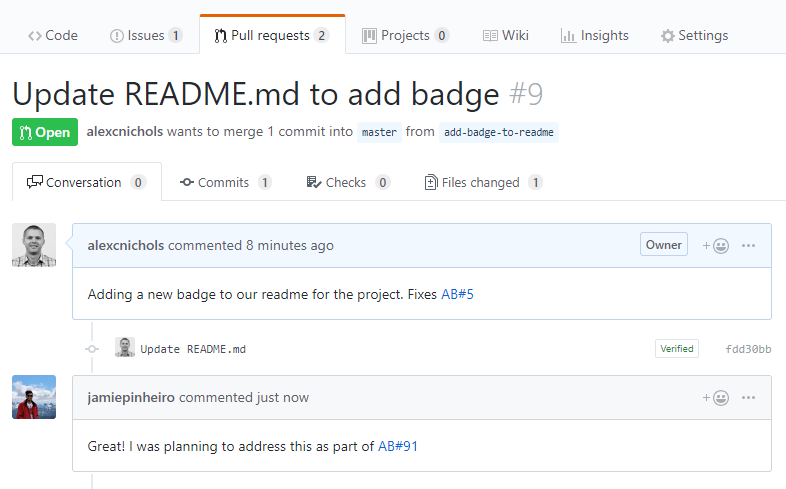
Navigate to Azure Boards work items directly from mentions in any GitHub comment
Now when you mention a work item within the comment of an issue, pull request, or commit in GitHub using the AB#{work item ID} syntax, those mentions will become hyperlinks that you can click on to navigate directly to the mentioned work item.
This doesn't create a formal link that clutters up the work item in Azure Boards for every related conversation, but instead gives your team a way to provide a little more information about work items while discussing code or a customer-reported issue. See the Azure Boards GitHub integration documentation for more information.
Accept and execute on issues in GitHub while planning in Azure Boards
Now you can link work items in Azure Boards with related issues in GitHub. With this new type of linking, several other scenarios are now possible. If your team wants to continue accepting bug reports from users, for example, as issues within GitHub but relate and organize the team's work overall in Azure Boards, now you can.

The same mention syntax your team uses for commits and pull requests still applies and of course you can link manually in Azure Boards with the issue URL. See the GitHub & Azure Boards documentation for more information.

Quickly view linked GitHub activity from the Kanban board
When reviewing the Kanban board yourself or as a team, you often have questions such as "has this item started development yet?" or "is this item in review yet?" With the new GitHub annotations on the Kanban board, now you can get a quick sense of where an item is and directly navigate to the GitHub commit, pull request, or issue for more detail. See the Customize cards documentation for more information about this and the other annotations for Tasks and Tests.

Repos
Draft pull requests
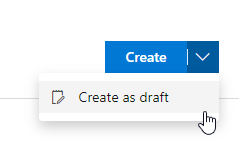
In order to prevent pull requests from being completed before they're ready and to make it easy to create work in progress that may not involve everyone, we now support draft pull requests.
Draft pull requests can be created by selecting Create as draft from the Create button drop down when creating a pull request.
Once you have created a draft pull request, you will see a badge indicating its status next to the title.
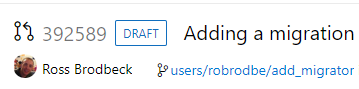
Draft pull requests do not include reviewers or run builds by default but allow you to manually add reviewers and run builds. To promote the pull request to a normal pull request, simply click the Publish button from the pull request detail page.
Rerun expired build for auto-complete pull requests
Azure Repos will now automatically queue expired builds that have been triggered by a pull request policy. This applies to pull requests that have passed all other policies and are set to auto-complete.
Previously, when pull requests had policies like required reviewers, the approval process could take too long and an associated build could expire before a reviewer approved the pull request. If the pull request was set to auto-complete it would remain blocked until a user manually queued the expired build. With this change the build will be queued automatically so that the pull request can auto-complete after a successful build.
Note
This automation will only queue up to five expired builds per pull request and will only attempt to re-queue each build once.
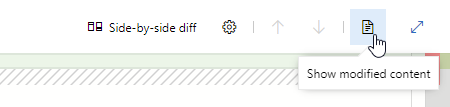
View just the left or right file in a pull request
Today, when viewing file changes in a pull request, you can use either a Side-by-side diff or Inline diff mode. We have received feedback that many of you just want to see the original file or the changed file, without comparing them, so we added a new option that will allow you to view either the left file or the right file individually.
New merge types for completing pull requests
You now have more options when merging the changes from a pull request to the target branch. We have added support for two of our most requested features on the Developer Community: Fast-Forward merging and Semi-Linear merging (also called "Rebase and Merge").
You will now see these new options available in the Complete Pull Request dialog:

The updated policy administration page allows administrators to control which merge strategies are allowed on a branch or folder of branches.

Note
Existing policies are still enforced. For example, if your branch currently has a "squash merge only" policy in place, you will have to edit that policy in order to use the new merge strategies.
There are a few situations when rebasing during pull request completion is not possible:
- If a policy on the target branch prohibits using rebase strategies, you will need "Override branch policies" permission.
- If the source branch of the pull request has policies, you won't be able to rebase it. Rebasing will modify the source branch without going through the policy approval process.
- If you've used the Merge Conflict Extension to resolve merge conflicts. Conflict resolutions applied to a three-way merge are seldom successful (or even valid) when rebasing all the commits in a pull request one at a time.
In all these cases, you still have the option of rebasing your branch locally and pushing to the server, or squash-merging your changes when completing the pull request.
Filter by target branch in pull requests (PRs)
Pull requests let your team review code and give feedback on changes before merging them into the main branch. They have become an important part of many teams' workflows since you can step through proposed changes, leave comments, and vote to approve or reject code changes.
To make it easier for you to find your pull requests, we added a filtering option to let you search for PRs using the target branch.

You can also use the target branch filtering to customize the pull requests view in the Mine tab.

Allow extensions to add syntax highlighting and autocomplete
Currently, we publish syntax highlighting for a subset of languages supported by the Monaco editor. However, many of you want to create your own syntax highlighting for languages that we don't support.
With this update, we added an extensibility point that allows extensions to add syntax highlighting and autocomplete to the file explorer and pull requests views.
You can find an example of an extension demonstrating this feature here.
In addition, we added support for Kusto language syntax highlighting.
Repository creation extension point
We've added an extension point to allow you to add new items to the repository picker. This extension point will let you add custom actions (redirects, popups, etc) to the repository picker menu, enabling flows like alternate repository creation scenarios.

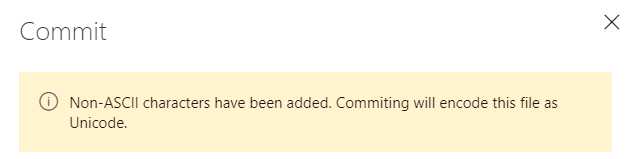
Improved encoding support
Previously, editing and saving files on the web would only save as UTF-8 encoding and we did not prompt you when the file encoding changed. Now, we will give you a warning when you try to save a file that is not UTF encoded via the web (which only supports UTF encoding). In addition, we added support for UTF-16 and UTF-32 encoding via the web pushes endpoint. This means that we will preserve the encoding type so you don't have to rewrite them as UTF-8.
The following screenshot shows and example of the dialog that you will see when you introduce encoding changes by a web push.
Go get command support in Azure Repos
Go is an open source programming language, also referred to as Golang. In Go, you can use the get command to download and install packages and dependencies. With this update, we've added support for go get within an Azure DevOps repository. With go get, you will be able to download packages with their dependencies named by the import paths. You can use the import key word to specify the import path.
Pipelines
Web editor with IntelliSense for YAML pipelines
If you use YAML to define your pipelines, you can now take advantage of the new editor features introduced with this release. Whether you are creating a new YAML pipeline or editing an existing YAML pipeline, you will be able to edit the YAML file within the pipeline web editor. Use Ctrl+Space for IntelliSense support as you edit the YAML file. You will see the syntax errors highlighted and also get help on correcting those errors.
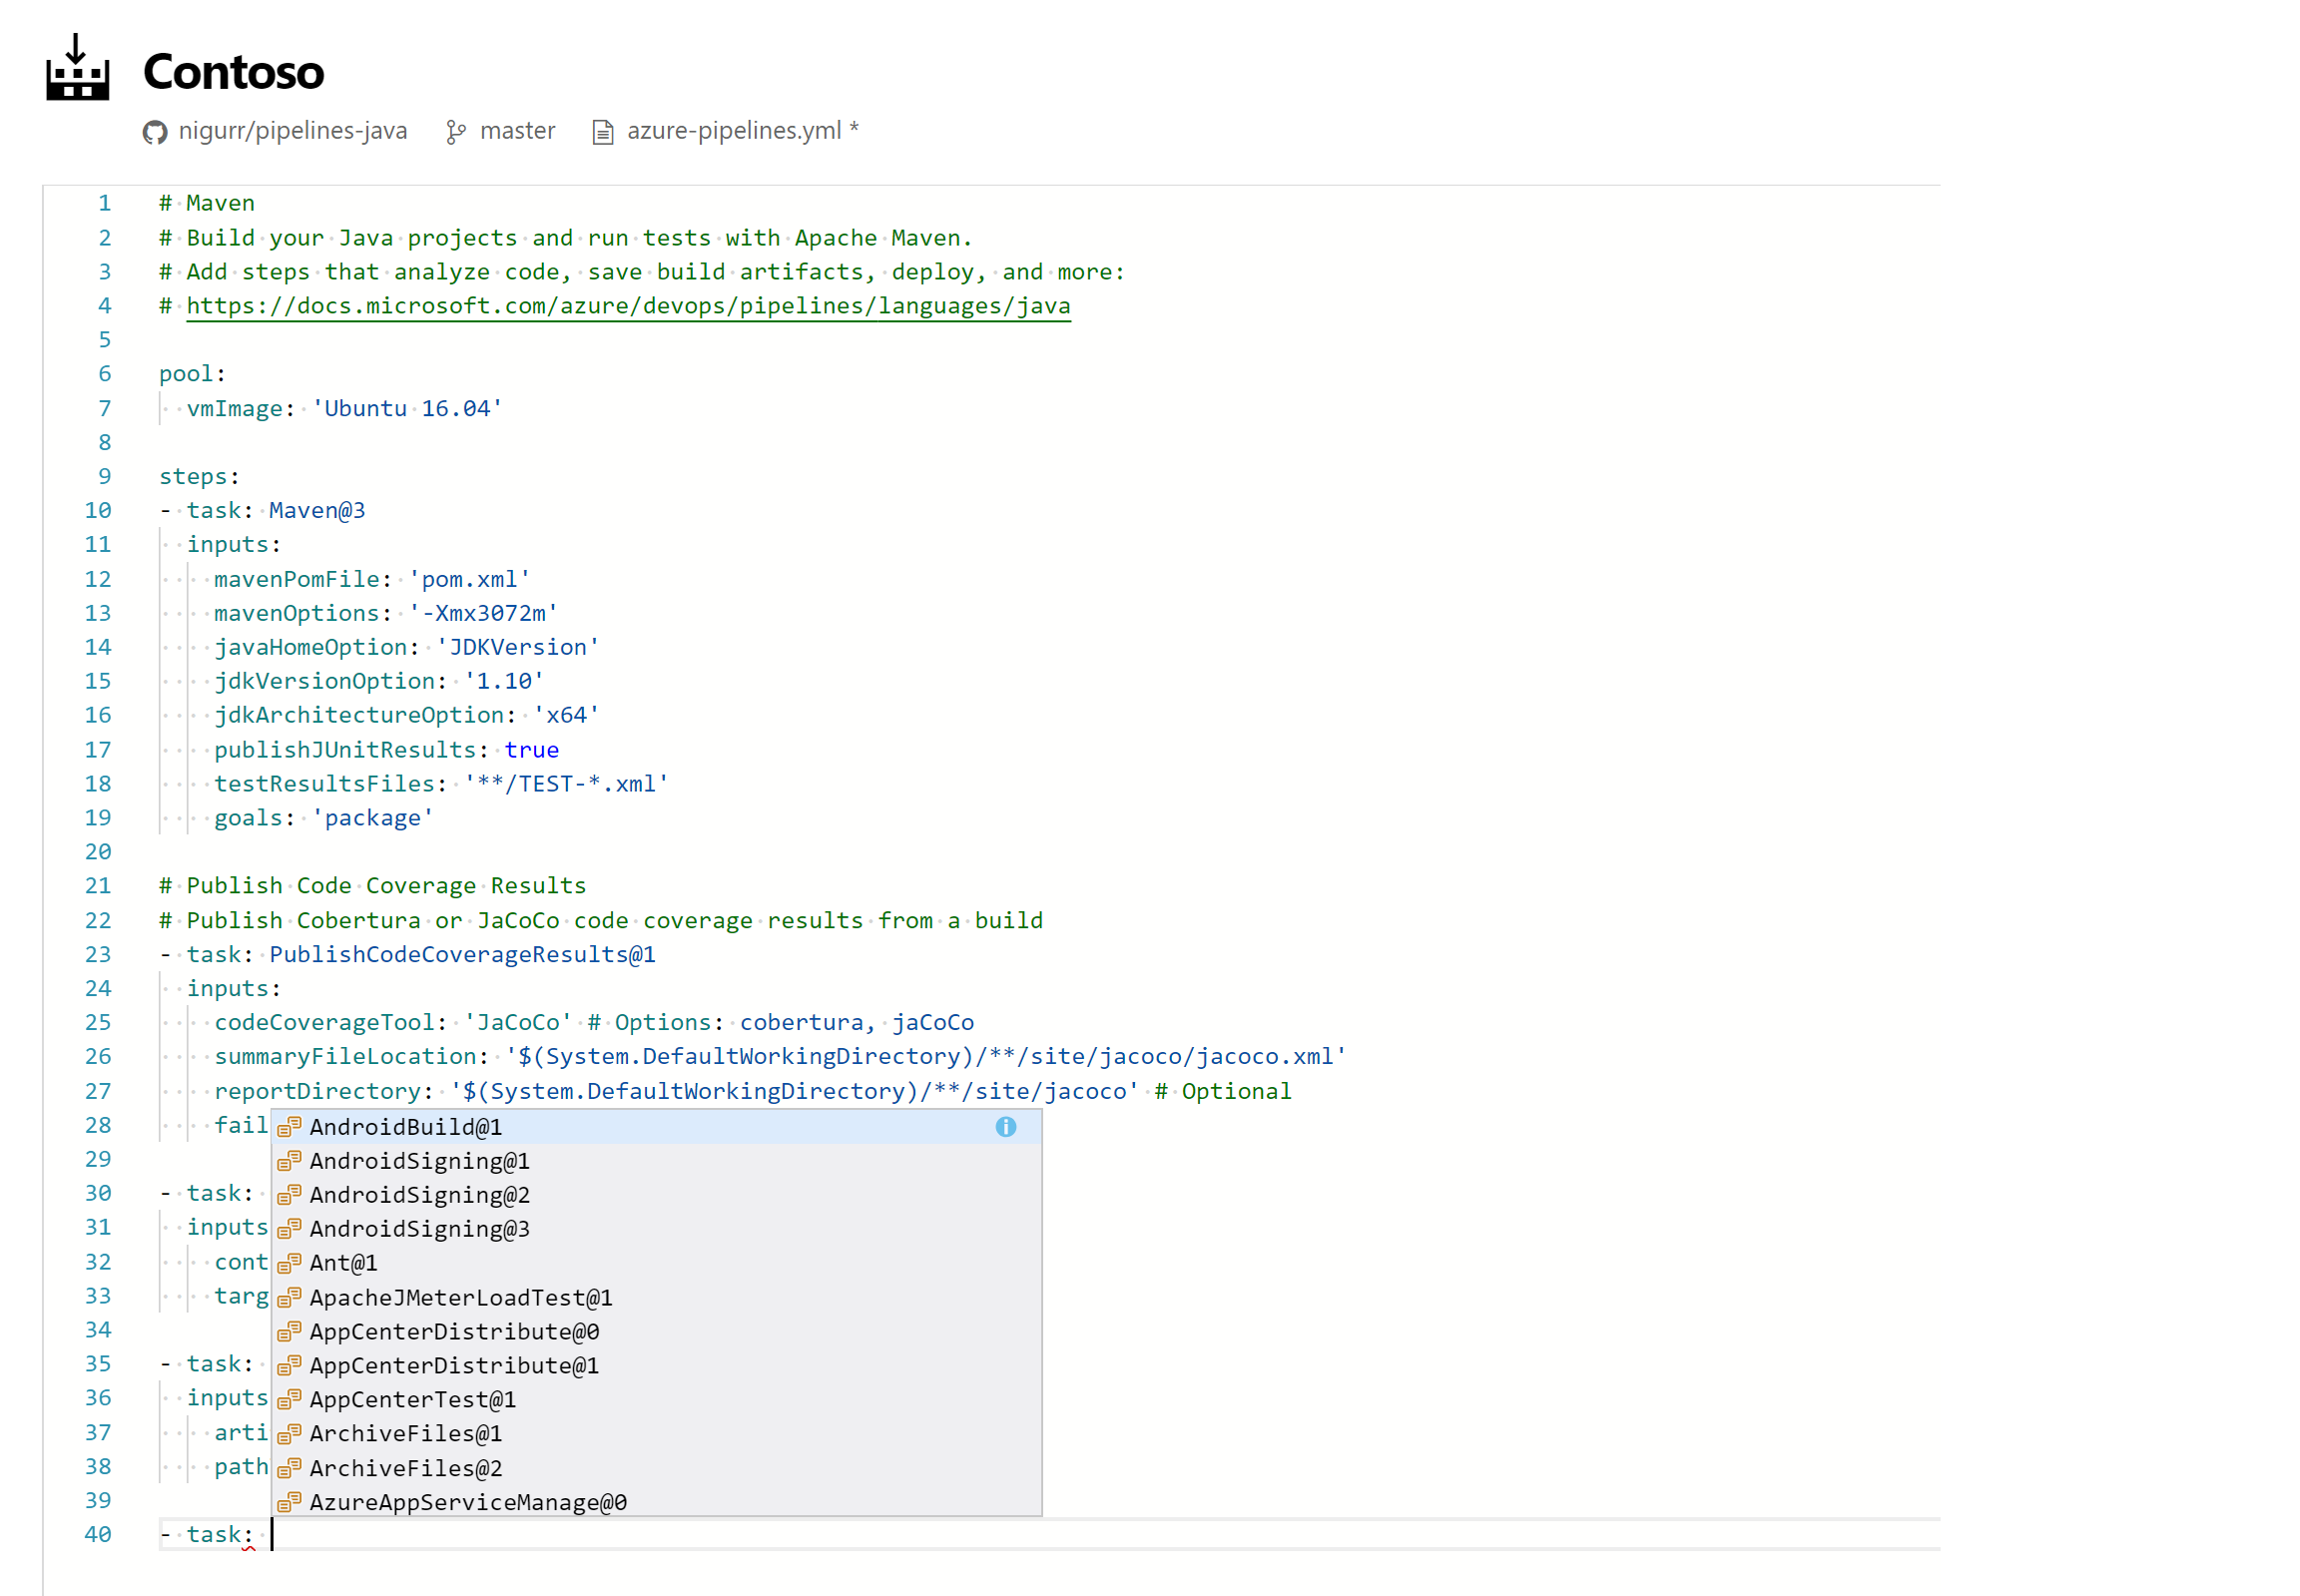
Task assistant for editing YAML files
We continue to receive a lot of feedback asking to make it easier to edit YAML files for pipelines, so we are adding a task assistant to the YAML editor. With this, you will have the same familiar experience for adding a new task to a YAML file as in the classic editor. This new assistant supports most of the common task input types such as pick lists and service connections. To use the new task assistant, select Edit on a YAML-based pipeline, and then select the Task assistant.

Trigger YAML pipelines with tags
YAML pipelines can be triggered when tags are added to a commit. This is valuable for teams whose workflows include tags. For instance, you can kick off a process when a commit is tagged as the "last known good".
You can specify which tags to include and exclude. For example:
trigger:
  tags:
    include:
    - releases/*
    exclude:
    - releases/old*
Declare container resources inline
Previously, we required you to declare your container resources in YAML pipelines, then reference them by name. We now offer an inline syntax for cases where you aren't going to refer to the container multiple times.
jobs:
- job: my-container-job
  container:
    image: microsoft/dotnet:latest
Setting to auto cancel an existing pipeline when a pull requests is updated
By default, pipelines triggered by pull requests (PRs) will be canceled if a new commit is pushed to the same PR. This is desirable in most cases since usually you don't want to continue running a pipeline on out-of-date code. If you don't want this behavior, you can add autoCancel: false to your PR trigger.
pr:
  branches:
    include:
    - main
    - releases/*
  autoCancel: false
Choose the directory of checked out code in YAML pipelines
Previously, we checked out repos to the s directory under $(Agent.BuildDirectory). Now you can choose the directory where your Git repo will be checked out for use with YAML pipelines.
Use the path keyword on checkout and you will be in control of the folder structure. Below is an example of the YAML code that you can use to specify a directory.
steps:
- checkout: self
  path: my-great-repo
In this example, your code will be checked out to the my-great-repo directory in the agent's workspace. If you don't specify a path, your repo will continue to be checked out to a directory called s.
New Azure App Service tasks optimized for YAML
We now support four new tasks which provide an easy yet powerful way to deploy Azure App Services with modern developers in mind. These tasks have an optimized YAML syntax making it simple and intuitive to author deployments to Azure AppServices, including WebApps, FunctionApps, WebApps for Containers and FunctionApp for Containers on both Windows and Linux platforms.
We also support a new utility task for file transformation and variable substitution for XML and JSON formats.
Changes to default permissions for new projects
Up until now, project contributors could not create pipelines unless they are explicitly given "Create build definition" permission. For new projects, your team members can readily create and update pipelines. This change will reduce the friction for new customers that are onboarding to Azure Pipelines. You can always update the default permissions on the Contributors group and restrict their access.
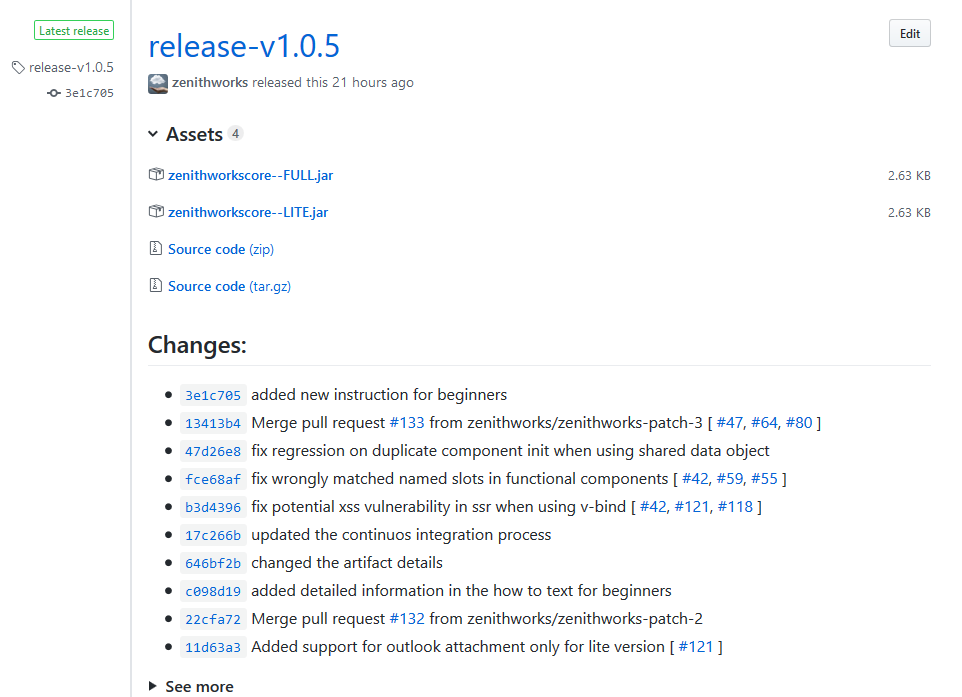
Manage GitHub releases using pipelines
GitHub releases are a great way to package and provide software to users. We are happy to announce that you can now automate it using GitHub Release task in Azure Pipelines. Using the task you can create a new release, modify existing draft/published releases or discard older ones. It supports features like uploading multiple assets, marking a release as pre-release, saving a release as draft and many more. This task also helps you create release notes. It also can automatically compute the changes(commits and associated issues) that were made in this release and add them to the release notes in a user friendly format.
Here is the simple YAML for the task:
task: GithubRelease@0
displayName: 'Create GitHub Release'
inputs:
  githubConnection: zenithworks
  repositoryName: zenithworks/pipelines-java
  assets: $(build.artifactstagingdirectory)/*.jar
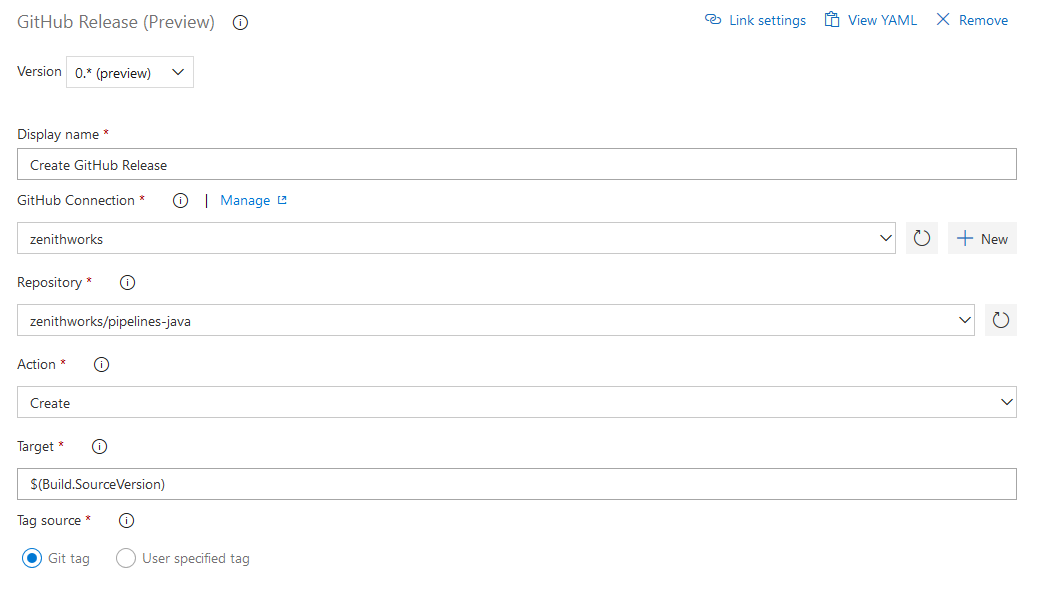
A sample GitHub release created using this task:
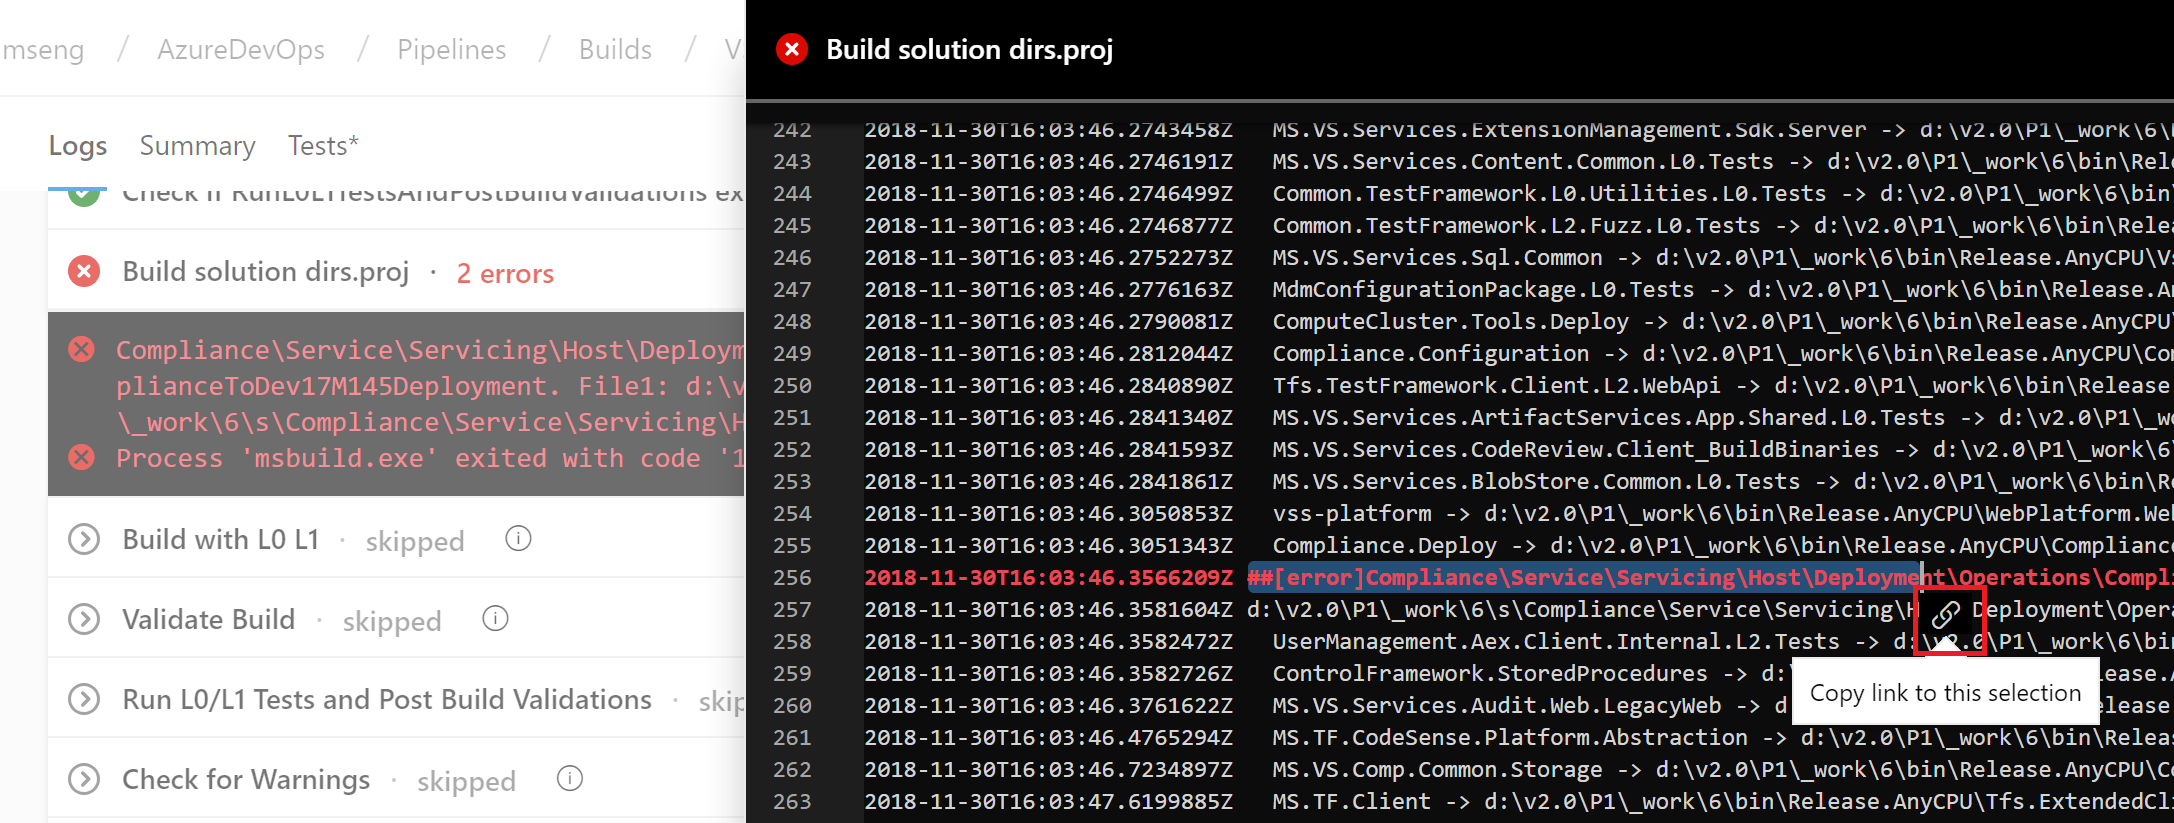
Links to specific lines in a build log
You can now share a link to specific lines in the build log. This will help you when collaborating with other team members in diagnosing build failures. Simply select the lines of a log from the results view to get a link icon.
Resource authorization improvements
We needed to provide security for protected resources (e.g., service connections, variable groups, agent pools, secure files) when referenced in a YAML file. At the same time, we wanted to make it easier for you to set up and use pipelines that use these types of resources for non-production scenarios. Previously, we added a setting to mark a resource as 'authorized for use in all pipelines'.
With this update, we are making it easier for you to fix a resource authorization problem even if you have not marked a resource as such. In the new experience, when a build fails because of a resource authorization error, you will see an option to explicitly authorize the use of those resources in the pipeline, and then proceed. Team members with permissions to authorize resources will be able to complete this action right from a failed build.

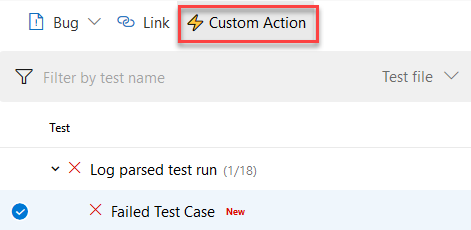
New extension contribution points in the Pipelines Test tab
We've continued to make the extension framework more powerful by adding two new contribution points in the Test Results tab in Pipelines. This will enable Marketplace extensions to provide more tailored reporting experiences and add further interactivity.
The two contribution points are:
Custom Action button in the toolbar
Sometimes you may want to perform an action like updating an API's data or running custom tools using metadata from your test results. With this contribution point, you can create extensions which use the immediate context of the selected test result to add a custom action to the *Custom Action- button.
Custom Details Tab in the details pane
You may have a wide variety of test report consumption workflows and may want to see different data points against failed tests for debugging and analysis. By using this contribution point, your team can add a new tab to the details pane that will come up when you select the any test result row in the data grid. This new tab can show a view with static content or dynamic data fetched using internal or external APIs.
Run once agent
If you're using infrastructure such as Azure Container Instances to run elastic private agents, often, you want each agent to accept only one job before going away. Until now, this wasn't easy since you had to terminate the agent (possibly causing a failure to be reported) or accept the risk that an agent might receive another job before you could shut it down. With this update, we added the --once flag to the agent configuration. When you configure the agent this way, it'll accept only one job and then shut itself down.
Agent pool user interface update
The agent pools management page in project settings has been updated with a new user interface. Now you can easily see all the jobs that are running in a pool. In addition you can learn why a job is not running.
 update")
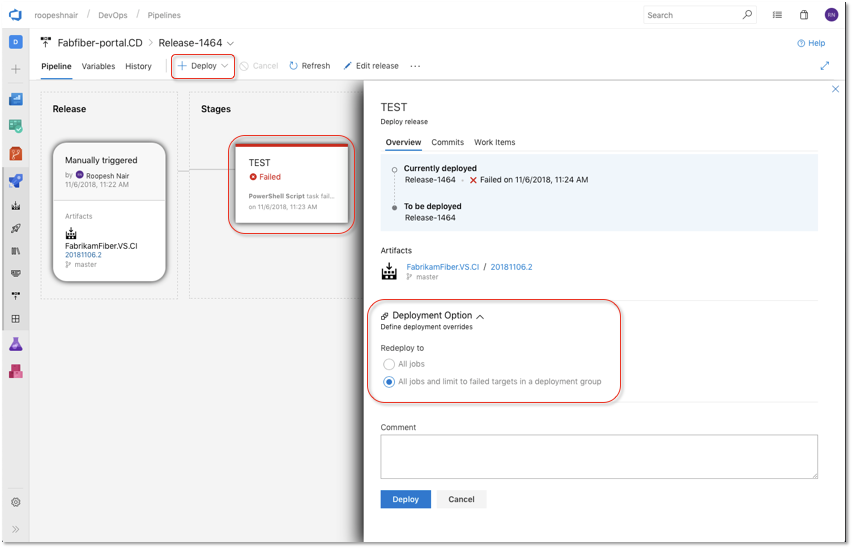
Deploy to failed targets in a Deployment Group
By default, Azure Pipelines used to re-run all jobs when you redeploy a previously failed run. Now, you can override this behavior by configuring the Deployment Option when deploying. By selecting the All jobs and limit to failed targets in a deployment group option, the re-run will run all the jobs and skip the deployments to the targets that are already up to date.
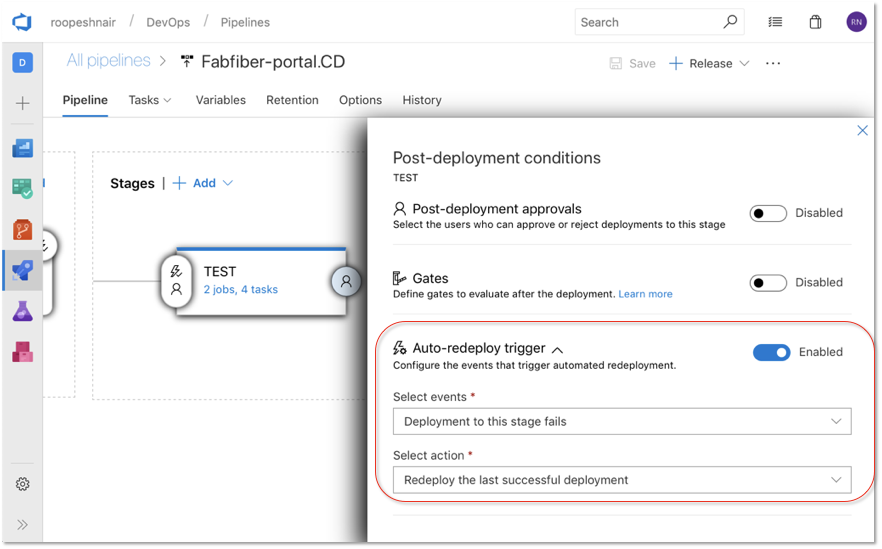
Automatically redeploy on failure
When a deployment to a stage fails, Azure Pipelines can now automatically redeploy the last successful deployment. You can configure the stage to automatically deploy the last successful release by configuring the Auto-redeploy trigger in the Post-deployment conditions. We plan to add additional triggered events and actions to the auto redeploy configuration in a future sprint. See the Deployment groups documentation for more information.
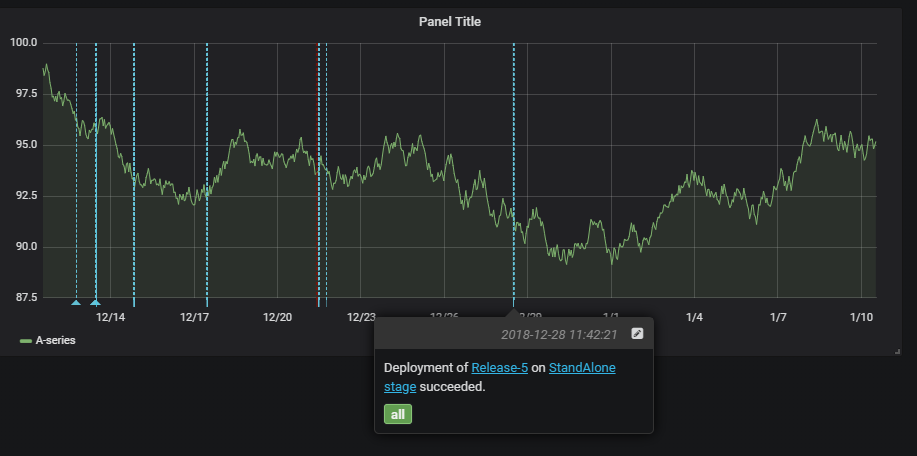
Grafana annotations service hook
We now support a new service hook that lets you add Grafana annotations for Deployment Completed events to a Grafana dashboard. This allows you to correlate deployments with the changes in application or infrastructure metrics that are being visualized in a Grafana dashboard.
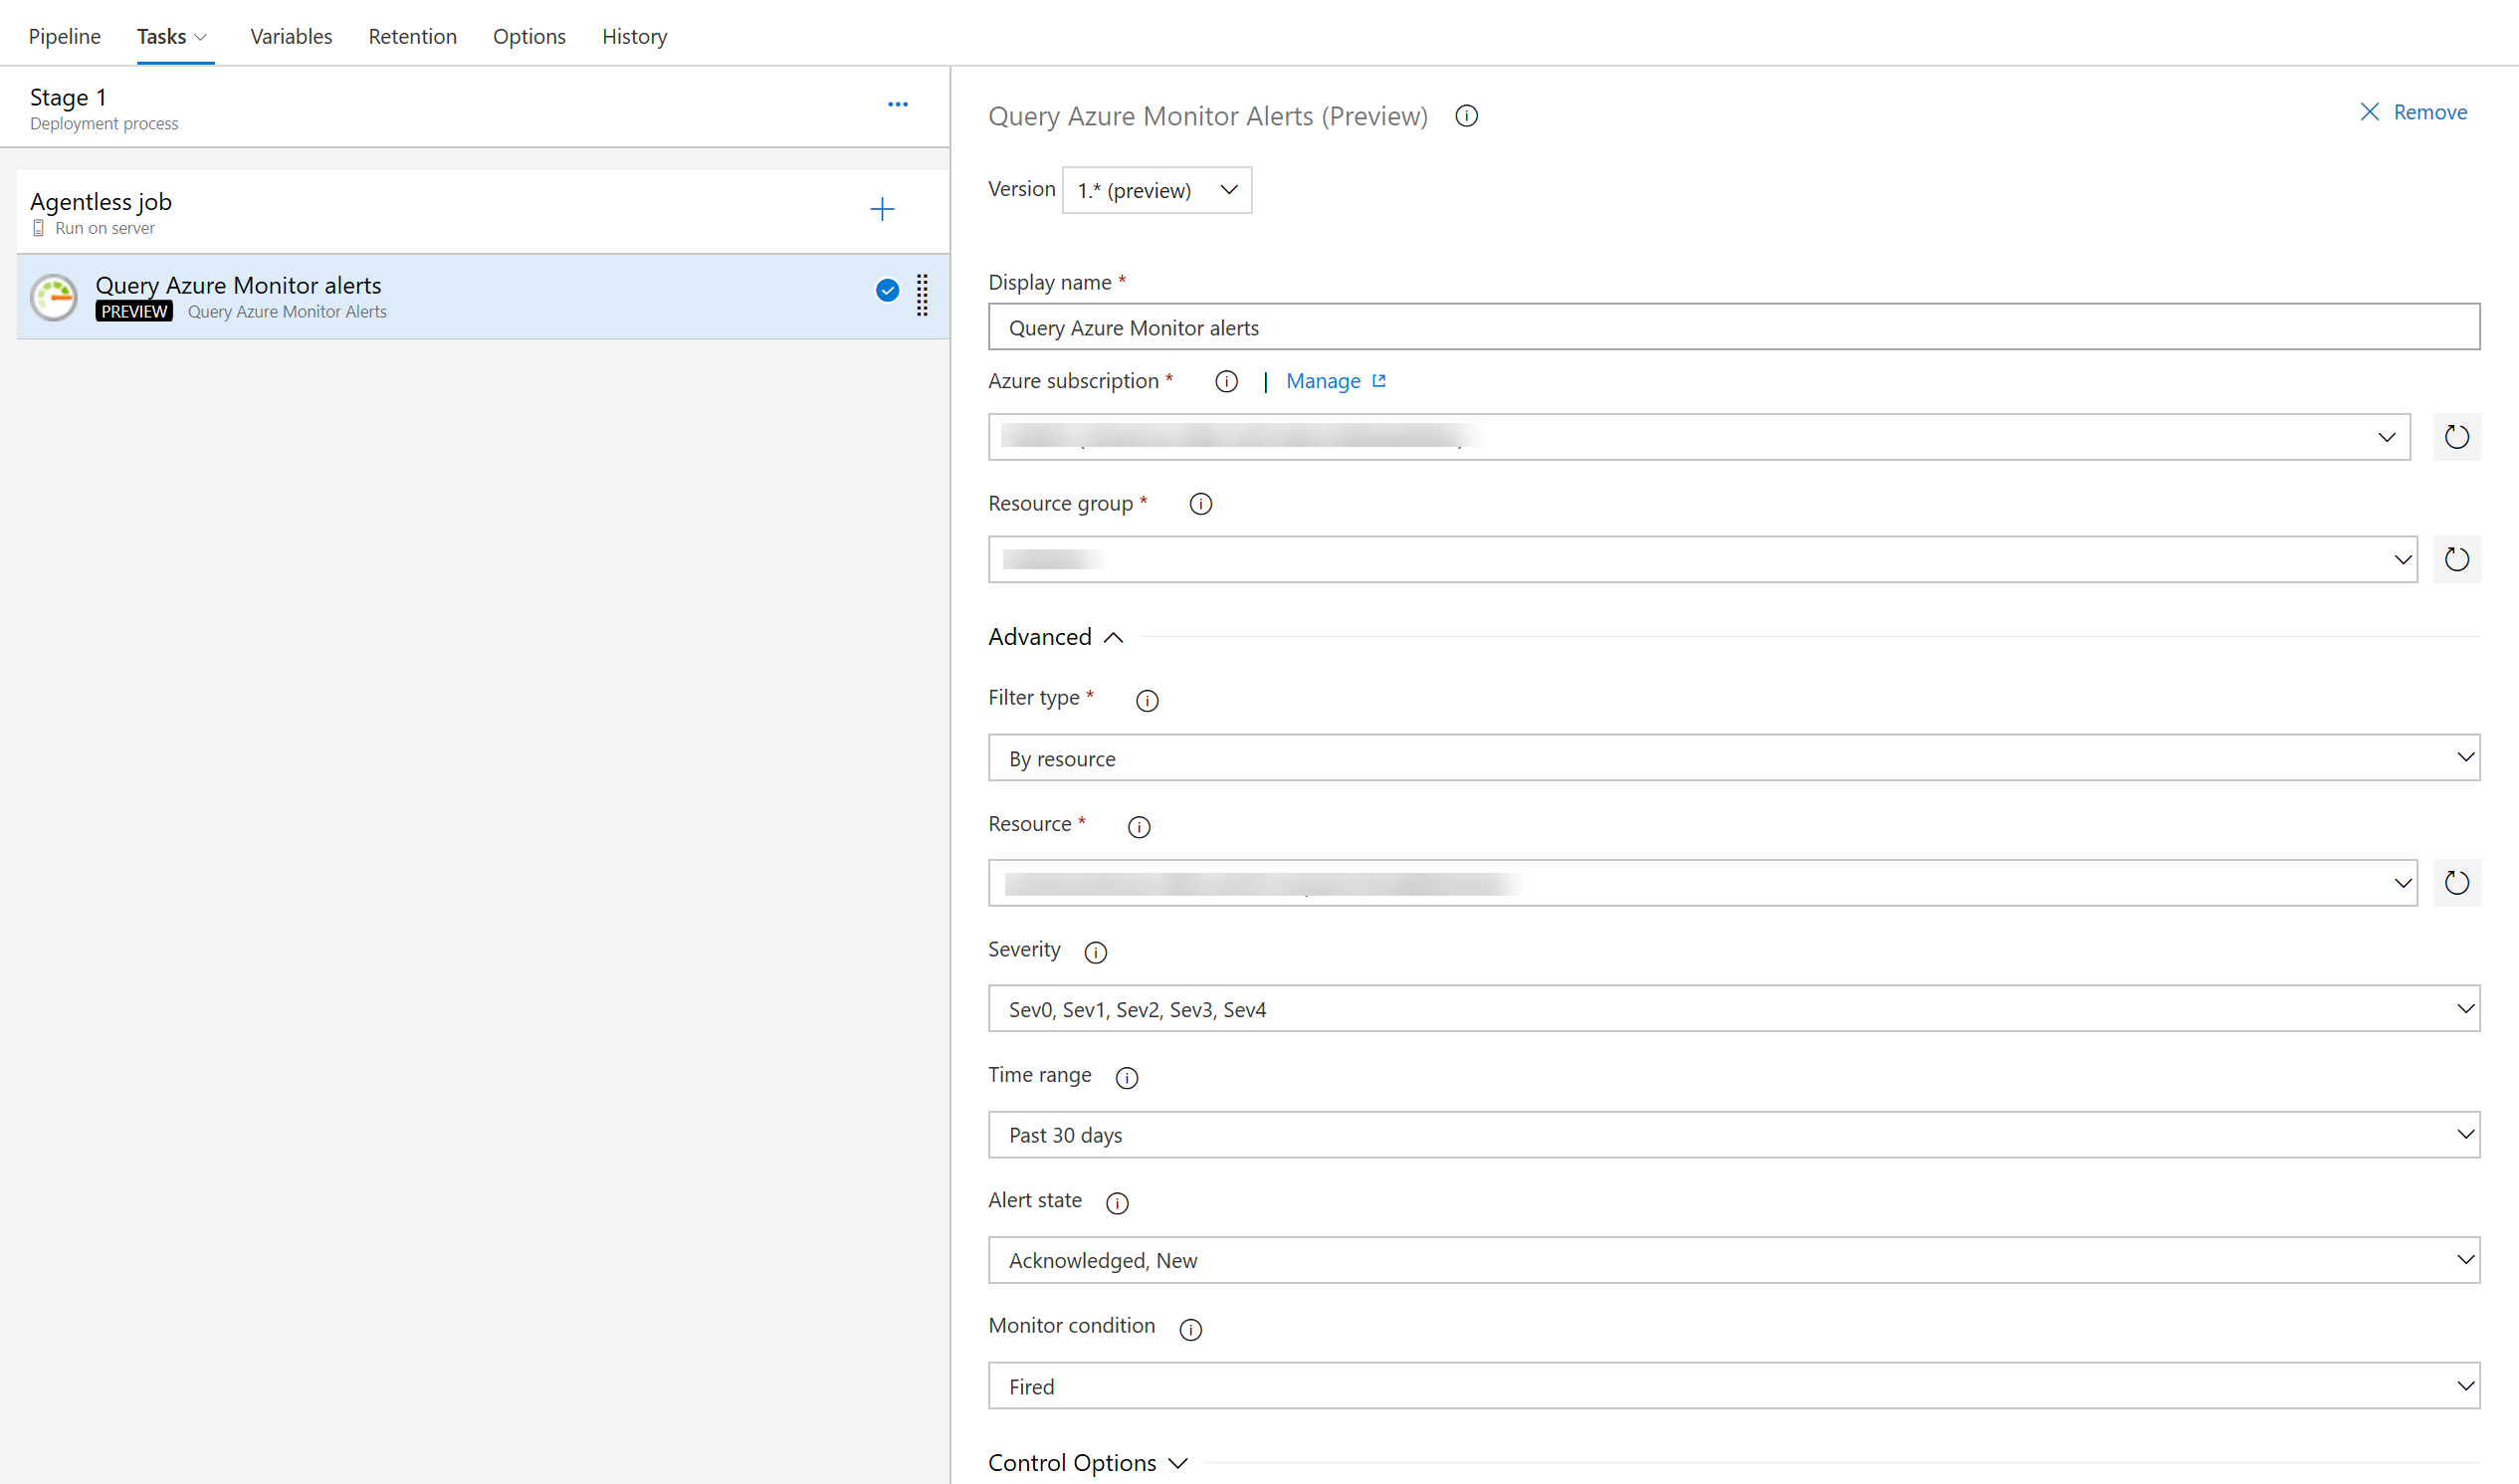
Query Azure Monitor alerts tasks
The previous version of the Query Azure Monitors task supported querying alerts only on the classic monitoring experience. With this new version of the task, you can query alerts on the unified monitoring experience recently introduced by Azure Monitor.
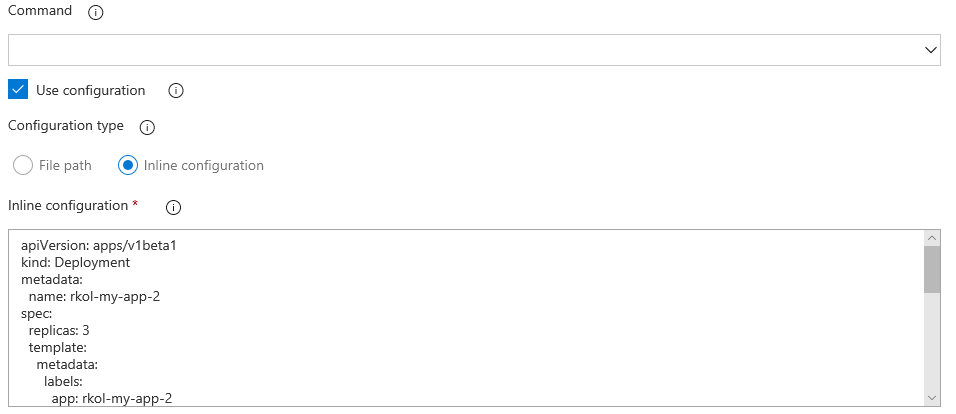
Inline input of spec file in Deploy to Kubernetes task
Previously, the Kubernetes deployment task required you to provide a file path for the configuration. Now you can add the configuration inline as well.
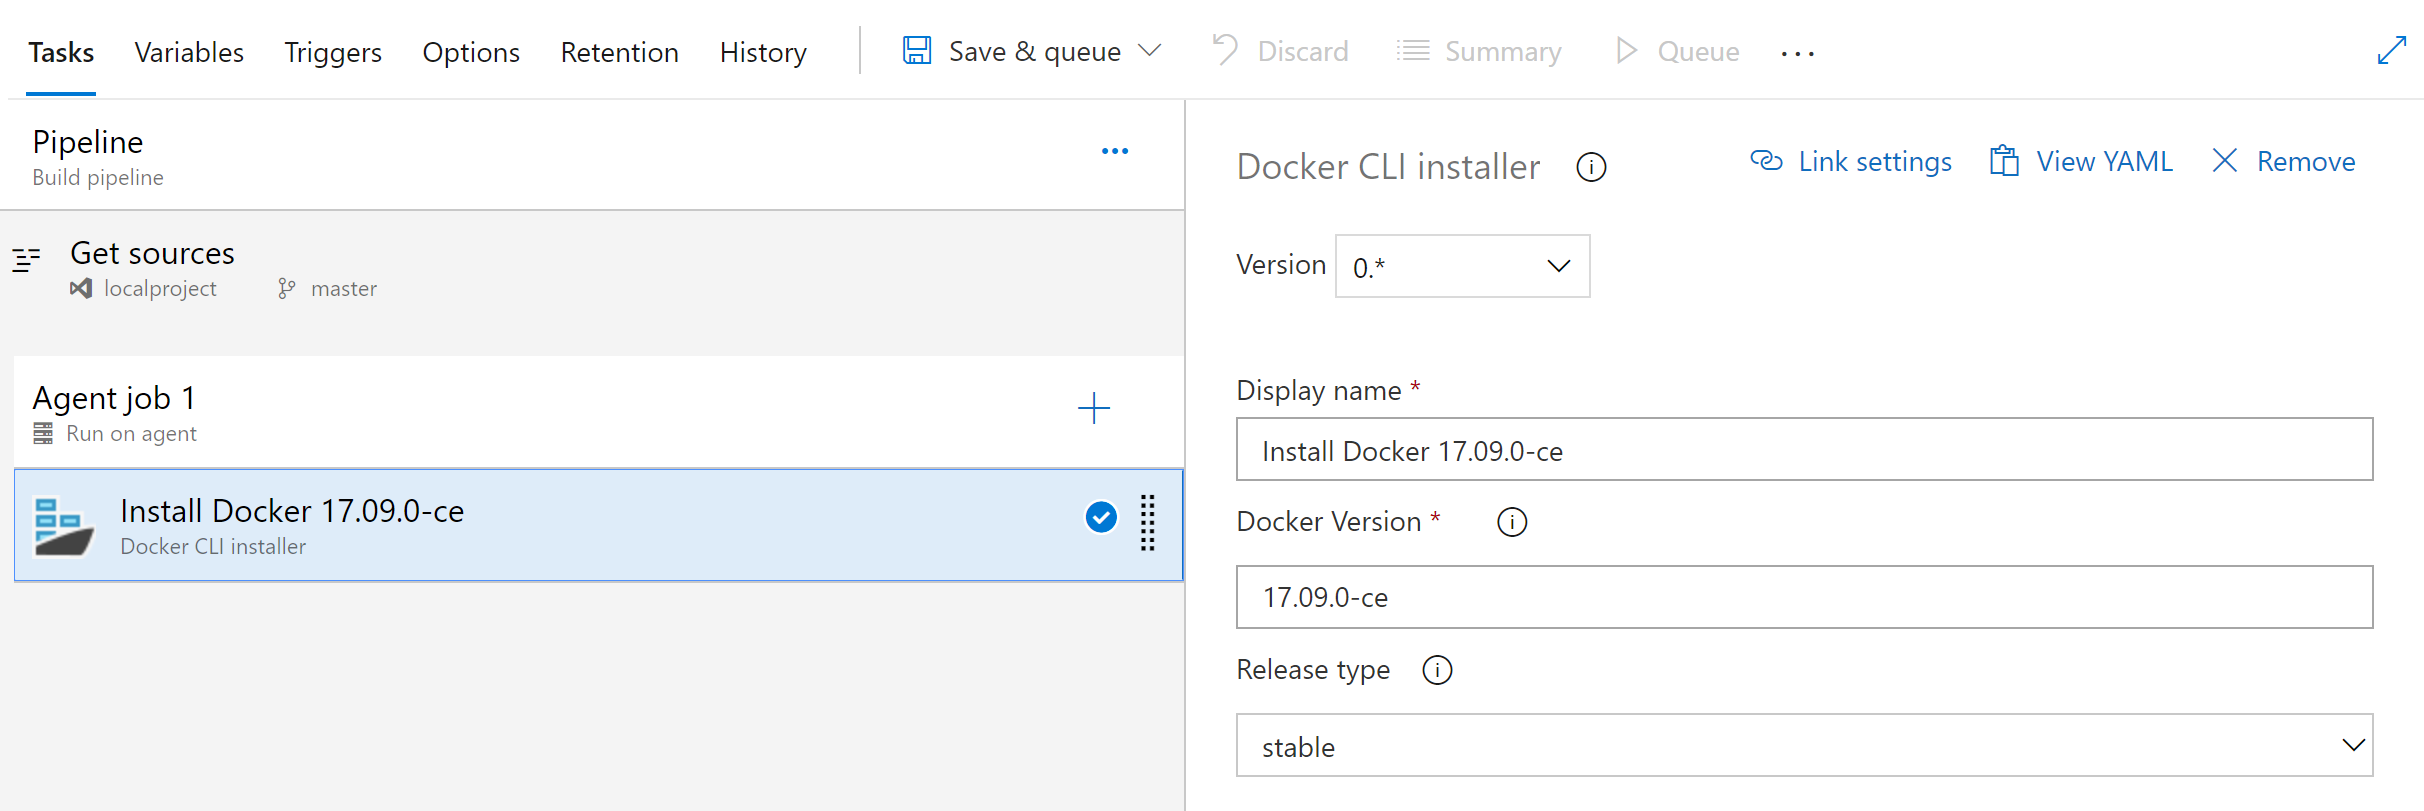
Docker CLI Installer task
This task allows installation of any version of Docker CLI on the agents as specified by the user.
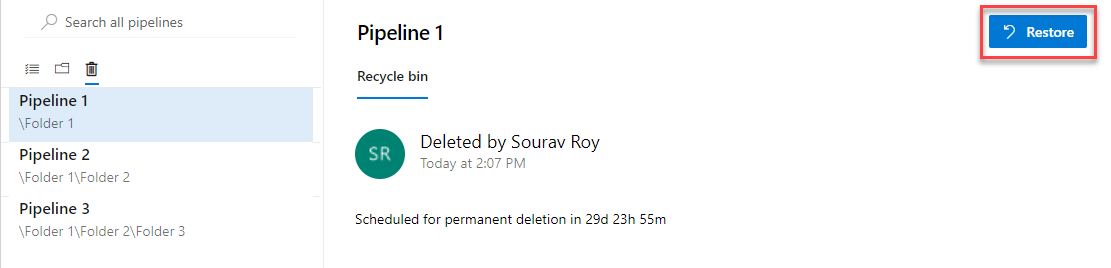
Restore deleted release pipelines
Deleting unused release pipelines helps to keep the release pipeline list clean but sometimes you delete something by mistake. With this update, it's now possible to restore a release pipeline that was deleted within the last 30 days. We added a new tab to the left panel of the Releases page that will display a list of deleted release pipelines. From this view you can restore a deleted release pipeline by selecting the pipeline from the list and clicking the Restore button.
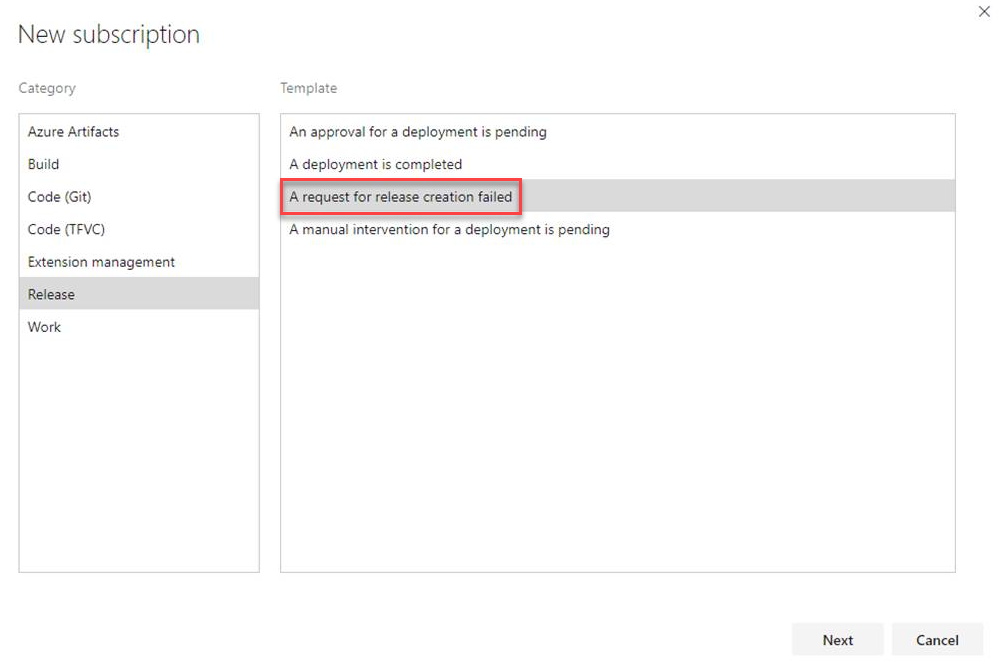
Notifications on failure of a release creation request
You can set notifications to receive emails as changes occur to your builds, code base, and other operations. For example, you can set an alert to get notified when a work item is assigned to you.
With this update, we added a new notification subscription to the Release category. This notification will send you an email when a request for a release creation fails. An example scenario where this may be useful is when a request to create a release fails because an artifact version is not available. To learn how to manage your notifications see the documentation here.
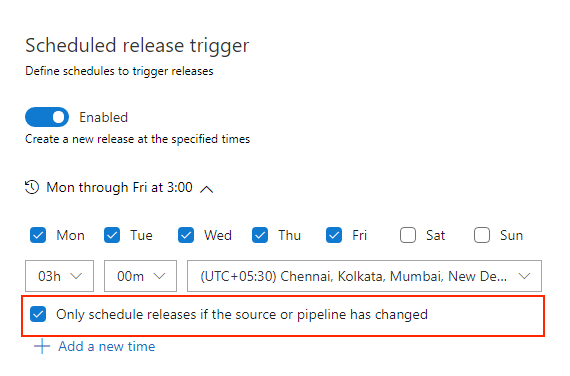
Schedule releases on source or pipeline change
Previously, when you had a scheduled release trigger, a release would get triggered even when there wasn't any change detected in the upstream artifact or in the release definition. An option has been added to the Schedule release trigger panel to schedule releases only if the artifact version or the release definition changed.
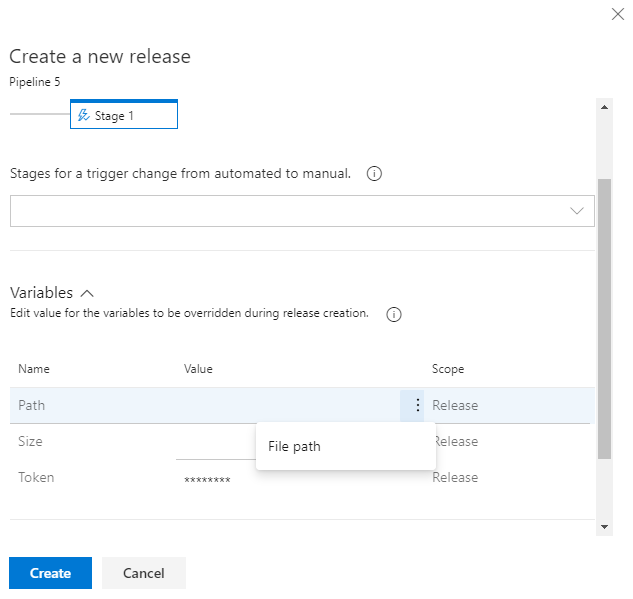
Contribution point for variables in the create release dialog
Previously, the variables values needed during release creation had to be entered by the user without any assistance or suggestions. We've added contribution points to the Create a new release dialog to support extensions that will help populate the value of a variable during the release creation.
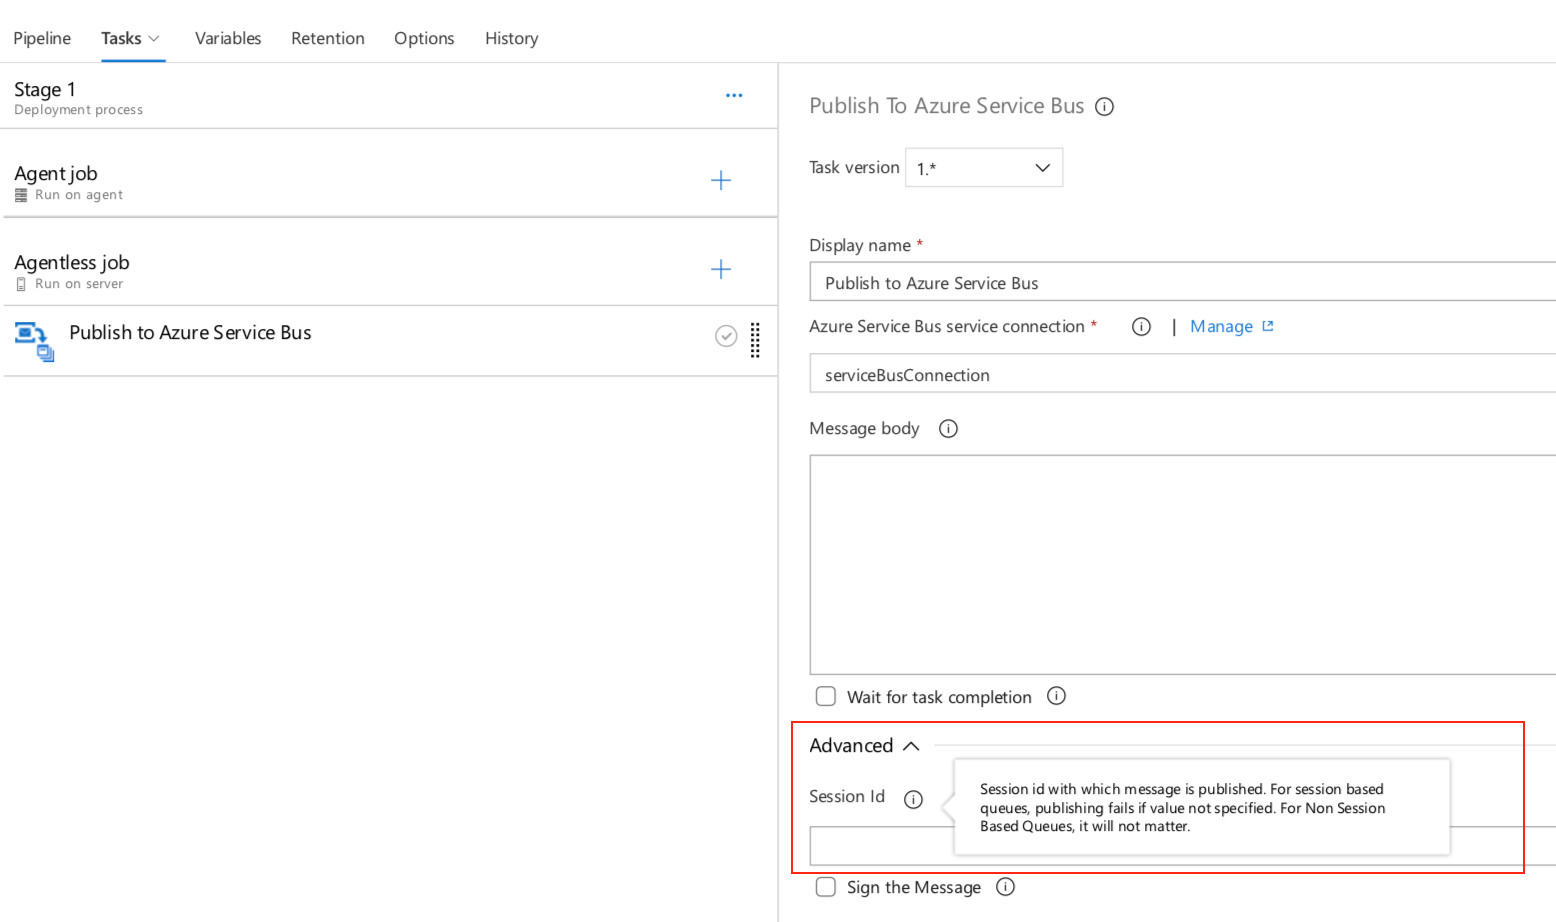
Publish to Azure Service Bus session queues
We've extended the Agentless job build task to include the ability to publish messages to session queues. This option has been added to the Publish to Azure Service Bus task.
New Azure subscription option in Kubernetes service connection
Service connections for builds and releases allow you to connect to external and remote services to execute tasks for a build or deployment. You can define and manage a service connection from the Admin settings of your project.
With this update, we added an authentication option to the Kubernetes service connection form. Now you can select Azure Subscription to authenticate your connection. This makes it easy to deploy to specific namespaces by setting up Kubernetes connections with your Azure subscription and cluster name.
For a role-based access control (RBAC) enabled cluster, ServiceAccount and RoleBinding objects are created in the chosen namespace. The RoleBinding object limits the operations of the created service account only to the chosen namespace. For an RBAC disabled cluster, the service account created has cluster-wide permissions across namespaces.

Azure container registry in Docker registry service connection
Now you can create a Docker registry service connection from your project's settings page. To create the connection, choose an Azure container registry in one of the subscriptions associated with your Azure Active Directory (AAD) identity. All tasks requiring service connections to container registries such as Docker@2 and KubernetesManifest@0 will support a single way of specifying a connection.

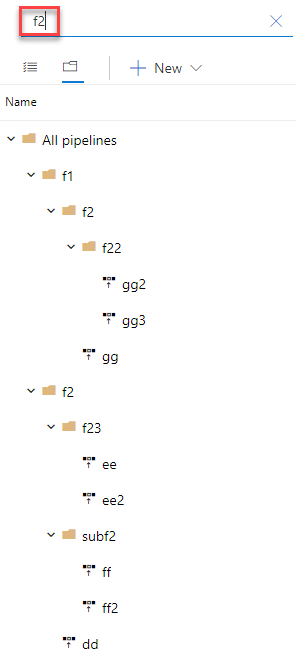
Search by folder name in release definitions
You can organize your release definitions by storing them in folders. Previously, you didn't have the option to do a search by folder. It was challenging to find a specific release definition if you had created a lot of folders. Now you can search by folder name in the release definition making it easier to find the definitions you are looking for.
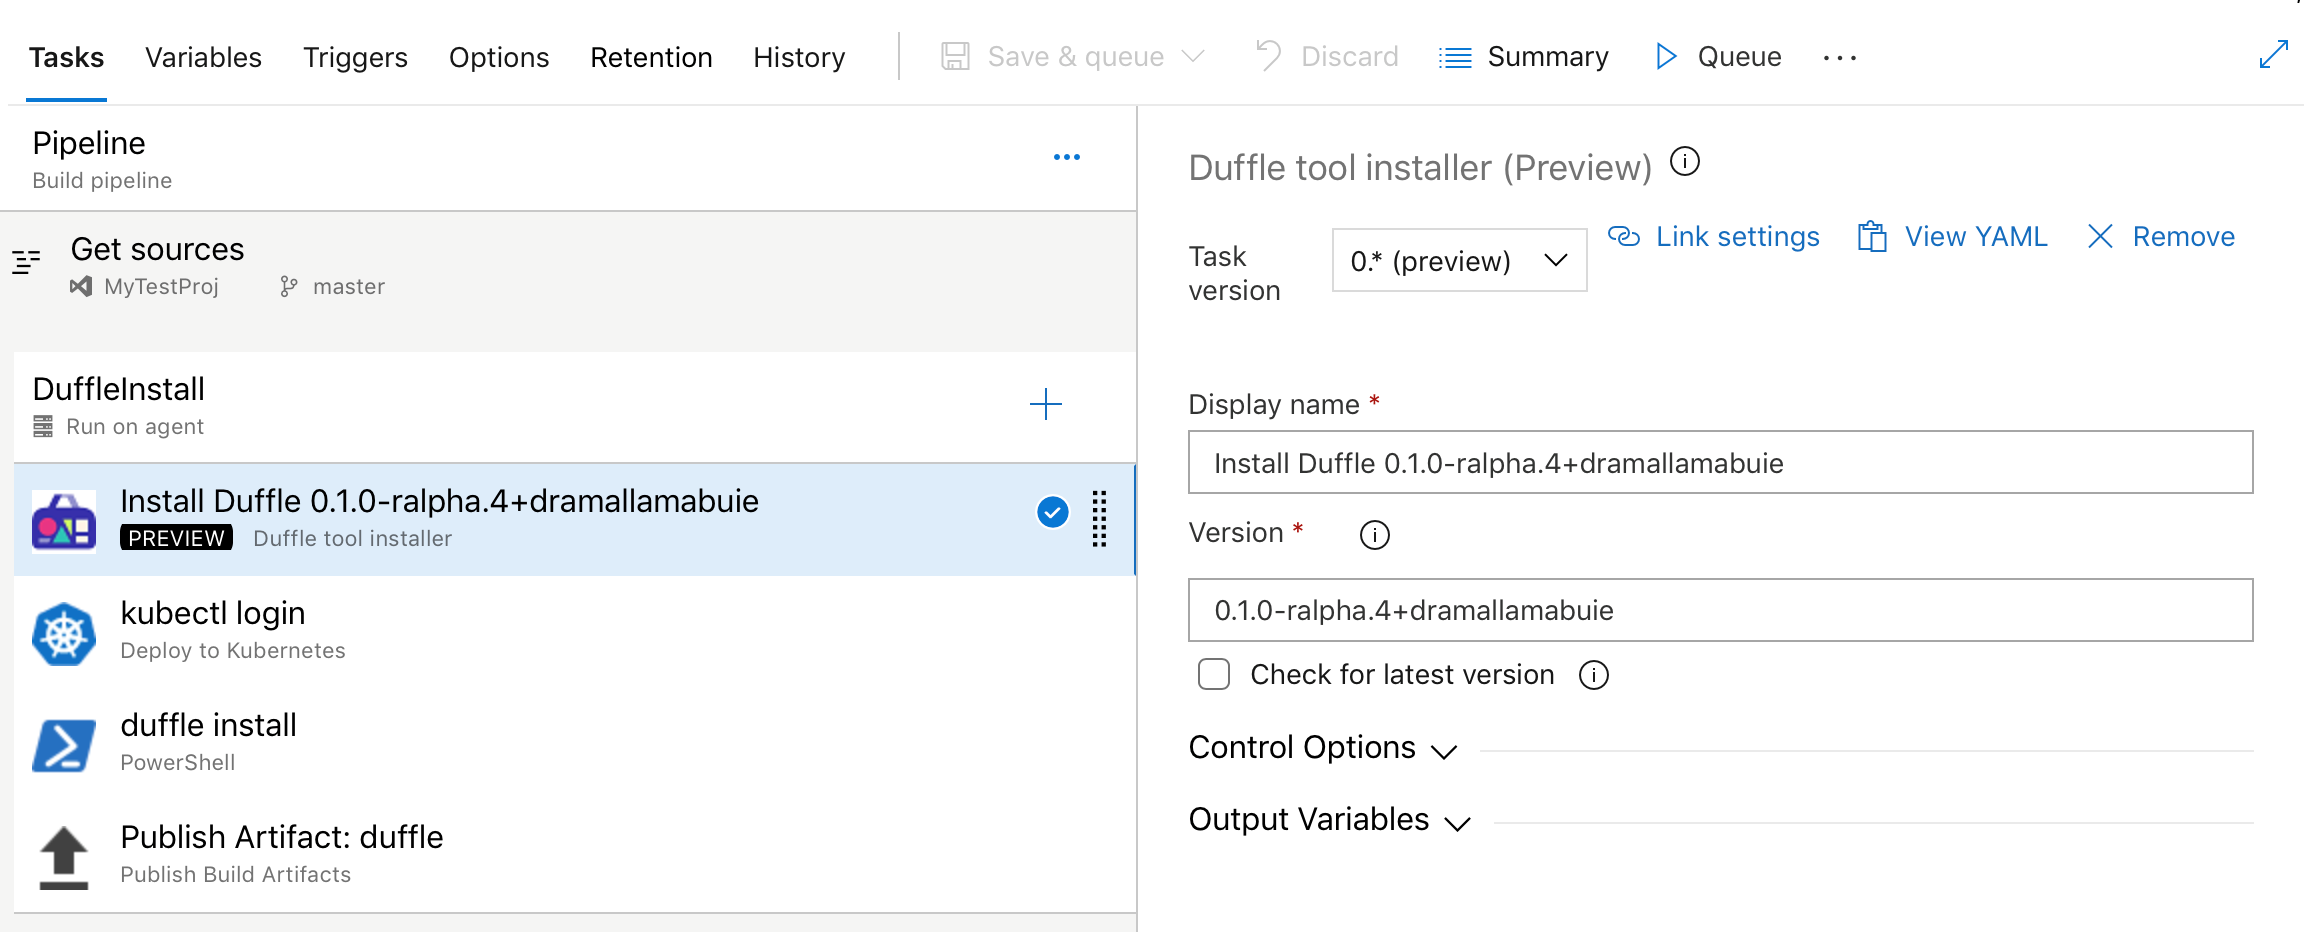
Duffle tool installer task in build and release pipeline
Duffle is a command line tool that allows you to install and manage Cloud Native Application Bundles (CNAB). With CNABs, you can bundle, install and manage container-native apps and their services.
In this update, we added a new task for build and release pipelines that allows you to install a specific version of Duffle binary.
Kubernetes manifest task
We added a new task to our release pipelines to simplify the process of deploying to Kubernetes clusters using manifest files. This task will provide the following benefits in comparison to the usage of kubectl binary in scripts:
Artifact substitution - The deploy action takes as input a list of container images which can be specified along with their tags or digests. This is substituted into the non-template version of the manifest files before applying it to the cluster to ensure that the right version of the image is pulled by the cluster's nodes.
Manifest stability - Rollout status is checked for the Kubernetes objects deployed to incorporate stability checks while computing the task status as success/failure.
Traceability annotations - Annotations are added to the deployed Kubernetes objects to superimpose traceability information about originating organization, project, pipeline, and run.
Bake manifest - The bake action of the task allows for baking Helm charts into Kubernetes manifest files so that they can be applied to the cluster.
Deployment strategy - Choosing canary strategy with deploy action leads to creation of desired percentage of workloads suffixed with -baseline and -canary so that they can be compared during a
ManualInterventiontask before utilizing the promote/reject action of the task to finalize the version to be retained.
steps:
- task: KubernetesManifest@0
  name: bake
  displayName: Bake K8s manifests from Helm chart
  inputs:
    action: bake
    helmChart: charts/sample
    overrides: 'image.repository:nginx'

- task: KubernetesManifest@0
  displayName: Deploy K8s manifests
  inputs:
    kubernetesServiceConnection: k8sSC1
    manifests: $(bake.manifestsBundle)
    containers: |
      nginx: 1.7.9
Upgrades to Docker task
We upgraded the Docker task to simplify the pipeline authoring experience. The buildAndPush command can now be used to build multiple tags for a specific container repository and push it to multiple container registries in a single step. The task can use Docker registry service connections for logging into container registries. Traceability metadata about source repository, commit and build provenance are added as labels to the images built using this task.
steps:
- task: Docker@2
  displayName: Container registry login - ACR1 service connection
  inputs:
    command: login
    containerRegistry: acr1
- task: Docker@2
  displayName: Container registry login - ACR2 service connection
  inputs:
    command: login
    containerRegistry: acr2
- task: Docker@2
  displayName: Build and push images
  inputs:
    repository: test
    tags: |
      d1
      d2
Kubectl tool installer
We added a new task that allows you to install a specific version of the Kubectl binary on the agents. The latest and semver version strings such as 'v1.14.0' are accepted as valid values for the Kubectl Version Spec input.

Improvements to ServiceNow integration
A key capability for cross-team collaboration is to enable each team to use a service of their choice and have effective end-to-end delivery. With this update, we enhanced the ServiceNow integration to support all types of changes (normal, standard and emergency). In addition, you can now specify the gate used to create a new change request using an existing template, as per the ITSM process followed in your organization. Finally, you can also gate releases based on existing change requests. This enables you to adopt CD, without needing to change the process recommended by your IT teams.

Support for Red Hat Enterprise Linux 6
With this update, we added agent support for Red Hat Enterprise Linux 6. You can now configure agents targeting the Red Hat Enterprise Linux 6 platform for build and release jobs execution.
Support for Azure PowerShell Az module
Azure PowerShell provides a set of cmdlets that you can use to manage Azure resources from the command line. Last December, the Azure PowerShell Az module became available and is now the intended module for managing your Azure resources.
Previously, we didn't provide support for the Azure PowerShell Az module in our hosted agents. With the new Azure PowerShell task version 4.* in build and release pipelines, we have added support for the new Az module for all platforms. Azure PowerShell task version 3.* will continue to support the AzureRM module. However, to keep up with the latest Azure services and features, we recommend that you switch to the Azure PowerShell task version 4.* as soon as possible.
The Az module has a compatibility mode to help you use existing scripts while you update them to use the new syntax. To enable compatibility for the Az module, use the Enable-AzureRmAlias command. Aliases let you use the old cmdlet names with Az module. You can get more details on migrating from the Azure RM module to the Azure PowerShell Az module here.
Note
You need to install the Az module on your agent machine if you are using private agents.
For more information on the Azure PowerShell Az module, see the documentation here.
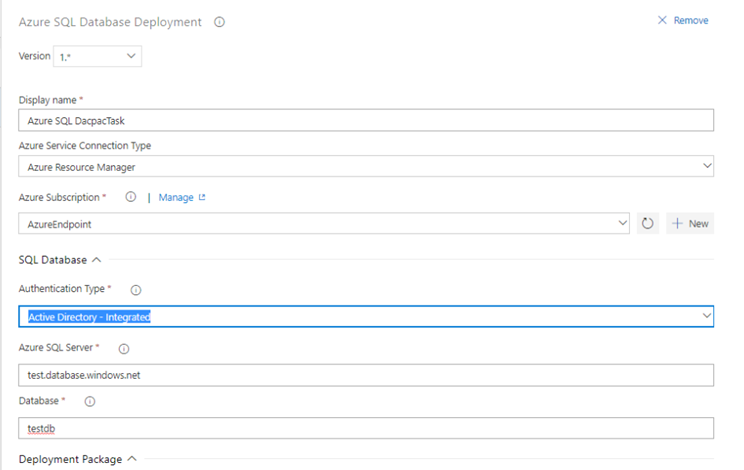
Azure Active Directory (AD) authentication support for Azure SQL task
The Azure SQL task has been enhanced to support connecting to a database using Azure AD (Integrated & Password) and a connection string in addition to the existing support for SQL server authentication.
Publish build artifacts with long file paths
Until now, there was a limitation that prevented uploading build artifacts with paths longer than 233 characters. This could prevent you from uploading code coverage results from Linux and macOS builds with file paths longer than the limit. The limit has been updated to support long paths.
Skip continuous integration (CI) for a commit
You can now tell Azure Pipelines to ignore a commit and skip running a pipeline that the commit would normally trigger. Just include [skip ci] in the commit message of the HEAD commit and Azure Pipelines will skip CI. You can also use any of the variations listed below. This is supported for commits to Azure Repos Git and GitHub Enterprise Server.
[skip ci]or[ci skip]skip-checks: trueorskip-checks:true[skip azurepipelines]or[azurepipelines skip][skip azpipelines]or[azpipelines skip][skip azp]or[azp skip]***NO_CI***
Test Plans
Test result trend (Advanced) widget
The Test result trend (Advanced) widget provides near real-time visibility into your test data for multiple builds and releases. The Test result trend (Advanced) widget displays a trend of your test results for your pipelines or across pipelines. You can use it to track the daily count of test, pass rate, and test duration. Tracking test quality over time and improving test collateral is key to maintaining a healthy DevOps pipeline.

The Test result trend (Advanced) widget helps you find outliers in your test results and answer questions like: are tests taking longer to run than usual? What test file or pipeline is affecting my overall pass rate? What are my long running tests?
To help you answer these questions, the widget provides these features:
- Displays a trend of pass rate, and count of test results or test duration
- Presents test results based on multiple build pipelines or release pipelines
- Uses combined charting options to display two metrics over the same trend
- Filters the test count over time by test outcome
- Filters all your test results by branch or test
- Stacks your metrics by test attributes such as Priority or Environment
- Group you data on Test files, owner or pipelines
The widget is highly configurable allowing you to use it for a wide variety of scenarios.
Share test run results via URL
You can configure automated tests to run as part of a build or release. The published test results can be viewed in the Tests tab in build or release summary. With this update, we added a Copy results URL feature so you can share a single test run results with others in your team.
The sharing levels include:
- Run level
- Result level
- Individual tab selected within test run
- Sharing is also compatible with any extension tabs configured
When you share the URL, viewers will see the test run results in the full screen view.
Artifacts
NuGet packages with SemVer 2.0.0 version numbers
Previously, Azure Artifacts did not support NuGet packages with SemVer 2.0.0 version numbers (generally, version numbers that contain the build metadata portion of the version, which is signified by a +). Now you can save packages from nuget.org that contain build metadata and push your own packages with build metadata. Per the SemVer spec and NuGet.org policy, build metadata cannot be used to order packages. So, you cannot publish both 1.0.0+build1 and 1.0.0+build2 to Azure Artifacts (or nuget.org) as those versions will be considered equivalent and thus subject to the immutability constraints.
Provenance information on packages
With this update, we've made it a bit easier to understand the provenance of your packages: who or what published them and what source code commit they came from. This information is populated automatically for all packages published using the NuGet, npm, Maven, and Twine Authenticate (for Python) tasks in Azure Pipelines.
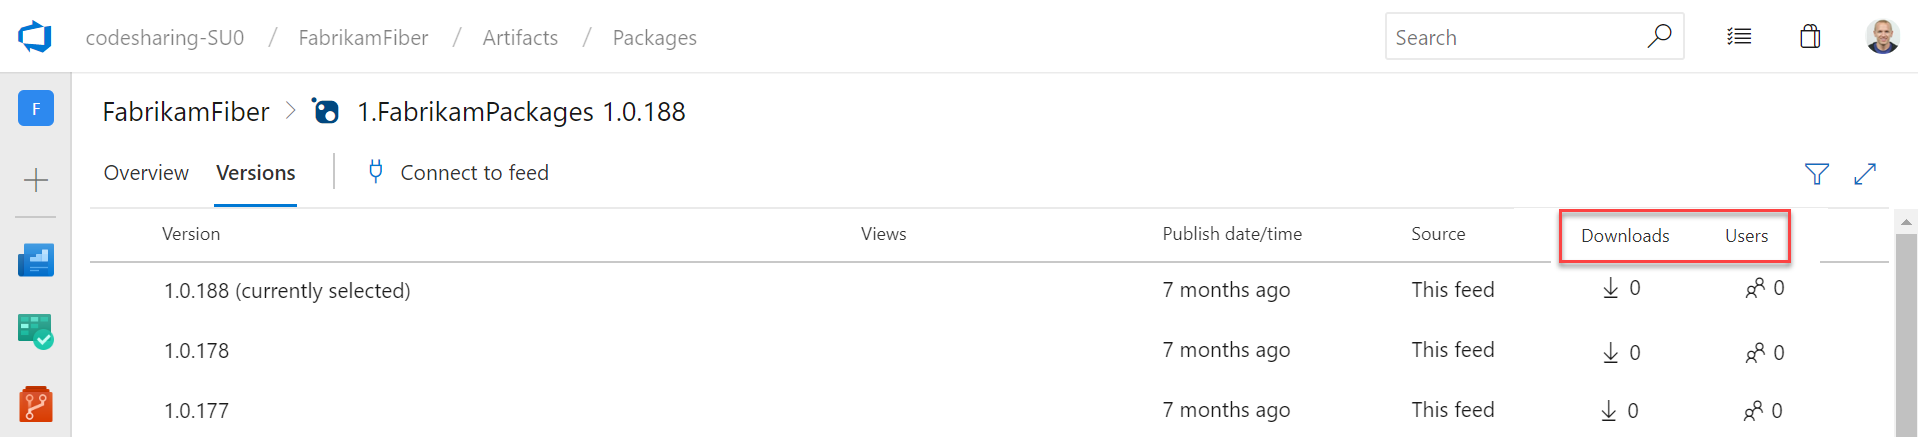
Package usage stats
Until now, Azure Artifacts didn't provide a way to gauge the usage or popularity of packages. With this update, we added a count of Downloads and Users to both the package list and package details pages. You can see the stats on the right side of either page.
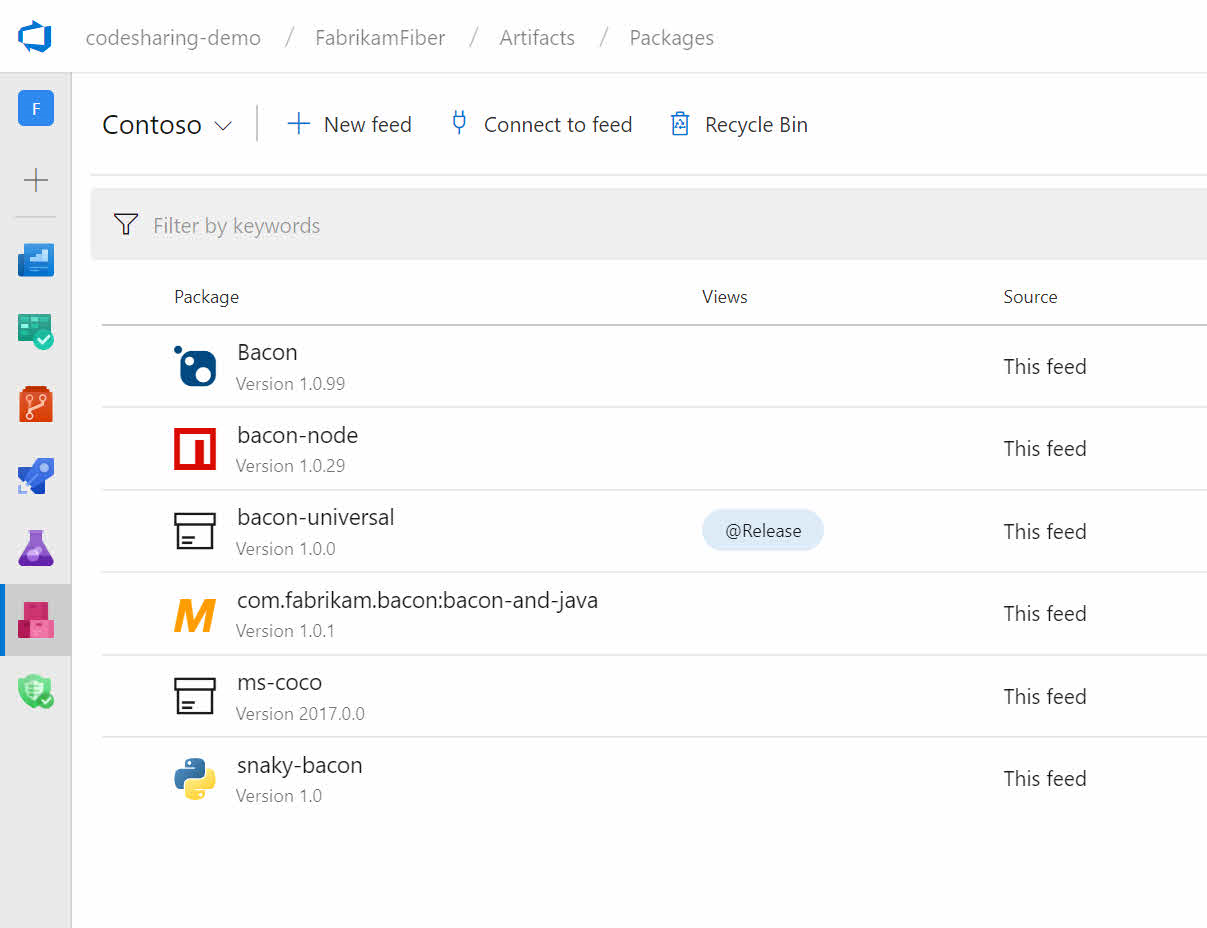
Support for Python Packages
Azure Artifacts can now host Python packages: both packages you produce yourself and upstream packages saved from the public PyPI. For more details, see the announcement blog post and the docs.
Now, you can now host all of your NuGet, npm, Maven, and Python packages in the same feed.
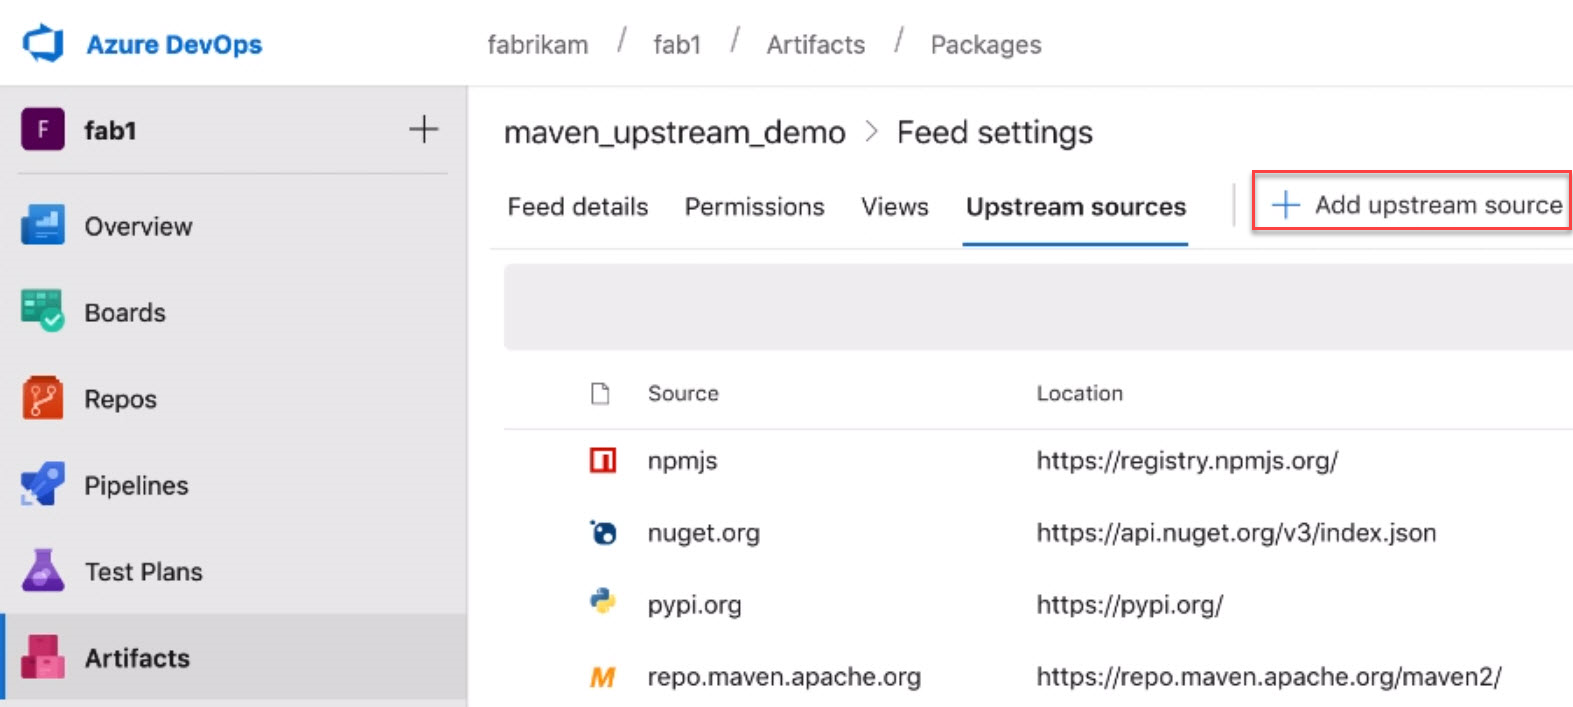
Upstream sources for Maven
Upstream sources are now available for Maven feeds. This includes the primary Maven Central repository and Azure Artifacts feeds. To add Maven upstreams to an existing feed, visit Feed settings, select the Upstream sources pivot, then select Add upstream source.
Proxy support for Artifacts-related tasks
Until now, many Artifacts-related build tasks didn't provide full support for Azure Pipelines' proxy infrastructure, which led to challenges using the tasks from on-premises agents. With this update, we've added support for proxies to the following tasks:
- Npm@1 ('npm' in the designer)
- NuGetCommand@2 ('NuGet' in the designer): restore and push commands only
- DotNetCoreCLI@2 ('.NET Core' in the designer): restore and nuget push commands only
- NpmAuthenticate@0, PipAuthenticate@0, and TwineAuthenticate@0 ('[type] Authenticate' in the designer): These tasks support proxies during the acquisition of auth tokens, but it is still necessary to configure any subsequent tasks/scripts/tools to also use the proxy. Put another way, these tasks do not configure the proxy for the underlying tool (npm, pip, twine).
- NuGetToolInstaller@0, NodeTool@0, DotNetCoreInstaller@0 ('[type] Installer' in the designer)
All Artifacts package types supported in releases
Until now, only NuGet packages have been supported in the Azure Artifacts artifact type in Pipelines releases. With this update, all Azure Artifacts package types - Maven, npm, and Python - are supported.
Artifacts views supported in releases
Previously, the Azure Artifacts artifact type could only trigger when new package versions were published to the feed. Now, we've also added support for views, so you can trigger releases when packages already in the feed are promoted to a view.
Retention policies can skip packages downloaded recently
Until now, Azure Artifacts feeds have offered basic retention policies that would start deleting old package versions when a "maximum number of versions per package" was reached. With this update, we've added the ability to skip recently-downloaded packages when doing this clean-up. To enable, edit your feed and check the Skip packages downloaded recently checkbox.
Delegate who can manage feeds
In Azure Artifacts, Project Collection Administrators (PCAs) have always been able to administer all feeds in an Azure DevOps server. With this update, PCAs can also give this ability to other users and groups, thus delegating the ability to manage any feed.
Wiki
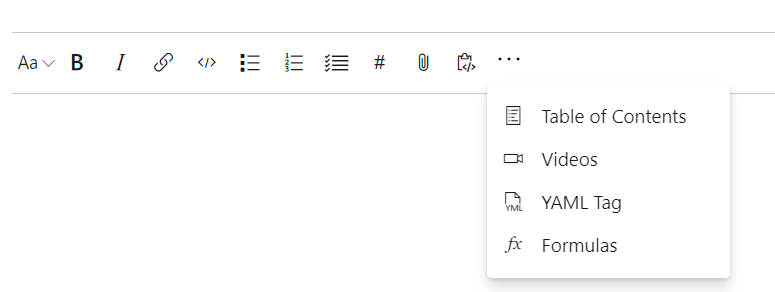
Markdown templates for formulas and videos
There is no longer a need to remember markdown syntax for adding formulas, videos and YAML tags when editing a Wiki. You can now click on the context menu in the toolbar and select the option of your choice.
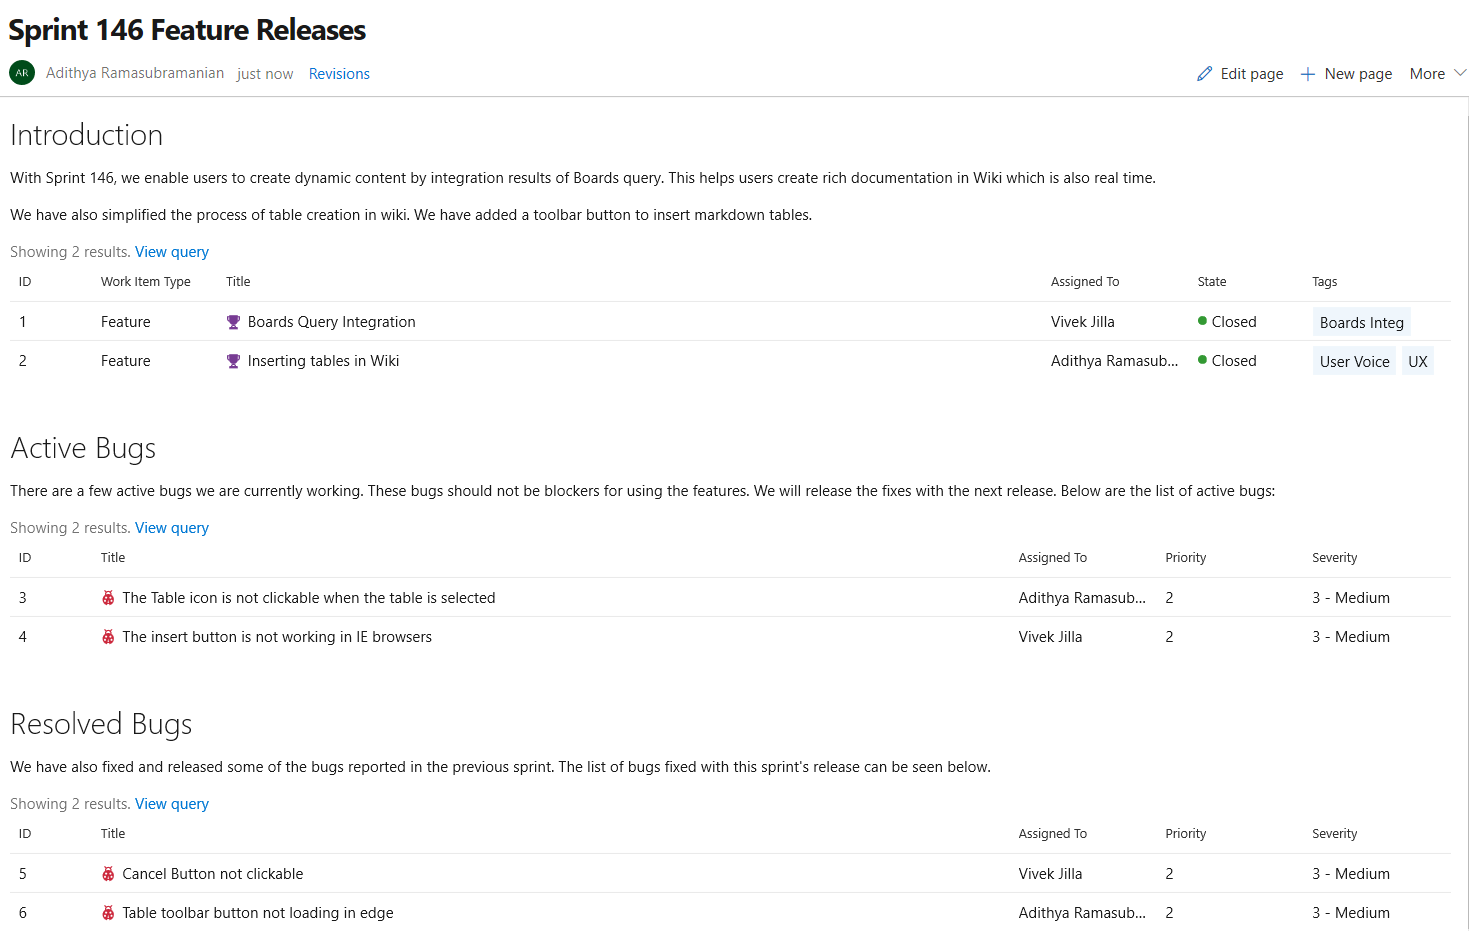
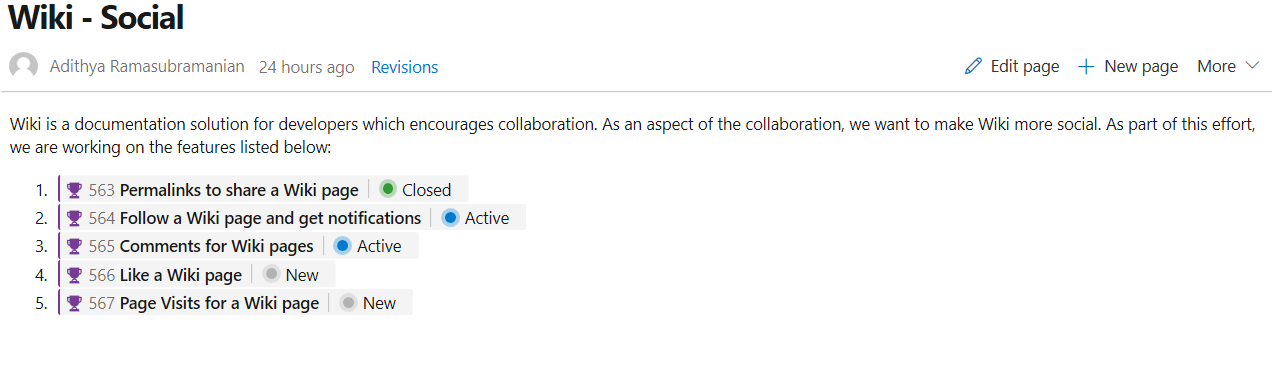
Embed Azure Boards query results in Wiki
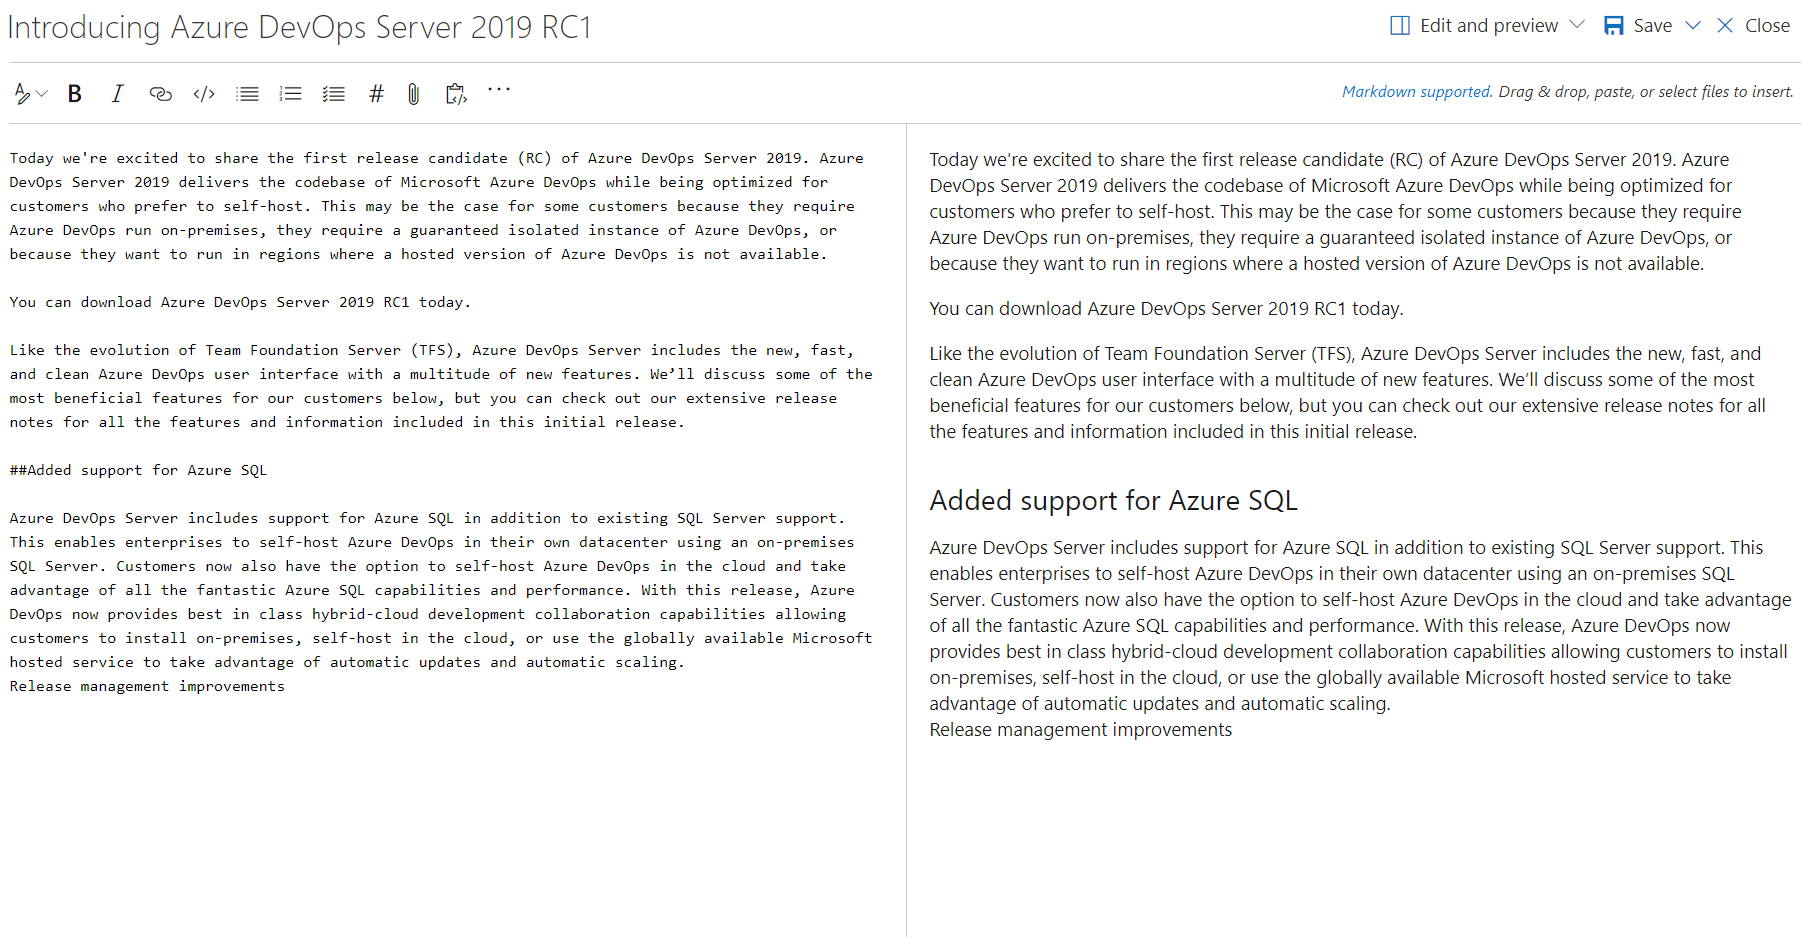
You can now embed Azure Boards query results in a wiki page in the form of a table. The image below shows a sample of a wiki page with a list of all features released and all the active bugs in the current sprint embedded in the wiki. The content displayed in the page is using an existing work item query. With this new feature you can create dynamic content and not need to worry about manually updating the wiki page.
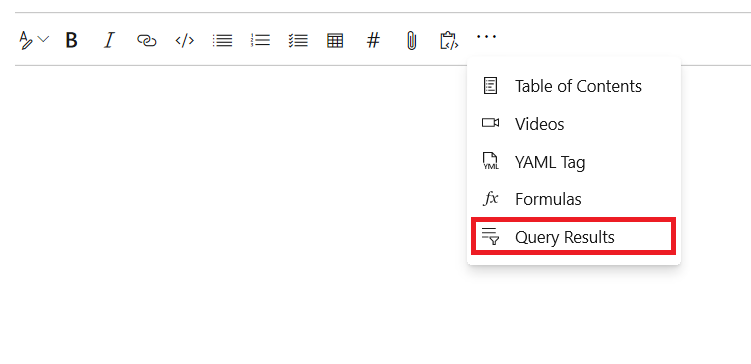
The query results can be added in two steps:
- Click on the "Query Results" button from the edit toolbar.
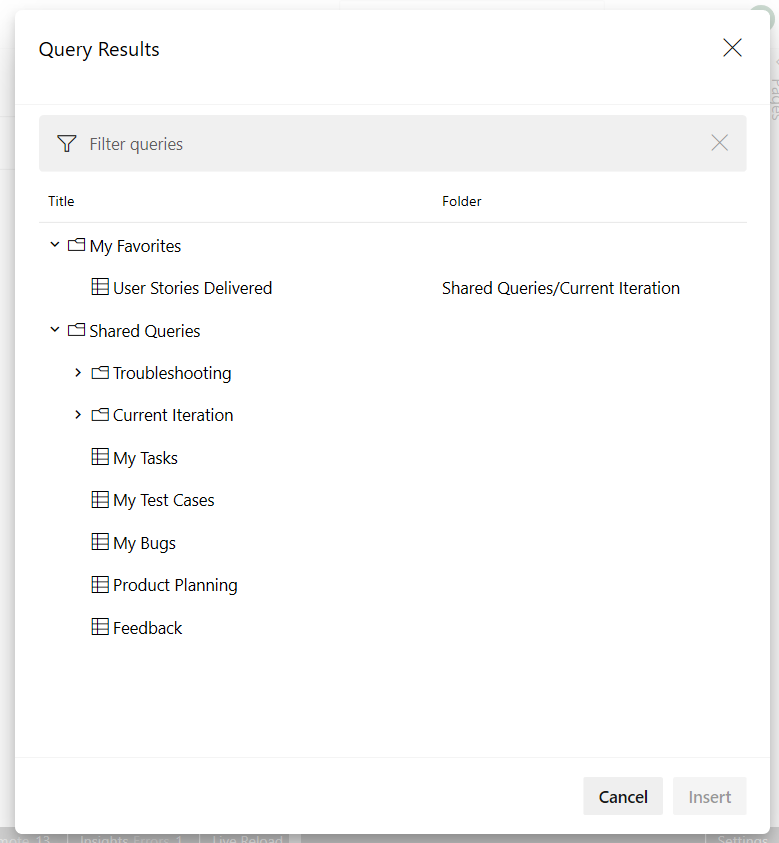
- Select the required query and click on "Insert" button.
The results of the query can now be viewed in the form of a table after you save the page.
Monospaced font for Wiki Markdown editor
With the introduction of monospaced fonts for wiki Markdown editor, readability is no longer a challenge. The Markdown source looks clean and easy to read. This feature has been prioritized based on this suggestion ticket.
Permalinks for Wiki pages
Until now, shared Wiki page links broke if the linked page was renamed or moved. We've now introduced permanent links by adding a page IDs to the URL. This ensures that links you share remain intact as the wiki changes over time.
This feature was prioritized based on this suggestion ticket.
Show work item status in Wiki pages
In this update, we've enhanced work item mentions in Wiki pages by adding the status of the work item to the page, along with its ID and title.
Work item references in Pull Request comments and Boards discussions will also show the status.
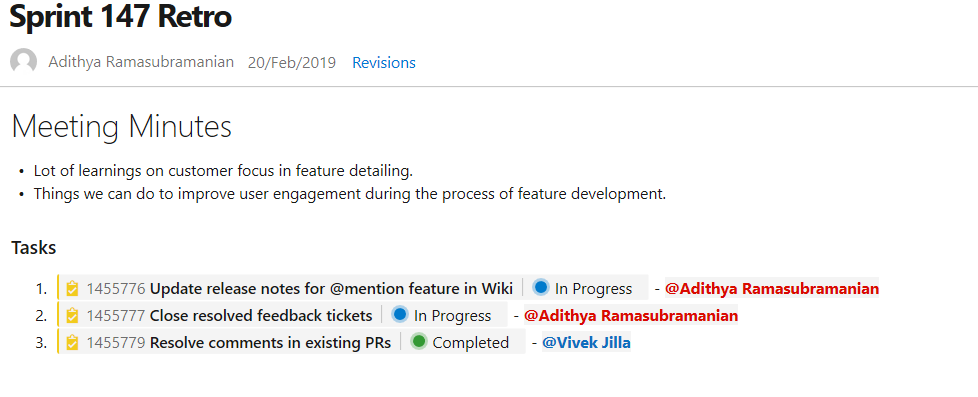
@mention users and groups
You can now @mention users and groups in a wiki page. This makes documents like a team's contact page, guidance documents and knowledge documents richer. The image below is an example showing a sprint retrospective with tasks and the person responsible.
 @mention users and groups." />
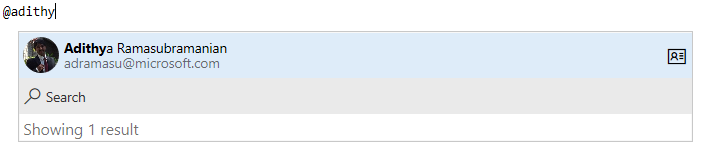
In addition, you can also select a user or a group from the autosuggestion by typing "@" in the wiki edit page. The person mentioned will also get notified by mail.
 @mention." />
Finally, you can also click on the @mentioned user to view the profile information card. This feature has been prioritized based on this feature suggestion.
Notifications on wiki pages
Until now, you didn't have a way of knowing when the content on a wiki page was changed. Now you can follow wiki pages to get notified via email when the page is edited, deleted or renamed. To track changes made to a wiki, select the Follow button from the wiki page.

This feature has been prioritized based on this suggestion ticket. To learn more, see our documentation here.
Support for HTML tags
Now, you can create richer content in wiki using HTML tags. Check out what you can do with HTML tags below.
You can now create collapsible sections inside your wiki pages by using the details and summary tags. You can add the open attribute to keep the details expanded by default.

For more information on the details tag, take a look at the documentation here.
This was prioritized based on this suggestion ticket.
Note
This tag is not supported in Edge and Internet Explorer browsers.
Improved table creation and editing
Until now, creating and editing tables in a wiki was difficult. We've made changes to make it easier for you to add and manage tables in your wiki.
Create a table from grid
You no longer have to remember the markdown table syntax. Now you can create a markdown table easily by selecting from a 15 X 15 grid. Just select the required number of columns and rows to insert a table with a single click.
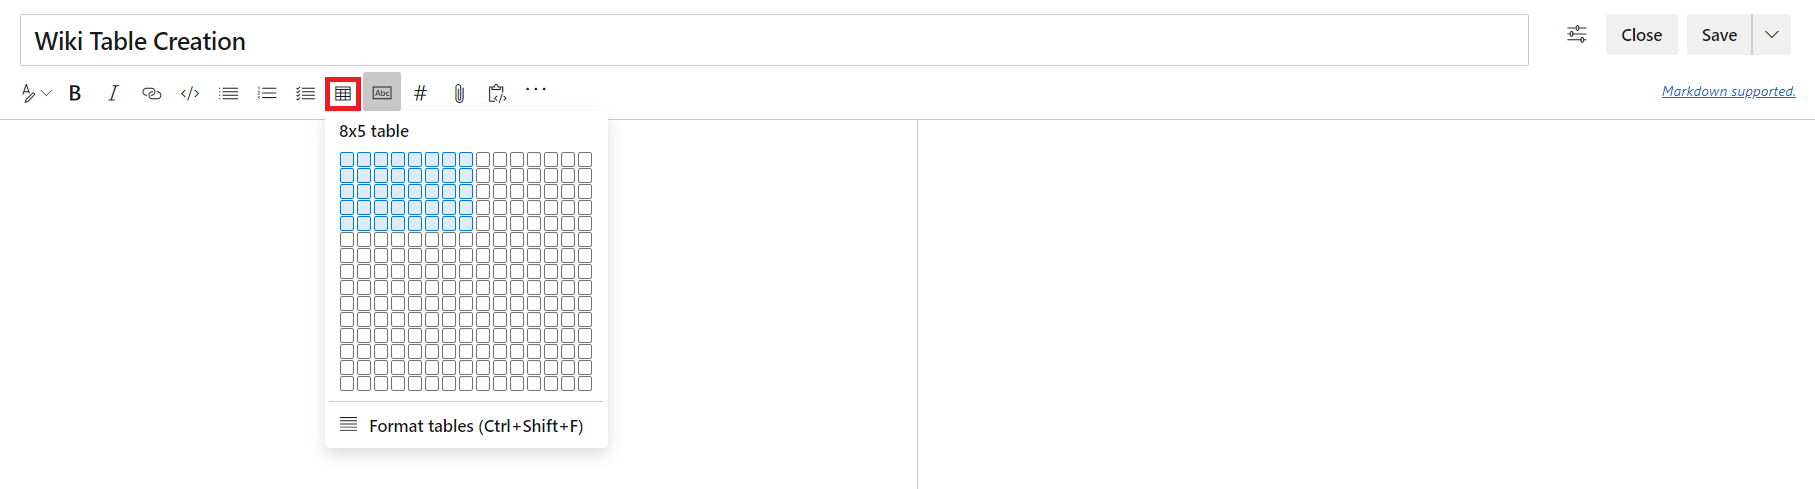
This feature has been prioritized based on the following suggestion tickets:
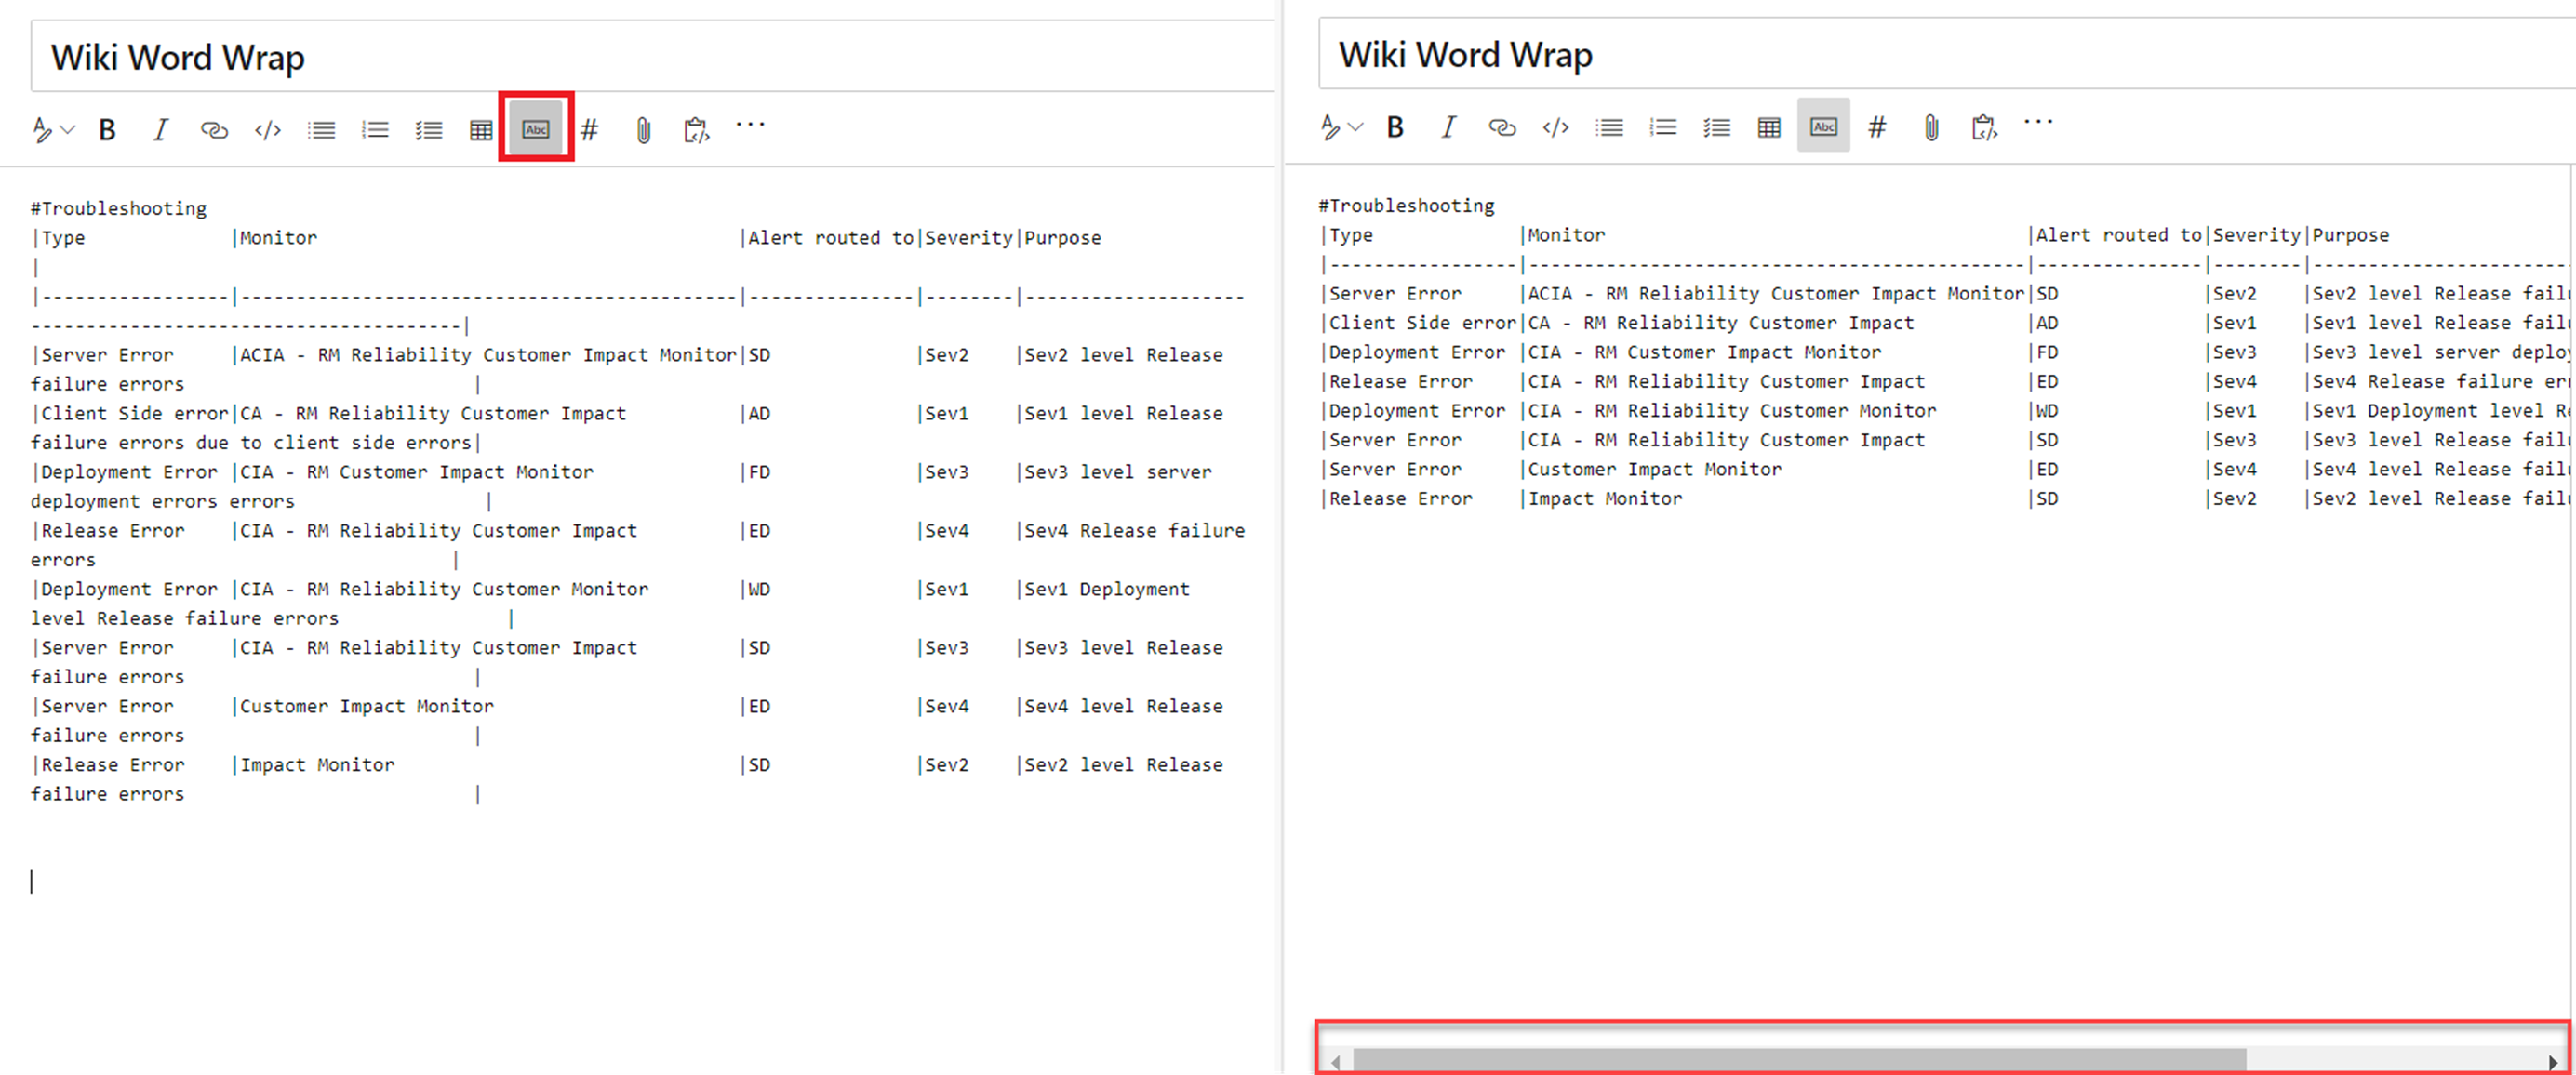
Better table readability
You can now toggle word wrap for your editor to have better readability of your tables. Disabling word wrap adds a scroll bar which lets you see the content of large tables easier.
Autoformating markdown tables
You no longer have to add spaces to align your markdown columns. With the Format tables button, your markdown tables are automatically formatted by adding spaces to the cells to align the columns. If you have large tables, use it with disable word wrap to make the tables easier to read.

You can also use the Ctrl + Shift + F shortcut to format your tables.
Reporting
Analytics extension no longer needed to use Analytics
Analytics is increasingly becoming an integral part of the Azure DevOps experience. It is an important capability for customers to help them make data driven decisions.
For Update 1, we're excited to announce that customers no longer need the Analytics extension to use Analytics. Customers can now enable Analytics underneath Project Collection Settings. It's a simple process that's right within the product.
Here is how customers can enable Analytics:
- Navigate to Project Collection Settings:

- Click Enable Analytics

And that's it! Analytics powered experiences will be turned on for the collection.
New collections created in Update 1 and Azure DevOps Server 2019 collections with the Analytics extension installed that were upgraded will have Analytics enabled by default.
To learn more about Analytics and the experiences it enables:
- Read more about enabling Analytics.
- Read the Analytics Overview documentation.
- Read up on the key features: Analytics Widgets, Top Failing Test Report, Power BI Integration, and the OData Endpoint.
- Watch this Channel 9 Video on Azure DevOps Analytics.
Feedback
We would love to hear from you! You can report a problem or provide an idea and track it through Developer Community and get advice on Stack Overflow.