Note
Access to this page requires authorization. You can try signing in or changing directories.
Access to this page requires authorization. You can try changing directories.
In this quickstart, you use an Azure Resource Manager (ARM) template to create a lab in Azure DevTest Labs that has one Windows Server 2019 Datacenter virtual machine (VM) in it.
An Azure Resource Manager template is a JavaScript Object Notation (JSON) file that defines the infrastructure and configuration for your project. The template uses declarative syntax. You describe your intended deployment without writing the sequence of programming commands to create the deployment.
DevTest Labs can use ARM templates for many tasks, from creating and provisioning labs to adding users. This quickstart uses the Creates a lab with a claimed VM ARM template from the Azure Quickstart Templates gallery.
Prerequisites
- If you don't have an Azure subscription, create a free account before you begin.
Review template resources
The Creates a lab with a claimed VM ARM template defines the following resource types:
- Microsoft.DevTestLab/labs: Creates the lab resource.
- Microsoft.DevTestLab/labs/virtualnetworks: Creates a virtual network for the lab.
- Microsoft.DevTestLab/labs/virtualmachines: Creates the VM for the lab.
The azuredeploy.json template file defines the following schema:
{
  "$schema": "https://schema.management.azure.com/schemas/2019-04-01/deploymentTemplate.json#",
  "contentVersion": "1.0.0.0",
  "metadata": {
    "_generator": {
      "name": "bicep",
      "version": "0.5.6.12127",
      "templateHash": "12097184829658896385"
    }
  },
  "parameters": {
    "labName": {
      "type": "string",
      "metadata": {
        "description": "The name of the new lab instance to be created"
      }
    },
    "location": {
      "type": "string",
      "defaultValue": "[resourceGroup().location]",
      "metadata": {
        "description": "Location for all resources."
      }
    },
    "vmName": {
      "type": "string",
      "metadata": {
        "description": "The name of the vm to be created."
      }
    },
    "vmSize": {
      "type": "string",
      "defaultValue": "Standard_D4_v3",
      "metadata": {
        "description": "The size of the vm to be created."
      }
    },
    "userName": {
      "type": "string",
      "metadata": {
        "description": "The username for the local account that will be created on the new vm."
      }
    },
    "password": {
      "type": "secureString",
      "metadata": {
        "description": "The password for the local account that will be created on the new vm."
      }
    }
  },
  "variables": {
    "labSubnetName": "[format('{0}Subnet', variables('labVirtualNetworkName'))]",
    "labVirtualNetworkId": "[resourceId('Microsoft.DevTestLab/labs/virtualnetworks', parameters('labName'), variables('labVirtualNetworkName'))]",
    "labVirtualNetworkName": "[format('Dtl{0}', parameters('labName'))]"
  },
  "resources": [
    {
      "type": "Microsoft.DevTestLab/labs",
      "apiVersion": "2018-09-15",
      "name": "[parameters('labName')]",
      "location": "[parameters('location')]"
    },
    {
      "type": "Microsoft.DevTestLab/labs/virtualnetworks",
      "apiVersion": "2018-09-15",
      "name": "[format('{0}/{1}', parameters('labName'), variables('labVirtualNetworkName'))]",
      "dependsOn": [
        "[resourceId('Microsoft.DevTestLab/labs', parameters('labName'))]"
      ]
    },
    {
      "type": "Microsoft.DevTestLab/labs/virtualmachines",
      "apiVersion": "2018-09-15",
      "name": "[format('{0}/{1}', parameters('labName'), parameters('vmName'))]",
      "location": "[parameters('location')]",
      "properties": {
        "userName": "[parameters('userName')]",
        "password": "[parameters('password')]",
        "labVirtualNetworkId": "[variables('labVirtualNetworkId')]",
        "labSubnetName": "[variables('labSubnetName')]",
        "size": "[parameters('vmSize')]",
        "allowClaim": false,
        "galleryImageReference": {
          "offer": "WindowsServer",
          "publisher": "MicrosoftWindowsServer",
          "sku": "2019-Datacenter",
          "osType": "Windows",
          "version": "latest"
        }
      },
      "dependsOn": [
        "[resourceId('Microsoft.DevTestLab/labs', parameters('labName'))]",
        "[resourceId('Microsoft.DevTestLab/labs/virtualnetworks', parameters('labName'), variables('labVirtualNetworkName'))]"
      ]
    }
  ],
  "outputs": {
    "labId": {
      "type": "string",
      "value": "[resourceId('Microsoft.DevTestLab/labs', parameters('labName'))]"
    }
  }
}
More templates for Azure DevTest Labs are available in the Azure Quickstart Templates gallery and Azure Quickstart Templates public GitHub repository. The Azure Lab Services Community public GitHub repository offers many DevTest Labs resources. You can find artifacts, environments, PowerShell scripts, and quickstart ARM templates that you can use and customize for your scenario.
Deploy the template
The following steps deploy the ARM template and create a DevTest Labs VM:
Select the following Deploy to Azure button to sign in to the Azure portal and open the quickstart ARM template:

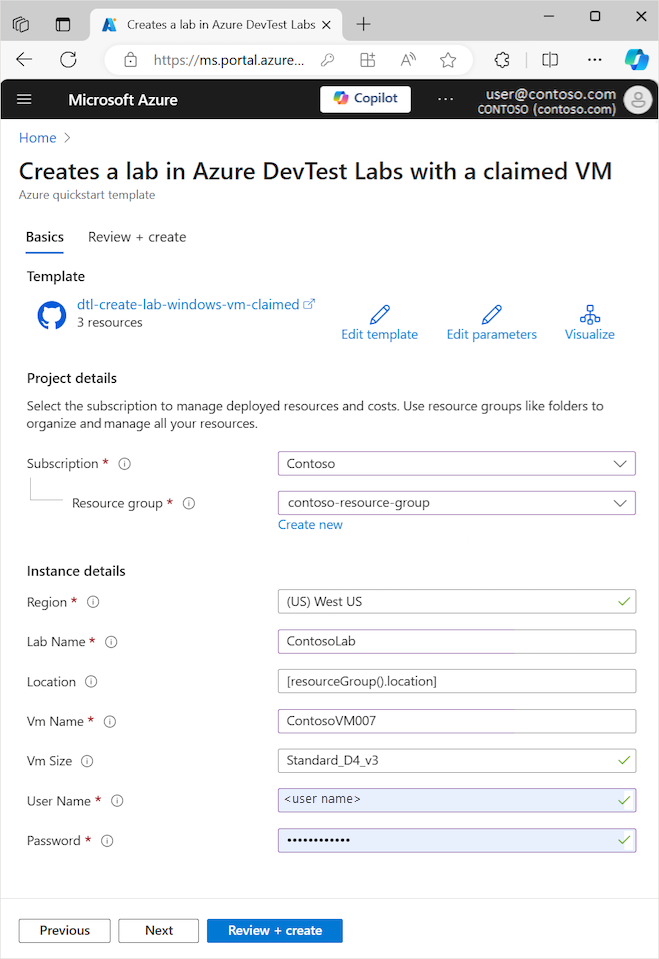
On the Creates a lab in Azure DevTest Labs with a claimed VM pane, configure the following settings:
- Resource group: Select an existing resource group from the dropdown list, or create a new resource group.
- Region: If you create a new resource group, select a location for the resource group and lab.
- Lab Name: Enter a name for the new lab.
- Vm Name: Enter a name for the new VM.
- Vm Size: Select a size for the new VM.
- User Name: Enter a name for the user who can access the VM.
- Password: Enter a password for the VM user.
Select Review + create, and after validation passes, select Create.
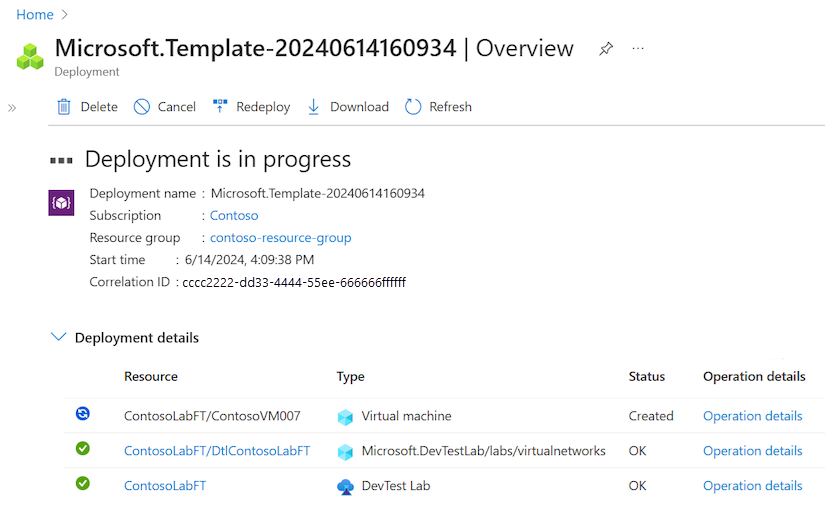
During deployment, you can monitor the deployment progress on the template Overview page:
Note
The process to deploy a new lab with claimed VM can take a long time.


Validate the deployment
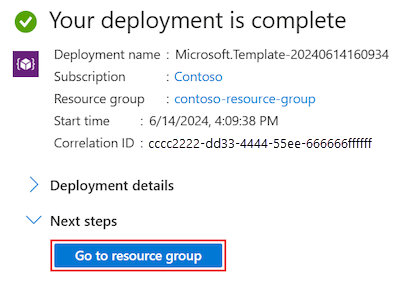
When the deployment completes, select Go to resource group from the template Overview page or from the Azure portal Notifications:
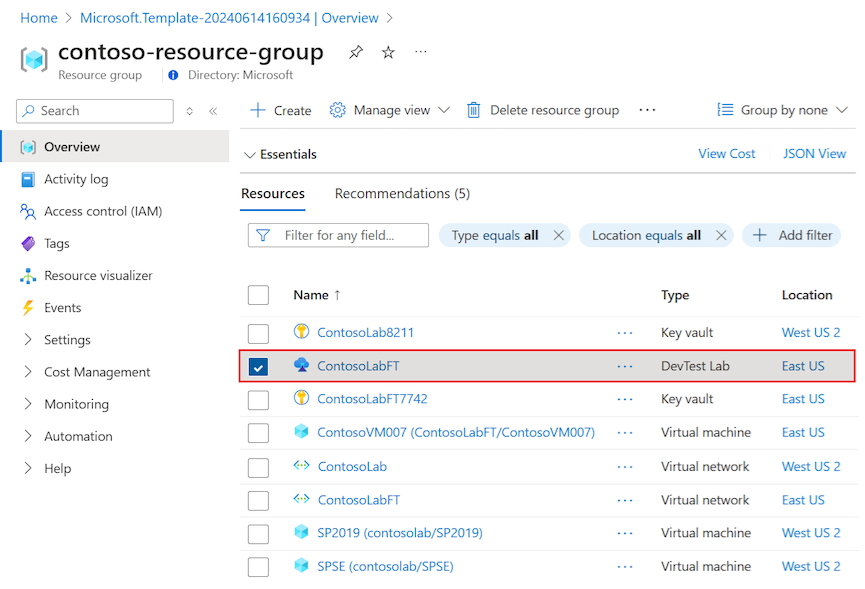
The Resource group page lists the resources in the resource group, including the new lab and its dependent resources like virtual networks and VMs. To open the lab Overview page, select the DevTest Lab resource for your new lab in list:
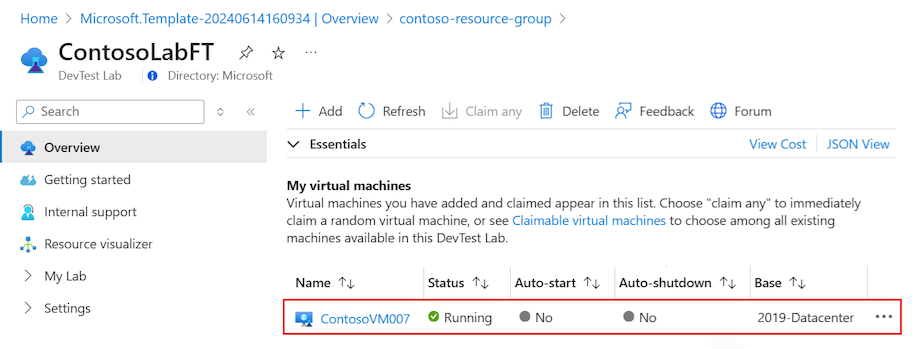
On the lab Overview page, you can see the new VM under My virtual machines:


Note
The deployment also creates a resource group for the VM. The resource group contains VM resources like the IP address, network interface, and disk. The VM resource group appears in your subscription's Resource groups list with the name <lab name>-<vm name>-<numerical string>.
Clean up resources
When you're done with the lab resources, delete them to avoid further charges. Before you can delete the resource group, you must first delete the lab.
Go to the lab Overview page and select Delete:

On the confirmation page, enter the lab name, and select Delete.
During the deletion, you can select Notifications at the top of your screen to view progress.
Note
Deleting the lab can take several minutes.
After you delete the lab, you can delete the resource group that contained the lab, which deletes all other resources in the resource group.
Go to your subscription's Resource groups list.
Select the resource group that contained the lab.
At the top of the page, select Delete resource group.
On the confirmation page, enter the resource group name, and then select Delete.