Integrate Azure Digital Twins with Azure Time Series Insights
In this article, you'll learn how to integrate Azure Digital Twins with Azure Time Series Insights (TSI).
The solution described in this article uses Time Series Insights to collect and analyze historical data about your IoT solution. Azure Digital Twins is a good fit for feeding data into Time Series Insights, as it allows you to correlate multiple data streams and standardize your information before sending it to Time Series Insights.
Tip
The simplest way to analyze historical twin data over time is to use the data history feature to connect an Azure Digital Twins instance to an Azure Data Explorer cluster, so that graph updates are automatically historized to Azure Data Explorer. You can then query this data in Azure Data Explorer using the Azure Digital Twins query plugin for Azure Data Explorer. If you don't need to use Time Series Insights specifically, you might consider this alternative for a simpler integration experience.
Prerequisites
Before you can set up a relationship with Time Series Insights, you'll need to set up the following resources:
- An Azure Digital Twins instance. For instructions, see Set up an Azure Digital Twins instance and authentication.
- A model and a twin in the Azure Digital Twins instance. You'll need to update twin's information a few times to see that data tracked in Time Series Insights. For instructions, see Add a model and twin.
Tip
In this article, the changing digital twin values that are viewed in Time Series Insights are updated manually for simplicity. However, if you want to complete this article with live simulated data, you can set up an Azure function that updates digital twins based on IoT telemetry events from a simulated device. For instructions, follow Ingest IoT Hub data, including the final steps to run the device simulator and validate that the data flow works.
Later, look for another TIP to show you where to start running the device simulator and have your Azure functions update the twins automatically, instead of sending manual digital twin update commands.
Solution architecture
You'll be attaching Time Series Insights to Azure Digital Twins through the following path.

Create Event Hubs namespace
Before creating the event hubs, you'll first create an Event Hubs namespace that will receive events from your Azure Digital Twins instance. You can either use the Azure CLI instructions below, or use the Azure portal by following Create an event hub using Azure portal. To see what regions support Event Hubs, visit Azure products available by region.
az eventhubs namespace create --name <name-for-your-Event-Hubs-namespace> --resource-group <your-resource-group> --location <region>
Tip
If you get an error stating BadRequest: The specified service namespace is invalid., make sure the name you've chosen for your namespace meets the naming requirements described in this reference document: Create Namespace.
You'll be using this Event Hubs namespace to hold the two event hubs that are needed for this article:
- Twins hub - Event hub to receive twin change events
- Time series hub - Event hub to stream events to Time Series Insights
The next sections will walk you through creating and configuring these hubs within your event hub namespace.
Create twins hub
The first event hub you'll create in this article is the twins hub. This event hub will receive twin change events from Azure Digital Twins. To set up the twins hub, you'll complete the following steps in this section:
- Create the twins hub
- Create an authorization rule to control permissions to the hub
- Create an endpoint in Azure Digital Twins that uses the authorization rule to access the hub
- Create a route in Azure Digital Twins that sends twin updates event to the endpoint and connected twins hub
- Get the twins hub connection string
Create the twins hub with the following CLI command. Specify a name for your twins hub.
az eventhubs eventhub create --name <name-for-your-twins-hub> --resource-group <your-resource-group> --namespace-name <your-Event-Hubs-namespace-from-earlier>
Create twins hub authorization rule
Create an authorization rule with send and receive permissions. Specify a name for the rule.
az eventhubs eventhub authorization-rule create --rights Listen Send --name <name-for-your-twins-hub-auth-rule> --resource-group <your-resource-group> --namespace-name <your-Event-Hubs-namespace-from-earlier> --eventhub-name <your-twins-hub-from-earlier>
Create twins hub endpoint
Create an Azure Digital Twins endpoint that links your event hub to your Azure Digital Twins instance. Specify a name for your twins hub endpoint.
az dt endpoint create eventhub --dt-name <your-Azure-Digital-Twins-instance-name> --eventhub-resource-group <your-resource-group> --eventhub-namespace <your-Event-Hubs-namespace-from-earlier> --eventhub <your-twins-hub-name-from-earlier> --eventhub-policy <your-twins-hub-auth-rule-from-earlier> --endpoint-name <name-for-your-twins-hub-endpoint>
Create twins hub event route
Azure Digital Twins instances can emit twin update events whenever a twin's state is updated. In this section, you'll create an Azure Digital Twins event route that will direct these update events to the twins hub for further processing.
Create a route in Azure Digital Twins to send twin update events to your endpoint from above. The filter in this route will only allow twin update messages to be passed to your endpoint. Specify a name for the twins hub event route. For the Azure Digital Twins instance name placeholder in this command, you can use the friendly name or the host name for a boost in performance.
az dt route create --dt-name <your-Azure-Digital-Twins-instance-hostname-or-name> --endpoint-name <your-twins-hub-endpoint-from-earlier> --route-name <name-for-your-twins-hub-event-route> --filter "type = 'Microsoft.DigitalTwins.Twin.Update'"
Get twins hub connection string
Get the twins event hub connection string, using the authorization rules you created above for the twins hub.
az eventhubs eventhub authorization-rule keys list --resource-group <your-resource-group> --namespace-name <your-Event-Hubs-namespace-from-earlier> --eventhub-name <your-twins-hub-from-earlier> --name <your-twins-hub-auth-rule-from-earlier>
Take note of the primaryConnectionString value from the result to configure the twins hub app setting later in this article.
Create time series hub
The second event hub you'll create in this article is the time series hub. This event hub is the one that will stream the Azure Digital Twins events to Time Series Insights. To set up the time series hub, you'll complete these steps:
- Create the time series hub
- Create an authorization rule to control permissions to the hub
- Get the time series hub connection string
Later, when you create the Time Series Insights instance, you'll connect this time series hub as the event source for the Time Series Insights instance.
Create the time series hub using the following command. Specify a name for the time series hub.
az eventhubs eventhub create --name <name-for-your-time-series-hub> --resource-group <your-resource-group> --namespace-name <your-Event-Hub-namespace-from-earlier>
Create time series hub authorization rule
Create an authorization rule with send and receive permissions. Specify a name for the time series hub auth rule.
az eventhubs eventhub authorization-rule create --rights Listen Send --name <name-for-your-time-series-hub-auth-rule> --resource-group <your-resource-group> --namespace-name <your-Event-Hub-namespace-from-earlier> --eventhub-name <your-time-series-hub-name-from-earlier>
Get time series hub connection string
Get the time series hub connection string, using the authorization rules you created above for the time series hub:
az eventhubs eventhub authorization-rule keys list --resource-group <your-resource-group> --namespace-name <your-Event-Hub-namespace-from-earlier> --eventhub-name <your-time-series-hub-name-from-earlier> --name <your-time-series-hub-auth-rule-from-earlier>
Take note of the primaryConnectionString value from the result to configure the time series hub app setting later in this article.
Also, take note of the following values to use them later to create a Time Series Insights instance.
- Event hub namespace
- Time series hub name
- Time series hub auth rule
Create a function
In this section, you'll create an Azure function that will convert twin update events from their original form as JSON Patch documents to JSON objects that only contain updated and added values from your twins.
First, create a new function app project.
You can do this using Visual Studio (for instructions, see Develop Azure Functions using Visual Studio), Visual Studio Code (for instructions, see Create a C# function in Azure using Visual Studio Code), or the Azure CLI (for instructions, see Create a C# function in Azure from the command line).
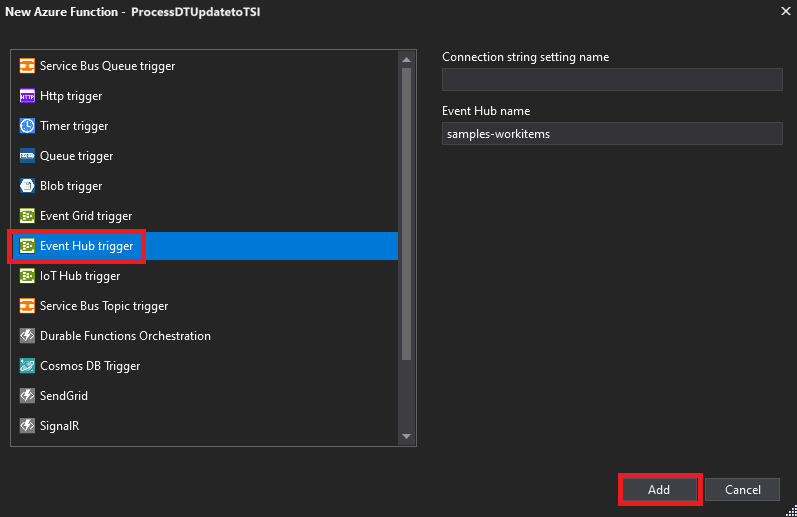
Create a new Azure function called ProcessDTUpdatetoTSI.cs to update device telemetry events to the Time Series Insights. The function type will be Event Hub trigger.
Add the following packages to your project (you can use the Visual Studio NuGet package manager, or the dotnet add package command in a command-line tool).
Replace the code in the ProcessDTUpdatetoTSI.cs file with the following code:
using System.Collections.Generic;
using System.Threading.Tasks;
using System.Text;
using Microsoft.Azure.WebJobs;
using Microsoft.Extensions.Logging;
using Newtonsoft.Json;
using Newtonsoft.Json.Linq;
using Azure.Messaging.EventHubs;

namespace UpdateTSI
{
    public static class ProcessDTUpdatetoTSI
    {
        [FunctionName("ProcessDTUpdatetoTSI")]
        public static async Task Run(
            [EventHubTrigger("twins-event-hub", Connection = "EventHubAppSetting-Twins")]EventData myEventHubMessage,
            [EventHub("tsi-event-hub", Connection = "EventHubAppSetting-TSI")]IAsyncCollector<string> outputEvents,
            ILogger log)
        {
            JObject message = (JObject)JsonConvert.DeserializeObject(Encoding.UTF8.GetString(myEventHubMessage.Body));
            log.LogInformation($"Reading event: {message}");

            // Read values that are replaced or added
            var tsiUpdate = new Dictionary<string, object>();
            foreach (var operation in message["patch"])
            {
                if (operation["op"].ToString() == "replace" || operation["op"].ToString() == "add")
                {
                    //Convert from JSON patch path to a flattened property for TSI
                    //Example input: /Front/Temperature
                    //        output: Front.Temperature
                    string path = operation["path"].ToString().Substring(1);
                    path = path.Replace("/", ".");
                    tsiUpdate.Add(path, operation["value"]);
                }
            }
            // Send an update if updates exist
            if (tsiUpdate.Count > 0)
            {
                tsiUpdate.Add("$dtId", myEventHubMessage.Properties["cloudEvents:subject"]);
                await outputEvents.AddAsync(JsonConvert.SerializeObject(tsiUpdate));
            }
        }
    }
}
Save your function code.
Publish the project with the ProcessDTUpdatetoTSI.cs function to a function app in Azure.
For instructions on how to publish the function using Visual Studio, see Develop Azure Functions using Visual Studio. For instructions on how to publish the function using Visual Studio Code, see Create a C# function in Azure using Visual Studio Code. For instructions on how to publish the function using the Azure CLI, see Create a C# function in Azure from the command line.

Save the function app name to use later to configure app settings for the two event hubs.
Configure the function app
Next, assign an access role for the function and configure the application settings so that it can access your resources.
Run the following commands in Azure Cloud Shell or a local Azure CLI.
Note
This section must be completed by an Azure user who has permissions to manage user access to Azure resources, including granting and delegating permissions. Common roles that meet this requirement are Owner, Account admin, or the combination of User Access Administrator and Contributor. For more information about permission requirements for Azure Digital Twins roles, see Set up an instance and authentication.
Assign an access role
The Azure function requires a bearer token to be passed to it. To make sure the bearer token is passed, grant the function app the Azure Digital Twins Data Owner role for your Azure Digital Twins instance, which will give the function app permission to perform data plane activities on the instance.
Use the following command to create a system-managed identity for your function (if the function already has one, this command will print its details). Take note of the
principalIdfield in the output. You'll use this ID to refer to the function so that you can grant it permissions in the next step.az functionapp identity assign --resource-group <your-resource-group> --name <your-function-app-name>Use the
principalIdvalue in the following command to give the function the Azure Digital Twins Data Owner role for your Azure Digital Twins instance.az dt role-assignment create --dt-name <your-Azure-Digital-Twins-instance> --assignee "<principal-ID>" --role "Azure Digital Twins Data Owner"
Configure application settings
Next, make the URL of your Azure Digital Twins instance accessible to your function by setting an environment variable for it.
Tip
The Azure Digital Twins instance's URL is made by adding https:// to the beginning of your instance's host name. To see the host name, along with all the properties of your instance, run az dt show --dt-name <your-Azure-Digital-Twins-instance>.
The following command sets an environment variable for your instance's URL that your function will use whenever it needs to access the instance.
az functionapp config appsettings set --resource-group <your-resource-group> --name <your-function-app-name> --settings "ADT_SERVICE_URL=https://<your-Azure-Digital-Twins-instance-host-name>"
Next, add environment variables in the function app's settings that allow it to access the twins hub and time series hub.
Use the twins hub primaryConnectionString value that you saved earlier to create an app setting in your function app that contains the twins hub connection string:
az functionapp config appsettings set --settings "EventHubAppSetting-Twins=<your-twins-hub-primaryConnectionString>" --resource-group <your-resource-group> --name <your-function-app-name>
Use the time series hub primaryConnectionString value that you saved earlier to create an app setting in your function app that contains the time series hub connection string:
az functionapp config appsettings set --settings "EventHubAppSetting-TSI=<your-time-series-hub-primaryConnectionString>" --resource-group <your-resource-group> --name <your-function-app-name>
Create and connect a Time Series Insights instance
In this section, you'll set up Time Series Insights instance to receive data from your time series hub. For more information about this process, see Set up an Azure Time Series Insights Gen2 PAYG environment. Follow the steps below to create a Time Series Insights environment.
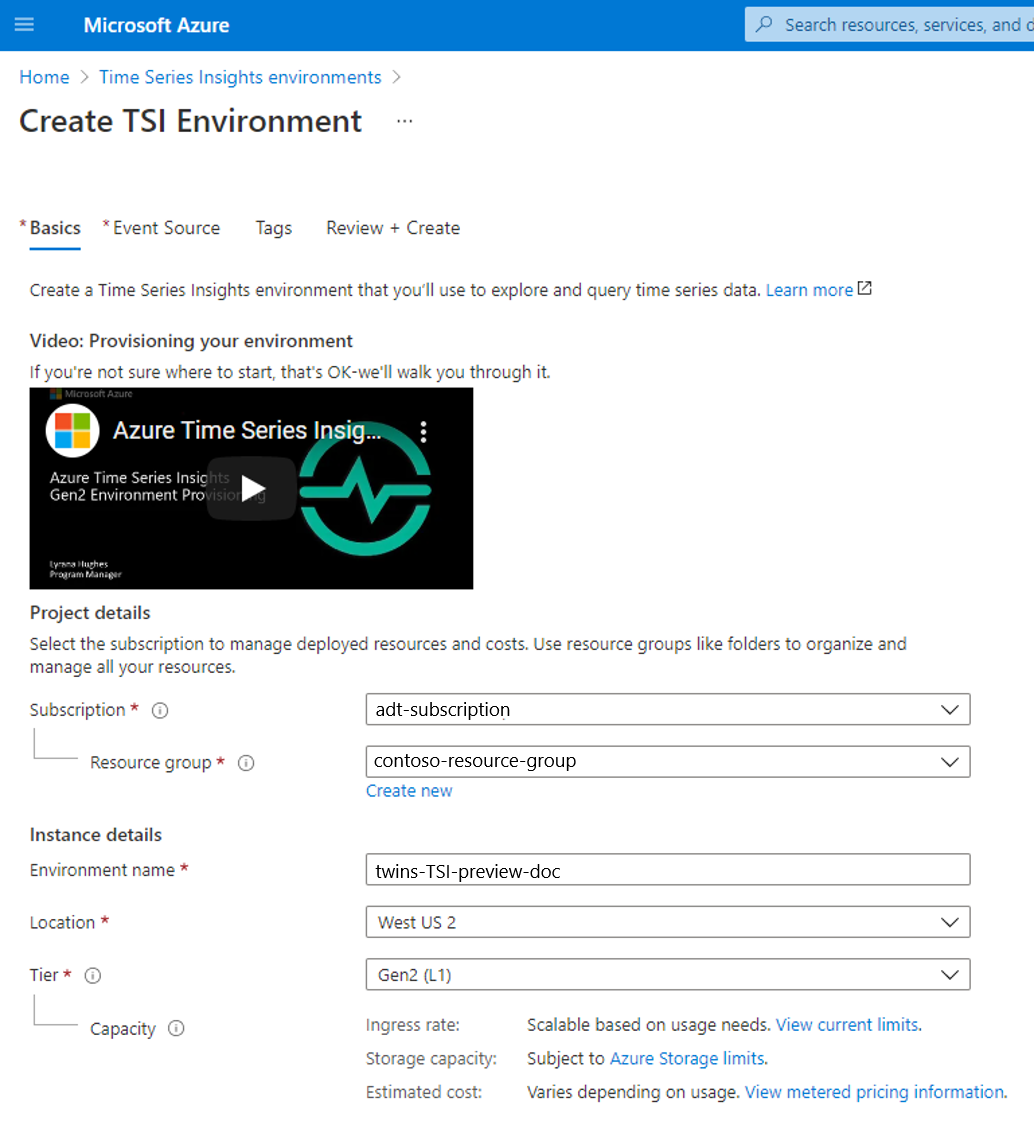
In the Azure portal, search for Time Series Insights environments, and select the Create button. Choose the following options to create the time series environment.
- Subscription - Choose your subscription.
- Resource group - Choose your resource group.
- Environment name - Specify a name for your time series environment.
- Location - Choose a location.
- Tier - Choose the Gen2(L1) pricing tier.
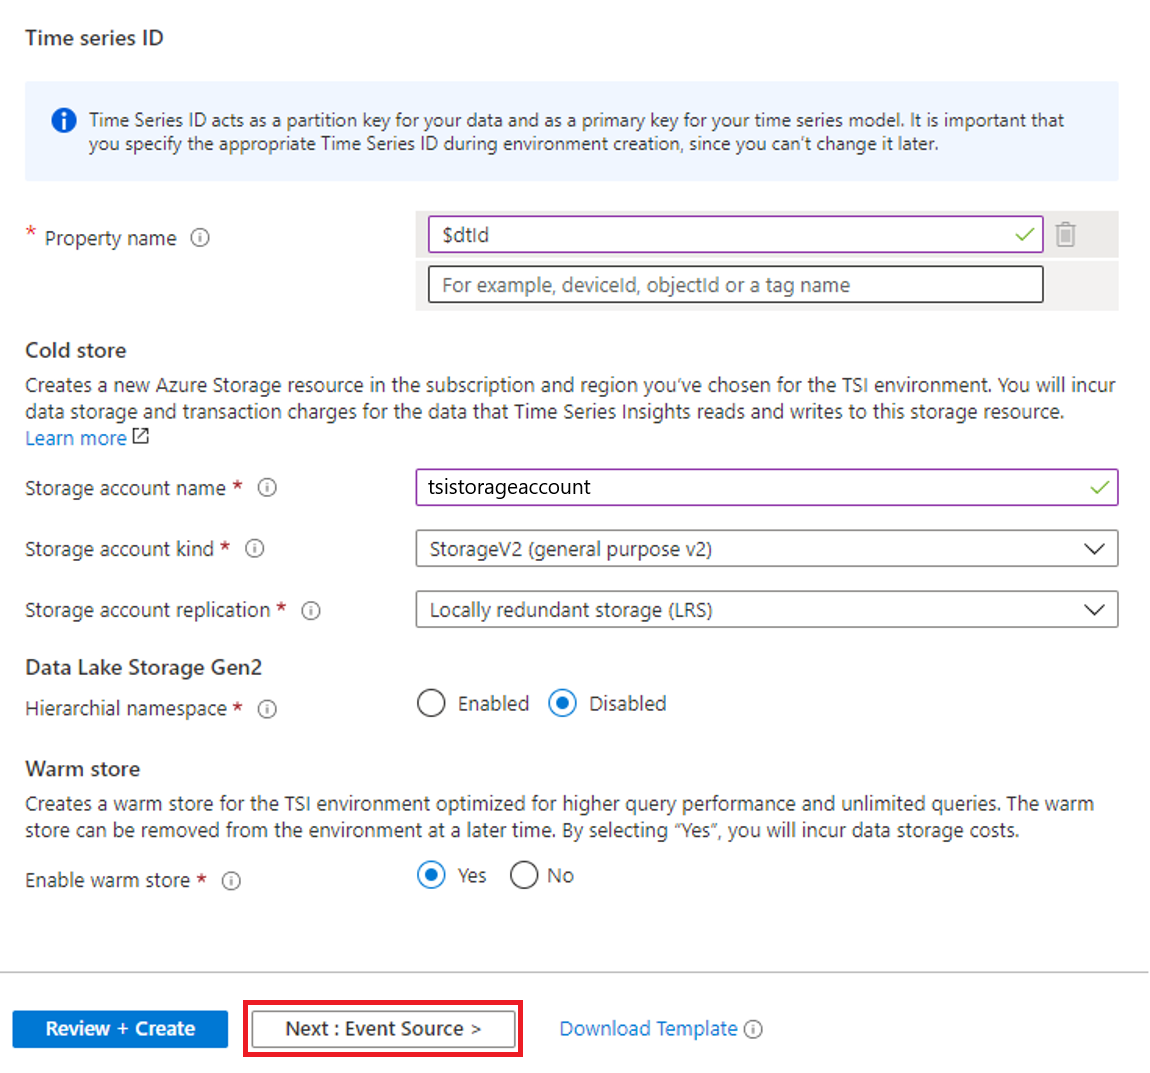
- Property name - Enter $dtId (Read more about selecting an ID value in Best practices for choosing a Time Series ID).
- Storage account name - Specify a storage account name.
- Enable warm store - Leave this field set to Yes.
You can leave default values for other properties on this page. Select the Next : Event Source > button.
- Subscription - Choose your subscription.
In the Event Source tab, choose the following fields:
- Create an event source? - Choose Yes.
- Source type - Choose Event Hub.
- Name - Specify a name for your event source.
- Subscription - Choose your Azure subscription.
- Event Hub namespace - Choose the namespace that you created earlier in this article.
- Event Hub name - Choose the time series hub name that you created earlier in this article.
- Event Hub access policy name - Choose the time series hub auth rule that you created earlier in this article.
- Event Hub consumer group - Select New and specify a name for your event hub consumer group. Then, select Add.
- Property name - Leave this field blank.
Choose the Review + Create button to review all the details. Then, select the Review + Create button again to create the time series environment.


Send IoT data to Azure Digital Twins
To begin sending data to Time Series Insights, you'll need to start updating the digital twin properties in Azure Digital Twins with changing data values.
Use the az dt twin update CLI command to update a property on the twin you added in the Prerequisites section. If you used the twin creation instructions from Ingest telemetry from IoT Hub), you can use the following command in the local CLI or the Cloud Shell bash terminal to update the temperature property on the thermostat67 twin. There's one placeholder for the Azure Digital Twins instance's host name (you can also use the instance's friendly name with a slight decrease in performance).
az dt twin update --dt-name <your-Azure-Digital-Twins-instance-hostname-or-name> --twin-id thermostat67 --json-patch '{"op":"replace", "path":"/Temperature", "value": 20.5}'
Repeat the command at least 4 more times with different property values to create several data points that can be observed later in the Time Series Insights environment.
Tip
If you want to complete this article with live simulated data instead of manually updating the digital twin values, first make sure you've completed the TIP from the Prerequisites section to set up an Azure function that updates twins from a simulated device. After that, you can run the device now to start sending simulated data and updating your digital twin through that data flow.
Visualize your data in Time Series Insights
Now, data should be flowing into your Time Series Insights instance, ready to be analyzed. Follow the steps below to explore the data coming in.
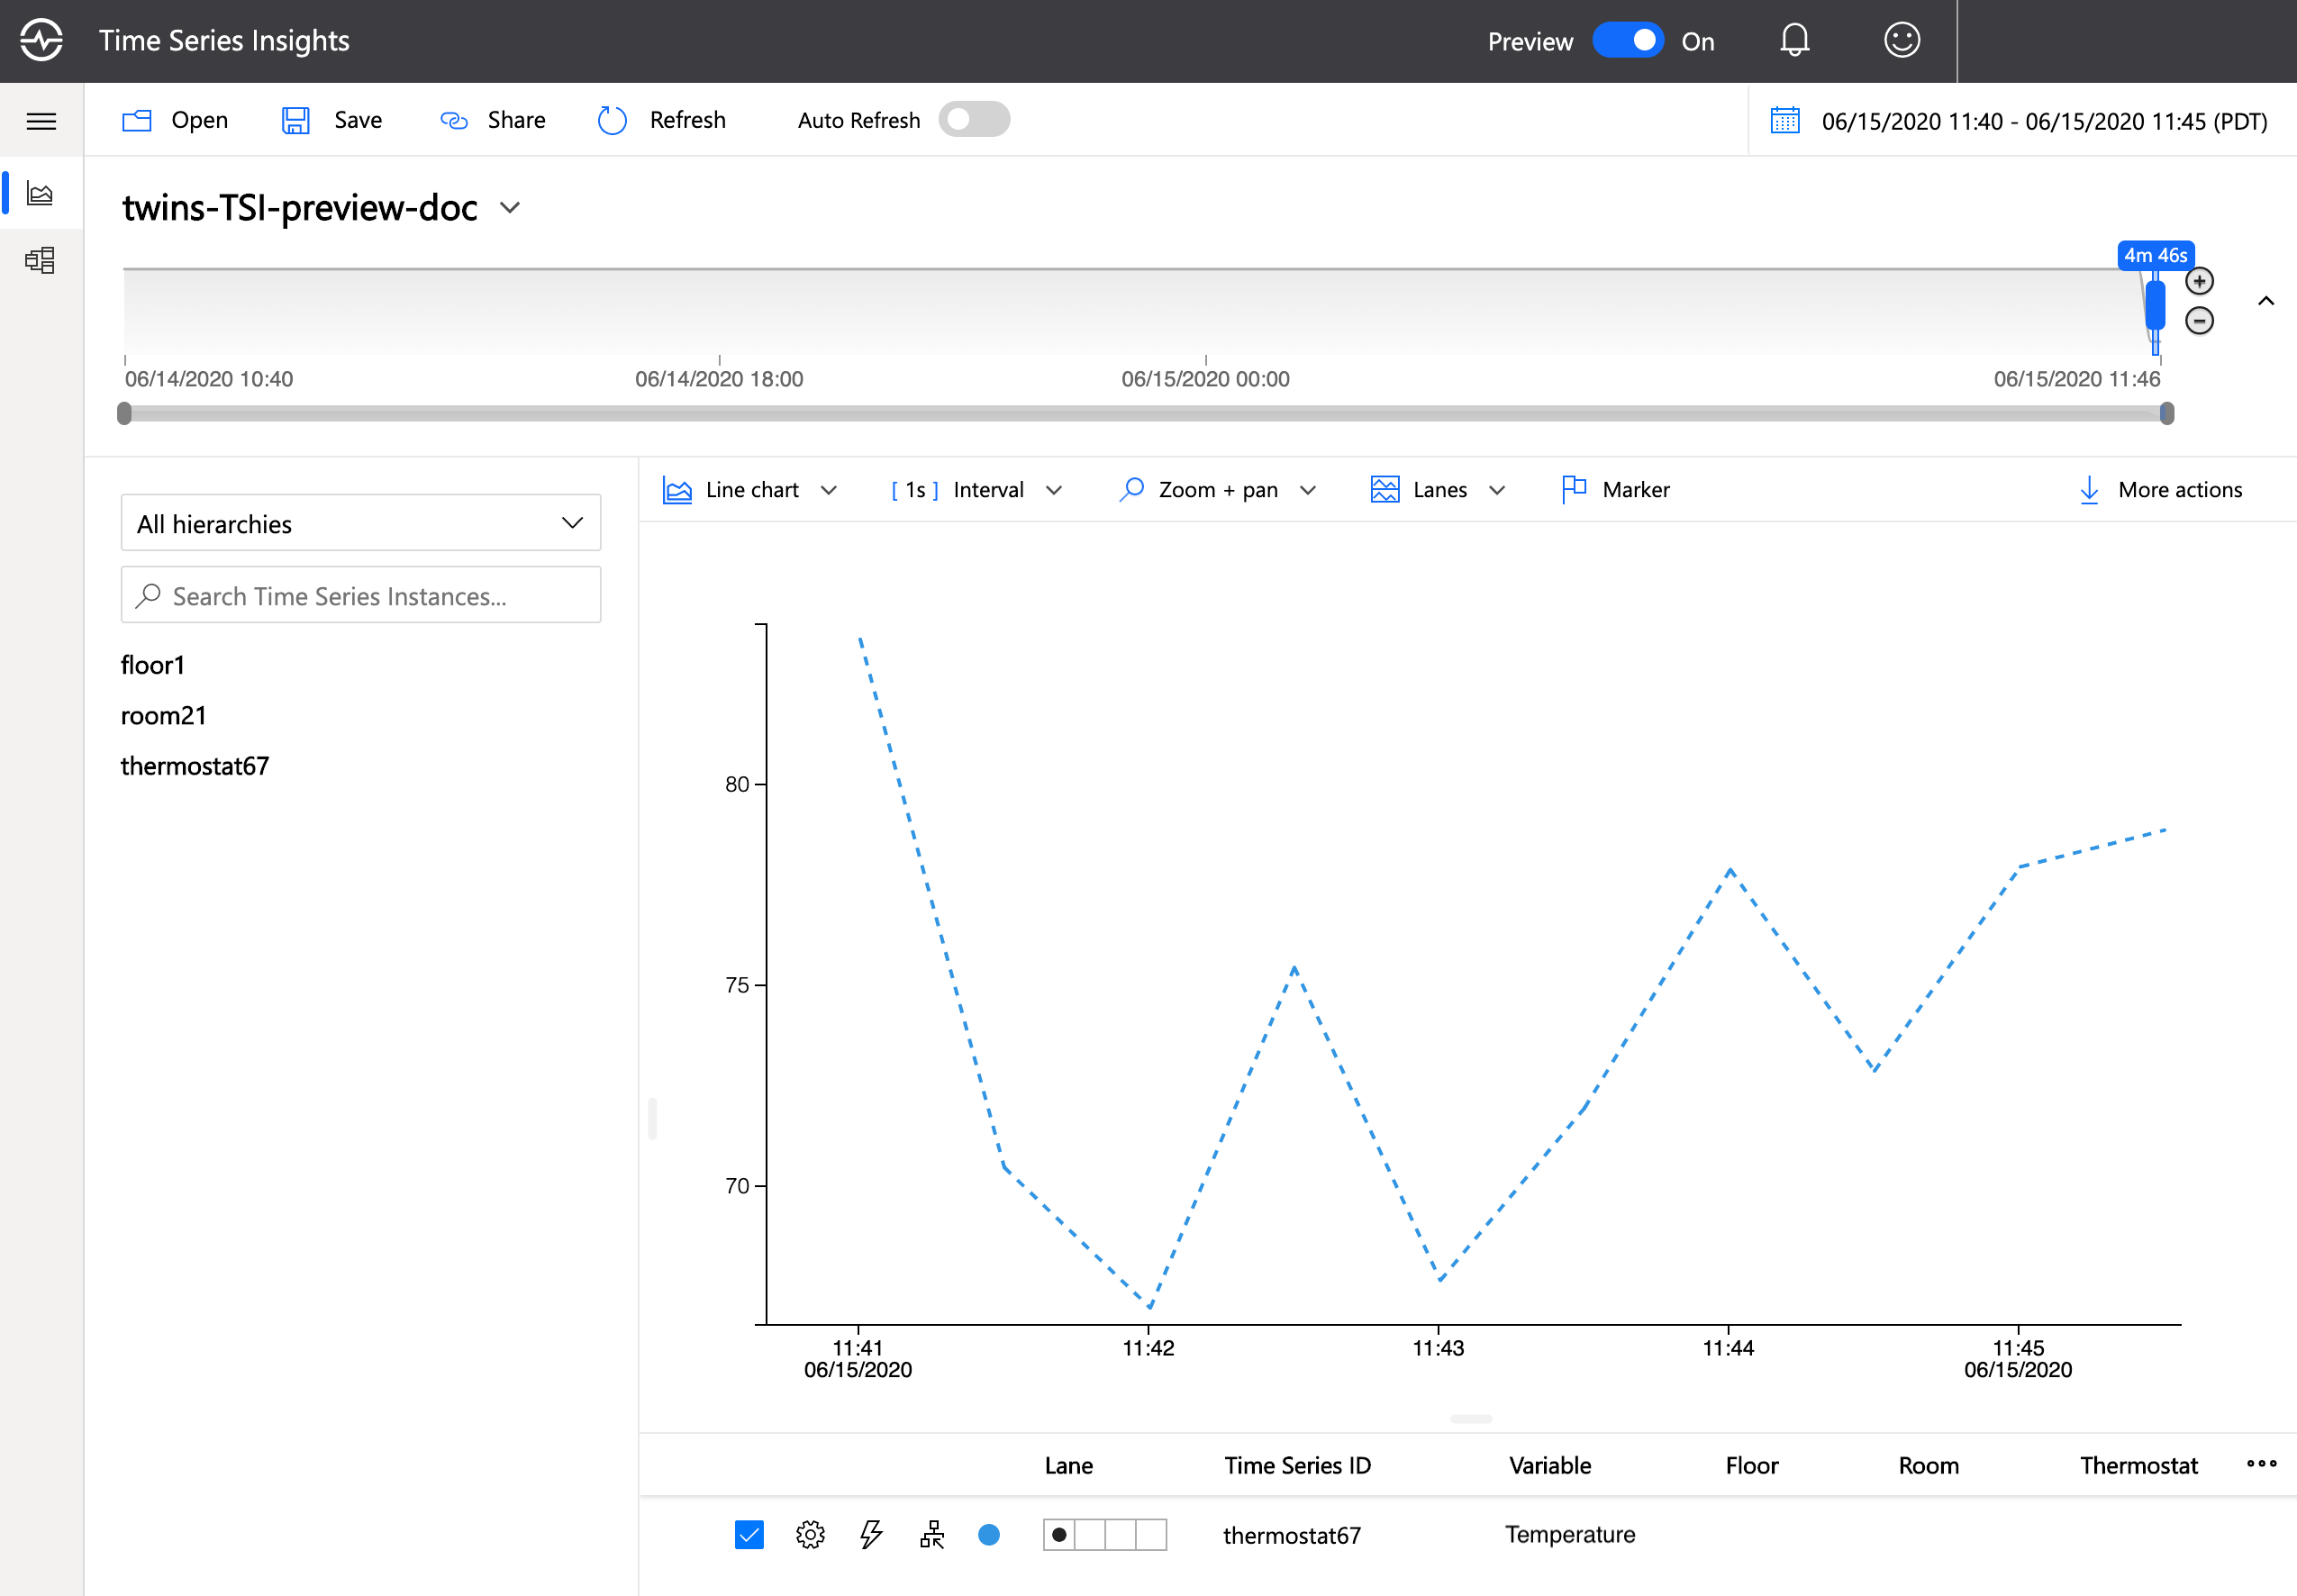
In the Azure portal, search for your time series environment name that you created earlier. In the menu options on the left, select Overview to see the Time Series Insights Explorer URL. Select the URL to view the temperature changes reflected in the Time Series Insights environment.

In the explorer, you'll see the twins in the Azure Digital Twins instance shown on the left. Select the twin you've edited properties for, choose the property you've changed, and select Add.
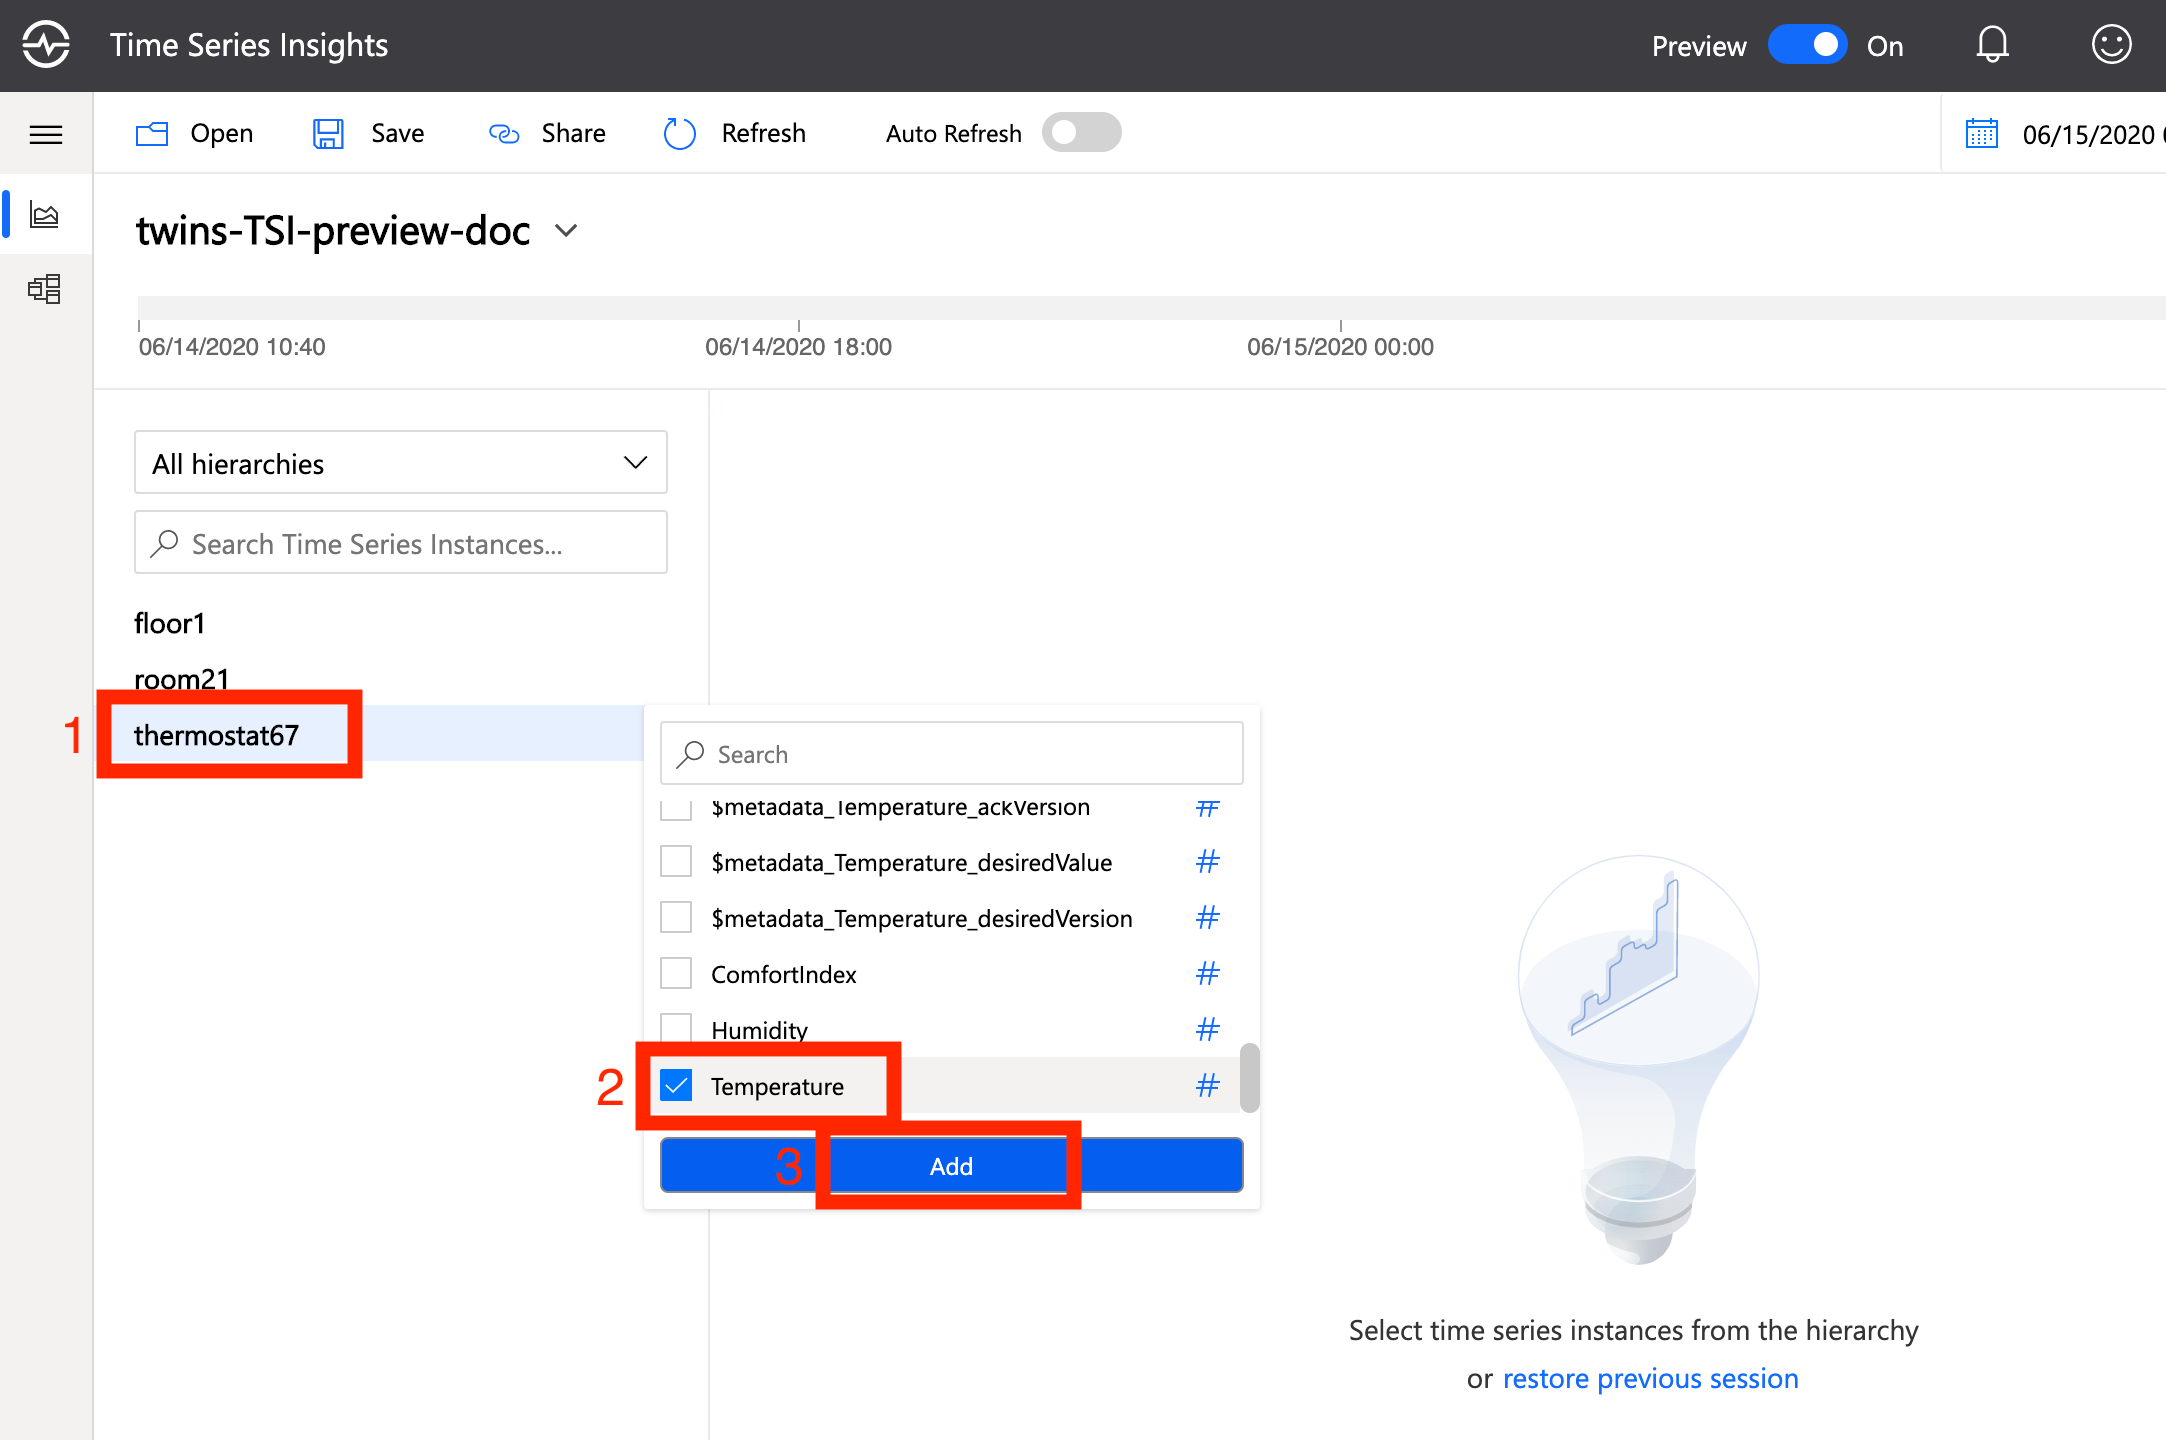
You should now see the property changes you made reflected in the graph, as shown below.


If you allow a simulation to run for much longer, your visualization will look something like this:

Next steps
After establishing a data pipeline to send time series data from Azure Digital Twins to Time Series Insights, you might want to think about how to translate asset models designed for Azure Digital Twins into asset models for Time Series Insights. For a tutorial on this next step in the integration process, see Model synchronization between Azure Digital Twins and Time Series Insights Gen2.
Feedback
Coming soon: Throughout 2024 we will be phasing out GitHub Issues as the feedback mechanism for content and replacing it with a new feedback system. For more information see: https://aka.ms/ContentUserFeedback.
Submit and view feedback for