Automanage devices in Azure Digital Twins using Device Provisioning Service (DPS)
In this article, you'll learn how to integrate Azure Digital Twins with Device Provisioning Service (DPS).
The solution described in this article will allow you to automate the process to provision and retire IoT Hub devices in Azure Digital Twins, using Device Provisioning Service.
For more information about the provision and retire stages, and to better understand the set of general device management stages that are common to all enterprise IoT projects, see the Device lifecycle section of IoT Hub's device management documentation.
Prerequisites
Before you can set up the provisioning, you'll need to set up the following resources:
- An Azure Digital Twins instance. Follow the instructions in Set up an instance and authentication to create an Azure digital twins instance. Gather the instance's host name in the Azure portal (instructions).
- An IoT hub. For instructions, see the "Create an IoT Hub" section of the IoT Hub quickstart.
- An Azure function that updates digital twin information based on IoT Hub data. Follow the instructions in Ingest IoT hub data to create this Azure function. Gather the function name to use it in this article.
This sample also uses a device simulator that includes provisioning using the Device Provisioning Service. The device simulator is located here: Azure Digital Twins and IoT Hub Integration Sample. Get the sample project on your machine by navigating to the GitHub repo for the sample, which you can download as a .zip file by selecting the Code button and Download ZIP.

Unzip the downloaded folder.
You'll need Node.js installed on your machine. The device simulator is based on Node.js, version 10.0.x or later.
Solution architecture
This solution includes steps for provisioning and retiring a device in Azure Digital Twins, using Device Provisioning Service.
To allocate devices in the solution, data flows between a thermostat device and DPS. The data then flows from DPS into IoT Hub, and to Azure Digital Twins through an Azure function.
To retire a device, data from a manual device deletion flows into Azure Digital Twins through IoT Hub, Event Hubs, and an Azure function.
The image below illustrates this architecture.

This article is divided into two sections, each focused on a portion of this full architecture:
- Autoprovision device using Device Provisioning Service
- Autoretire device using IoT Hub lifecycle events
Autoprovision device using Device Provisioning Service
In this section, you'll be attaching Device Provisioning Service to Azure Digital Twins to autoprovision devices through the path below. This diagram is an excerpt from the full architecture shown earlier.

Here's a description of the process flow:
- Device contacts the DPS endpoint, passing identifying information to prove its identity.
- DPS validates device identity by validating the registration ID and key against the enrollment list, and calls an Azure function to do the allocation.
- The Azure function creates a new twin in Azure Digital Twins for the device. The twin will have the same name as the device's registration ID.
- DPS registers the device with an IoT hub, and populates the device's chosen twin state.
- The IoT hub returns device ID information and the IoT hub connection information to the device. The device can now connect to the IoT hub.
The following sections walk through the steps to set up this autoprovision device flow.
Create a Device Provisioning Service
When a new device is provisioned using Device Provisioning Service, a new twin for that device can be created in Azure Digital Twins with the same name as the registration ID.
Create a Device Provisioning Service instance, which will be used to provision IoT devices. You can either use the Azure CLI instructions below, or use the Azure portal by following Set up the IoT Hub Device Provisioning Service with the Azure portal.
The following Azure CLI command will create a Device Provisioning Service. You'll need to specify a Device Provisioning Service name, resource group, and region. To see what regions support Device Provisioning Service, visit Azure products available by region. The command can be run in Cloud Shell, or locally if you have the Azure CLI installed on your machine.
az iot dps create --name <Device-Provisioning-Service-name> --resource-group <resource-group-name> --location <region>
Add a function to use with Device Provisioning Service
Inside your function app project that you created in the Prerequisites section, you'll create a new function to use with the Device Provisioning Service. This function will be used by the Device Provisioning Service in a Custom Allocation Policy to provision a new device.
Navigate to the function app project on your machine and follow the steps below.
First, create a new function of type HTTP-trigger in the function app project.
Add a new NuGet package to the project: Microsoft.Azure.Devices.Provisioning.Service. You might need to add more packages to your project as well, if the packages used in the code aren't part of the project already.
In the newly created function code file, paste in the following code, name the function DpsAdtAllocationFunc.cs, and save the file.
// Copyright (c) Microsoft. All rights reserved.
// Licensed under the MIT license. See LICENSE file in the project root for full license information.

using System;
using System.IO;
using System.Net;
using System.Net.Http;
using System.Threading.Tasks;
using Azure;
using Azure.Core.Pipeline;
using Azure.DigitalTwins.Core;
using Azure.Identity;
using Microsoft.AspNetCore.Mvc;
using Microsoft.AspNetCore.Http;
using Microsoft.Azure.WebJobs;
using Microsoft.Azure.WebJobs.Extensions.Http;
using Microsoft.Azure.Devices.Shared;
using Microsoft.Azure.Devices.Provisioning.Service;
using Microsoft.Extensions.Logging;
using Newtonsoft.Json;

namespace Samples.AdtIothub
{
    public static class DpsAdtAllocationFunc
    {
        private static string adtInstanceUrl = Environment.GetEnvironmentVariable("ADT_SERVICE_URL");
        private static readonly HttpClient singletonHttpClientInstance = new HttpClient();

        [FunctionName("DpsAdtAllocationFunc")]
        public static async Task<IActionResult> Run(
            [HttpTrigger(AuthorizationLevel.Function, "get", "post", Route = null)] HttpRequest req, ILogger log)
        {
            // Get request body
            string requestBody = await new StreamReader(req.Body).ReadToEndAsync();
            log.LogDebug($"Request.Body: {requestBody}");
            dynamic data = JsonConvert.DeserializeObject(requestBody);

            // Get registration ID of the device
            string regId = data?.deviceRuntimeContext?.registrationId;

            bool fail = false;
            string message = "Uncaught error";
            var response = new ResponseObj();

            // Must have unique registration ID on DPS request
            if (regId == null)
            {
                message = "Registration ID not provided for the device.";
                log.LogInformation("Registration ID: NULL");
                fail = true;
            }
            else
            {
                string[] hubs = data?.linkedHubs.ToObject<string[]>();

                // Must have hubs selected on the enrollment
                if (hubs == null
                    || hubs.Length < 1)
                {
                    message = "No hub group defined for the enrollment.";
                    log.LogInformation("linkedHubs: NULL");
                    fail = true;
                }
                else
                {
                    // Find or create twin based on the provided registration ID and model ID
                    dynamic payloadContext = data?.deviceRuntimeContext?.payload;
                    string dtmi = payloadContext.modelId;
                    log.LogDebug($"payload.modelId: {dtmi}");
                    string dtId = await FindOrCreateTwinAsync(dtmi, regId, log);

                    // Get first linked hub (TODO: select one of the linked hubs based on policy)
                    response.iotHubHostName = hubs[0];

                    // Specify the initial tags for the device.
                    var tags = new TwinCollection();
                    tags["dtmi"] = dtmi;
                    tags["dtId"] = dtId;

                    // Specify the initial desired properties for the device.
                    var properties = new TwinCollection();

                    // Add the initial twin state to the response.
                    var twinState = new TwinState(tags, properties);
                    response.initialTwin = twinState;
                }
            }

            log.LogDebug("Response: " + ((response.iotHubHostName != null)? JsonConvert.SerializeObject(response) : message));

            return fail
                ? new BadRequestObjectResult(message)
                : (ActionResult)new OkObjectResult(response);
        }

        public static async Task<string> FindOrCreateTwinAsync(string dtmi, string regId, ILogger log)
        {
            // Create Digital Twins client
            var cred = new DefaultAzureCredential();
            var client = new DigitalTwinsClient(new Uri(adtInstanceUrl), cred);

            // Find existing DigitalTwin with registration ID
            try
            {
                // Get DigitalTwin with Id 'regId'
                BasicDigitalTwin existingDt = await client.GetDigitalTwinAsync<BasicDigitalTwin>(regId).ConfigureAwait(false);

                // Check to make sure it is of the correct model type
                if (StringComparer.OrdinalIgnoreCase.Equals(dtmi, existingDt.Metadata.ModelId))
                {
                    log.LogInformation($"DigitalTwin {existingDt.Id} already exists");
                    return existingDt.Id;
                }

                // Found DigitalTwin but it is not of the correct model type
                log.LogInformation($"Found DigitalTwin {existingDt.Id} but it is not of model {dtmi}");
            }
            catch(RequestFailedException ex) when (ex.Status == (int)HttpStatusCode.NotFound)
            {
                log.LogDebug($"Did not find DigitalTwin {regId}");
            }

            // Either the DigitalTwin was not found, or we found it but it is of a different model type
            // Create or replace it with what it needs to be, meaning if it was not found a brand new DigitalTwin will be created
            // and if it was of a different model, it will replace that existing DigitalTwin
            // If it was intended to only create the DigitalTwin if there is no matching DigitalTwin with the same Id,
            // ETag.All could have been used as the ifNonMatch parameter to the CreateOrReplaceDigitalTwinAsync method call.
            // Read more in the CreateOrReplaceDigitalTwinAsync documentation here:
            // https://docs.microsoft.com/en-us/dotnet/api/azure.digitaltwins.core.digitaltwinsclient.createorreplacedigitaltwinasync?view=azure-dotnet
            BasicDigitalTwin dt = await client.CreateOrReplaceDigitalTwinAsync(
                regId,
                new BasicDigitalTwin
                {
                    Metadata = { ModelId = dtmi },
                    Contents =
                    {
                        { "Temperature", 0.0 }
                    }
                }
            ).ConfigureAwait(false);

            log.LogInformation($"Digital Twin {dt.Id} created.");
            return dt.Id;
        }
    }

    /// <summary>
    /// Expected function result format
    /// </summary>
    public class ResponseObj
    {
        public string iotHubHostName { get; set; }
        public TwinState initialTwin { get; set; }
    }
}
Publish the project with the DpsAdtAllocationFunc.cs function to a function app in Azure.
For instructions on how to publish the function using Visual Studio, see Develop Azure Functions using Visual Studio. For instructions on how to publish the function using Visual Studio Code, see Create a C# function in Azure using Visual Studio Code. For instructions on how to publish the function using the Azure CLI, see Create a C# function in Azure from the command line.
Important
When creating the function app for the first time in the Prerequisites section, you may have already assigned an access role for the function and configured the application settings for it to access your Azure Digital Twins instance. These need to be done once for the entire function app, so verify they've been completed in your app before continuing. You can find instructions in the Configure published app section of the Write app authentication code article.
Create Device Provisioning enrollment
Next, you'll need to create an enrollment in Device Provisioning Service using a custom allocation function. To create an enrollment, follow the instructions in the Create the enrollment section of the custom allocation policies article in the Device Provisioning Service documentation.
While going through that flow, make sure you select the following options to link the enrollment to the function you created.
- Select how you want to assign devices to hubs: Custom (Use Azure Function).
- Select the IoT hubs this group can be assigned to: Choose your IoT hub name or select the Link a new IoT hub button, and choose your IoT hub from the options.
Next, choose the Select a new function button to link your function app to the enrollment group. Then, fill in the following values:
- Subscription: Your Azure subscription is autopopulated. Make sure it's the right subscription.
- Function App: Choose your function app name.
- Function: Choose DpsAdtAllocationFunc.
Save your details.

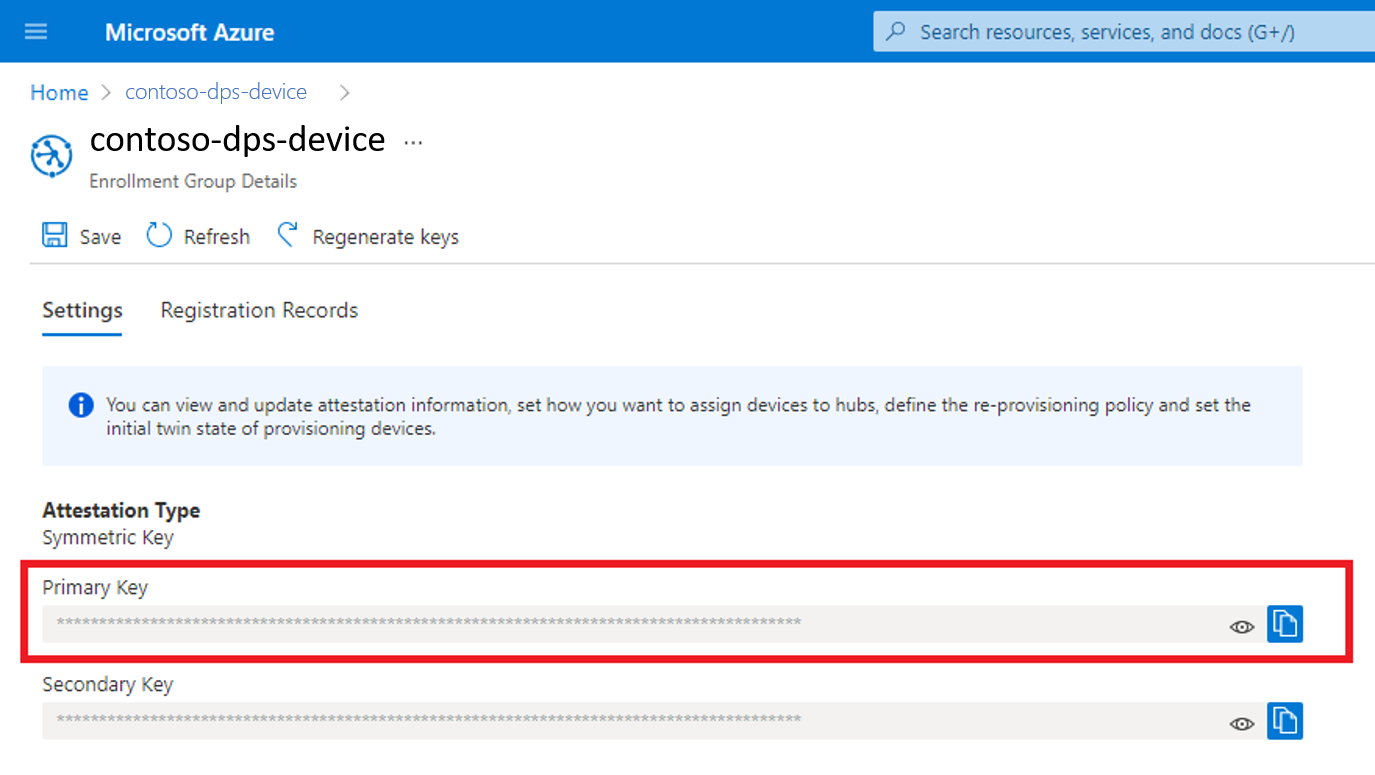
After creating the enrollment, select it to view its settings. Copy the Primary Key for the enrollment, which will be used later in this article to configure the device simulator.
Set up the device simulator
This sample uses a device simulator that includes provisioning using the Device Provisioning Service. The device simulator is located in the Azure Digital Twins and IoT Hub Integration Sample that you downloaded in the Prerequisites section.
Upload the model
The device simulator is a thermostat-type device that uses the model with this ID: dtmi:contosocom:DigitalTwins:Thermostat;1. You'll need to upload this model to Azure Digital Twins before you can create a twin of this type for the device.
The model looks like this:
{
    "@id": "dtmi:contosocom:DigitalTwins:Thermostat;1",
    "@type": "Interface",
    "@context": "dtmi:dtdl:context;3",
    "contents": [
      {
        "@type": "Property",
        "name": "Temperature",
        "schema": "double"
      }
    ]
  }
To upload this model to your twins instance, run the following Azure CLI command, which uploads the above model as inline JSON. You can run the command in Azure Cloud Shell in your browser (use the Bash environment), or on your machine if you have the CLI installed locally. There's one placeholder for the instance's host name (you can also use the instance's friendly name with a slight decrease in performance).
az dt model create --dt-name <instance-hostname-or-name> --models '{ "@id": "dtmi:contosocom:DigitalTwins:Thermostat;1", "@type": "Interface", "@context": "dtmi:dtdl:context;2", "contents": [ { "@type": "Property", "name": "Temperature", "schema": "double" } ]}'
Note
If you're using anything other than Cloud Shell in the Bash environment, you may need to escape certain characters in the inline JSON so that it's parsed correctly. For more information, see Use special characters in different shells.
For more information about models, see Manage models.
Configure and run the simulator
In a command window on your local machine, navigate to the downloaded sample Azure Digital Twins and IoT Hub Integration that you unzipped earlier, and then into the device-simulator directory. Next, install the dependencies for the project using the following command:
npm install
Next, in your device simulator directory, copy the .env.template file to a new file called .env, and gather the following values to fill in the settings:
PROVISIONING_IDSCOPE: To get this value, navigate to your device provisioning service in the Azure portal, then select Overview in the menu options and look for the field ID Scope.
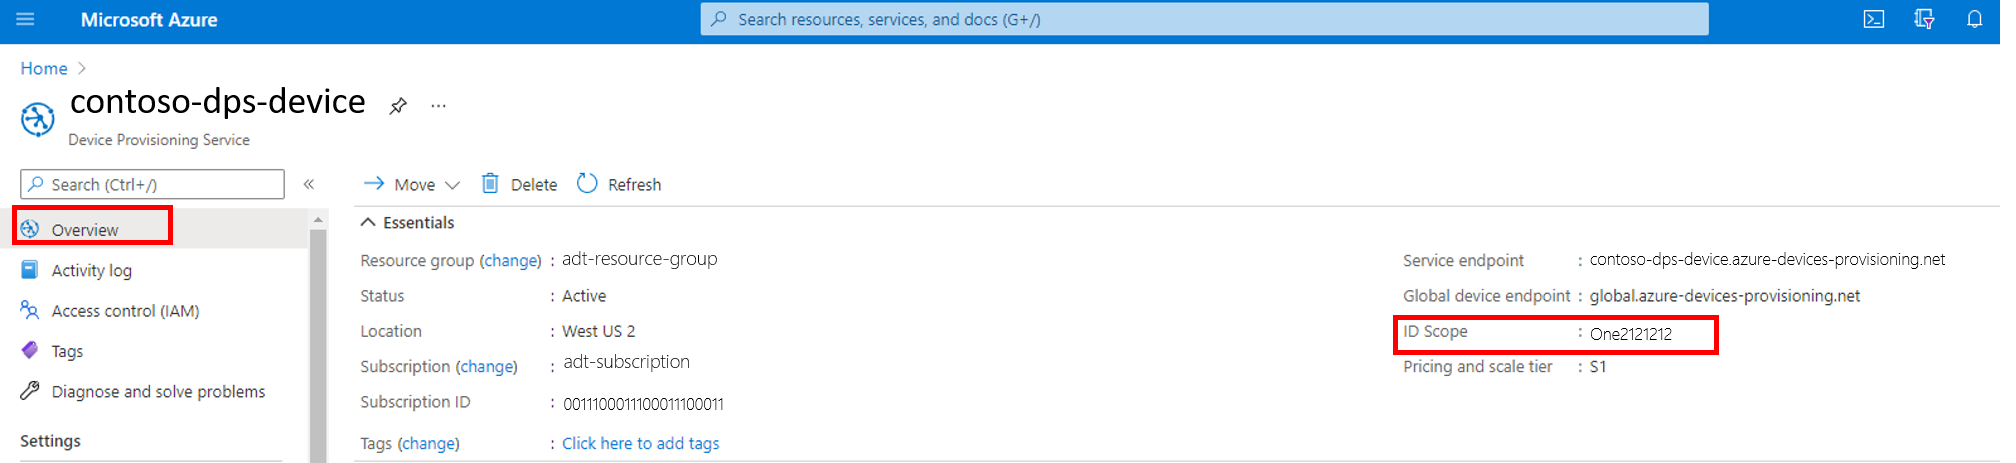
PROVISIONING_REGISTRATION_ID: You can choose a registration ID for your device.
ADT_MODEL_ID:
dtmi:contosocom:DigitalTwins:Thermostat;1PROVISIONING_SYMMETRIC_KEY: This environment variable is the primary key for the enrollment you set up earlier. To get this value again, navigate to your device provisioning service in the Azure portal, select Manage enrollments, then select the enrollment group that you created earlier and copy the Primary Key.


Now, use the values above to update the .env file settings.
PROVISIONING_HOST = "global.azure-devices-provisioning.net"
PROVISIONING_IDSCOPE = "<Device-Provisioning-Service-Scope-ID>"
PROVISIONING_REGISTRATION_ID = "<Device-Registration-ID>"
ADT_MODEL_ID = "dtmi:contosocom:DigitalTwins:Thermostat;1"
PROVISIONING_SYMMETRIC_KEY = "<Device-Provisioning-Service-enrollment-primary-SAS-key>"
Save and close the file.
Start running the device simulator
Still in the device-simulator directory in your command window, start the device simulator using the following command:
node .\adt_custom_register.js
You should see the device being registered and connected to IoT Hub, and then starting to send messages.

Validate
The flow you've set up in this article will result in the device automatically being registered in Azure Digital Twins. Use the following Azure Digital Twins CLI command to find the twin of the device in the Azure Digital Twins instance you created. There's a placeholder for the instance's host name (you can also use the instance's friendly name with a slight decrease in performance), and a placeholder for the device registration ID.
az dt twin show --dt-name <instance-hostname-or-name> --twin-id "<device-registration-ID>"
You should see the twin of the device being found in the Azure Digital Twins instance.

Autoretire device using IoT Hub lifecycle events
In this section, you'll be attaching IoT Hub lifecycle events to Azure Digital Twins to autoretire devices through the path below. This diagram is an excerpt from the full architecture shown earlier.

Here's a description of the process flow:
- An external or manual process triggers the deletion of a device in IoT Hub.
- IoT Hub deletes the device and generates a device lifecycle event that will be routed to an event hub.
- An Azure function deletes the twin of the device in Azure Digital Twins.
The following sections walk through the steps to set up this autoretire device flow.
Create an event hub
Next, you'll create an Azure event hub to receive IoT Hub lifecycle events.
Follow the steps described in the Create an event hub quickstart. Name your event hub lifecycleevents. You'll use this event hub name when you set up IoT Hub route and an Azure function in the next sections.
The screenshot below illustrates the creation of the event hub.

Create SAS policy for your event hub
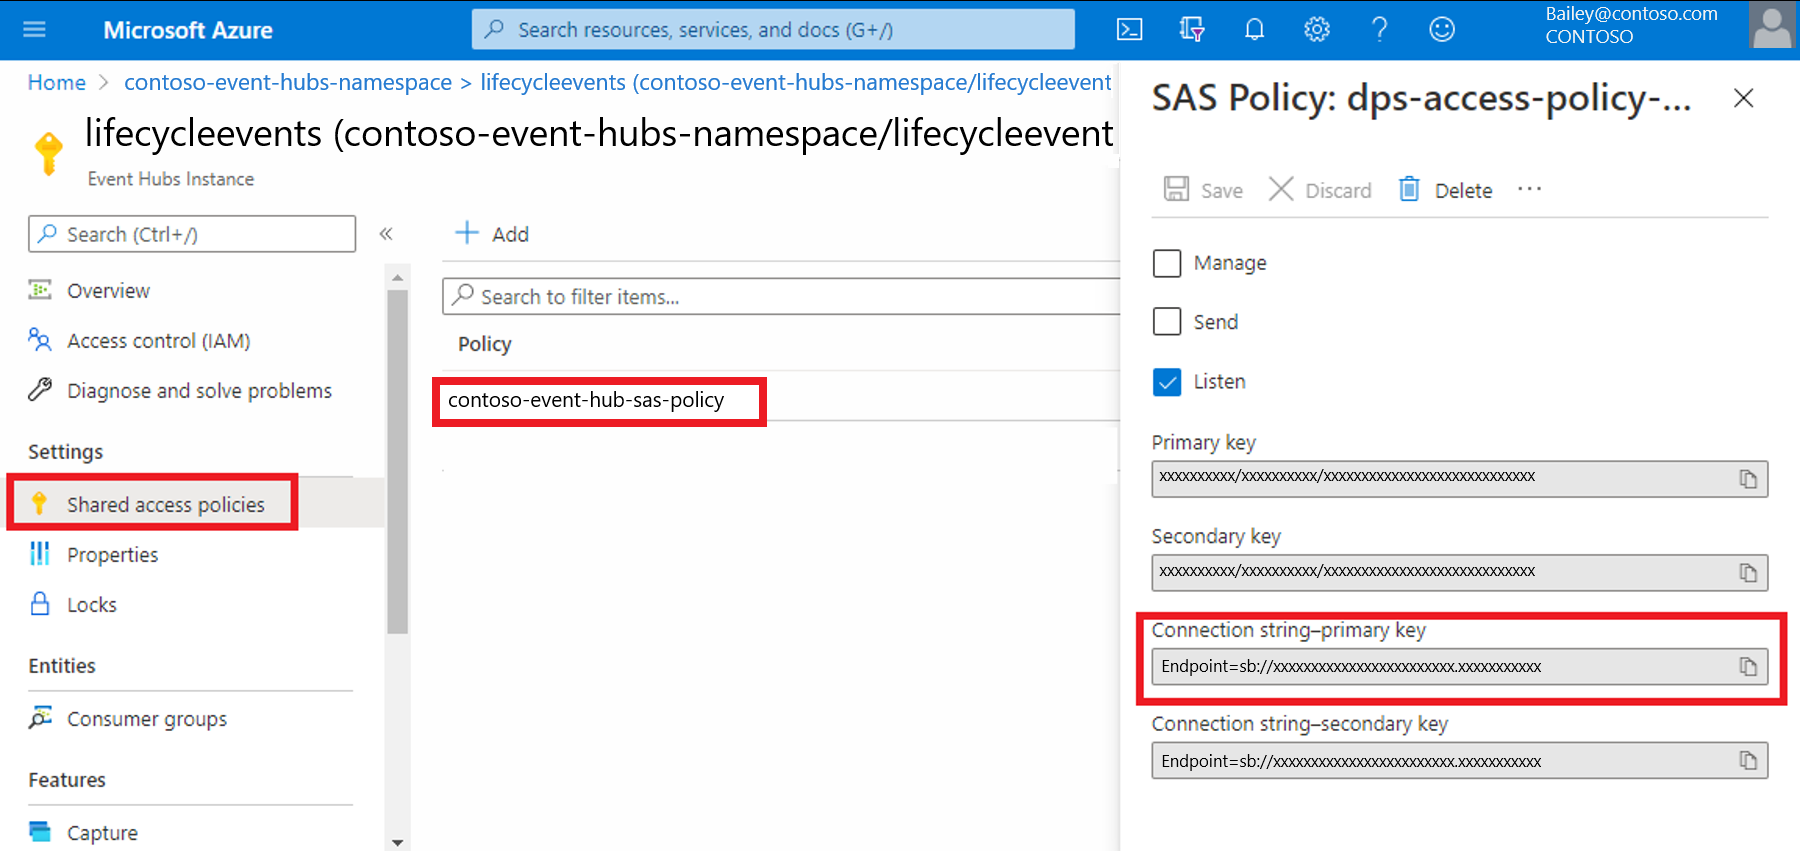
Next, you'll need to create a shared access signature (SAS) policy to configure the event hub with your function app. To create the SAS policy:
- Navigate to the event hub you created in the Azure portal and select Shared access policies in the menu options on the left.
- Select Add. In the Add SAS Policy window that opens, enter a policy name of your choice and select the Listen checkbox.
- Select Create.

Configure event hub with function app
Next, configure the Azure function app that you set up in the Prerequisites section to work with your new event hub. You'll configure the function by setting an environment variable inside the function app with the event hub's connection string.
Open the policy that you created and copy the Connection string-primary key value.
Add the connection string as a variable in the function app settings with the following Azure CLI command. The command can be run in Cloud Shell, or locally if you have the Azure CLI installed on your machine.
az functionapp config appsettings set --settings "EVENTHUB_CONNECTIONSTRING=<Event-Hubs-SAS-connection-string-Listen>" --resource-group <resource-group> --name <your-function-app-name>

Add a function to retire with IoT Hub lifecycle events
Inside your function app project that you created in the Prerequisites section, you'll create a new function to retire an existing device using IoT Hub lifecycle events.
For more about lifecycle events, see IoT Hub Non-telemetry events. For more information about using Event Hubs with Azure functions, see Azure Event Hubs trigger for Azure Functions.
Navigate to the function app project on your machine and follow the steps below.
First, create a new function of type Event Hub Trigger in the function app project.
Add a new NuGet package to the project: Microsoft.Azure.Devices.Provisioning.Service. You might need to add more packages to your project as well, if the packages used in the code aren't part of the project already.
In the newly created function code file, paste in the following code, name the function DeleteDeviceInTwinFunc.cs, and save the file.
// Copyright (c) Microsoft. All rights reserved.
// Licensed under the MIT license. See LICENSE file in the project root for full license information.

using System;
using System.Collections.Generic;
using System.Linq;
using System.Net;
using System.Net.Http;
using System.Threading.Tasks;
using Azure;
using Azure.Core.Pipeline;
using Azure.DigitalTwins.Core;
using Azure.Identity;
using Microsoft.Azure.EventHubs;
using Microsoft.Azure.WebJobs;
using Microsoft.Extensions.Logging;

namespace Samples.AdtIothub
{
    public static class DeleteDeviceInTwinFunc
    {
        private static string adtAppId = "https://digitaltwins.azure.net";
        private static readonly string adtInstanceUrl = Environment.GetEnvironmentVariable("ADT_SERVICE_URL", EnvironmentVariableTarget.Process);
        private static readonly HttpClient singletonHttpClientInstance = new HttpClient();

        [FunctionName("DeleteDeviceInTwinFunc")]
        public static async Task Run(
            [EventHubTrigger("lifecycleevents", Connection = "EVENTHUB_CONNECTIONSTRING")] EventData[] events, ILogger log)
        {
            var exceptions = new List<Exception>(events.Length);

            // Create Digital Twin client
            var cred = new ManagedIdentityCredential(adtAppId);
            var client = new DigitalTwinsClient(
                new Uri(adtInstanceUrl),
                cred,
                new DigitalTwinsClientOptions
                {
                    Transport = new HttpClientTransport(singletonHttpClientInstance)
                });

            foreach (EventData eventData in events)
            {
                try
                {
                    //log.LogDebug($"EventData: {System.Text.Json.JsonSerializer.Serialize(eventData)}");

                    string opType = eventData.Properties["opType"] as string;
                    if (opType == "deleteDeviceIdentity")
                    {
                        string deviceId = eventData.Properties["deviceId"] as string;

                        try
                        {
                            // Find twin based on the original Registration ID
                            BasicDigitalTwin digitalTwin = await client.GetDigitalTwinAsync<BasicDigitalTwin>(deviceId);

                            // In order to delete the twin, all relationships must first be removed
                            await DeleteAllRelationshipsAsync(client, digitalTwin.Id, log);

                            // Delete the twin
                            await client.DeleteDigitalTwinAsync(digitalTwin.Id, digitalTwin.ETag);
                            log.LogInformation($"Twin {digitalTwin.Id} deleted in DT");
                        }
                        catch (RequestFailedException e) when (e.Status == (int)HttpStatusCode.NotFound)
                        {
                            log.LogWarning($"Twin {deviceId} not found in DT");
                        }
                    }
                }
                catch (Exception e)
                {
                    // We need to keep processing the rest of the batch - capture this exception and continue.
                    exceptions.Add(e);
                }
            }

            if (exceptions.Count > 1)
                throw new AggregateException(exceptions);

            if (exceptions.Count == 1)
                throw exceptions.Single();
        }

        /// <summary>
        /// Deletes all outgoing and incoming relationships from a specified digital twin
        /// </summary>
        public static async Task DeleteAllRelationshipsAsync(DigitalTwinsClient client, string dtId, ILogger log)
        {
            AsyncPageable<BasicRelationship> relationships = client.GetRelationshipsAsync<BasicRelationship>(dtId);
            await foreach (BasicRelationship relationship in relationships)
            {
                await client.DeleteRelationshipAsync(dtId, relationship.Id, relationship.ETag);
                log.LogInformation($"Twin {dtId} relationship {relationship.Id} deleted in DT");
            }

            AsyncPageable<IncomingRelationship> incomingRelationships = client.GetIncomingRelationshipsAsync(dtId);
            await foreach (IncomingRelationship incomingRelationship in incomingRelationships)
            {
                await client.DeleteRelationshipAsync(incomingRelationship.SourceId, incomingRelationship.RelationshipId);
                log.LogInformation($"Twin {dtId} incoming relationship {incomingRelationship.RelationshipId} from {incomingRelationship.SourceId} deleted in DT");
            }
        }
    }
}
Publish the project with the DeleteDeviceInTwinFunc.cs function to a function app in Azure.
For instructions on how to publish the function using Visual Studio, see Develop Azure Functions using Visual Studio. For instructions on how to publish the function using Visual Studio Code, see Create a C# function in Azure using Visual Studio Code. For instructions on how to publish the function using the Azure CLI, see Create a C# function in Azure from the command line.
Important
When creating the function app for the first time in the Prerequisites section, you may have already assigned an access role for the function and configured the application settings for it to access your Azure Digital Twins instance. These need to be done once for the entire function app, so verify they've been completed in your app before continuing. You can find instructions in the Configure published app section of the Write app authentication code article.
Create an IoT Hub route for lifecycle events
Now you'll set up an IoT Hub route, to route device lifecycle events. In this case, you'll specifically listen to device delete events, identified by if (opType == "deleteDeviceIdentity"). This event will trigger the delete of the digital twin item, completing the retirement process of a device and its digital twin.
First, you'll need to create an event hub endpoint in your IoT hub. Then, you'll add a route in IoT hub to send lifecycle events to this event hub endpoint. Follow these steps to create an event hub endpoint:
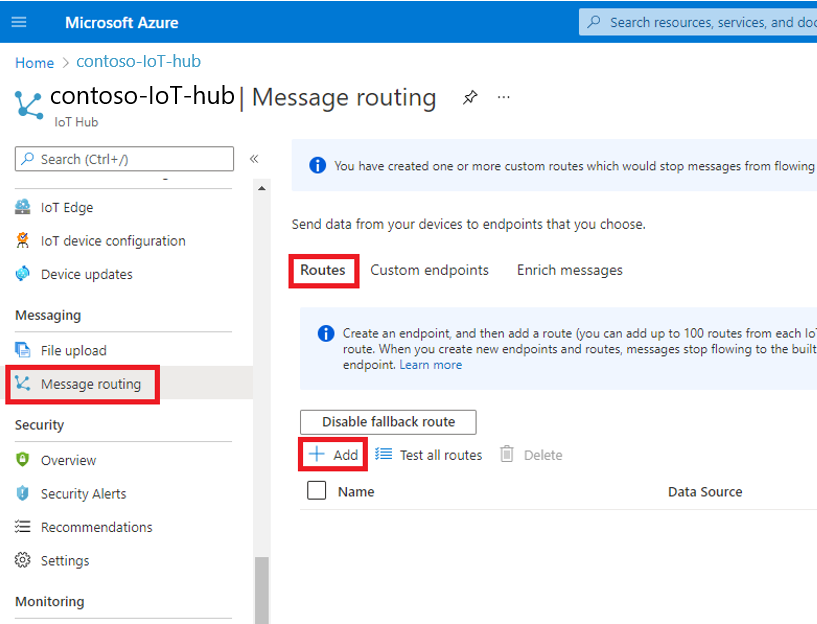
In the Azure portal, navigate to the IoT hub you created in the Prerequisites section and select Message routing in the menu options on the left.
Select the Custom endpoints tab.
Select + Add and choose Event hubs to add an Event Hubs type endpoint.
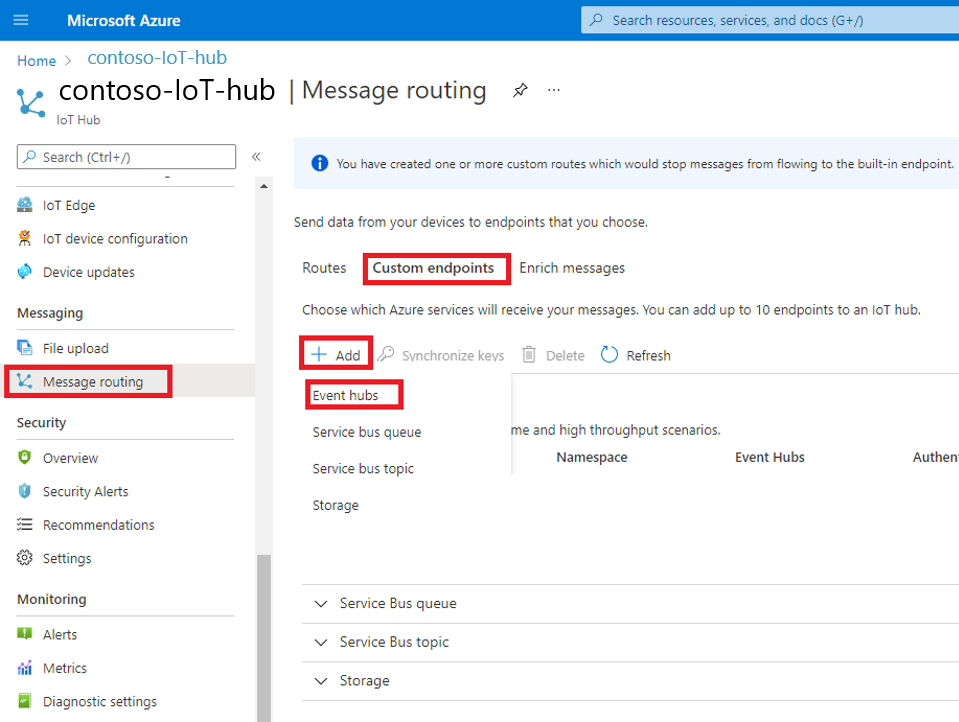
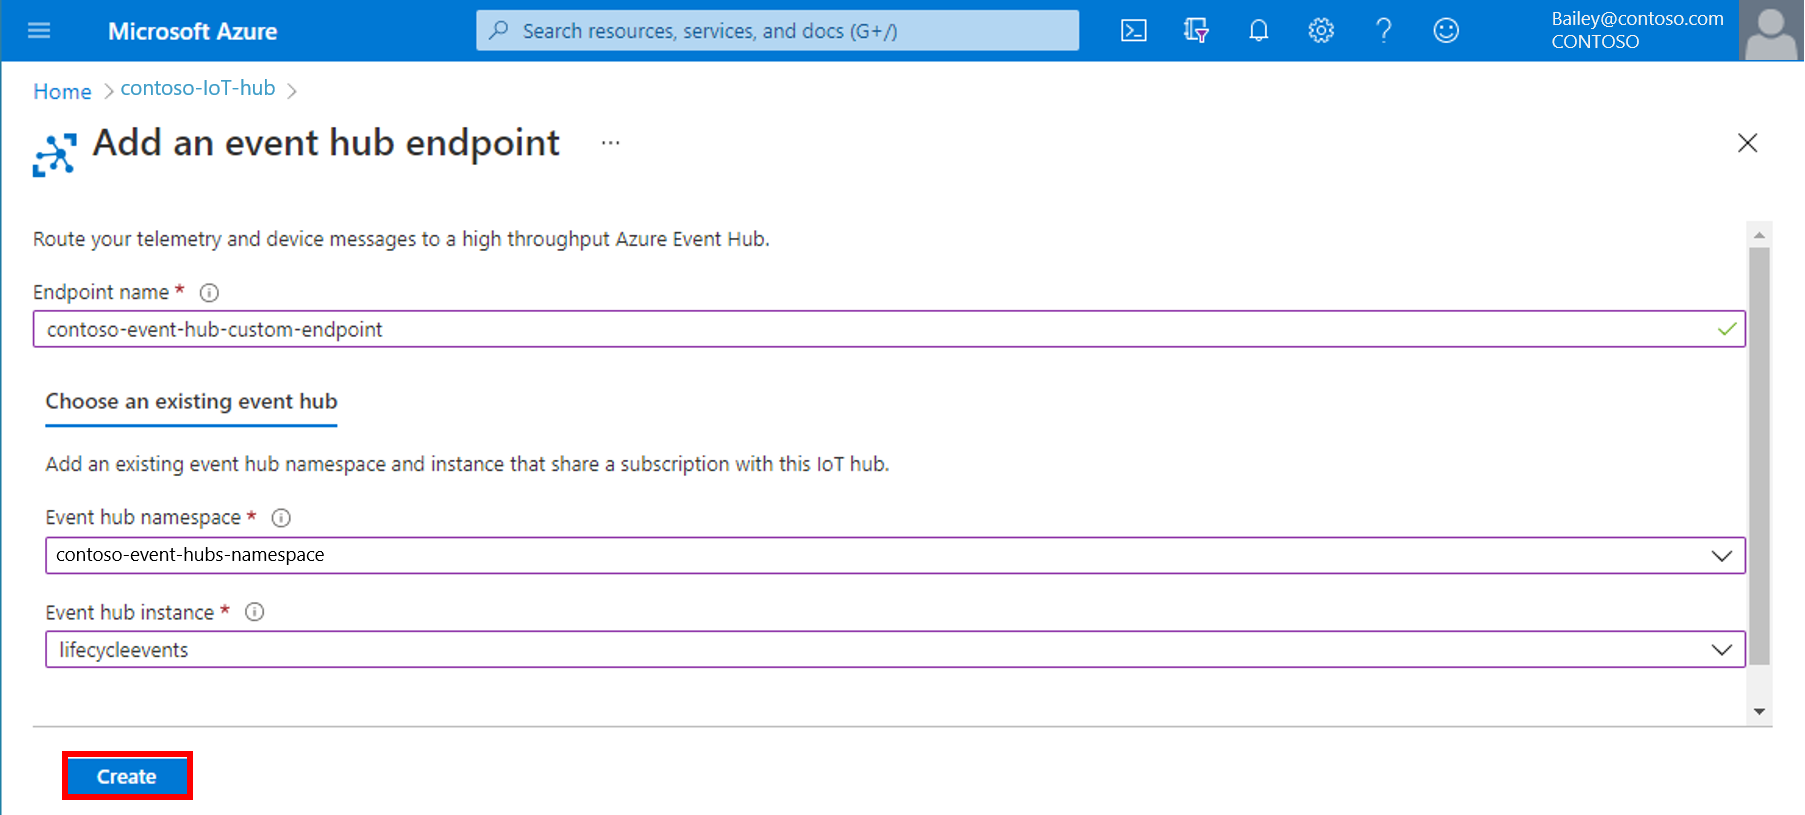
In the window Add an event hub endpoint that opens, choose the following values:
- Endpoint name: Choose an endpoint name.
- Event hub namespace: Select your event hub namespace from the dropdown list.
- Event hub instance: Choose the event hub name that you created in the previous step.
Select Create. Keep this window open to add a route in the next step.


Next, you'll add a route that connects to the endpoint you created in the above step, with a routing query that sends the delete events. Follow these steps to create a route:
Navigate to the Routes tab and select Add to add a route.
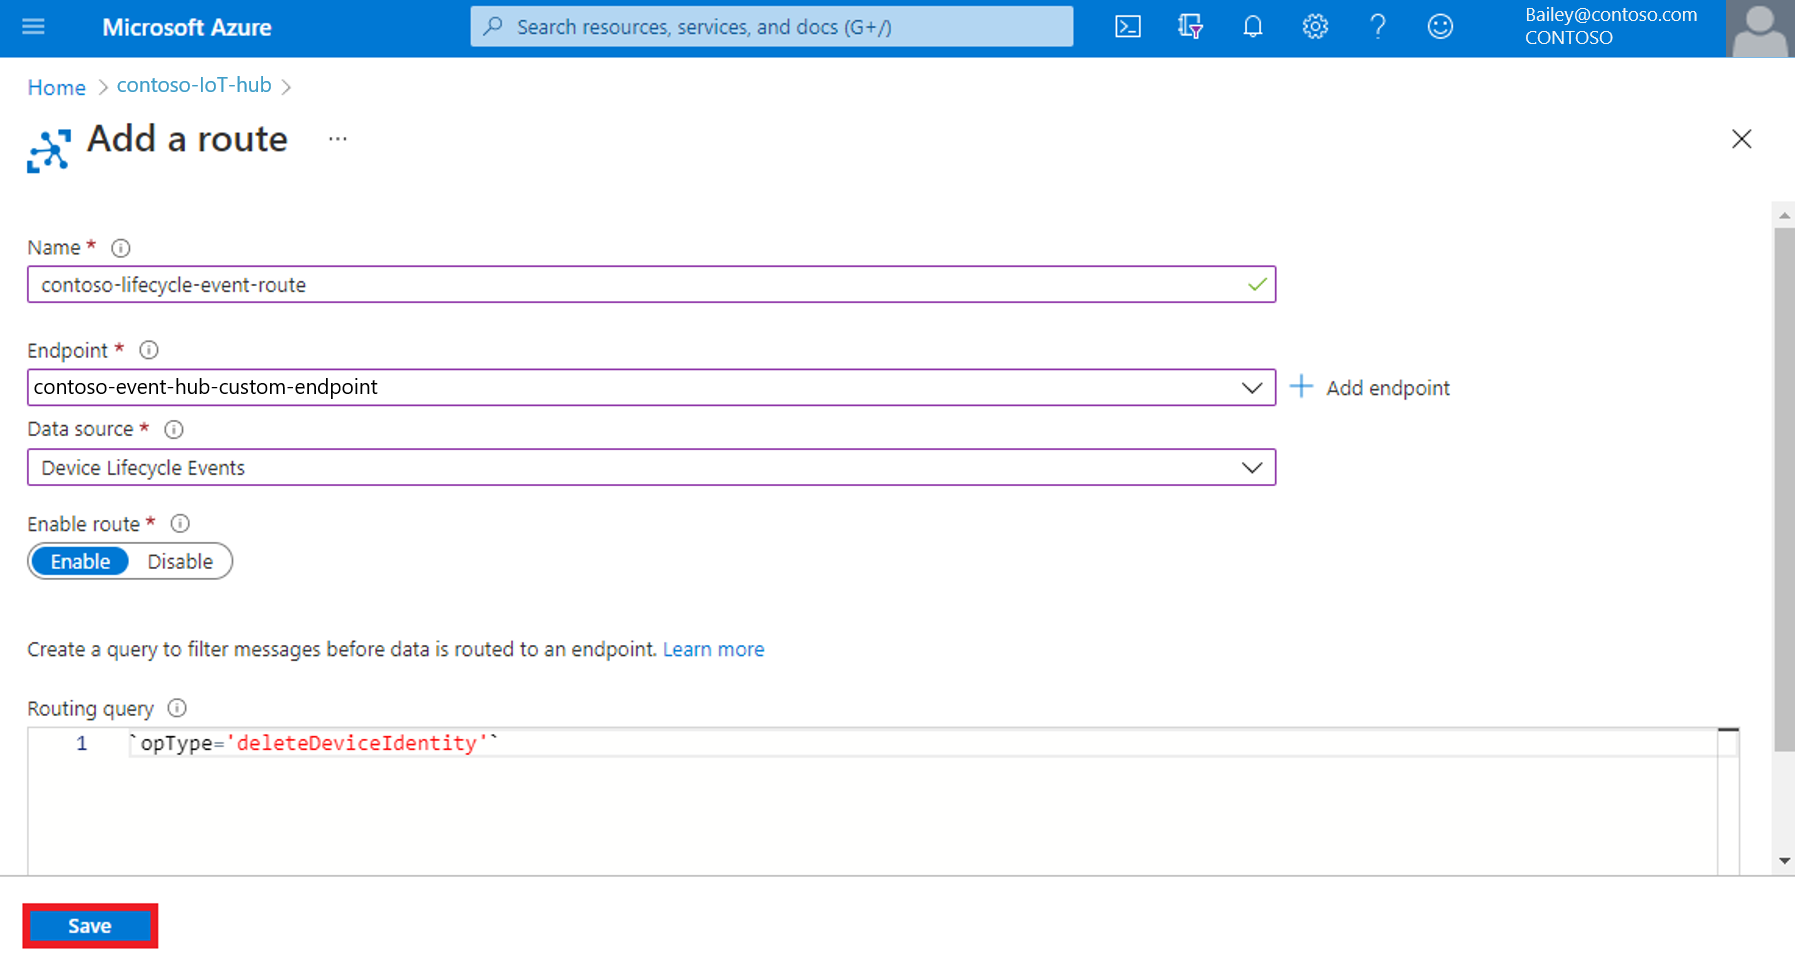
In the Add a route page that opens, choose the following values:
- Name: Choose a name for your route.
- Endpoint: Choose the Event Hubs endpoint you created earlier from the dropdown.
- Data source: Choose Device Lifecycle Events.
- Routing query: Enter
opType='deleteDeviceIdentity'. This query limits the device lifecycle events to only send the delete events.
Select Save.


Once you've gone through this flow, everything is set to retire devices end-to-end.
Validate
To trigger the process of retirement, you need to manually delete the device from IoT Hub.
You can manually delete the device from IoT Hub with an Azure CLI command or in the Azure portal. Follow the steps below to delete the device in the Azure portal:
- Navigate to your IoT hub, and choose IoT devices in the menu options on the left.
- You'll see a device with the device registration ID you chose in the first half of this article. You can also choose any other device to delete, as long as it has a twin in Azure Digital Twins so you can verify that the twin is automatically deleted after the device is deleted.
- Select the device and choose Delete.

It might take a few minutes to see the changes reflected in Azure Digital Twins.
Use the following Azure Digital Twins CLI command to verify the twin of the device in the Azure Digital Twins instance was deleted. There's a placeholder for the instance's host name (you can also use the instance's friendly name with a slight decrease in performance), and a placeholder for the device registration ID.
az dt twin show --dt-name <instance-hostname-or-name> --twin-id "<device-registration-ID>"
You should see that the twin of the device cannot be found in the Azure Digital Twins instance anymore.

Clean up resources
If you no longer need the resources created in this article, follow these steps to delete them.
Using the Azure Cloud Shell or local Azure CLI, you can delete all Azure resources in a resource group with the az group delete command. This command removes the resource group; the Azure Digital Twins instance; the IoT hub and the hub device registration; the Event Grid topic and associated subscriptions; the Event Hubs namespace and both Azure Functions apps, including associated resources like storage.
Important
Deleting a resource group is irreversible. The resource group and all the resources contained in it are permanently deleted. Make sure that you do not accidentally delete the wrong resource group or resources.
az group delete --name <your-resource-group>
Then, delete the project sample folder you downloaded from your local machine.
Next steps
The digital twins created for the devices are stored as a flat hierarchy in Azure Digital Twins, but they can be enriched with model information and a multi-level hierarchy for organization. To learn more about this concept, read:
For more information about using HTTP requests with Azure functions, see:
You can write custom logic to automatically provide this information using the model and graph data already stored in Azure Digital Twins. To read more about managing, upgrading, and retrieving information from the twins graph, see the following how-to guides:
Feedback
Coming soon: Throughout 2024 we will be phasing out GitHub Issues as the feedback mechanism for content and replacing it with a new feedback system. For more information see: https://aka.ms/ContentUserFeedback.
Submit and view feedback for