Note
Access to this page requires authorization. You can try signing in or changing directories.
Access to this page requires authorization. You can try changing directories.
Data history is an Azure Digital Twins feature for automatically historizing graph updates to Azure Data Explorer. This data can be queried using the Azure Digital Twins query plugin for Azure Data Explorer to gain insights about your environment over time.
This article shows how to set up a working data history connection between Azure Digital Twins and Azure Data Explorer. It uses the Azure CLI and the Azure portal to set up and connect the required data history resources, including:
- an Azure Digital Twins instance
- an Event Hubs namespace containing an event hub
- an Azure Data Explorer cluster containing a database
It also contains a sample twin graph that you can use to see the historized graph updates in Azure Data Explorer.
Tip
Although this article uses the Azure portal, you can also work with data history using the 2022-05-31 version of the rest APIs.
Prerequisites
Prepare your environment for the Azure CLI
Use the Bash environment in Azure Cloud Shell. For more information, see Get started with Azure Cloud Shell.

If you prefer to run CLI reference commands locally, install the Azure CLI. If you're running on Windows or macOS, consider running Azure CLI in a Docker container. For more information, see How to run the Azure CLI in a Docker container.
If you're using a local installation, sign in to the Azure CLI by using the az login command. To finish the authentication process, follow the steps displayed in your terminal. For other sign-in options, see Authenticate to Azure using Azure CLI.
When you're prompted, install the Azure CLI extension on first use. For more information about extensions, see Use and manage extensions with the Azure CLI.
Run az version to find the version and dependent libraries that are installed. To upgrade to the latest version, run az upgrade.
Note
You can also use Azure Cloud Shell in the PowerShell environment instead of the Bash environment, if you prefer. The commands on this page are written for the Bash environment, so they might require some small adjustments to be run in PowerShell.
Set up CLI session
To start working with Azure Digital Twins in the CLI, the first thing to do is sign in and set the CLI context to your subscription for this session. Run these commands in your CLI window:
az login
az account set --subscription "<your-Azure-subscription-ID>"
Tip
You can also use your subscription name instead of the ID in the previous command.
If you're using this subscription with Azure Digital Twins for the first time, run the following command to register with the Azure Digital Twins namespace. (If you're not sure, it's ok to run it again even if you ran it sometime in the past.)
az provider register --namespace 'Microsoft.DigitalTwins'
Next you add the Microsoft Azure IoT Extension for Azure CLI, to enable commands for interacting with Azure Digital Twins and other IoT services. Run this command to make sure you have the latest version of the extension:
az extension add --upgrade --name azure-iot
Now you're ready to work with Azure Digital Twins in the Azure CLI.
You can verify this status by running az dt --help at any time to see a list of the top-level Azure Digital Twins commands that are available.
Set up local variables for CLI session
This article provides CLI commands that you can use to create the data history resources. In order to make it easy to copy and run those commands later, you can set up local variables in your CLI session now, and then refer to those variables later in the CLI commands when creating your resources. To create the variables, update the placeholders (identified with <...> brackets) in the following commands, and then run the commands. Make sure to follow the naming rules described in the comments. These values are used later when creating the new resources.
Note
These commands are written for the Bash environment. They can be adjusted for PowerShell if you prefer to use a PowerShell CLI environment.
## General Setup
location="<your-resource-region>"
resourcegroup="<your-resource-group-name>"

## Azure Digital Twins Setup
# Instance name can contain letters, numbers, and hyphens. It must start and end with a letter or number, and be between 4 and 62 characters long.
dtname="<name-for-your-digital-twins-instance>"
# Connection name can contain letters, numbers, and hyphens. It must contain at least one letter, and be between 3 and 50 characters long.
connectionname="<name-for-your-data-history-connection>"

## Event Hub Setup
# Namespace can contain letters, numbers, and hyphens. It must start with a letter, end with a letter or number, and be between 6 and 50 characters long.
eventhubnamespace="<name-for-your-event-hub-namespace>"
# Event hub name can contain only letters, numbers, periods, hyphens and underscores. It must start and end with a letter or number.
eventhub="<name-for-your-event-hub>"

## Azure Data Explorer Setup
# Cluster name can contain only lowercase alphanumeric characters. It must start with a letter, and be between 4 and 22 characters long.
clustername="<name-for-your-cluster>"
# Database name can contain only alphanumeric, spaces, dash and dot characters, and be up to 260 characters in length.
databasename="<name-for-your-database>"

# Enter a name for the table where relationship create and delete events are stored.
relationshiplifecycletablename="<name-for-your-relationship-lifecycle-events-table>"
# Enter a name for the table where twin create and delete events are stored.
twinlifecycletablename="<name-for-your-twin-lifecycle-events-table>"
# Optionally, enter a custom name for the table where twin property updates are stored. If not provided, the table is named AdtPropertyEvents.
twinpropertytablename="<name-for-your-twin-property-events-table>"
Create an Azure Digital Twins instance with a managed identity
If you already have an Azure Digital Twins instance, ensure that you enable a system-assigned managed identity for it.
If you don't have an Azure Digital Twins instance, follow the instructions in Create the instance with a managed identity to create an Azure Digital Twins instance with a system-assigned managed identity for the first time.
Then, make sure you have Azure Digital Twins Data Owner role on the instance. You can find instructions in Set up user access permissions.
If you'd like to add the name of your instance to your local CLI variables, so it can be automatically plugged into later commands copied from this article, store it in the variable dtname like this:
dtname="<name-of-your-instance>"
Create an Event Hubs namespace and event hub
The next step is to create an Event Hubs namespace and an event hub. This hub receives graph lifecycle and property update notifications from the Azure Digital Twins instance and then forward the messages to the target Azure Data Explorer cluster.
As part of the data history connection setup later, you grant the Azure Digital Twins instance the Azure Event Hubs Data Owner role on the event hub resource.
For more information about Event Hubs and their capabilities, see the Event Hubs documentation.
Note
While setting up data history, local authorization must be enabled on the event hub. If you ultimately want to have local authorization disabled on your event hub, disable the authorization after setting up the connection. You also need to adjust some permissions, described in Restrict network access to data history resources later in this article.
Use the following CLI commands to create the required resources. The commands use several local variables ($location, $resourcegroup, $eventhubnamespace, and $eventhub) that were created earlier in Set up local variables for CLI session.
Create an Event Hubs namespace:
az eventhubs namespace create --name $eventhubnamespace --resource-group $resourcegroup --location $location
Create an event hub in your namespace:
az eventhubs eventhub create --name $eventhub --resource-group $resourcegroup --namespace-name $eventhubnamespace
Create a Kusto (Azure Data Explorer) cluster and database
Next, create a Kusto (Azure Data Explorer) cluster and database to receive the data from Azure Digital Twins.
As part of the data history connection setup later, you grant the Azure Digital Twins instance the Contributor role on at least the database (it can also be scoped to the cluster), and the Admin role on the database.
Important
Make sure that the cluster has public network access enabled. If the Azure Data Explorer cluster has public network access disabled, Azure Digital Twins is unable to configure the tables and other required artifacts, and data history setup fails.
Use the following CLI commands to create the required resources. The commands use several local variables ($location, $resourcegroup, $clustername, and $databasename) that were created earlier in Set up local variables for CLI session.
Start by adding the Kusto extension to your CLI session, if you don't have it already.
az extension add --name kusto
Next, create the Kusto cluster. The following command requires 5-10 minutes to execute, and creates an E2a v4 cluster in the developer tier. This type of cluster has a single node for the engine and data-management cluster, and is applicable for development and test scenarios. For more information about the tiers in Azure Data Explorer and how to select the right options for your production workload, see Select the correct compute SKU for your Azure Data Explorer cluster and Azure Data Explorer Pricing.
az kusto cluster create --cluster-name $clustername --sku name="Dev(No SLA)_Standard_E2a_v4" tier="Basic" --resource-group $resourcegroup --location $location --type SystemAssigned
Create a database in your new Kusto cluster (using the previously specified cluster name and in the same location). This database is used to store contextualized Azure Digital Twins data. The following command creates a database with a soft delete period of 365 days, and a hot cache period of 31 days. For more information about the options available for this command, see az kusto database create.
az kusto database create --cluster-name $clustername --database-name $databasename --resource-group $resourcegroup --read-write-database soft-delete-period=P365D hot-cache-period=P31D location=$location
Set up data history connection
Now that you created the required resources, use the command in this section to create a data history connection between the Azure Digital Twins instance, the event hub, and the Azure Data Explorer cluster.
This command also creates three tables in your Azure Data Explorer database to store twin property updates, relationship lifecycle events, and twin lifecycle events, respectively. For more information about these types of historized data and their corresponding Azure Data Explorer tables, see Data types and schemas.
Use the command in this section to create a data history connection and the tables in Azure Data Explorer. The command always creates a table for historized twin property updates, and it includes parameters to create the tables for relationship lifecycle and twin lifecycle events.
Note
By default, this command assumes all resources are in the same resource group as the Azure Digital Twins instance. You can specify resources that are in different resource groups using the parameter options for this command.
The following command uses local variables that were created earlier in Set up local variables for CLI session and has several parameters, including...
- The names of the relationship lifecycle and twin lifecycle tables in Azure Data Explorer (these parameters are optional if you don't want to historize these event types, but required if you do want to historize these event types)
- An optional parameter to specify the name of the twin property event table (if this value isn't provided, this table is named AdtPropertyEvents by default). If you don't want to specify another name, remove the
--adx-property-events-tableparameter from the command before running it. - The optional parameter
--adx-record-removalsto turn on historization for twin property deletions (events that remove properties entirely)
az dt data-history connection create adx --dt-name $dtname --cn $connectionname --adx-cluster-name $clustername --adx-database-name $databasename --eventhub $eventhub --eventhub-namespace $eventhubnamespace --adx-property-events-table $twinpropertytablename --adx-twin-events-table $twinlifecycletablename --adx-relationship-events-table $relationshiplifecycletablename --adx-record-removals true
When executing the previous command, you're given the option of assigning the necessary permissions required for setting up your data history connection on your behalf (if you already assigned the necessary permissions, you can skip these prompts). These permissions are granted to the managed identity of your Azure Digital Twins instance. The minimum required roles are:
- Azure Event Hubs Data Owner on the event hub
- Contributor scoped at least to the specified database (it can also be scoped to the cluster)
- Database principal assignment with role Admin (for table creation / management) scoped to the specified database
For regular data plane operation, these roles can be reduced to a single Azure Event Hubs Data Sender role, if desired.


After setting up the data history connection, you can optionally remove the roles granted to your Azure Digital Twins instance for accessing the Event Hubs and Azure Data Explorer resources. In order to use data history, the only role the instance needs is Azure Event Hubs Data Sender (or a higher role that includes these permissions, such as Azure Event Hubs Data Owner) on the Event Hubs resource.
Note
Once the connection is set up, the default settings on your Azure Data Explorer cluster results in an ingestion latency of approximately 10 minutes or less. You can reduce this latency by enabling streaming ingestion (less than 10 seconds of latency) or an ingestion batching policy. For more information about Azure Data Explorer ingestion latency, see End-to-end ingestion latency.
Restrict network access to data history resources
If you'd like to restrict network access to the resources involved in data history (your Azure Digital Twins instance, event hub, or Azure Data Explorer cluster), you should set those restrictions after setting up the data history connection. These restrictions include disabling local access for your resources, among other measures to reduce network access.
To make sure your data history resources can communicate with each other, you should also modify the data connection for the Azure Data Explorer database to use a system-assigned managed identity.
To make sure your data history connection is set up properly when your resources need reduced network access, perform the following steps in order:
- Make sure local authorization is enabled on your data history resources (your Azure Digital Twins instance, event hub, and Azure Data Explorer cluster)
- Create the data history connection
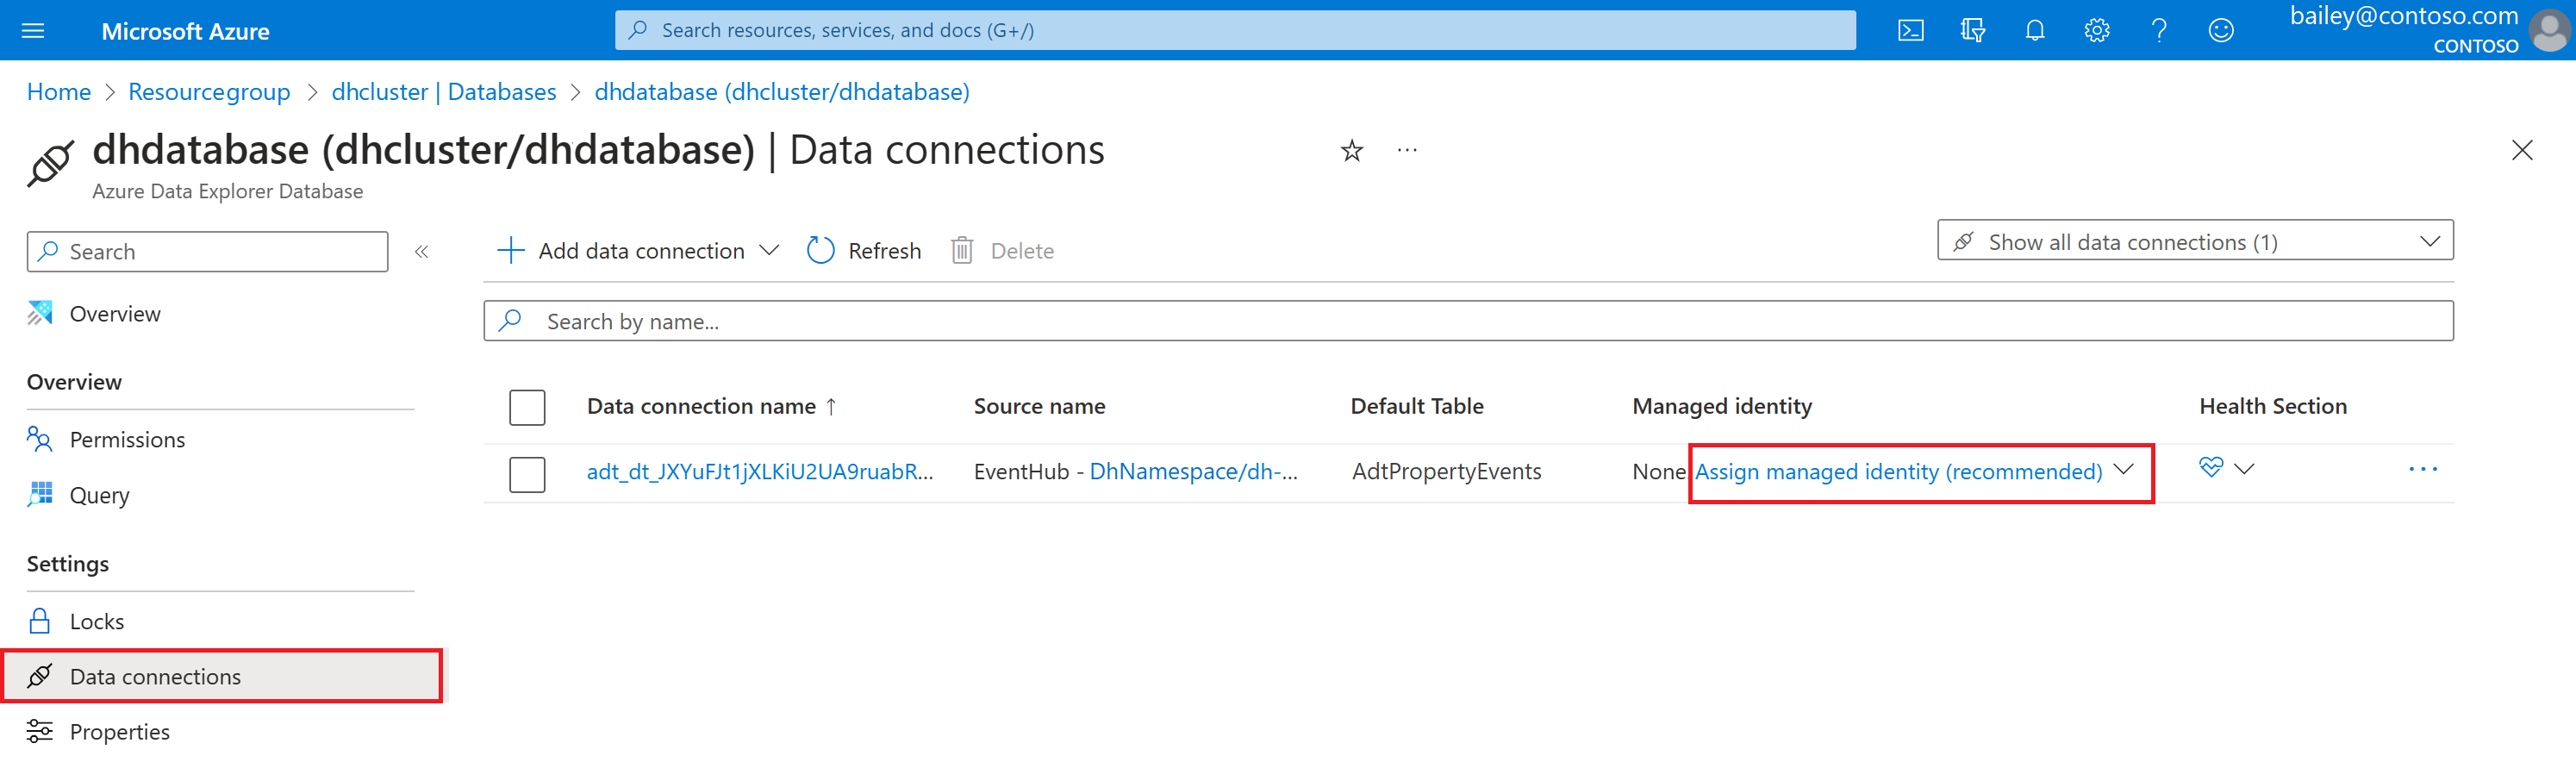
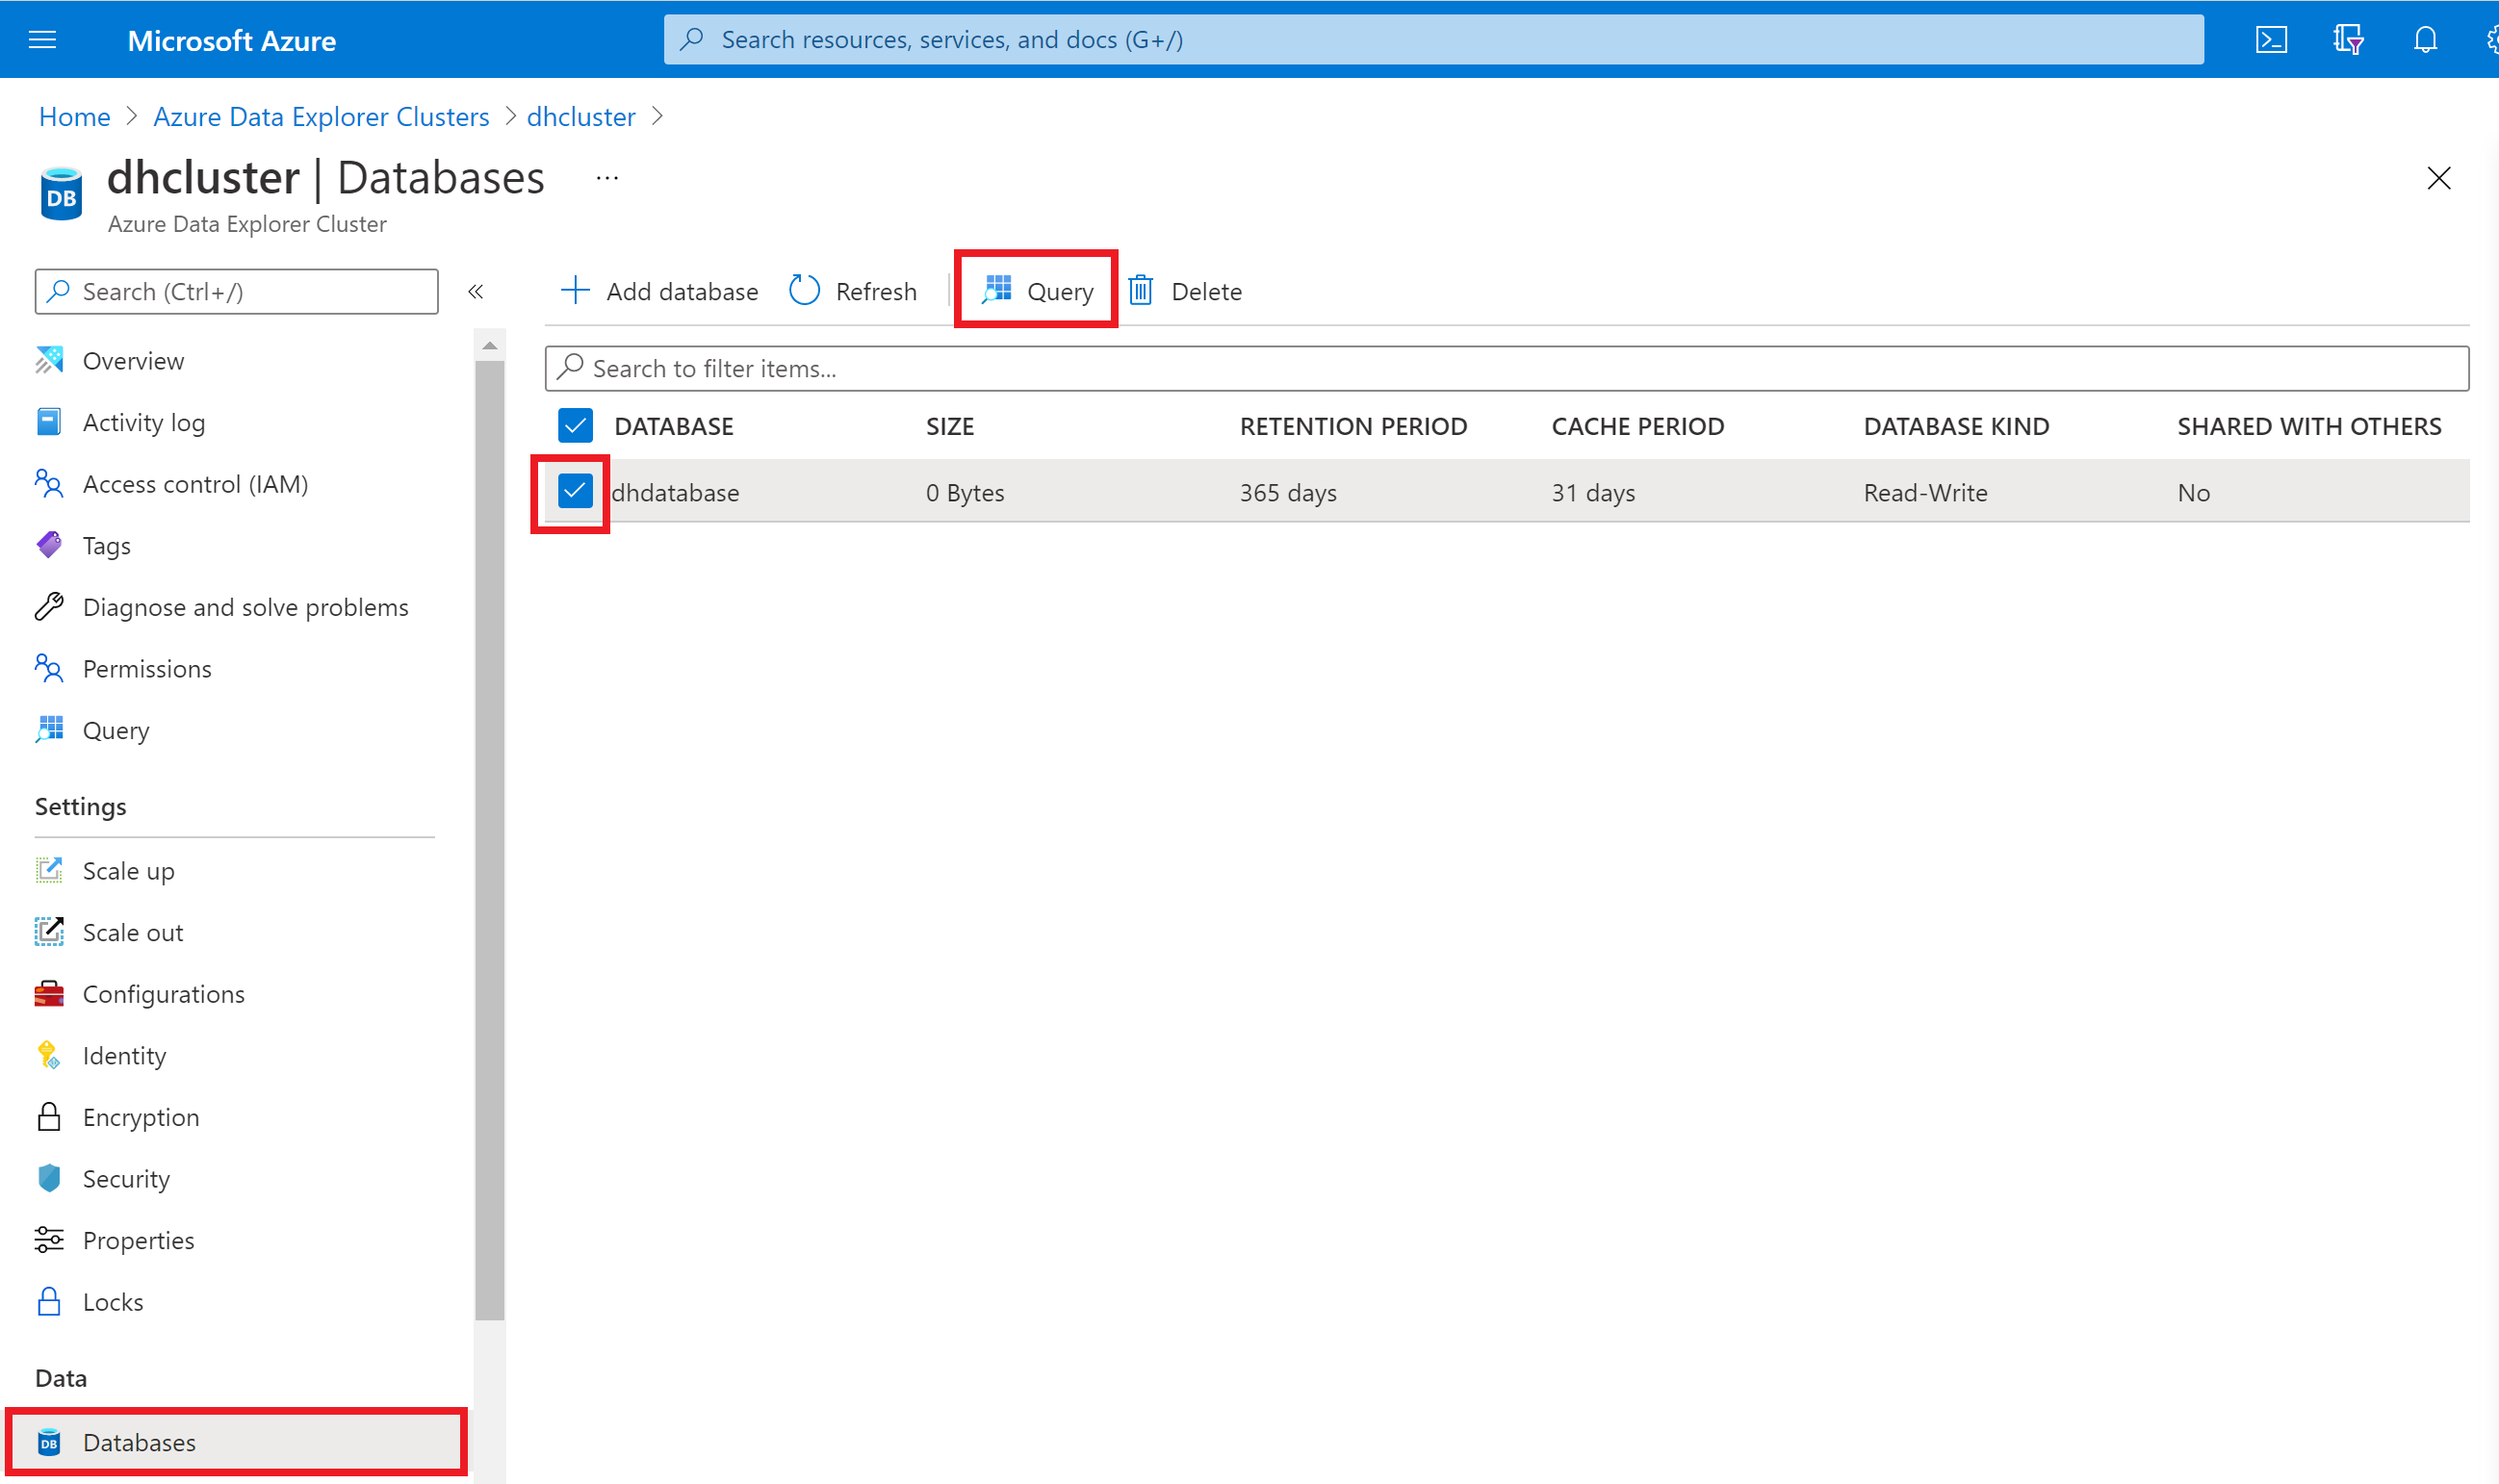
- Update the data connection for the Azure Data Explorer database to use a system-assigned managed identity. In the Azure portal, you can update the data connection by navigating to the Azure Data Explorer cluster and using Databases in the menu to navigate to the data history database. In the database menu, select Data connections. In the table entry for your data history connection, you should see the option to Assign managed identity, where you can choose System-assigned.
- You can now disable local authorization or set other network restrictions for your desired resources, by changing the access settings on your Azure Digital Twins instance, event hub, or Azure Data Explorer cluster.

Troubleshoot connection setup
Here are a few common errors you might encounter when setting up a data history connection, and how to resolve them.
- If you have public network access disabled for your Azure Data Explorer cluster, you encounter an error that the service failed to create the data history connection, with the message "The resource could not ACT due to an internal server error." Data history setup fails if the Azure Data Explorer cluster has public network access disabled, since Azure Digital Twins is unable to configure the tables and other required artifacts.
- (CLI users) If you encounter the error "Could not create Azure Digital Twins instance connection. Unable to create table and mapping rule in database. Check your permissions for the Azure Database Explorer and run
az loginto refresh your credentials," resolve the error by adding yourself as an AllDatabasesAdmin under Permissions in your Azure Data Explorer cluster. - (Cloud Shell users) If you're using the Cloud Shell and encounter the error "Failed to connect to MSI. Please make sure MSI is configured correctly," try running the command with a local Azure CLI installation instead.
Verify with a sample twin graph
Now that your data history connection is set up, you can test it with data from your digital twins.
If you already have twins in your Azure Digital Twins instance that are actively receiving graph updates (including twin property updates or updates from changing the structure of the graph by creating or deleting elements), you can skip this section and visualize the results using your own resources.
Otherwise, continue through this section to set up a sample graph that undergoes twin and relationship lifecycle events and generate twin property updates.
You can set up a sample graph for this scenario using the Azure Digital Twins Data Simulator. The Azure Digital Twins Data Simulator creates twins and relationships in your Azure Digital Twins instance, and continuously pushes property updates to the twins.
Create a sample graph
You can use the Azure Digital Twins Data Simulator to provision a sample twin graph and push property updates to it. The twin graph created here models pasteurization processes for a dairy company.
Start by opening the Azure Digital Twins Data Simulator in your browser. Set these fields:
- Instance URL: Enter the host name of your Azure Digital Twins instance. The host name can be found in the portal page for your instance, and has a format like
<Azure-Digital-Twins-instance-name>.api.<region-code>.digitaltwins.azure.net. - Simulation Type: Select Dairy facility from the dropdown menu.
Select Generate Environment.

You see confirmation messages on the screen as models, twins, and relationships are created in your environment. This process also generates twin and relationship creation events, which are historized to Azure Data Explorer as twin and relationship lifecycle events, respectively.
When the simulation is ready, the Start simulation button is enabled. Scroll down and select Start simulation to push simulated data to your Azure Digital Twins instance. To continuously update the twins in your Azure Digital Twins instance, keep this browser window in the foreground on your desktop and complete other browser actions in a separate window. This window continuously generates twin property updates events that are historized to Azure Data Explorer.
View the historized updates in Azure Data Explorer
This section shows you how to view all three types of historized updates generated by the simulator and stored in Azure Data Explorer tables.
Start in the Azure portal and navigate to the Azure Data Explorer cluster you created earlier. Choose the Query pane, under Data, from the left menu to open the query view.
Next, expand the cluster and database in the left pane to see the name of the data history tables. There should be three: one for twin property update events, one for relationship lifecycle events, and one for twin lifecycle events. You use these table names to run queries on the tables to verify and view the historized data.

Verify table entries
To verify that events are being historized to the database, start by copying the following command. It has a placeholder for the name of the relationship lifecycle events table, and it changes the ingestion for the table to batched mode so it ingests data from the live simulation every 10 seconds.
.alter table <relationship-lifecycle-events-table-name> policy ingestionbatching @'{"MaximumBatchingTimeSpan":"00:00:10", "MaximumNumberOfItems": 500, "MaximumRawDataSizeMB": 1024}'
Paste the command into the query window, replacing the placeholder with the name of your relationship events table. Select the Run button to run the command.

Repeat the command two more times using the name of the twin lifecycle events table and then the property update table to update the ingestion mode of the other tables as well.
Next, add the following commands to the query window and run them. Each command contains a placeholder for the name of one of the tables, and the commands output the number of items in the tables.
Note
It might take up to 5 minutes for the first batch of ingested data to appear.
<twin-property-updates-table-name>
| count

<relationship-lifecycle-events-table-name>
| count

<twin-lifecycle-events-table-name>
| count
You should see in the results that the count of items in each table is something greater than zero, indicating that property update, relationship lifecycle, and twin lifecycle events are being historized to their respective tables.
Explore twin property updates table
In this section, you do some more exploration with the twin property update data that's in the table.
First, run the following command to view 100 records in the table:
<twin-property-updates-table-name>
| limit 100
Next, run a query based on the data of your twins to see the contextualized time series data.
Use the following query to chart the outflow of all salt machine twins in the sample Oslo dairy factory. This Kusto query uses the Azure Digital Twins plugin to select the twins of interest, joins those twins against the data history time series in Azure Data Explorer, and then charts the results. Make sure to replace the <ADT-instance-host-name> placeholder with the host name of your instance, and the <table-name> placeholder with the name of your twin property updates table.
let ADTendpoint = "https://<ADT-instance-host-name>";
let ADTquery = ```SELECT SALT_MACHINE.$dtId as tid
FROM DIGITALTWINS FACTORY
JOIN SALT_MACHINE RELATED FACTORY.contains
WHERE FACTORY.$dtId = 'OsloFactory'
AND IS_OF_MODEL(SALT_MACHINE , 'dtmi:assetGen:SaltMachine;1')```;
evaluate azure_digital_twins_query_request(ADTendpoint, ADTquery)
| extend Id = tostring(tid)
| join kind=inner (<table-name>) on Id
| extend val_double = todouble(Value)
| where Key == "OutFlow"
| render timechart with (ycolumns = val_double)
The results should show the outflow numbers changing over time.

Troubleshoot connection
If you don't see data in Azure Data Explorer, the historization data flow isn't working properly. You can investigate the issue by viewing your Event Hubs namespace in the Azure portal, which displays charts showing the flow of messages into and out of the namespace. This display allows you to verify both the flow of incoming messages from Azure Digital Twins and the outgoing messages to Azure Data Explorer, to help you identify which part of the flow isn't working.

Next steps
To keep exploring the dairy scenario, you can view more sample queries on GitHub that show how you can monitor the performance of the dairy operation based on machine type, factory, maintenance technician, and various combinations of these parameters.
To build Grafana dashboards that visualize the performance of the dairy operation, read Creating dashboards with Azure Digital Twins, Azure Data Explorer, and Grafana.
For more information on using the Azure Digital Twins query plugin for Azure Data Explorer, see Querying with the Azure Data Explorer plugin and this blog post. You can also read more about the plugin here: Querying with the Azure Data Explorer plugin.