Get Azure recommendations to migrate your SQL Server database
The Azure SQL Migration extension for Azure Data Studio helps you to assess your database requirements, get the right-sized SKU recommendations for Azure resources, and migrate your SQL Server database to Azure.
Learn how to use this unified experience, collecting performance data from your source SQL Server instance to get right-sized Azure recommendations for your Azure SQL targets.
Overview
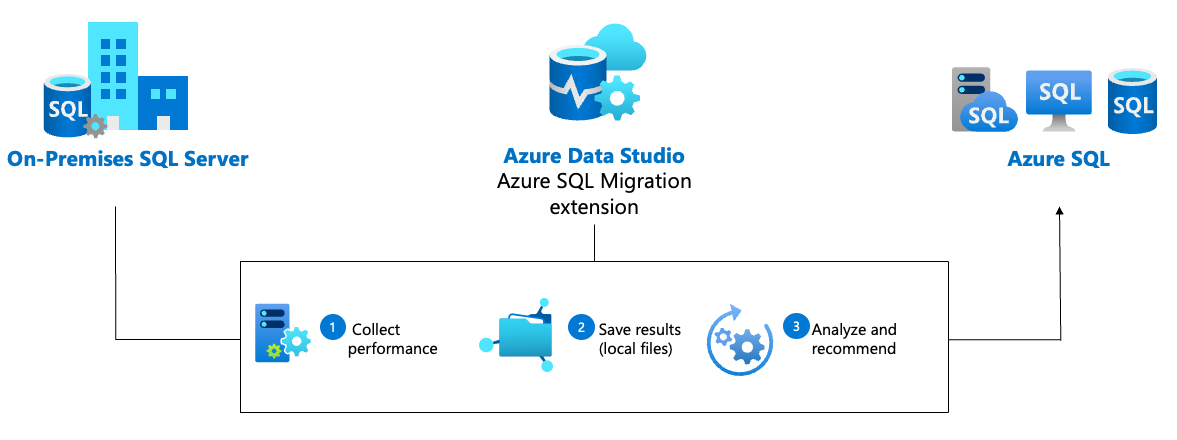
Before migrating to Azure SQL, you can use the SQL Migration extension in Azure Data Studio to help you generate right-sized recommendations for Azure SQL Database, Azure SQL Managed Instance, and SQL Server on Azure Virtual Machines targets. The tool helps you collect performance data from your source SQL instance (running on-premises or other cloud), and recommend a compute and storage configuration to meet your workload's needs.
The diagram presents the workflow for Azure recommendations in the Azure SQL Migration extension for Azure Data Studio:
Note
Assessment and the Azure recommendation feature in the Azure SQL Migration extension for Azure Data Studio supports source SQL Server instances running on Windows or Linux.
Prerequisites
To get started with Azure recommendations for your SQL Server database migration, you must meet the following prerequisites:
- Download and install Azure Data Studio.
- Install the Azure SQL Migration extension from Azure Data Studio Marketplace.
- Ensure that the login you use to connect the source SQL Server instance, has the minimum permissions.
Supported sources and targets
Azure recommendations can be generated for the following SQL Server versions:
- SQL Server 2008 and later versions on Windows or Linux are supported.
- SQL Server running on other clouds may be supported, but the accuracy of results may vary
Azure recommendations can be generated for the following Azure SQL targets:
- Azure SQL Database
- Hardware families: Standard series (Gen5)
- Service tiers: General Purpose, Business Critical, Hyperscale
- Azure SQL Managed Instance
- Hardware families: Standard series (Gen5), Premium series, Premium series memory-optimized
- Service tiers: General Purpose, Business Critical
- SQL Server on Azure Virtual Machine
- VM families: General purpose, memory-optimized
- Storage families: Premium SSD
Performance data collection
Before recommendations can be generated, performance data needs to be collected from your source SQL Server instance. During this data collection step, multiple dynamic system views (DMVs) from your SQL Server instance are queried to capture the performance characteristics of your workload. The tool captures metrics including CPU, memory, storage, and IO usage every 30 seconds, and saves the performance counters locally to your machine as a set of CSV files.
Instance level
This performance data is collected once per SQL Server instance:
| Performance dimension | Description | Dynamic Management view (DMV) |
|---|---|---|
| SqlInstanceCpuPercent | The amount of CPU that the SQL Server process was using, as a percentage | sys.dm_os_ring_buffers |
| PhysicalMemoryInUse | Overall memory footprint of the SQL Server process | sys.dm_os_process_memory |
| MemoryUtilizationPercentage | SQL Server's memory utilization | sys.dm_os_process_memory |
Database level
| Performance dimension | Description | Dynamic Management view (DMV) |
|---|---|---|
| DatabaseCpuPercent | The total percentage of CPU used by a database | sys.dm_exec_query_stats |
| CachedSizeInMb | Total size in Megabytes of cache used by a database | sys.dm_os_buffer_descriptors |
File level
| Performance dimension | Description | Dynamic Management view (DMV) |
|---|---|---|
| ReadIOInMb | The total number of megabytes read from this file | sys.dm_io_virtual_file_stats |
| WriteIOInMb | The total number of megabytes written to this file | sys.dm_io_virtual_file_stats |
| NumOfReads | The total number of reads issued on this file | sys.dm_io_virtual_file_stats |
| NumOfWrites | The total number of writes issued on this file | sys.dm_io_virtual_file_stats |
| ReadLatency | The IO read latency on this file | sys.dm_io_virtual_file_stats |
| WriteLatency | The IO write latency on this file | sys.dm_io_virtual_file_stats |
A minimum of 10 minutes of data collection is required before a recommendation can be generated, but to accurately assess your workload, it's recommended that you run the data collection for a duration sufficiently long to capture both on-peak and off-peak usage.
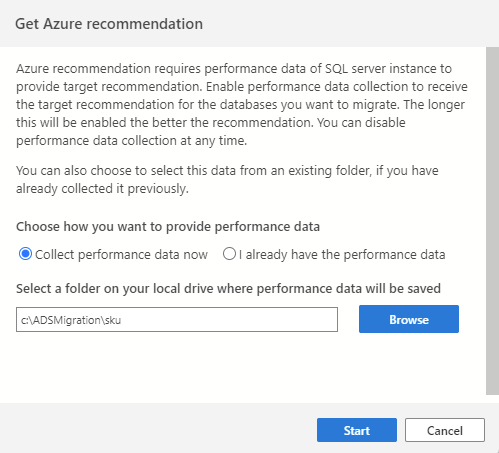
To initiate the data collection process, begin by connecting to your source SQL instance in Azure Data Studio, then launch the SQL Migration wizard. On step 2, select "Get Azure recommendation". Select "Collect performance data now" and select a folder on your machine where the collected data will be saved.
Important
The data collection process runs for 10 minutes to generate the first recommendation. It's important to start the data collection process when your active database workload reflects usage that's similar to your production scenarios.
After the first recommendation is generated, you can continue to run the data collection process to refine recommendations. This option is especially useful if your usage patterns vary over time.
The data collection process begins once you select Start. Every 10 minutes, the collected data points are aggregated and the max, mean and variance of each counter will be written to disk to a set of three CSV files.
You typically see a set of CSV files with the following suffixes in the selected folder:
SQLServerInstance_CommonDbLevel_Counters.csv: Contains static configuration data about the database file layout and metadata.SQLServerInstance_CommonInstanceLevel_Counters.csv: Contains static data about the hardware configuration of the server instance.SQLServerInstance_PerformanceAggregated_Counters.csv: Contains aggregated performance data that's updated frequently.
During this time, leave Azure Data Studio open, though you can continue with other operations. At any time, you can stop the data collection process by returning to this page and select Stop data collection.
Generating right-sized recommendations
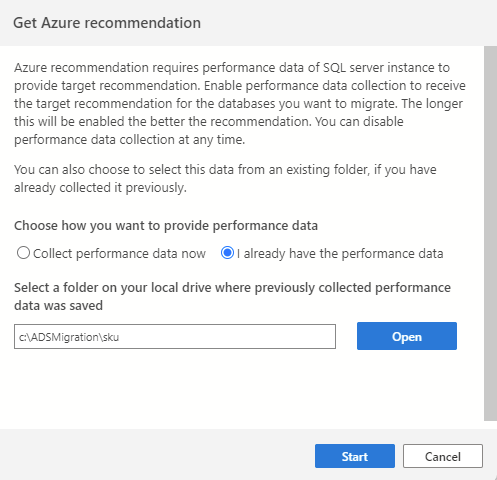
If you have already collected performance data from a previous session, or using a different tool (such as Database Migration Assistant), you can import any existing performance data by selecting the option I already have the performance data. Proceed to select the folder where your performance data (three .csv files) is saved and select Start to initiate the recommendation process.
Note
Step one of the SQL Migration wizard asks you to select a set of databases to assess, and these are the only databases which will be taken into consideration during the recommendation process.
However, the performance data collection process collects performance counters for all databases from the source SQL Server instance, not just the ones that were selected.
This means that previously collected performance data can be used to repeatedly regenerate recommendations for a different subset of databases by specifying a different list on step one.
Recommendation parameters
There are multiple configurable settings that could affect your recommendations.
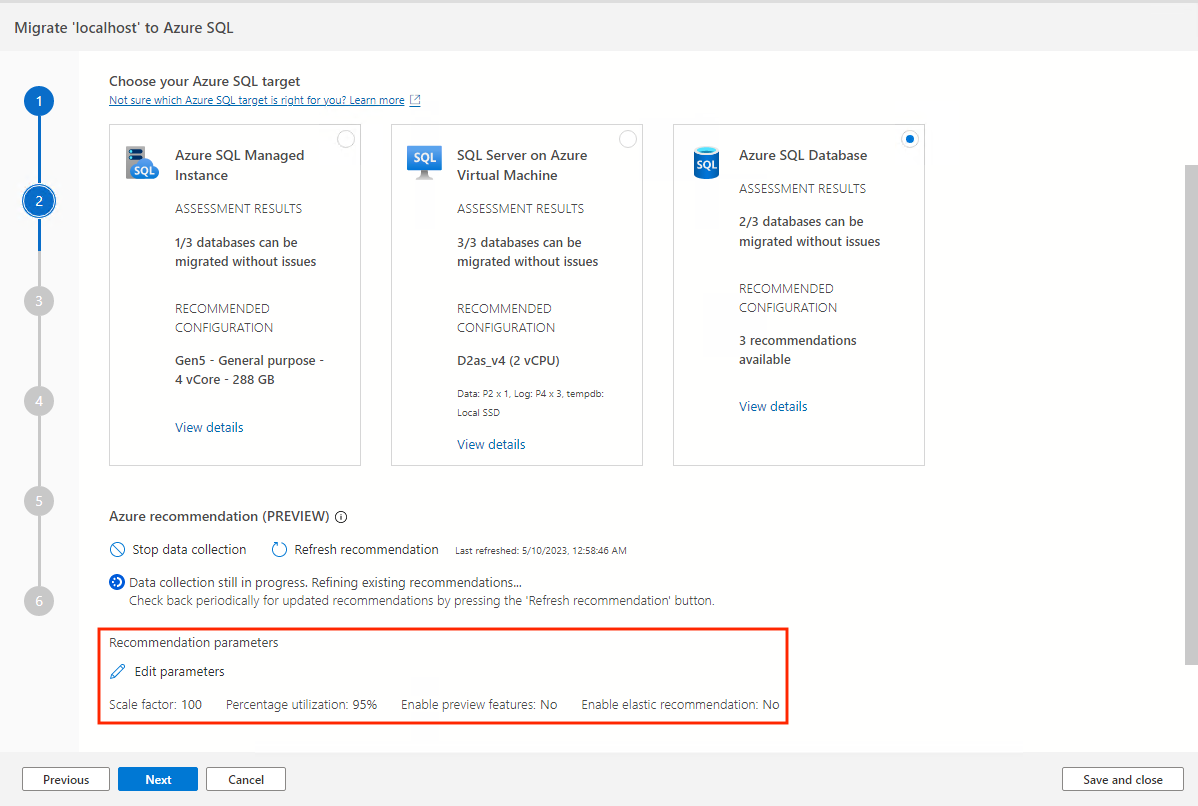
Select the Edit parameters option to adjust these parameters according to your needs.
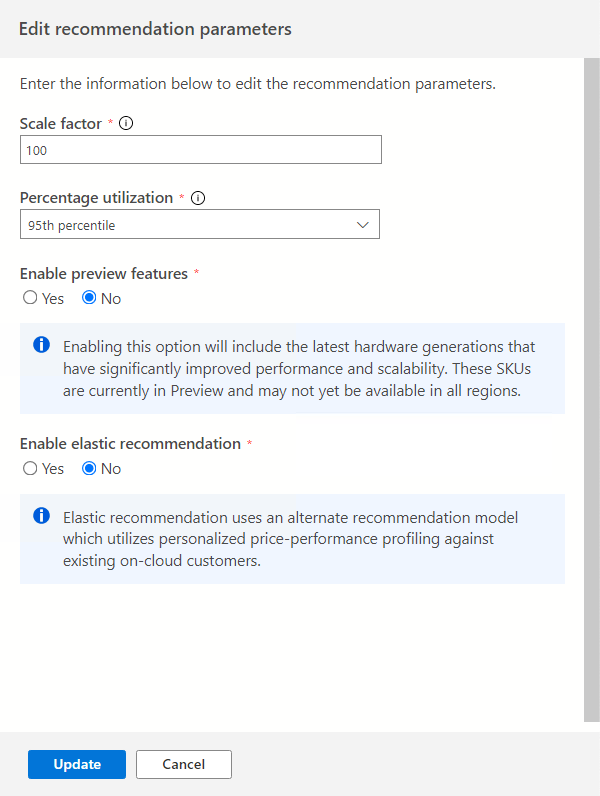
Scale factor:
This option allows you to provide a buffer to apply to each performance dimension. This option accounts for issues like seasonal usage, short performance history, and likely increases in future usage. For example, if you determine that a four-vCore CPU requirement has a scale factor of 150%, the true CPU requirement is six vCores.The default scale factor volume is 100%.
Percentage utilization:
The percentile of data points to be used as performance data is aggregated.The default value is the 95th percentile.
Enable preview features:
This option allows for configurations to be recommended that may not be generally available to all users in all regions yet.This option is turned off by default.
Enable elastic recommendation:
This option uses an alternate recommendation model that utilizes personalized price-performance profiling against existing on-cloud customers.
This option is turned off by default.
Important
The data collection process terminates if you close Azure Data Studio. The data that was collected up to that point is saved in your folder.
If you close Azure Data Studio while data collection is in progress, use one of the following options to restart data collection:
- Reopen Azure Data Studio and import the data files that are saved in your local folder. Then, generate a recommendation from the collected data.
- Reopen Azure Data Studio and start data collection again by using the migration wizard.
Minimum permissions
To query the necessary system views for performance data collection, specific permissions are required for the SQL Server login used for this task. You can create a minimum privileged user for assessment and performance data collection using the following script:
-- Create a login to run the assessment
USE master;
GO

CREATE LOGIN [assessment] WITH PASSWORD = '<STRONG PASSWORD>';

-- Create user in every database other than TempDB and model and provide minimal read-only permissions
EXECUTE sp_MSforeachdb '
   USE [?];
   IF (''?'' NOT IN (''TempDB'',''model''))
   BEGIN TRY
      CREATE USER [assessment] FOR LOGIN [assessment]
   END TRY
   BEGIN CATCH
      PRINT ERROR_MESSAGE()
   END CATCH'

EXECUTE sp_MSforeachdb '
   USE [?];
   IF (''?'' NOT IN (''tempdb'',''model''))
   BEGIN TRY
      GRANT SELECT ON sys.sql_expression_dependencies TO [assessment]
   END TRY
   BEGIN CATCH
      PRINT ERROR_MESSAGE()
   END CATCH'

EXECUTE sp_MSforeachdb '
   USE [?];
   IF (''?'' NOT IN (''tempdb'',''model''))
   BEGIN TRY
      GRANT VIEW DATABASE STATE TO [assessment]
   END TRY
   BEGIN CATCH
      PRINT ERROR_MESSAGE()
   END CATCH'

-- Provide server level read-only permissions
GRANT SELECT ON sys.sql_expression_dependencies TO [assessment];
GRANT SELECT ON sys.sql_expression_dependencies TO [assessment];
GRANT EXECUTE ON OBJECT::sys.xp_regenumkeys TO [assessment];
GRANT VIEW DATABASE STATE TO assessment;
GRANT VIEW SERVER STATE TO assessment;
GRANT VIEW ANY DEFINITION TO assessment;

-- Provide msdb specific permissions
USE msdb;
GO

GRANT EXECUTE ON [msdb].[dbo].[agent_datetime] TO [assessment];
GRANT SELECT ON [msdb].[dbo].[sysjobsteps] TO [assessment];
GRANT SELECT ON [msdb].[dbo].[syssubsystems] TO [assessment];
GRANT SELECT ON [msdb].[dbo].[sysjobhistory] TO [assessment];
GRANT SELECT ON [msdb].[dbo].[syscategories] TO [assessment];
GRANT SELECT ON [msdb].[dbo].[sysjobs] TO [assessment];
GRANT SELECT ON [msdb].[dbo].[sysmaintplan_plans] TO [assessment];
GRANT SELECT ON [msdb].[dbo].[syscollector_collection_sets] TO [assessment];
GRANT SELECT ON [msdb].[dbo].[sysmail_profile] TO [assessment];
GRANT SELECT ON [msdb].[dbo].[sysmail_profileaccount] TO [assessment];
GRANT SELECT ON [msdb].[dbo].[sysmail_account] TO [assessment];

-- USE master;
-- GO
-- EXECUTE sp_MSforeachdb 'USE [?]; BEGIN TRY DROP USER [assessment] END TRY BEGIN CATCH SELECT ERROR_MESSAGE() END CATCH';
-- DROP LOGIN [assessment];
Unsupported scenarios and limitations
- Azure Recommendations don't include price estimates, as this situation may vary depending on region, currency, and discounts such as the Azure Hybrid Benefit. To get price estimates, use the Azure Pricing Calculator, or create a SQL assessment in Azure Migrate.
- Recommendations for Azure SQL Database with the DTU-based purchasing model aren't supported.
- Currently, Azure recommendations for Azure SQL Database serverless compute tier and Elastic Pools aren't supported.
Troubleshooting
- No recommendations generated
- If no recommendations were generated, this situation could mean that no configurations were identified which can fully satisfy the performance requirements of your source instance. In order to see reasons why a particular size, service tier, or hardware family was disqualified:
- Access the logs from Azure Data Studio by going to Help > Show All Commands > Open Extension Logs Folder
- Navigate to Microsoft.mssql > SqlAssessmentLogs > open SkuRecommendationEvent.log
- The log contains a trace of every potential configuration that was assessed and the reason why it was/was not considered being an eligible configuration:
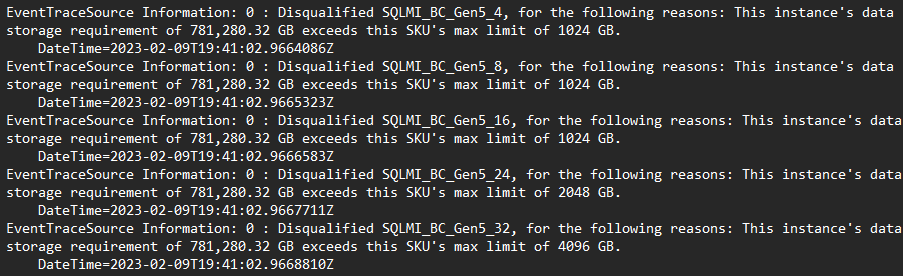
- Try regenerating the recommendation with elastic recommendation enabled. This option uses an alternate recommendation model, which utilizes personalized price-performance profiling against existing on-cloud customers.
- If no recommendations were generated, this situation could mean that no configurations were identified which can fully satisfy the performance requirements of your source instance. In order to see reasons why a particular size, service tier, or hardware family was disqualified:
Next steps
Feedback
Coming soon: Throughout 2024 we will be phasing out GitHub Issues as the feedback mechanism for content and replacing it with a new feedback system. For more information see: https://aka.ms/ContentUserFeedback.
Submit and view feedback for