Note
Access to this page requires authorization. You can try signing in or changing directories.
Access to this page requires authorization. You can try changing directories.
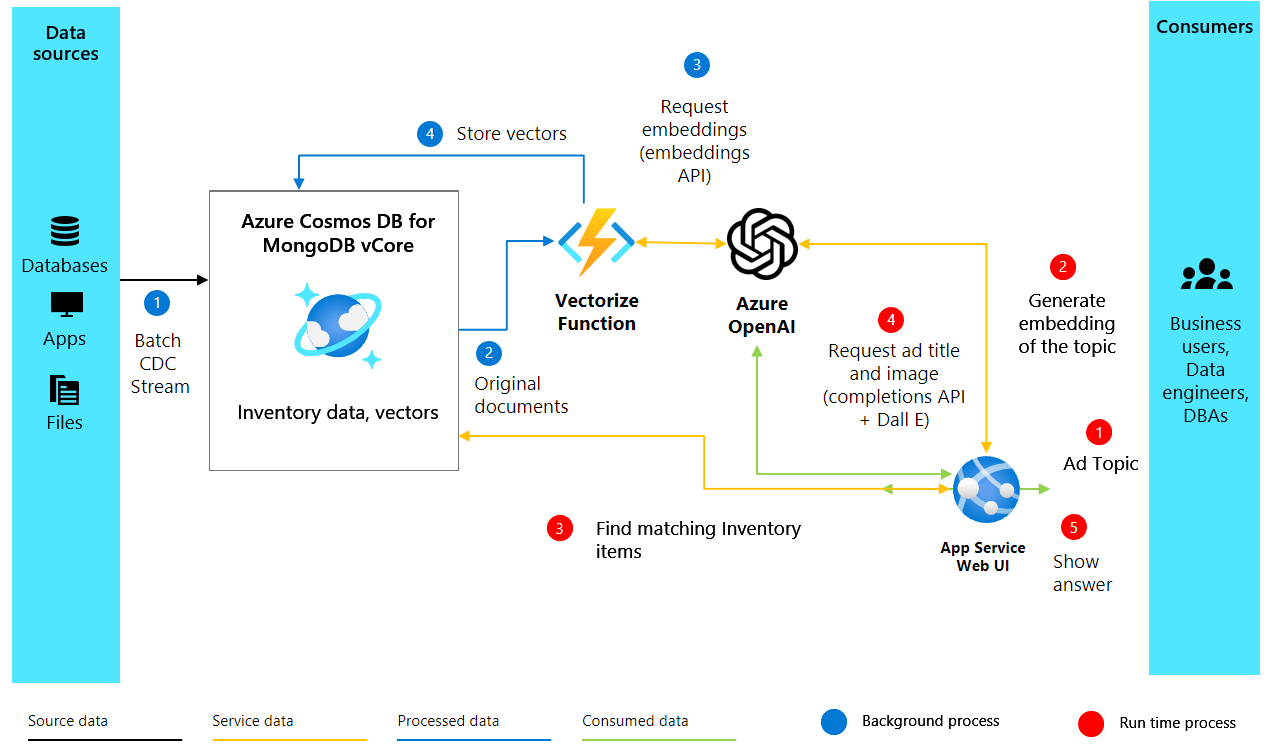
In this tutorial, you build an AI-powered advertisement generator using Azure DocumentDB and OpenAI to create dynamic, personalized advertising content. The application uses vector similarity search to match inventory items with advertisement subjects, then uses GPT-4 and DALL-E 3 to generate compelling ad copy and images through an AI assistant named Heelie.
The application works by generating vector embeddings for inventory descriptions using OpenAI embeddings, which capture the semantic meaning of product descriptions. These vectors are stored and indexed in Azure DocumentDB, enabling powerful vector similarity searches. When you need to generate an advertisement, the application vectorizes the advertisement subject to find the best-matching inventory items through vector search. It then uses a retrieval-augmented generation (RAG) process to send the top matches to OpenAI, which crafts compelling advertisement content including catchy taglines and realistic images.
In this tutorial, you:
- Set up your Python environment with required packages
- Configure Azure OpenAI and Azure DocumentDB clients
- Create vector embeddings from product descriptions
- Set up an Azure DocumentDB database with vector indexing
- Implement vector similarity search to find relevant products
- Generate advertisement content using GPT-4 and DALL-E 3
- Build an interactive web interface with Gradio
If you don't have an Azure subscription, create a free account before you begin.
Prerequisites
- An Azure subscription. If you don't have an Azure subscription, create a free account.
An existing Azure DocumentDB cluster
- If you don't have a cluster, create a new cluster
Firewall configured to allow access to your client IP address
-
text-embedding-ada-002embeddings model deployedgpt-4completions model deployed
Python 3.12 or later
Get sample data
In this tutorial, you work with a dataset of shoe products that includes product descriptions and precomputed vector embeddings. The sample data contains inventory information that the application uses to demonstrate vector similarity search and advertisement generation.
Download the sample data file from the GitHub repository:
curl -o data/shoes_with_vectors.json https://raw.githubusercontent.com/jayanta-mondal/ignite-demo/main/data/shoes_with_vectors.jsonCreate a
datafolder in your project directory and save theshoes_with_vectors.jsonfile inside it. The file contains product information including names, descriptions, prices, and vector embeddings that enable semantic search functionality.
Set up your Python environment
Set up your Python environment with the necessary packages and configure your Azure clients to authenticate requests to the OpenAI API and Azure services.
Open your terminal and install the required Python packages:
pip install numpy
pip install openai==1.2.3
pip install pymongo
pip install python-dotenv
pip install azure-core
pip install azure-cosmos
pip install tenacity
pip install gradio
Verify the OpenAI package installation:
pip show openaiCreate a new Python file for your project (for example,
ad_generator.py).Add the following code to import required libraries and configure the Azure OpenAI client:
import json
import time
import openai

from dotenv import dotenv_values
from openai import AzureOpenAI

# Configure the API to use Azure as the provider
openai.api_type = "azure"
openai.api_key = "<AZURE_OPENAI_API_KEY>"  # Replace with your actual Azure OpenAI API key
openai.api_base = "https://<OPENAI_ACCOUNT_NAME>.openai.azure.com/"  # Replace with your OpenAI account name
openai.api_version = "2023-06-01-preview"

# Initialize the AzureOpenAI client with your API key, version, and endpoint
client = AzureOpenAI(
    api_key=openai.api_key,
    api_version=openai.api_version,
    azure_endpoint=openai.api_base
)
Replace the placeholder values with your actual Azure OpenAI credentials:
<AZURE_OPENAI_API_KEY>: Your Azure OpenAI API key from the prerequisites<OPENAI_ACCOUNT_NAME>: Your Azure OpenAI account name
Create vector embeddings
Create vector embeddings from product descriptions to capture their semantic meaning in a form that machines can understand and process. The following diagram illustrates the solution architecture:
Create vector embeddings using Azure OpenAI by adding the following function to your Python file:
import openai

def generate_embeddings(text):
    try:
        response = client.embeddings.create(
            input=text, model="text-embedding-ada-002")
        embeddings = response.data[0].embedding
        return embeddings
    except Exception as e:
        print(f"An error occurred: {e}")
        return None
This function takes a text input and uses the
client.embeddings.createmethod to generate a vector embedding. Thetext-embedding-ada-002model converts the text into a high-dimensional vector that captures semantic meaning.Test your embeddings function with a sample product description:
embeddings = generate_embeddings("Shoes for San Francisco summer")

if embeddings is not None:
    print(embeddings)
If successful, the function prints the generated embeddings; otherwise, it handles exceptions by printing an error message.
Connect to Azure DocumentDB
Establish a connection to Azure DocumentDB to store and index your embeddings in a database that supports vector similarity search.
Add the following code to establish a connection with your Azure DocumentDB cluster:
import pymongo

# Replace <username>, <password>, and <cluster-name> with your actual credentials
mongo_conn = "mongodb+srv://<username>:<password>@<cluster-name>.mongocluster.cosmos.azure.com/?tls=true&authMechanism=SCRAM-SHA-256&retrywrites=false&maxIdleTimeMS=120000"
mongo_client = pymongo.MongoClient(mongo_conn)
Replace the placeholder values with your actual MongoDB credentials from the prerequisites:
<username>: Your MongoDB username<password>: Your MongoDB password<cluster-name>: Your vCore cluster name
Create a database and collection
Store the advertisement data and product inventory by creating a database and collection within your Azure DocumentDB instance.
Add the following code to create a database and collection:
DATABASE_NAME = "AdgenDatabase"
COLLECTION_NAME = "AdgenCollection"

mongo_client.drop_database(DATABASE_NAME)
db = mongo_client[DATABASE_NAME]
collection = db[COLLECTION_NAME]

if COLLECTION_NAME not in db.list_collection_names():
    # Creates a unsharded collection that uses the database's shared throughput
    db.create_collection(COLLECTION_NAME)
    print("Created collection '{}'.\n".format(COLLECTION_NAME))
else:
    print("Using collection: '{}'.\n".format(COLLECTION_NAME))
This code defines database and collection names, drops any existing database with the same name for a clean setup, creates a new database and collection, and prints confirmation messages.
Create a vector index
Create a vector index to enable efficient vector similarity searches within your collection. Azure DocumentDB supports different types of vector indexes: Inverted File Index (IVF) and Hierarchical Navigable Small World (HNSW).
Choose your indexing algorithm based on your cluster tier:
- IVF: Default algorithm that works on all cluster tiers, uses approximate nearest neighbors (ANN) approach
- HNSW: Graph-based structure, faster with greater accuracy, only available on M40 cluster tiers and higher
To create an IVF index, run the following command:
db.runCommand({
  'createIndexes': 'AdgenCollection',
  'indexes': [
    {
      'name': 'vectorSearchIndex',
      'key': {
        "contentVector": "cosmosSearch"
      },
      'cosmosSearchOptions': {
        'kind': 'vector-ivf',
        'numLists': 1,
        'similarity': 'COS',
        'dimensions': 1536
      }
    }
  ]
});
(Optional) If you're using an M40 cluster tier or higher, you can create an HNSW index instead:
db.runCommand({
    "createIndexes": "AdgenCollection",
    "indexes": [
        {
            "name": "VectorSearchIndex",
            "key": {
                "contentVector": "cosmosSearch"
            },
            "cosmosSearchOptions": {
                "kind": "vector-hnsw",
                "m": 16,
                "efConstruction": 64,
                "similarity": "COS",
                "dimensions": 1536
            }
        }
    ]
})
Important
You can only create one index per vector property. If you want to change the index type (for example, from IVF to HNSW), you must drop the index first before creating a new index.
Load inventory data
Insert the inventory data, which includes product descriptions and their corresponding vector embeddings, into your collection.
Add the following code to load and insert the data into your collection:
data_file = open(file="./data/shoes_with_vectors.json", mode="r")
data = json.load(data_file)
data_file.close()

result = collection.insert_many(data)

print(f"Number of data points added: {len(result.inserted_ids)}")
This code opens the JSON file, loads the data, inserts all documents into the collection using
insert_many(), and prints the number of documents added.
Implement vector search
Use vector search to find the most relevant items based on a query. The vector index you created enables semantic searches within the dataset.
Add the following function to perform vector similarity searches:
def vector_search(query, num_results=3):

    query_vector = generate_embeddings(query)

    embeddings_list = []
    pipeline = [
        {
            '$search': {
                "cosmosSearch": {
                    "vector": query_vector,
                    "numLists": 1,
                    "path": "contentVector",
                    "k": num_results
                },
                "returnStoredSource": True }},
        {'$project': { 'similarityScore': { '$meta': 'searchScore' }, 'document' : '$$ROOT' } }
    ]
    results = collection.aggregate(pipeline)
    return results
This function generates a vector embedding for the search query, creates an aggregation pipeline that uses Azure DocumentDB's
$searchfunctionality, finds the closest matching items based on vector similarity, and returns results with similarity scores.Test your vector search function with a sample query:
query = "Shoes for Seattle sweater weather"
results = vector_search(query, 3)

print("\nResults:\n")
for result in results:
    print(f"Similarity Score: {result['similarityScore']}")
    print(f"Title: {result['document']['name']}")
    print(f"Price: {result['document']['price']}")
    print(f"Material: {result['document']['material']}")
    print(f"Image: {result['document']['img_url']}")
    print(f"Purchase: {result['document']['purchase_url']}\n")
This code executes a vector search and displays the top three matching products with their similarity scores and details.
Generate advertisement content
Combine all components to craft compelling advertisements using OpenAI's GPT-4 for text and DALL-E 3 for images.
Add the following function to generate catchy advertisement titles using GPT-4:
from openai import OpenAI

def generate_ad_title(ad_topic):
    system_prompt = '''
    You are Heelie, an intelligent assistant for generating witty and captivating taglines for online advertisements.
        - The ad campaign taglines that you generate are short and typically under 100 characters.
    '''

    user_prompt = f'''Generate a catchy, witty, and short sentence (less than 100 characters)
                    for an advertisement for selling shoes for {ad_topic}'''
    messages=[
        {"role": "system", "content": system_prompt},
        {"role": "user", "content": user_prompt},
    ]

    response = client.chat.completions.create(
        model="gpt-4",
        messages=messages
    )

    return response.choices[0].message.content
Add the following function to generate advertisement images using DALL-E 3:
def generate_ad_image(ad_topic):
    daliClient = OpenAI(
        api_key="<DALI_API_KEY>"
    )

    image_prompt = f'''
        Generate a photorealistic image of an ad campaign for selling {ad_topic}.
        The image should be clean, with the item being sold in the foreground with an easily identifiable landmark of the city in the background.
        The image should also try to depict the weather of the location for the time of the year mentioned.
        The image should not have any generated text overlay.
    '''

    response = daliClient.images.generate(
        model="dall-e-3",
        prompt= image_prompt,
        size="1024x1024",
        quality="standard",
        n=1,
        )

    return response.data[0].url
Replace
<DALI_API_KEY>with your OpenAI API key.Add the following function to combine all elements into a complete HTML advertisement:
def render_html_page(ad_topic):

    # Find the matching shoes from the inventory
    results = vector_search(ad_topic, 4)

    ad_header = generate_ad_title(ad_topic)
    ad_image_url = generate_ad_image(ad_topic)


    with open('./data/ad-start.html', 'r', encoding='utf-8') as html_file:
        html_content = html_file.read()

    html_content += f'''<header>
            <h1>{ad_header}</h1>
        </header>'''

    html_content += f'''
            <section class="ad">
            <img src="{ad_image_url}" alt="Base Ad Image" class="ad-image">
        </section>'''

    for result in results:
        html_content += f'''
        <section class="product">
            <img src="{result['document']['img_url']}" alt="{result['document']['name']}" class="product-image">
            <div class="product-details">
                <h3 class="product-title" color="gray">{result['document']['name']}</h2>
                <p class="product-price">{"$"+str(result['document']['price'])}</p>
                <p class="product-description">{result['document']['description']}</p>
                <a href="{result['document']['purchase_url']}" class="buy-now-button">Buy Now</a>
            </div>
        </section>
        '''

    html_content += '''</article>
                    </body>
                    </html>'''

    return html_content
This function performs a vector search to find matching products, generates an advertisement title using GPT-4, generates an advertisement image using DALL-E 3, and combines everything into an HTML page with product listings.
Build an interactive interface
Create an interactive web interface that allows users to input advertisement subjects and dynamically generates and displays the resulting advertisements.
Add the following code to create the web interface:
import gradio as gr

css = """
    button { background-color: purple; color: red; }
    <style>
    </style>
"""

with gr.Blocks(css=css, theme=gr.themes.Default(spacing_size=gr.themes.sizes.spacing_sm, radius_size="none")) as demo:
    subject = gr.Textbox(placeholder="Ad Keywords", label="Prompt for Heelie!!")
    btn = gr.Button("Generate Ad")
    output_html = gr.HTML(label="Generated Ad HTML")

    btn.click(render_html_page, [subject], output_html)

    btn = gr.Button("Copy HTML")

if __name__ == "__main__":
    demo.launch()
Save your Python file (for example,
ad_generator.py).Run the application from your terminal:
python ad_generator.pyOpen your web browser and navigate to the URL displayed in the terminal (typically
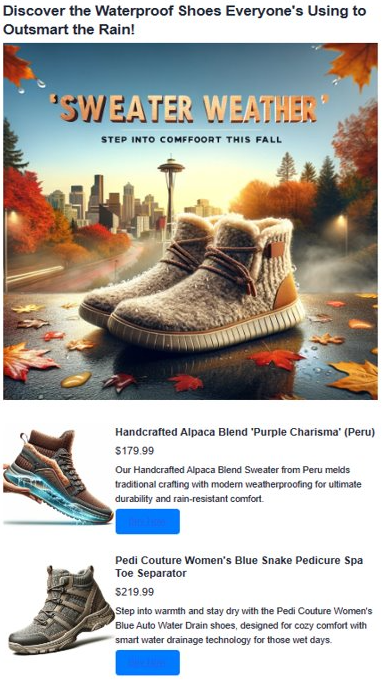
http://localhost:7860).Enter advertisement keywords and select Generate Ad to see your AI-generated advertisement.
Observe the generated advertisement. The generated advertisement combines vector search results with AI-generated content to create a compelling, personalized advertisement. The app creates several things for you. First, it makes a catchy tagline using AI. Then it creates a realistic ad image with DALL-E 3. It also finds products that match your subject using vector search. Finally, it shows you full product details with images, descriptions, and links to buy them.
Clean up resources
If you created resources specifically for this tutorial and no longer need them, delete them to avoid incurring charges.
Delete the Azure DocumentDB database by navigating to your Azure DocumentDB resource in the Azure portal, selecting Data Explorer, right-clicking the
AdgenDatabase, and selecting Delete Database.(Optional) Delete the Azure OpenAI deployments by navigating to your Azure OpenAI resource in the Azure portal, selecting Model deployments, and deleting the GPT-4 and text-embedding-ada-002 deployments if you created them only for this tutorial.
(Optional) If you created a dedicated resource group for this tutorial, delete the entire resource group to remove all associated resources.