Note
Access to this page requires authorization. You can try signing in or changing directories.
Access to this page requires authorization. You can try changing directories.
Overview
Azure Enclave is an Azure service that accelerates and streamlines the deployment and management of secure, isolated, and compliant cloud environments for the most sensitive mission workloads.
Communities provide the isolated hub network foundation that securely and logically group enclaves together for governance, management, connectivity, and monitoring. A community owner can enable connectivity to other communities or on-premises networks through community endpoints and transit hubs.
In this tutorial, part one of eight, you create an Azure Enclave community in the Azure portal. Later tutorials in this series create enclaves, enclave endpoints, and enclave connections.
In this tutorial, you:
- Plan your community architecture and address space.
- Deploy a community for your enclaves.
- Understand hub-and-spoke topology benefits.
- Validate community deployment, connectivity resources, monitoring, and access.
- Clean up the community when you no longer need it.
Prerequisites
- An Azure subscription with quota for the required networking, firewall policy, and monitoring resources.
- Permissions to create and manage resources in the target subscription or resource group:
- Contributor
- User Access Administrator, if you need to create or update role assignments
- Basic familiarity with Azure networking, Azure resource groups, and private IP address planning.
- Azure CLI or Azure PowerShell installed, if you want to run optional validation commands.
Before you begin
Planning your community
Before creating your community, consider these important planning aspects:
Address space planning
Calculate the total IP space needed for all planned enclaves:
- Estimate enclave count: Plan for current needs plus 20-30% growth
- Calculate required space: Each enclave typically needs /16 to /24 CIDR
- Avoid overlaps: Ensure no overlap with on-premises networks or other Azure environments
- Plan carefully: Determine your required IP address space for your community and enclaves
Example calculation:
- Planning five enclaves, each with /16 CIDR (65,536 IPs each and 327,680 IPs total)
- Minimum community CIDR: /12 (1,048,576 IPs total)
- Recommended: /11 or /10 for growth buffer
Address space size recommendations:
| Deployment Size | Enclave Count | Recommended CIDR | Available IPs |
|---|---|---|---|
| Small | 1-3 enclaves | /14 | 262,144 |
| Medium | 4-10 enclaves | /12 | 1,048,576 |
| Large | 11-25 enclaves | /11 | 2,097,152 |
| Enterprise | 26+ enclaves | /10 | 4,194,304 |
Tip
Use the Azure IP Address Calculator to plan your address space.
Naming convention
Establish naming standards before deployment:
Recommended naming pattern:
- Format:
<organization>-<environment>-<purpose> - Examples:
contoso-prod-main- Production communityfabrikam-dev-sandbox- Development communitynorthwind-test-validation- Test community
Additional naming considerations:
- Keep names concise (3-24 characters)
- Use lowercase letters and hyphens
- Avoid special characters
- Document naming convention for team reference
Region selection
Choose the Azure region based on:
Data residency requirements:
- Regulatory compliance
- Data sovereignty requirements
- Industry-specific regulations
Service availability:
- Verify Azure Enclave availability in region
- Check required Azure services are available
- Consider preview vs. GA features
Performance and cost:
- Proximity to users for lower latency
- Network egress costs
- Azure pricing variations by region
Disaster recovery:
- Plan for secondary region if needed
- Consider paired regions for Azure DR
Architecture considerations
Hub-and-spoke topology
Communities create the hub and enclaves create the spokes for your hub-and-spoke network topology that provides several architectural benefits:
Hub (Community) components:
- Managed resource group: Azure-managed resources that support the community
- Connectivity resources: Virtual WAN and related connectivity resources for the community hub
- Firewall policy: Centralized rule policy and rule collections for traffic governance
- Centralized logging: Configurable logging and monitoring resources
- Policy enforcement: Centralized governance and compliance controls
Spoke (Enclave) components:
- Isolated virtual networks: Separate network boundaries per enclave
- Workload resources: Application-specific Azure resources
- Network Security Groups: Subnet-level security controls
- Private endpoints: Secure connectivity to Azure PaaS services
Benefits of hub-and-spoke topology:
| Benefit | Description |
|---|---|
| Network isolation | Each enclave is isolated with independent address space |
| Centralized security | Single point for traffic inspection and policy enforcement |
| Cost optimization | Shared infrastructure (firewall, VPN gateway) reduces costs |
| Simplified management | Centralized monitoring and governance |
| Scalability | Easily add new enclaves without affecting existing ones |
| Controlled connectivity | Explicit enclave connections required for inter-enclave traffic |
Security by default
Communities provide multiple security layers:
Network security:
- Isolated network boundaries with Azure Firewall
- Deny network traffic by default
- Explicit allow rules through community and enclave endpoints
- Network traffic logging for audit and compliance
Governance and compliance:
- Centralized Azure Policy enforcement
- Built-in compliance frameworks
- Policy exemption workflows with approval
- Audit logging of all administrative actions
Access controls:
- Just-in-time (JIT) access for administrative operations
- Maintenance mode for temporary elevated access
- Role-based access control (RBAC) integration
- Managed identity support
Monitoring and observability:
- Log Analytics workspace integration
- Azure Monitor for metrics and alerts
- Azure Firewall threat intelligence
- Network flow logs and diagnostics
Architecture diagram
The following diagram shows an example Azure Enclave environment that starts with a community and adds enclaves and workloads in later tutorials:

Create a community in Azure Enclave
Prepare resource group
Before creating a community, you need a resource group. An Azure resource group is a logical container into which you deploy and manage Azure resources.
Important
This tutorial uses myResourceGroup as a placeholder for the resource group name. You can optionally replace myResourceGroup with your own resource group name following your naming convention.
Best practices for resource group:
- Use descriptive names that indicate purpose and environment
- Apply tags for organization and cost tracking
- Ensure appropriate RBAC permissions are assigned
- Consider resource group location (should match community region)
Deploy the community
Community deployments take approximately 30-45 minutes to complete. Azure Enclave creates the community resource and supporting managed resources for connectivity, firewall policy, and monitoring.
Step 1: Navigate to Azure Enclave
In the Azure Enclave page, select Communities in the left menu.

Step 2: Start community creation
On the Communities page, select Create.

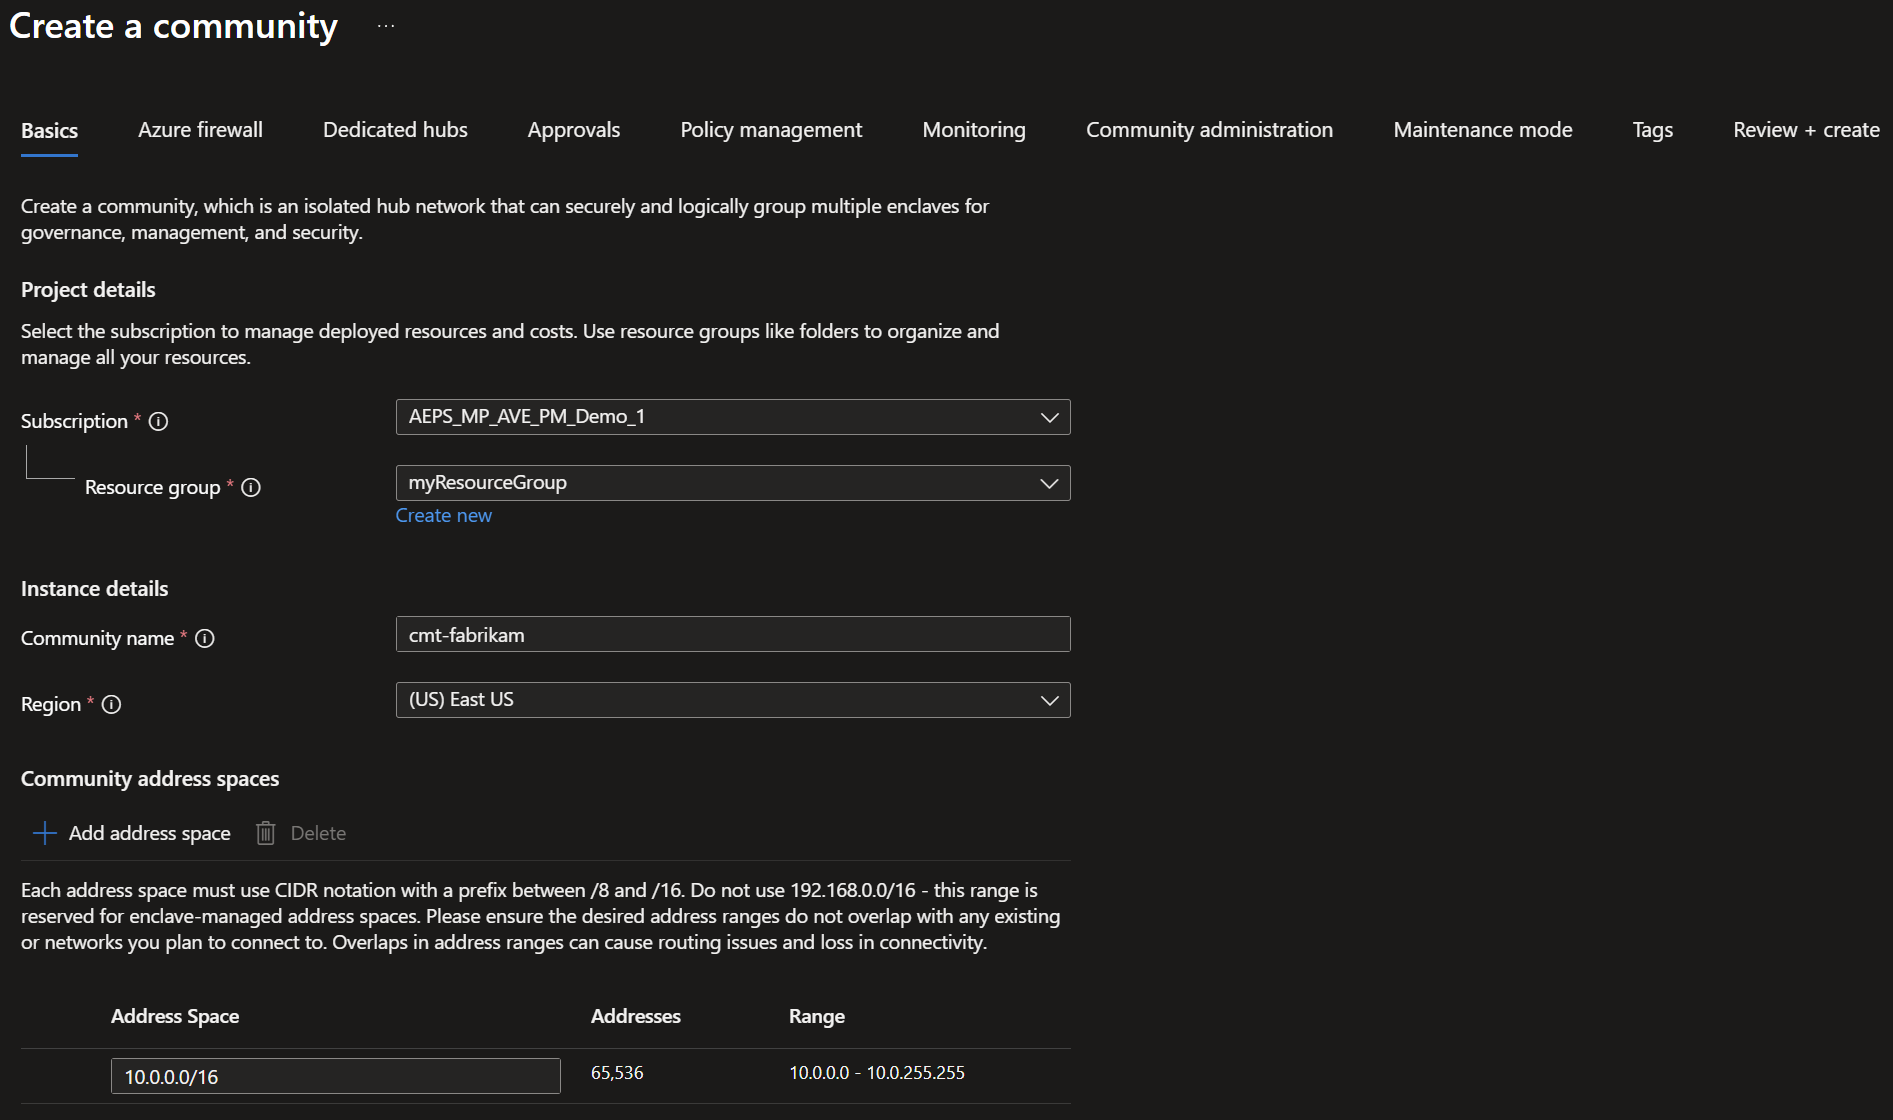
Step 3: Configure community settings
Enter the basic details for your community:
Basic configuration:
Subscription: Select your Azure subscriptionResource Group:myResourceGroup(or create new)Community name:cmt-fabrikam(or use your naming convention)Region:East US(choose based on your requirements)Community address space:10.0.0.0/16
Understanding the configuration parameters:
| Parameter | Description | Guidance |
|---|---|---|
| Subscription | Azure subscription to bill resources | Use subscription with adequate quotas |
| Resource Group | Logical container for community resources | Create new or use existing |
| Community name | Unique identifier for the community | Follow naming convention, 3-24 characters |
| Region | Azure region for deployment | Can't be changed after creation |
| Address space | Private IP range for community | Must be RFC 1918, plan for growth |
Address space guidance:
Private IP address ranges (RFC 1918):
10.0.0.0/8- Class A (16,777,216 addresses)172.16.0.0/12- Class B (1,048,576 addresses)192.168.0.0/16- Class C (65,536 addresses)
For this tutorial:
- Using
10.0.0.0/16provides 65,536 IP addresses - Sufficient for 3-5 enclaves with moderate-sized subnets
- Consider larger CIDR (for example, /14 or /12) for production to allow growth
You can look through the other tabs but for this tutorial you keep the defaults:
- keep the default firewall selected
- don't create any dedicated hubs for your enclaves
- keep the default policy management
- keep the default monitoring and logging settings
- don't add others to the community administration
- keep maintenance mode
Off
Select the Approvals tab next.
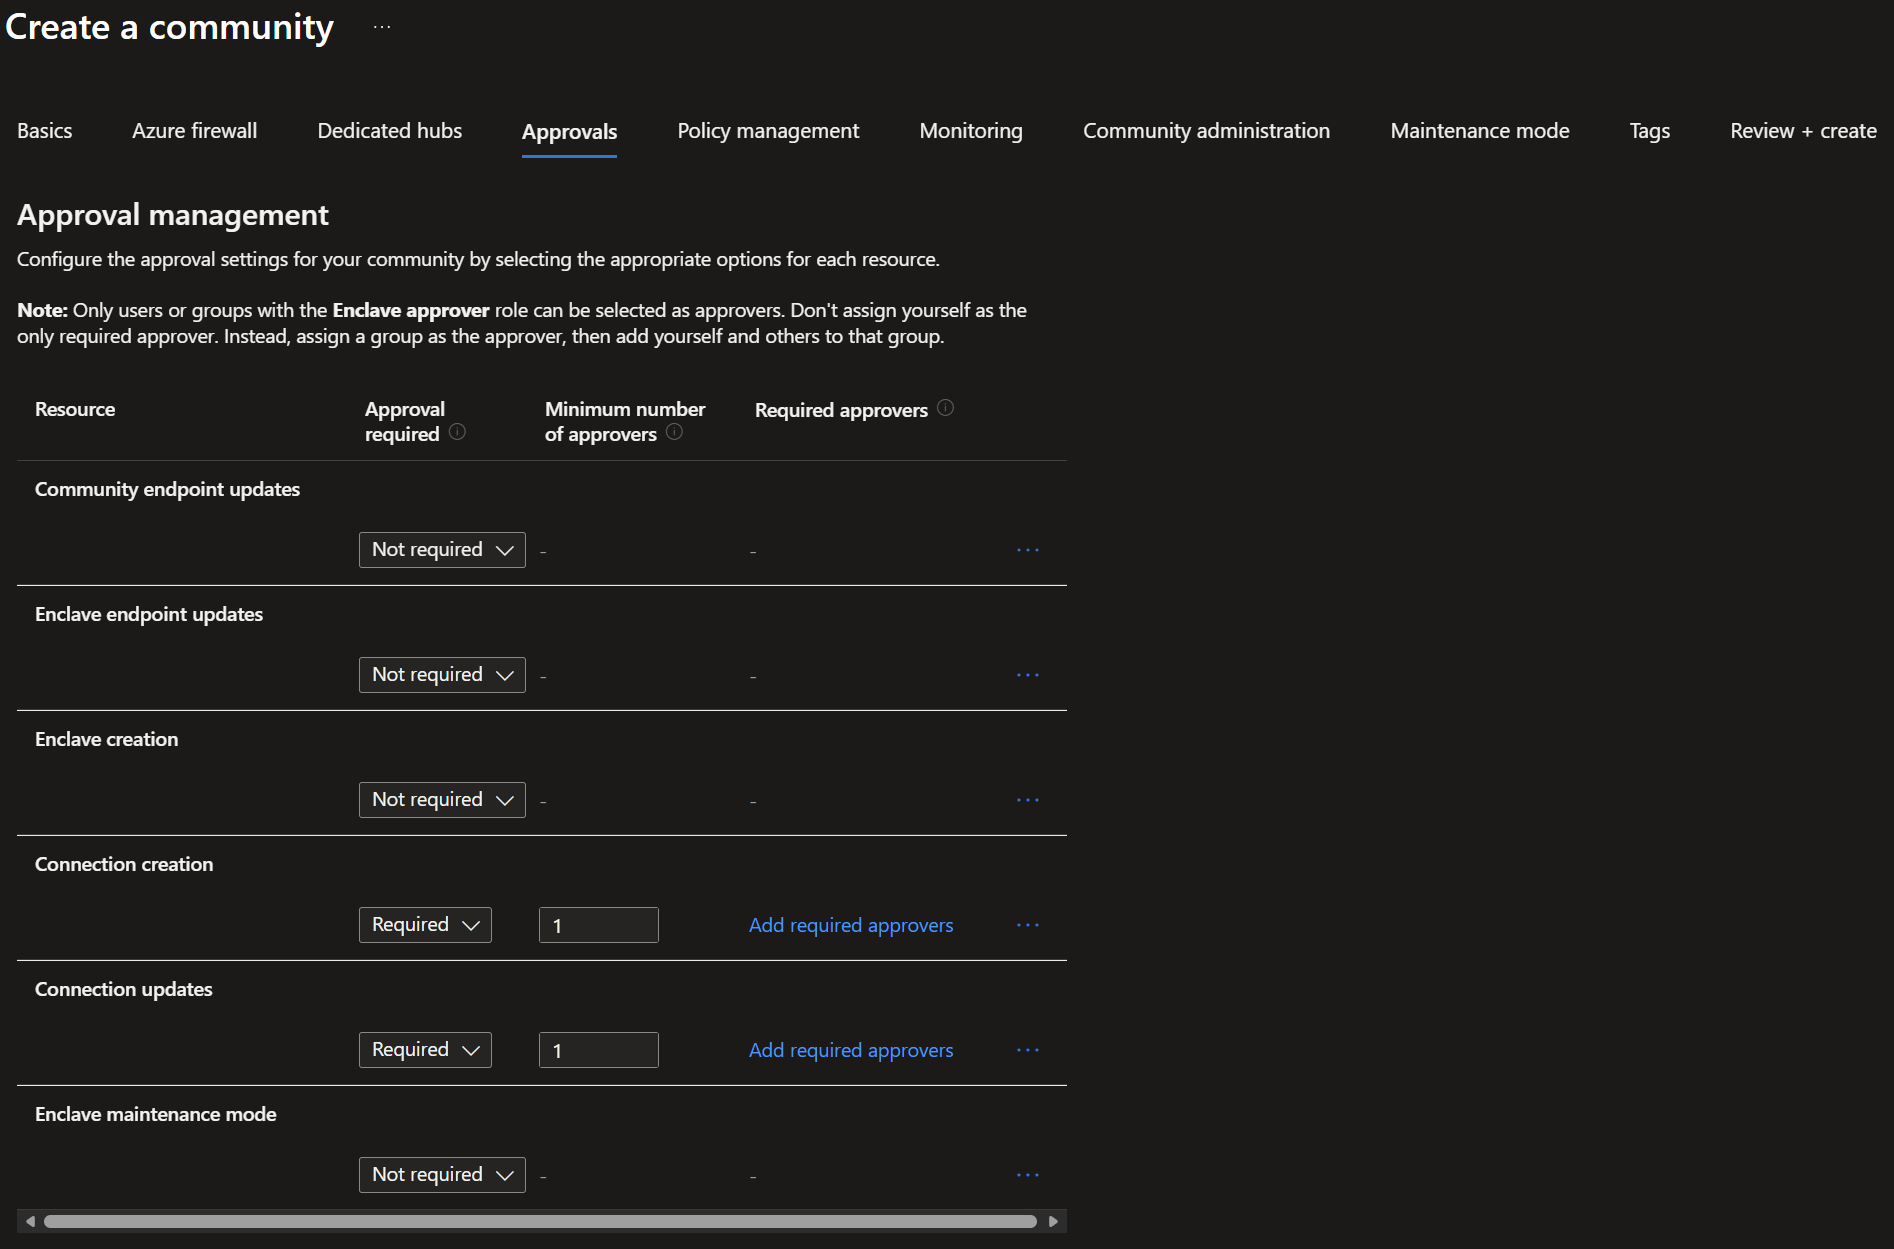
Step 4: Approvals
For this tutorial, you only need approvals for enclave connection creation and update. Enter the basic details for your community:
Approvals configuration:
Connection creation: SelectRequiredand enter1forMinimum number of approversConnection updates: SelectRequiredand enter1forMinimum number of approvers
Note
These approvals selections are just to demonstrate how approvals work on the last resource you create. This configuration doesn't represent a production configuration.
Step 5: Review and create
Select Review + create and validate the details for your community are correct.
Validation checks:
- Verify subscription and resource group are correct
- Confirm community name follows naming convention
- Validate region matches requirements
- Check address space is appropriate size and doesn't overlap
- Review any validation warnings or errors
Step 6: Create
Select Create to begin deployment.
What happens during deployment:
The deployment process creates:
- Virtual Network: Hub virtual network with community address space
- Azure Firewall: Premium or Standard tier for traffic filtering
- Firewall Policy: Default rules and policies
- Log Analytics Workspace: For monitoring and diagnostics
- Managed Resource Group: Contains Azure-managed infrastructure
- Diagnostic Settings: Logs and metrics configuration
- Network Security Groups: Default security rules
Monitoring deployment progress:
- Track deployment status in Azure portal notifications
- Review deployment logs if issues occur
- Estimated time: 30-45 minutes
- Status shows "Running" then "Succeeded"
Validate deployment
After the community deployment completes, perform these validation steps to ensure everything is configured correctly.
Step 1: Check community status
Navigate to the community in Azure portal
Verify
StatusshowsSucceededReview the
Overviewpage for basic information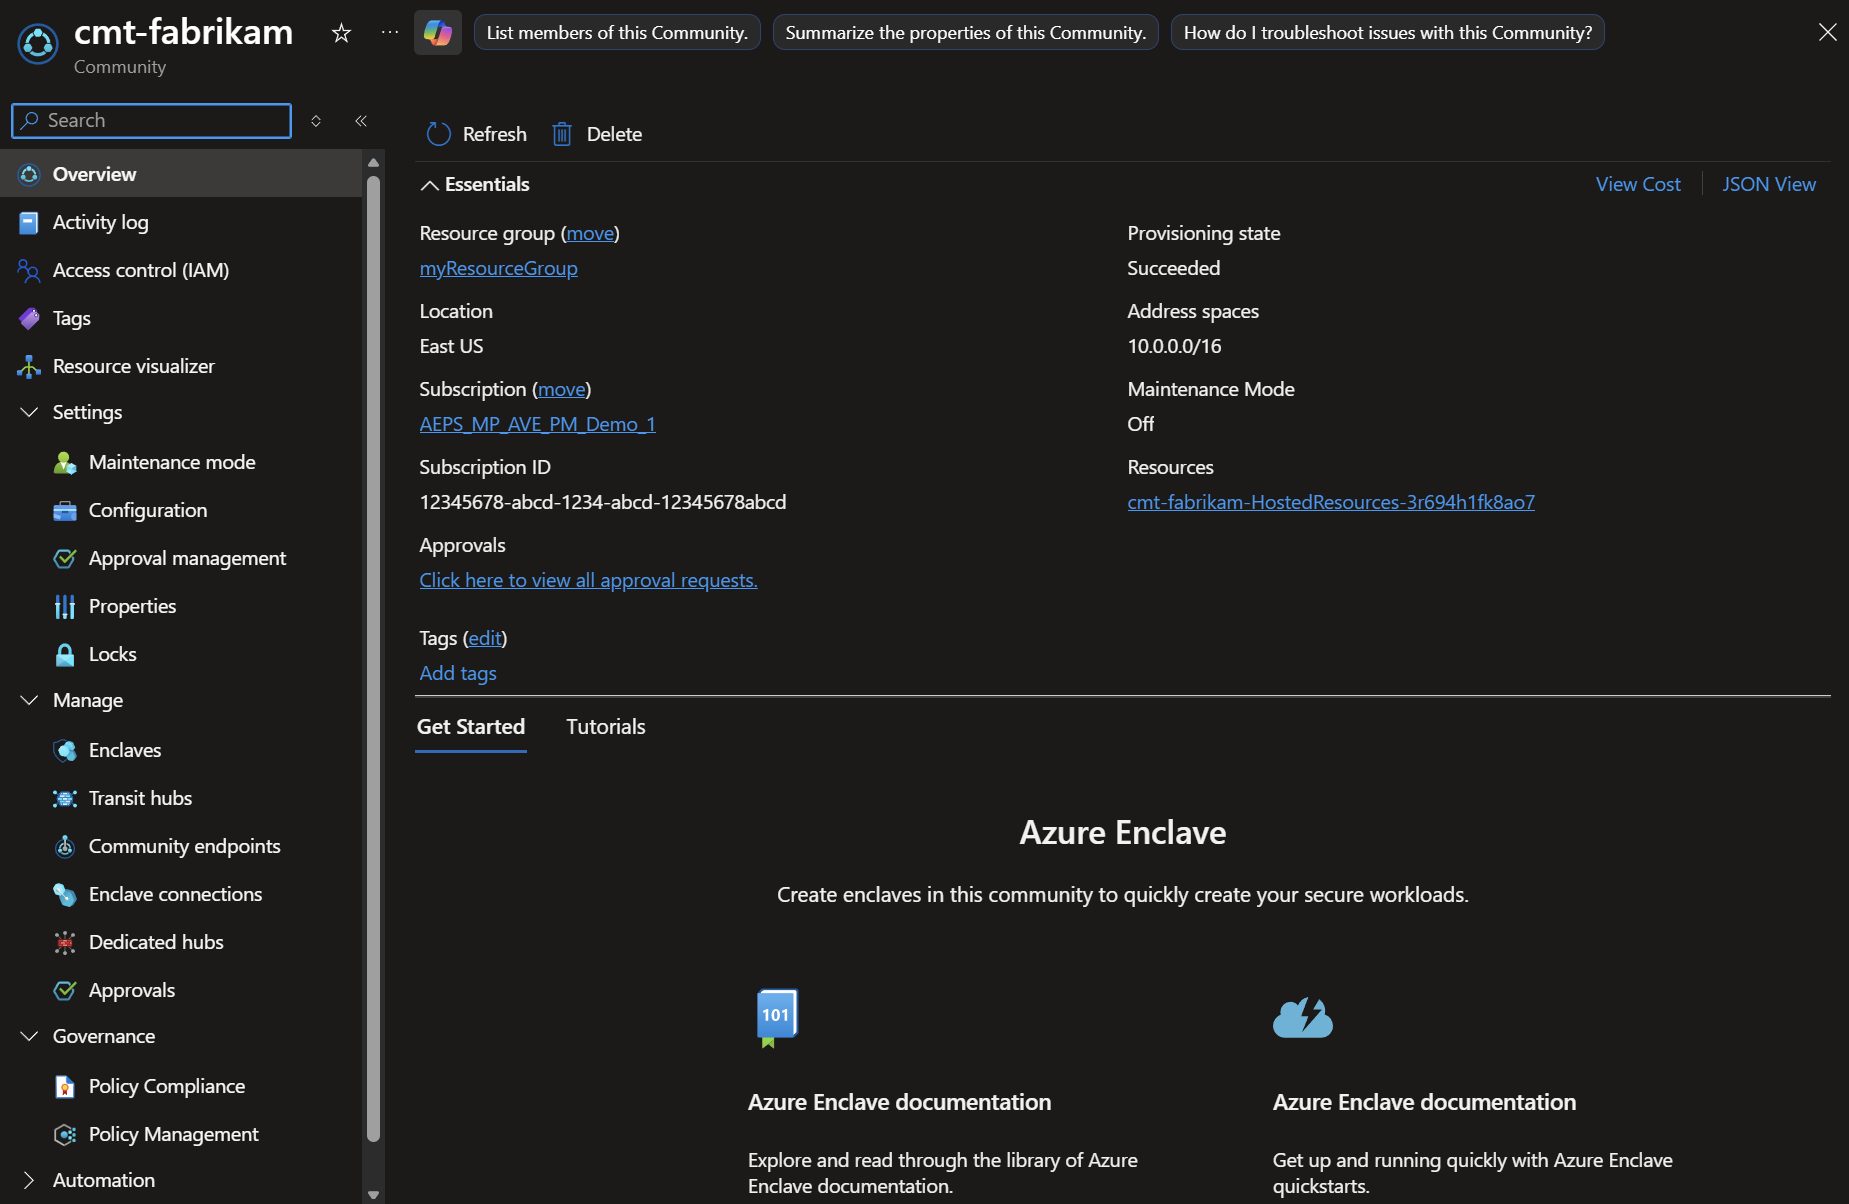

Key information to verify:
- Provisioning State: Should be "Succeeded"
- Resource Group: Correct resource group listed
- Location: Matches selected region
- Address Space: Correct CIDR displayed
- Managed Resource Group: Created automatically
Step 2: Verify network configuration
- In the community overview, select
Managed Resource Group - Review the resources created:
Expected resources in managed resource group:
- Managed identity
- Log Analytics workspace
- Virtual WAN and related connectivity resources
- Firewall policy and rule collection resources
- Diagnostic settings, where applicable
Verify managed connectivity resources:
- Navigate to the managed resource group.
- Confirm the expected connectivity and firewall policy resources were created.
- Check that the configured address space matches your community planning.
Step 3: Review RBAC and access
- Navigate to
Access control (IAM)in the community - Review role assignments
Expected roles:
- Your user account should have appropriate permissions
- Review inherited permissions from subscription/resource group
- Review assignments you made for community administration permissions
Validation checklist
After deployment, confirm:
- Community status shows Succeeded
- Community managed resource group created with expected resources
- Managed connectivity resources configured with the correct address space
- Firewall policy and rule collections created
- Log Analytics workspace connected
- Diagnostic settings enabled
- RBAC permissions are configured
- No deployment errors in activity log
Clean up resources
If you need to delete your community after completing this tutorial:
Warning
Deleting a community is permanent and cannot be undone. Associated enclaves, workloads, and managed resources can be deleted as part of the community deletion process. Review dependent resources before you delete the community.
Before deleting:
- Export any important configurations or data
- Document network settings for reference
- Notify team members of planned deletion
- Remove any dependencies (virtual network peering, connections)
To delete a community:
Navigate to Azure Enclave in the Azure portal
Select
Communitiesfrom the left menuSelect the community to delete (for example,
fabrikam)Select
Deletefrom the top menuType the community name to confirm deletion
Select
Delete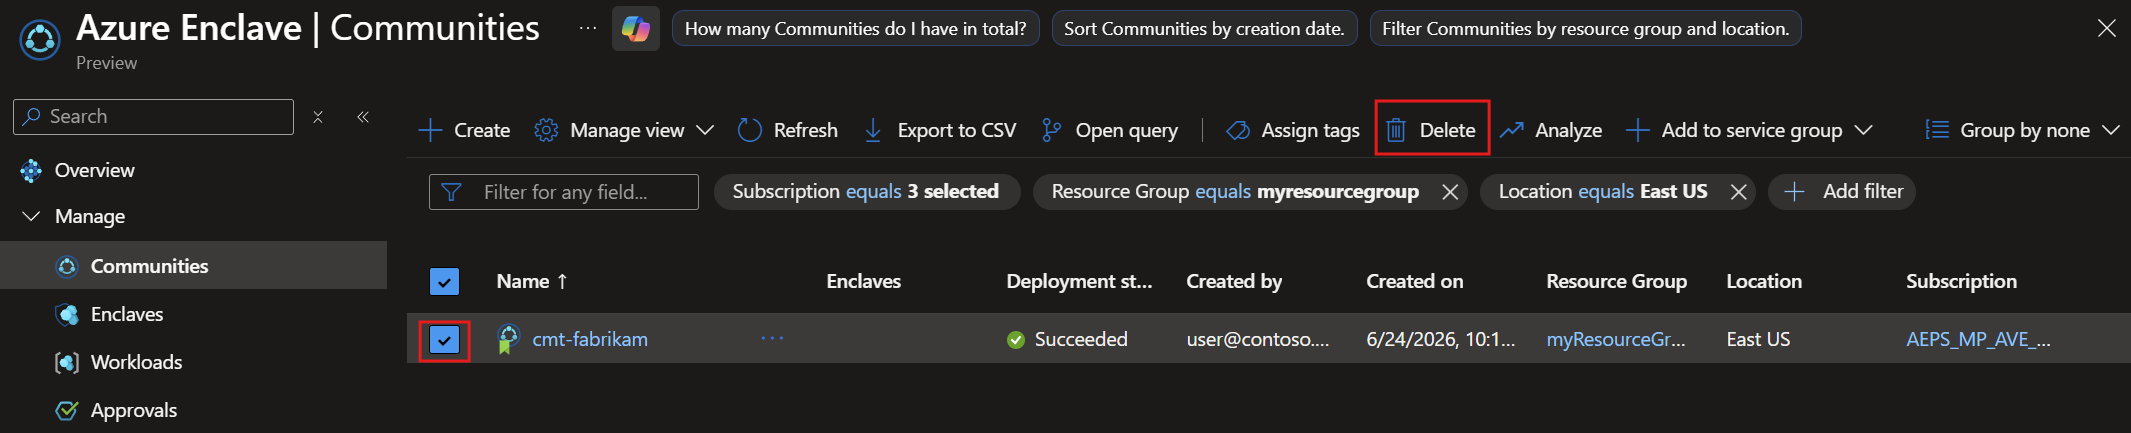

Alternative deletion via Azure CLI:
# Delete community (replace with your values)
az resource delete \
  --resource-group myResourceGroup \
  --resource-type Microsoft.Mission/communities \
  --name fabrikam \
  --api-version 2025-05-01-preview
What gets deleted:
- Community resource
- Associated enclaves within the community
- Associated workloads and empty workload resource groups
- Managed resource group and service-managed resources
- Firewall policy and associated rule collection resources
- Log Analytics workspace, if it isn't shared
What is retained:
- Resource group (if containing other resources)
- Any resources not managed by Azure Enclave
- Log Analytics data (based on retention settings)
Troubleshooting
Issue: Deployment fails with address space overlap error
Symptom: Deployment fails with error message about address space conflicts
Possible causes:
- Address space overlaps with existing virtual network in subscription
- Address space conflicts with on-premises network
- Address space overlaps with virtual network peering connections
Resolution steps:
- Review existing VNets in your subscription:
az network vnet list --output table - Choose a different, nonoverlapping CIDR block
- Verify with network team if using hybrid connectivity
- Restart deployment with new address space
Prevention: Maintain an IP address management (IPAM) spreadsheet documenting all allocated ranges
Issue: Deployment takes longer than expected
Symptom: Deployment running for more than 60 minutes
Possible causes:
- Azure region experiencing high load
- Complex firewall policy configurations
- Resource provider registration delays
Resolution steps:
- Check Azure status page for service health issues
- Review deployment logs in Activity Log
- Contact Azure support if deployment exceeds 90 minutes
- Don't cancel deployment unless explicitly advised
Prevention: Deploy during off-peak hours when possible
Issue: Can't access community after deployment
Symptom: Community deployed but inaccessible in portal
Possible causes:
- Insufficient RBAC permissions
- Conditional Access policies blocking access
- Managed resource group permissions issue
Resolution steps:
- Verify you have Reader or Contributor role on community
- Check Conditional Access policies in Microsoft Entra ID
- Request access from subscription administrator
- Clear browser cache and retry
Prevention: Ensure proper RBAC assignments before starting deployment
Getting help
If you continue experiencing issues:
- Check the Azure Enclave troubleshooting guide: Troubleshooting guide
- Review logs: Check Activity Log for error messages
- Azure documentation: Review the Azure Enclave documentation and Azure Enclave FAQs
- Contact support: Create a support ticket with:
- Subscription ID
- Community resource ID
- Timeline of deployment events
- Error messages and screenshots
- Deployment correlation ID
Understanding community costs
Create an Azure Calculator estimate for your community.
Cost optimization tips:
- Use Standard tier firewall for dev/test
- Configure log retention policies appropriately
- Monitor and right-size resources
- Use Microsoft Cost Management for tracking
Next steps
Congratulations! You successfully deployed an Azure Enclave community.
In the next tutorial, you'll learn how to create isolated enclaves within your community to host workloads.