Note
Access to this page requires authorization. You can try signing in or changing directories.
Access to this page requires authorization. You can try changing directories.
This article shows you how to authenticate with Azure Event Grid namespaces by using a webhook or an Azure function.
Webhook authentication allows external HTTP endpoints (webhooks or functions) to authenticate Message Queuing Telemetry Transport (MQTT) connections dynamically. This method uses Microsoft Entra ID JSON Web Token validation to ensure secure access.
When a client attempts to connect, the broker invokes a user-defined HTTP endpoint that validates credentials, such as Shared Access Signature tokens, usernames, and passwords, or even performs Certificate Revocation List checks. The webhook evaluates the request and returns a decision to allow or deny the connection, along with optional metadata for fine-grained authorization. This approach supports flexible and centralized authentication policies across diverse device fleets and use cases.
Prerequisites
- An Event Grid namespace with either a system-assigned or user-assigned managed identity.
- An external webhook or Azure function.
- Access granted to the Event Grid namespace's managed identity to the Azure function or webhook.
High-level steps
To use custom webhook authentication for namespaces, follow these steps:
- Create a namespace and configure its subresources.
- Enable a managed identity on your Event Grid namespace.
- Grant the managed identity access to your Azure function or webhook.
- Configure custom webhook settings on your Event Grid namespace.
- Connect your clients to the Event Grid namespace and get authenticated via the webhook or function.
Create a namespace and configure its subresources
To create a namespace and configure its subresources, follow the instructions in Quickstart: Publish and subscribe to MQTT messages on an Event Grid namespace with the Azure portal. Skip the steps to create a certificate and a client because the client identities come from the provided token. Client attributes are based on the custom claims in the client token. The client attributes are used in the client group query, topic template variables, and routing enrichment configuration.
Enable a managed identity on your Event Grid namespace
To enable a system-assigned managed identity on your Event Grid namespace, use the following command:
az eventgrid namespace update --resource-group <resource group name> --name <namespace name> --identity "{type:systemassigned}"
For information on how to configure system and user-assigned identities by using the Azure portal, see Enable managed identity for an Event Grid namespace.
Implementations
Option 1: Webhook Via Azure Functions implementation (Microsoft Entra App)
Azure Functions can host the webhook logic using Microsoft.Identity.Web to validate token automatically. We need Microsoft Entra app registration for Webhook API for validating Event Grid caller tokens, which has an Application ID URI for token issuance. Client side (Event Grid) already has managed identity.
Pros:
- No infrastructure to manage
- Built-in authentication helpers (
Microsoft.Identity.Web) - Durable, scalable, cost-efficient
Function must do the following operations:
- Validate caller token from Event Grid Managed Identity
- Validate client Json Web Token (JWT)
- Return allow or deny JSON
Option 2: External HTTPS endpoint implementation
This implementation can be any external HTTPS Endpoint (any cloud, any backend), using Microsoft Entra ID JWT validation with Microsoft.IdentityModel libraries.
Use any runtime: .NET / Node / Java / Python.
Key requirements:
Must be HTTPS
Must validate caller JWT
Must validate device JWT
Must respond within timeout (~5 sec recommended)


Grant the managed identity appropriate access to a function or webhook
Grant the managed identity of your Event Grid namespace the appropriate access to the target Azure function or webhook.
To set up custom authentication for an Azure function, follow the next steps.
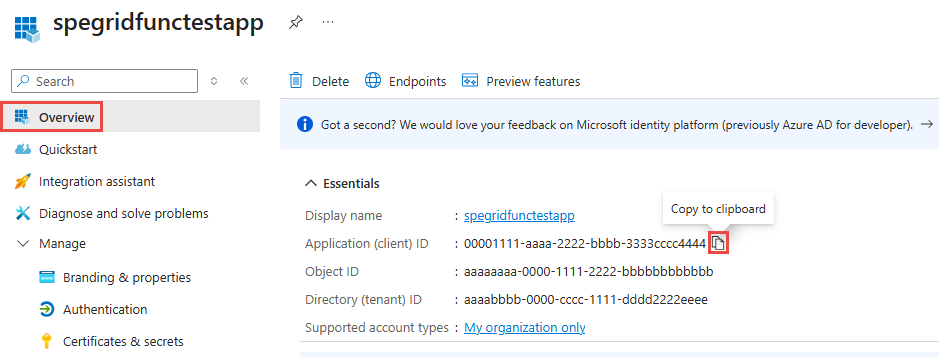
Create a Microsoft Entra app
On the Overview page of the app, make a note of the Application (client) ID value.
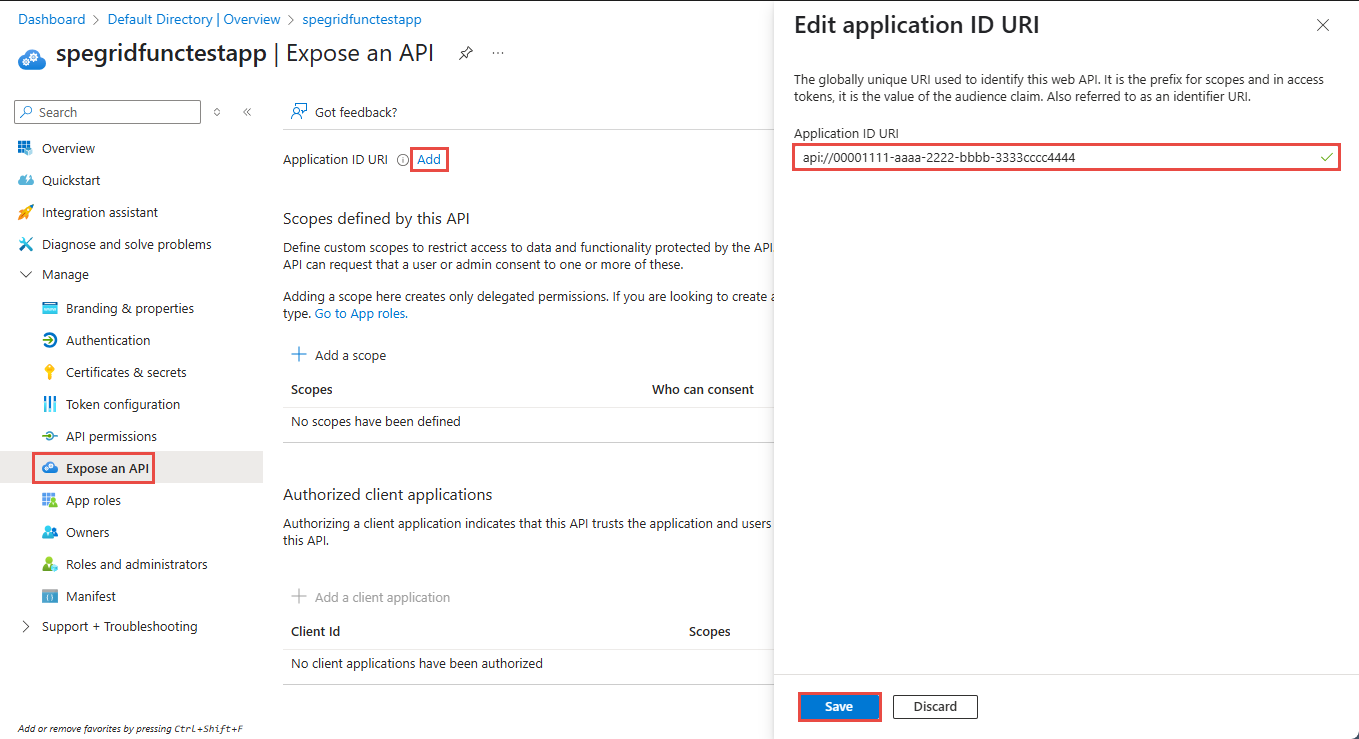
On the left menu, select Expose an API. Next to Application ID URI, select Add.
Make a note of the Application ID URI value on the Edit application ID URI pane, and then select Save.

Set up authentication for an Azure function
If you have a basic Azure function created from the Azure portal, set up authentication and validate the Microsoft Entra ID token that was created by using a managed identity.
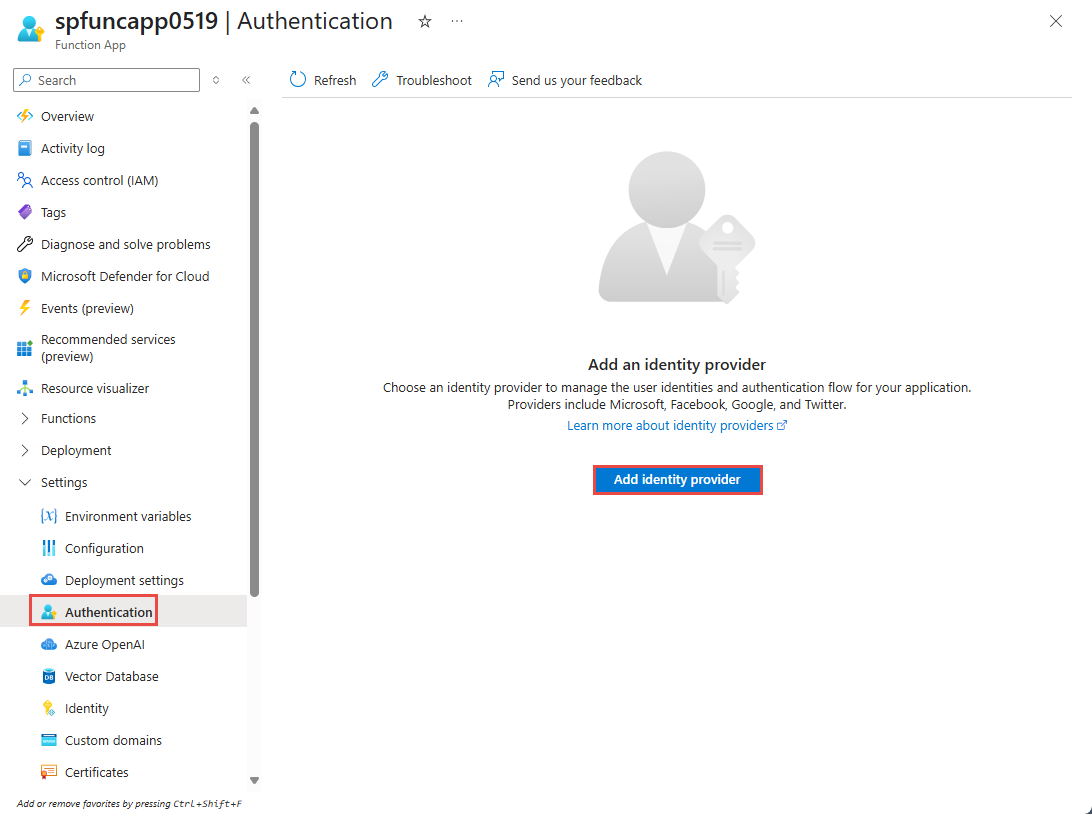
Go to your Azure Functions app.
On the left menu, select Authentication, and then select Add identity provider.
On the Add an identity provider page, for Identity Provider, select Microsoft from the dropdown list.
In the App registration section, specify values for the following properties:
Application (client) ID: Enter the client ID of the Microsoft Entra app that you noted earlier.
Issuer URL: Add the issuer URL in the form
https://login.microsoftonline.com/<tenantid>/v2.0.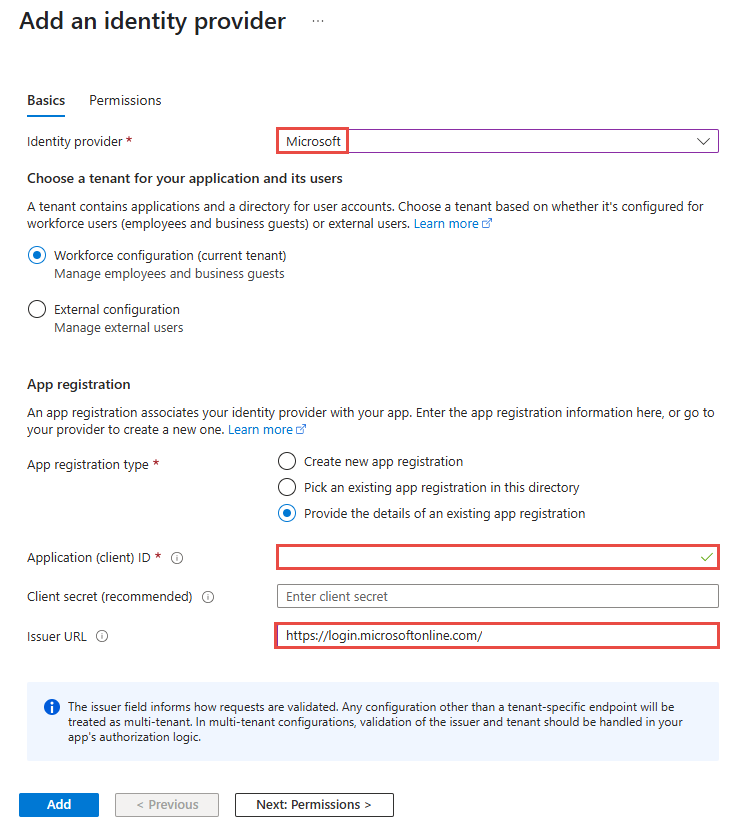
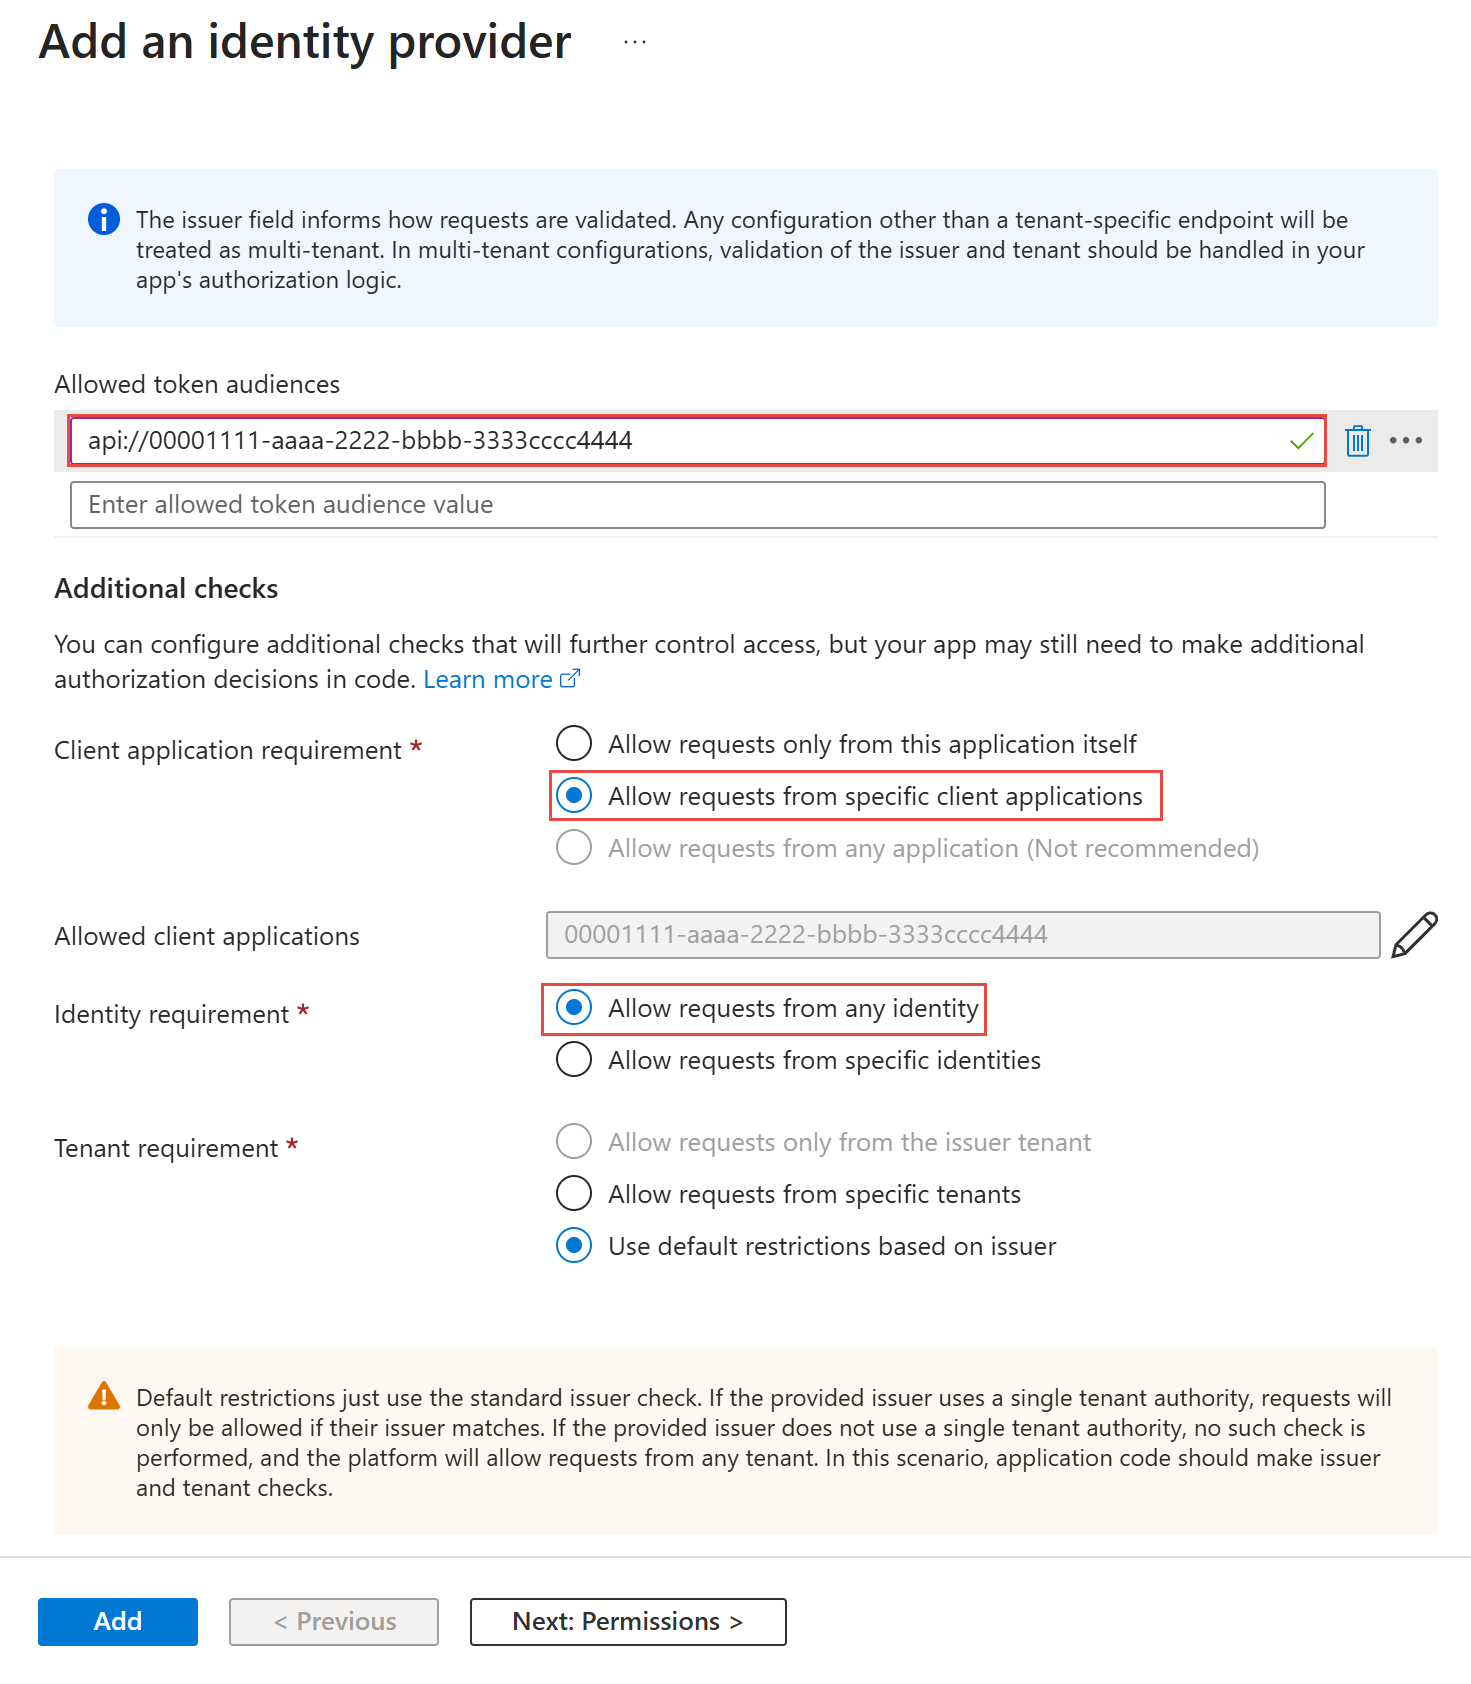
In the Token allowed audiences section, enter allowed token audiences. To be specific, enter the Application ID URI of the Microsoft Entra app that you noted earlier. The token audience is used to validate the incoming token from Event Grid.
In the Additional checks section, follow these steps:
For Client application requirement, select Allowed requestions from specific client applications, and then enter the application ID you noted earlier.
For Identity requirement, select Allow requests from any identity.
In the App Service authentication settings section, follow these steps:
For Restrict access, select Require authentication.
For Unauthenticated requests, select Return HTTP 401 Unauthorized.

Choose other settings based on your specific requirements, and then select Add.


Generate and use the Microsoft Entra ID token
Now, generate and use the Microsoft Entra ID token.
- Generate a Microsoft Entra ID token by using the managed identity with the application ID URI (
api://<ClientID>) as the resource. - Use this token to invoke the Azure function by including it in the request header.
Configure custom webhook authentication settings on your Event Grid namespace
Configure custom webhook authentication settings on your Event Grid namespace by using the Azure portal and the Azure CLI. You create the namespace first and then update it.
Use the Azure portal
Go to your Event Grid namespace in the Azure portal.
On the Event Grid Namespace page, select Configuration on the left menu.
In the Custom Webhook authentication section, specify values for the following properties:
- Managed identity type: Select User assigned.
- Webhook URL: Enter the value of the URL endpoint where the Event Grid service sends authenticated webhook requests by using the specified managed identity.
- Token audience URI: Enter the value of the Microsoft Entra application ID or URI to get the access token to be included as the bearer token in delivery requests.
- Microsoft Entra ID tenant ID: Enter the value of the Microsoft Entra tenant ID used to acquire the bearer token for authenticated webhook delivery.
Select Apply.


Use the Azure CLI
To update your namespace with the custom webhook authentication configuration, use the following command:
az eventgrid namespace update \
    --resource-group <resource-group-name> \
    --name <namespace-name> \
    --api-version 2025-04-01-preview \
    --identity-type UserAssigned \
    --identity-user-assigned-identities "/subscriptions/XXXXXXXXXXX/resourcegroups/XXXXXXXXXXX/providers/Microsoft.ManagedIdentity/userAssignedIdentities/XXXXXXXXXXX={}" \
    --set properties.isZoneRedundant=true \
        properties.topicSpacesConfiguration.state=Enabled \
        properties.topicSpacesConfiguration.clientAuthentication.webHookAuthentication.identity.type=UserAssigned \
        properties.topicSpacesConfiguration.clientAuthentication.webHookAuthentication.identity.userAssignedIdentity="/subscriptions/XXXXXXXXXXX/resourcegroups/XXXXXXXXXXX/providers/Microsoft.ManagedIdentity/userAssignedIdentities/XXXXXXXXXXX" \
        properties.topicSpacesConfiguration.clientAuthentication.webHookAuthentication.endpointUrl="https://XXXXXXXXXXX" \
        properties.topicSpacesConfiguration.clientAuthentication.webHookAuthentication.azureActiveDirectoryApplicationIdOrUri="api://XXXXXXXXXXX/.default" \
        properties.topicSpacesConfiguration.clientAuthentication.webHookAuthentication.azureActiveDirectoryTenantId="XXXXXXXXXXX"
Replace <NAMESPACE_NAME> and <RESOURCE_GROUP_NAME> with your actual values. Fill in the placeholders in the subscription, resource group, identity, app ID, URL, and tenant ID. To enhance the performance and reliability of webhook-based authentication for the Event Grid MQTT broker, we strongly recommend that you enable HTTP/2 support for your webhook endpoint.
Webhook API details
Request headers
Azure Event Grid sends the following headers in the request to the webhook:
**Authorization**: Bearer token
The token is a Microsoft Entra token for the managed identity that was configured to call the webhook.
Request payload
{
    "clientId": "<string>",
    "userName": "<string>",
    "password": "<base64 encoded bytes>",
    "authenticationMethod": "<string>",
    "authenticationData": "<base64 encoded bytes>",
    "clientCertificate": "<certificate in PEM format>",
    "clientCertificateChain": "<certificates from chain in PEM format>"
}
Payload field descriptions
| Field | Required/Optional | Description |
|---|---|---|
clientId |
Required | Client ID from MQTT CONNECT packet. |
userName |
Optional | Username from MQTT CONNECT packet. |
password |
Optional | Password from MQTT CONNECT packet in Base64 encoding. |
authenticationMethod |
Optional | Authentication method from MQTT CONNECT packet (MQTT5 only). |
authenticationData |
Optional | Authentication data from MQTT CONNECT packet in Base64 encoding (MQTT5 only). |
clientCertificate |
Optional | Client certificate in Privacy-Enhanced Mail (PEM) format. |
clientCertificateChain |
Optional | Other certificates provided by the client required to build the chain from the client certificate to the Certificate Authority certificate. |
Response payload
Successful response
HTTP/1.1 200 OK
Content-Type: application/json

{
    "decision": "allow",
    "clientAuthenticationName": "<string>",
    "attributes": {
        "attr": "<int/string/array_of_strings>",
        ...
    },
    "expiration": "<unix time format>"
}
Denied response
HTTP/1.1 200 Bad Request
Content-Type: application/json

{
    "decision": "deny",
    "errorReason": "<string>"
}
Error codes:
| Authentication Outcome | Function response | Event Grid MQTT reason code |
|---|---|---|
| Explicit authorization denial | "decision": "deny" |
Not authorized |
| Invalid / expired token | "decision": "deny" |
Not authorized |
| Function timeout | N/A | Server unavailable |
| Function exception / crash | N/A | Server unavailable |
| Transient platform failure | N/A | Server unavailable |
| Internal broker processing error | N/A | Server unavailable |
Response field descriptions
| Field | Description |
|---|---|
decision (required) |
Authentication decision is either allow or deny. |
clientAuthenticationName |
Client authentication name (identity name). (Required when decision is set to allow.) |
attributes |
Dictionary with attributes. Key is the attribute name, and the value is an int/string/array. (Optional when decision is set to allow.) |
expiration |
Expiration date in Unix time format. (Optional when decision is set to allow.) |
errorReason |
Error message if decision is set to deny. This error is logged. (Optional when decision is set to deny.) |
Examples of supported attribute types
"num_attr_pos": 1,
"num_attr_neg": -1,
"str_attr": "str_value",
"str_list_attr": [
    "str_value_1",
    "str_value_2"
]
All correct data types (number that fits <int32/string/array_of_strings>) are used as attributes. In the example, num_attr_pos, num_attr_neg, str_attr, and str_list_attr claims have correct data types and are used as attributes.