Note
Access to this page requires authorization. You can try signing in or changing directories.
Access to this page requires authorization. You can try changing directories.
In this quickstart, you create a topic in Event Grid on Kubernetes, create a subscription for the topic, and then send a sample event to the topic to test the scenario.
Important
Event Grid on Kubernetes with Azure Arc is currently in public preview. This preview version is provided without a service level agreement, and it's not recommended for production workloads. Certain features might not be supported or might have constrained capabilities. For more information, see Supplemental Terms of Use for Microsoft Azure Previews.
Prerequisites
- Connect your Kubernetes cluster to Azure Arc.
- Install Event Grid extension on Kubernetes cluster. This extension deploys Event Grid to a Kubernetes cluster.
Create a custom location
As an Azure location extension, a custom location lets you use your Azure Arc-enabled Kubernetes cluster as a target location for deploying resources such as Event Grid topics. A custom location represents a namespace in the cluster and it's the place where topics and event subscriptions are deployed. In this section, you create a custom location.
Declare the following variables to hold values of the Azure Arc cluster, resource group, and custom location names. Copy these statements to an editor, replace the values, and then copy/paste to the bash window.
resourcegroupname="<AZURE RESOURCE GROUP NAME>"
arcclustername="<AZURE ARC CLUSTER NAME>"
customlocationname="<CUSTOM LOCATION NAME>"
Get the resource ID of the Azure Arc-connected cluster. Update values for the Azure Arc cluster name and resource group parameters before running the command.
hostresourceid=$(az connectedk8s show -n $arcclustername -g $resourcegroupname --query id -o tsv)Get the Event Grid extension resource ID. This step assumes that the name you gave for the Event Grid extension is eventgrid-ext. Update Azure Arc cluster and resource group names before running the command.
clusterextensionid=$(az k8s-extension show --name eventgrid-ext --cluster-type connectedClusters -c $arcclustername -g $resourcegroupname --query id -o tsv)Create a custom location using the two values from the previous step. Update custom location and resource group names before running the command.
az customlocation create -n $customlocationname -g $resourcegroupname --namespace arc --host-resource-id $hostresourceid --cluster-extension-ids $clusterextensionidGet the resource ID of the custom location. Update the custom location name before running the command.
customlocationid=$(az customlocation show -n $customlocationname -g $resourcegroupname --query id -o tsv)For more information on creating custom locations, see Create and manage custom locations on Azure Arc-enabled Kubernetes.
Create a topic
In this section, you create a topic in the custom location you created in the previous step. Update resource group and Event Grid topic names before running the command. Update the location if you're using a location other than East US.
Declare a variable to hold the topic name.
topicname="<TOPIC NAME>"Run the following command to create a topic.
az eventgrid topic create -g $resourcegroupname --name $topicname --kind azurearc --extended-location-name $customlocationid --extended-location-type customlocation --input-schema CloudEventSchemaV1_0 --location $regionFor more information about the CLI command, see
az eventgrid topic create.
Create a message endpoint
Before you create a subscription for the custom topic, create an endpoint for the event message. Typically, the endpoint takes actions based on the event data. To simplify this quickstart, you deploy a prebuilt web app that displays the event messages. The deployed solution includes an App Service plan, an App Service web app, and source code from GitHub.
In the article page, select Deploy to Azure to deploy the solution to your subscription. In the Azure portal, provide values for the parameters.

The deployment may take a few minutes to complete. After the deployment has succeeded, view your web app to make sure it's running. In a web browser, navigate to:
https://<your-site-name>.azurewebsites.netIf the deployment fails, check the error message. It may be because the web site name is already taken. Deploy the template again and choose a different name for the site.
You see the site but no events have been posted to it yet.
Create a subscription
Subscribers can register for events published to a topic. To receive any event, you need to create an Event Grid subscription for a topic of interest. An event subscription defines the destination to which those events are sent. To learn about all the destinations or handlers supported, see Event handlers.
To create an event subscription with a WebHook (HTTPS endpoint) destination, enter a name for the event subscription, update the name of the web site, and run the following command.
topicid=$(az eventgrid topic show --name $topicname --resource-group $resourcegroupname --query id -o tsv)
az eventgrid event-subscription create --name <EVENT SUBSCRIPTION NAME> --source-resource-id $topicid --endpoint https://<SITE NAME>.azurewebsites.net/api/updates
For more information about the CLI command, see az eventgrid event-subscription create.
Send events to the topic
Run the following command to get the endpoint for the topic: After you copy and paste the command, update the topic name and resource group name before you run the command. You publish sample events to this topic endpoint.
az eventgrid topic show --name $topicname -g $resourcegroupname --query "endpoint" --output tsvRun the following command to get the key for the custom topic: After you copy and paste the command, update the topic name and resource group name before you run the command. It's the primary key of the topic. To get this key from the Azure portal, switch to the Access keys tab of the Event Grid Topic page. To be able post an event to a custom topic, you need the access key.
az eventgrid topic key list --name $topicname -g $resourcegroupname --query "key1" --output tsvRun the following Curl command to post the event. Specify the endpoint URL and key from step 1 and 2 before running the command.
curl  -k -X POST -H "Content-Type: application/cloudevents-batch+json" -H "aeg-sas-key: <KEY_FROM_STEP_2>" -g <ENDPOINT_URL_FROM_STEP_1> \
-d  '[{
      "specversion": "1.0",
      "type" : "orderCreated",
      "source": "myCompanyName/us/webCommerceChannel/myOnlineCommerceSiteBrandName",
      "id" : "eventId-n",
      "time" : "2020-12-25T20:54:07+00:00",
      "subject" : "account/acct-123224/order/o-123456",
      "dataSchema" : "1.0",
      "data" : {
         "orderId" : "123",
         "orderType" : "PO",
         "reference" : "https://www.myCompanyName.com/orders/123"
      }
}]'
If the topic endpoint URL from step 1 is a private IP address, such as in the case when Event Grid broker's service type is ClusterIP, you can execute Curl from within another pod in the cluster to have access to that IP address. For example, you can perform the following steps:
Create a manifest file with the following configuration. You may want to adjust the
dnsPolicyaccording to your needs. For more information, see DNS for Services and Pods.apiVersion: v1 kind: Pod metadata: name: test-pod2 spec: containers: - name: nginx image: nginx hostNetwork: true dnsPolicy: ClusterFirstWithHostNetCreate the pod.
kubectl apply -f <name_of_your_yaml_manifest_file>Verify that the pod is running.
kubectl get pod test-podStart a shell session from the container
kubectl exec --stdin --tty test-pod -- /bin/bash
At this point, you have a shell session from a running container in the cluster from which you can execute the Curl command described in an earlier step.
Note
To learn how to send cloud events using programming languages, see the following samples:
- C#.
- Java
- JavaScript and TypeScript
- Python
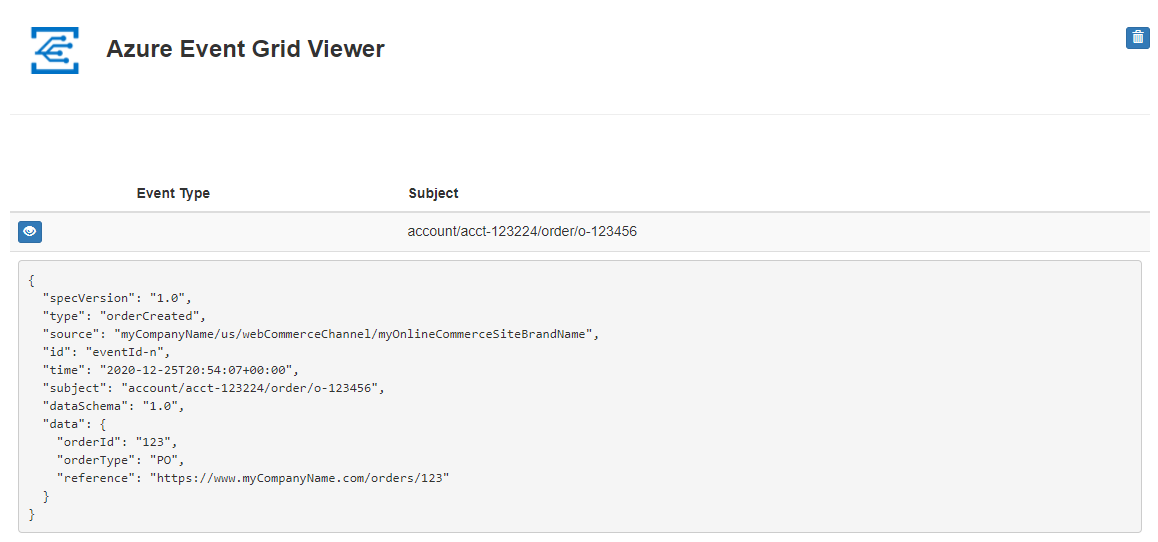
Verify in the Event Grid Viewer
You've triggered the event, and Event Grid sent the message to the endpoint you configured when subscribing. View your web app to see the event you just sent.
Next steps
See the following articles:
- Event handlers and destinations - provides information about all the event handlers and destinations that Event Grid on Kubernetes supports.
- Event filtering - provides information about filtering events on event subscriptions.