Onboard as an Azure Event Grid partner using the Azure portal
This article describes the way third-party SaaS providers, also known as partners are onboarded to Event Grid to be able to publish events from their services and how those events are consumed by end users.
Important
Partners can publish events to Azure Event Grid, and also receive events from it. These capabilities are enabled through the Partner Events feature. If you aren't familiar with Partner Events, see Partner Events overview for a detailed introduction of key concepts that are critical to understand and follow the steps in this article.
Onboarding process for partners
In a nutshell, enabling your service’s events to be consumed by users typically involves the following process:
Communicate your interest in becoming a partner to the Event Grid service team.
Register the Event Grid resource provider with your Azure subscription.
Create a channel and a partner topic in a single step.
Important
You may be able to create an event channel (legacy), which supports partner topics. Channel is the new routing resource type and is the preferred option, which supports both sending events via partner topics. An event channel is a legacy resource and will be deprecated soon.
Test the Partner Events functionality end to end.
For step #5, you should decide what kind of user experience you want to provide. You have the following options:
- Provide your own solution, typically a web graphical user interface (GUI) experience, hosted under your domain using our SDK and/or REST API to create a channel (latest and recommended) /event channel (legacy) and its corresponding partner topic. With this option, you can ask the user for the subscription and resource group under which you'll create a partner topic.
- Use Azure portal or CLI to create the channel (recommended)/event channel (legacy) and an associated partner topic. With this option, you must have get in the user’s Azure subscription some way and resource group under which you'll create a partner topic.
This article shows you how to onboard as an Azure Event Grid partner using the Azure portal.
Communicate your interest in becoming a partner
Contact the Event Grid team at askgrid@microsoft.com communicating your interest in becoming a partner. We'll have a conversation with you providing detailed information on Partner Events’ use cases, personas, onboarding process, functionality, pricing, and more.
Prerequisites
To complete the remaining steps, make sure you have:
- An Azure subscription. If you don't have one, create a free account before you begin.
- An Azure tenant.
Register the Event Grid resource provider
Unless you've used Event Grid before, you'll need to register the Event Grid resource provider. If you’ve used Event Grid before, skip to the next section.
In the Azure portal, do the following steps:
On the left menu, select Subscriptions.
Select the subscription you want to use for Event Grid from the subscription list.
On the Subscription page, select Resource providers under Settings on the left menu.
Search for Microsoft.EventGrid, and confirm that the Status is Not Registered.
Select Microsoft.EventGrid in the provider list.
Select Register on the command bar.
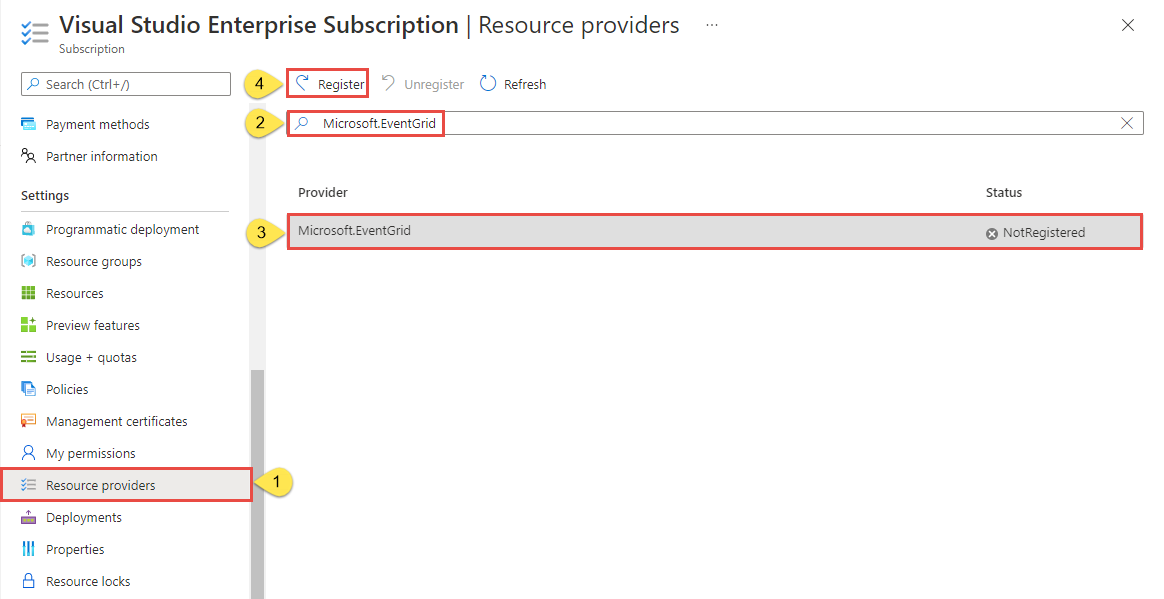
Refresh to make sure the status of Microsoft.EventGrid is changed to Registered.

Create a partner registration
Sign in to the Azure portal.
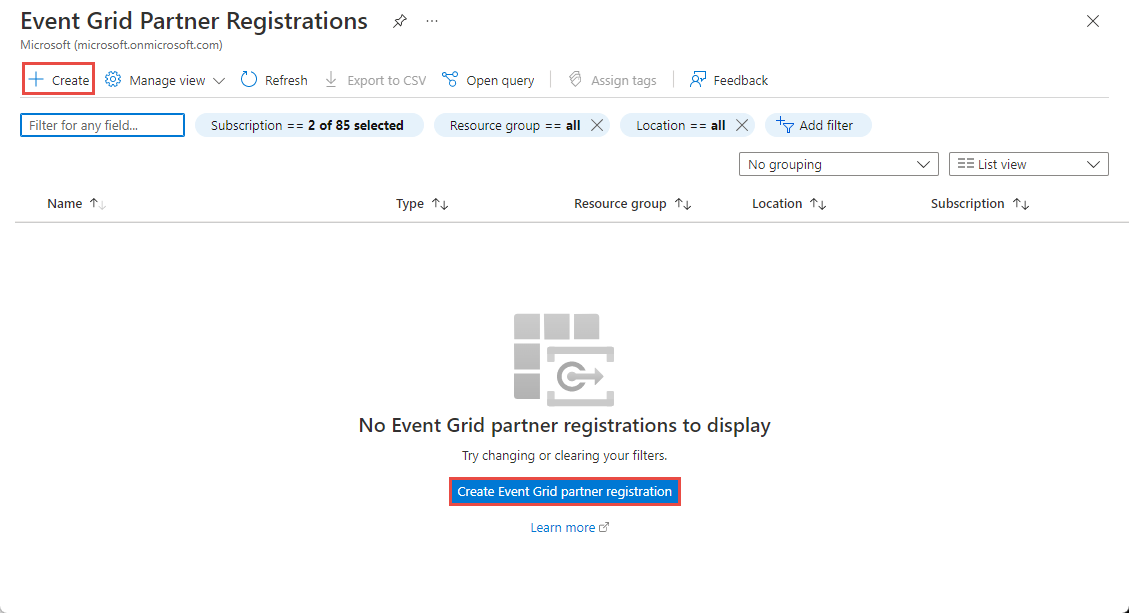
Select All services from the left navigation pane, then type in Event Grid Partner Registrations in the search bar, and select it.
On the Event Grid Partner Registrations page, select + Create on the command bar or Create Event Grid partner registrations link on the page.
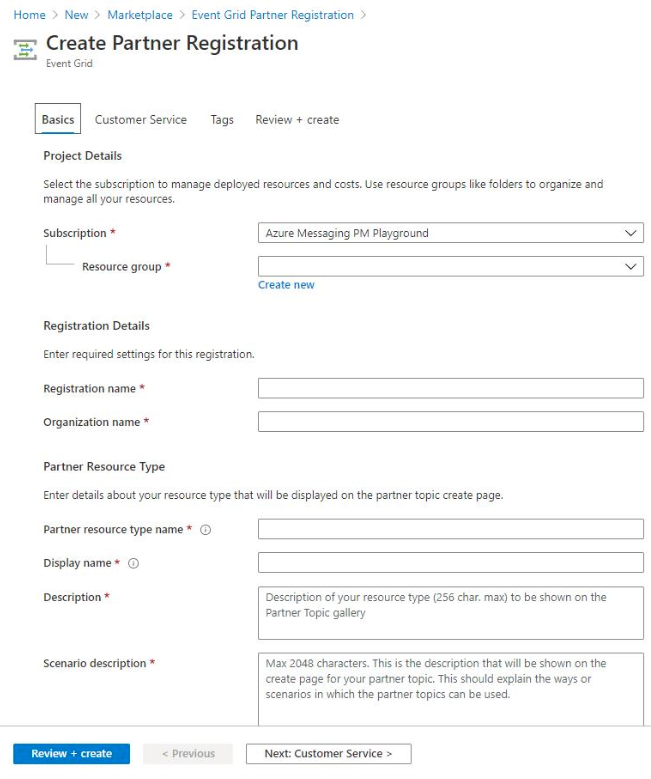
On the Create Partner Topic Type Registrations - Basics page, enter the following information:
- In the Project details section, follow these steps:
- Select your Azure subscription.
- Select an existing Azure resource group or create a new resource group.
- In the Registration details section, follow these steps:
- For Registration name, enter a name for the registration.
- For Organization name, enter the name of your organization.
- In the Partner resource type section, enter details about your resource type that will be displayed on the partner topic create page:
For Partner resource type name, enter the name for the resource type.
For Display name, enter a user-friendly display name for the partner topic (resource) type.
Enter a description for the resource type.
Enter a description for the scenario. It should explain the ways or scenarios in which the partner topics for your resources can be used.
- In the Project details section, follow these steps:
Select Next: Custom Service at the bottom of the page. On the Customer Service tab of the Create Partner Registration page, enter information that subscriber users will use to contact you when there's a problem with the event source:
Enter the Phone number.
Enter extension for the phone number.
Enter a support web site URL.

Select Next: Tags at the bottom of the page.
On the Tags page, configure the following values.
- Enter a name and a value for the tag you want to add. This step is optional.
- Select Review + create at the bottom of the page to create the registration (partner topic type).
On the Review + create page, review all settings, and then select Create to create the partner registration.
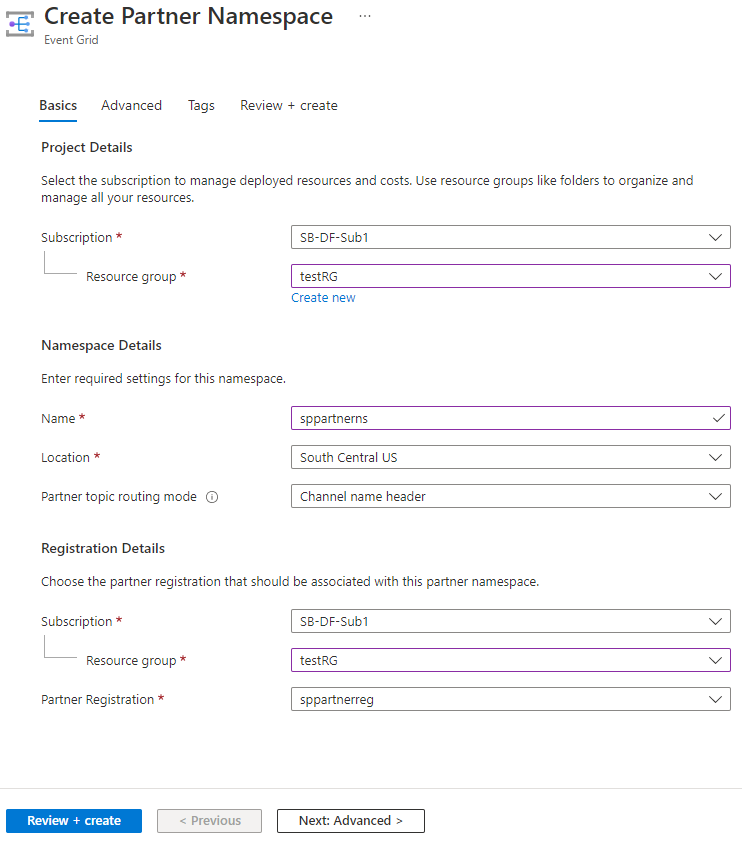
Create a partner namespace
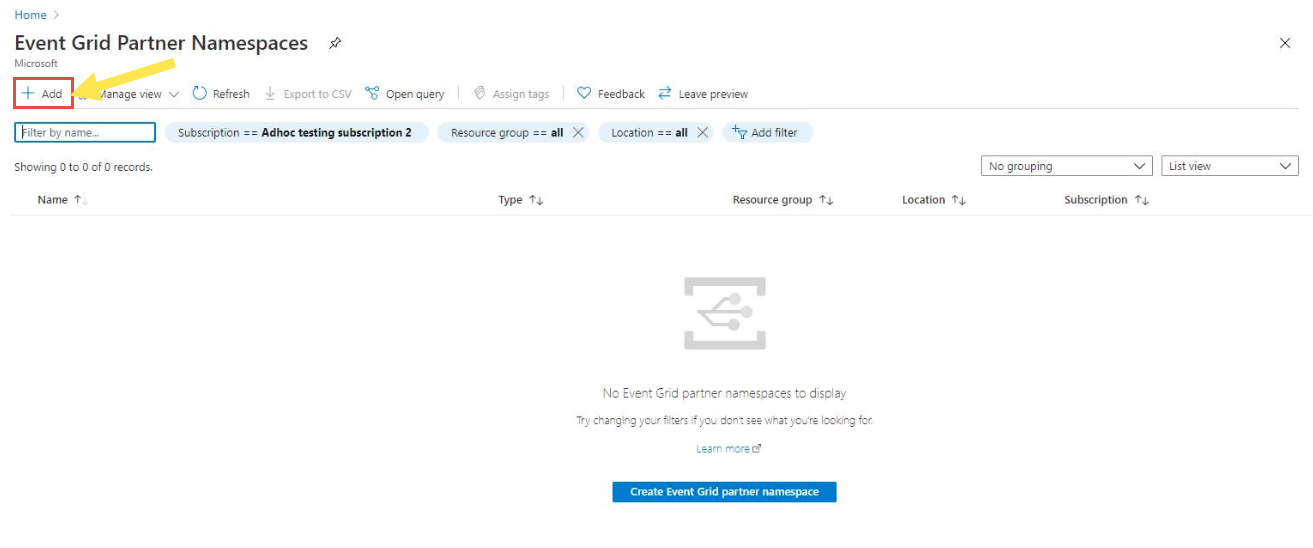
In the Azure portal, select All services from the left navigational menu, then type Event Grid Partner Namespaces in the search bar, and then select it from the list.
On the Event Grid Partner Namespaces page, select + Create on the toolbar.
On the Create Partner Namespace - Basics page, specify the following information.
In the Project details section, do the following steps:
- Select an Azure subscription.
- Select an existing resource group or create a resource group.
In the Namespace details section, do the following steps:
Enter a name for the namespace.
Select a location for the namespace.
For Partner topic routing mode, select Channel name header or Source attribute in event.
- Channel name header routing: With this kind of routing, you publish events using an http header called
aeg-channel-namewhere you provide the name of the channel to which events should be routed. If you select this option, you'll create channels in the namespace. - Source attribute in event routing. This routing approach is based on the value of the
sourcecontext attribute in the event. If you select this option, you'll create event channels, which is legacy equivalent to channels and will be deprecated soon.
Important
- It's not possible to update the routing mode once the namespace is created.
- Channel is the new routing resource type and is the preferred option. An event channel is a legacy resource and will be deprecated soon.
- Channel name header routing: With this kind of routing, you publish events using an http header called
In the Registration details section, follow these steps to associate the namespace with a partner registration.
- Select the subscription in which the partner registration exists.
- Select the resource group that contains the partner registration.
- Select the partner registration from the drop-down list.
Select Next: Tags at the bottom of the page.
On the Tags page, add tags (optional).
- Enter a name and a value for the tag you want to add. This step is optional.
- Select Review + create at the bottom of the page.
On the Review + create page, review the details, and select Create.
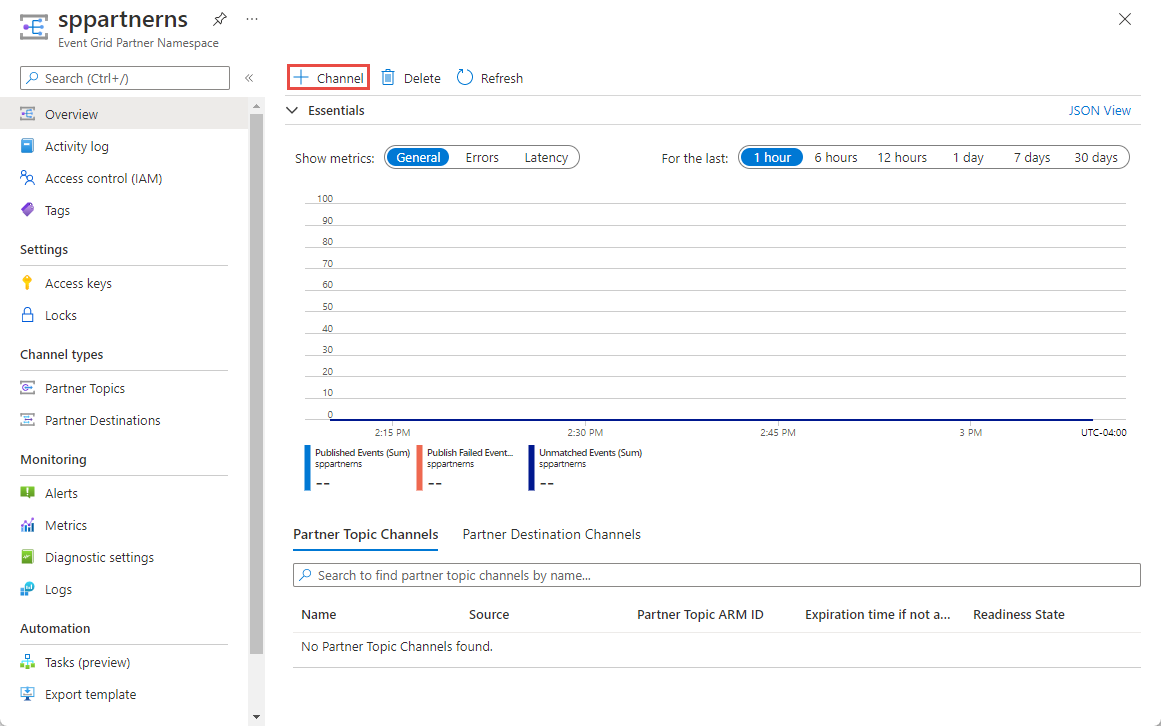
Create a channel
If you selected Channel name header for Partner topic routing mode, create a channel by following steps in this section.
Go to the Overview page of the partner namespace you created, and select + Channel on the command bar.
On the Create Channel - Basics page, follow these steps.
Enter a name for the channel. Channel name should be unique across the region in which is created.
For the channel type, select Partner Topic.
Partner topics are resources that hold published events. Select Partner Topic if you want to forward events to a partner topic that holds events to be processed by a handler later.
If you selected Partner Topic, enter the following details:
ID of the subscription in which the partner topic will be created.
Resource group in which the partner topic will be created.
Name of the partner topic.
Specify source information for the partner topic. Source is contextual information on the source of events provided by the partner that the end user can see. This information is helpful when end user is considering activating a partner topic, for example.
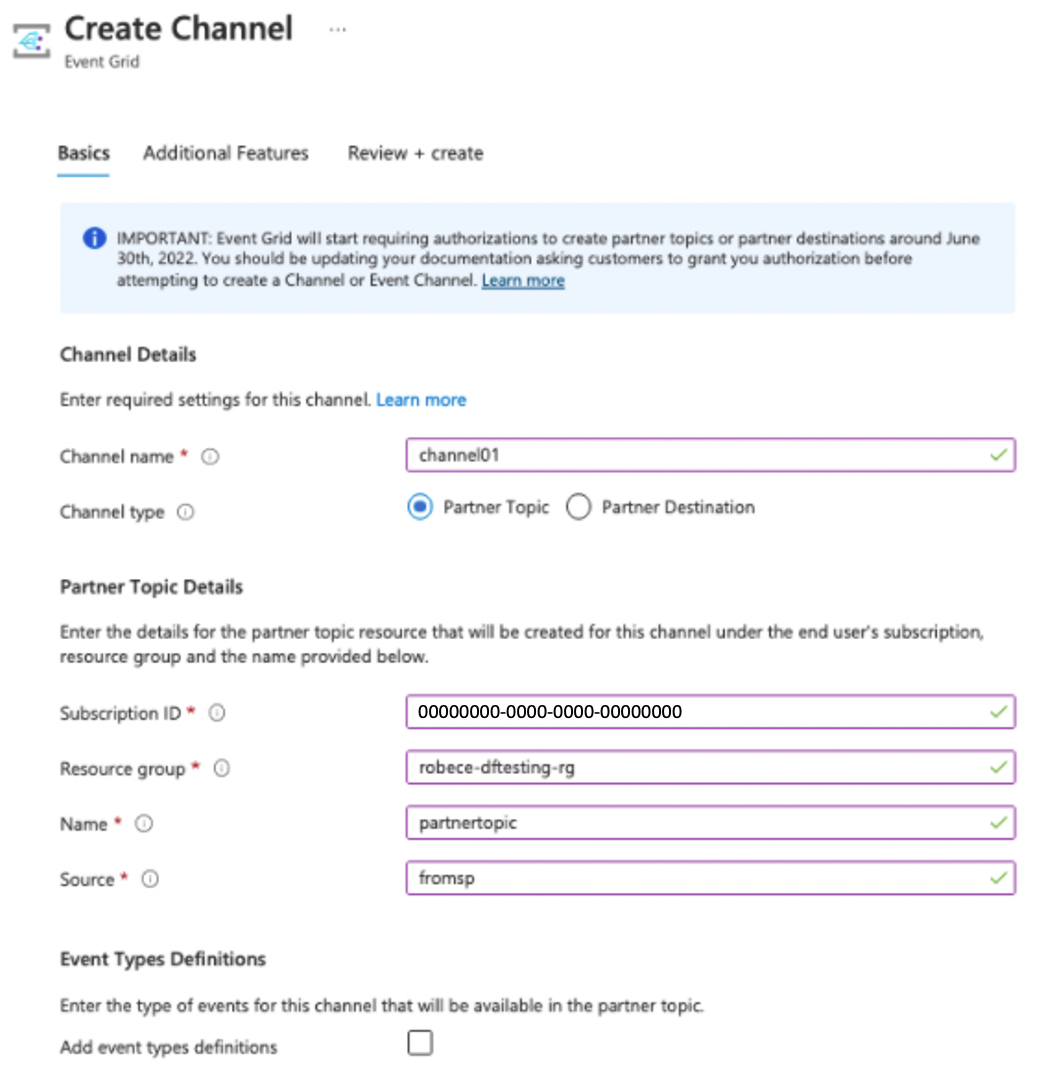
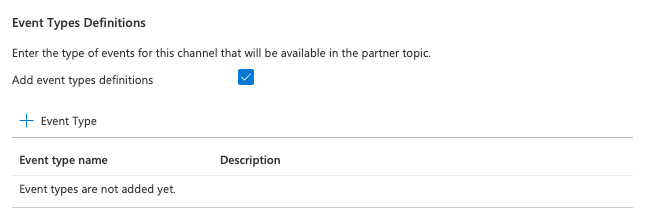
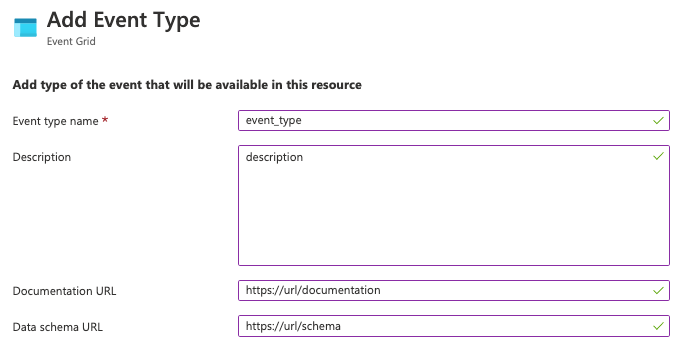
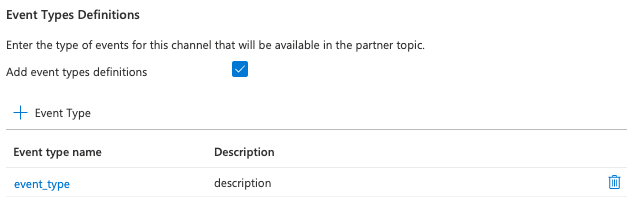
Select Add event type definitions to declare the kind of events that are sent to the channel and to its associated partner topic. Event types are shown to customers when creating event subscriptions on the partner topic and are used to select the specific event types to send to an event handler destination.
Select Next: Additional Features link at the bottom of the page.
On the Additional Features page, follow these steps:
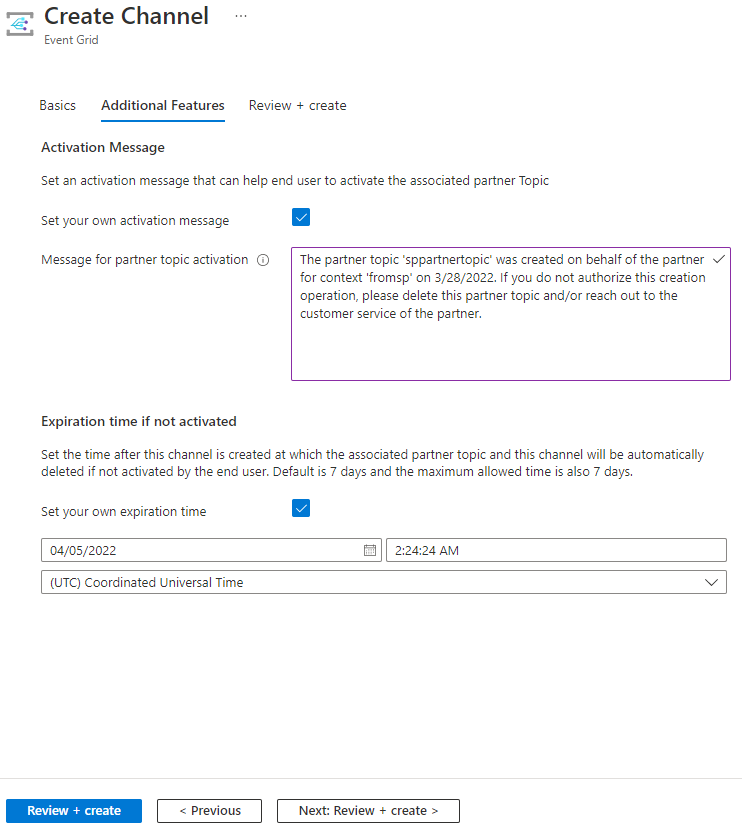
- To set your own activation message that can help end user to activate the associated partner topic, select the check box next to Set your own activation message, and enter the message.
- For expiration time, set the time after this channel is created at which the associated partner topic and this channel will be automatically deleted if not activated by the end user. 1.Select Next: Review + create.
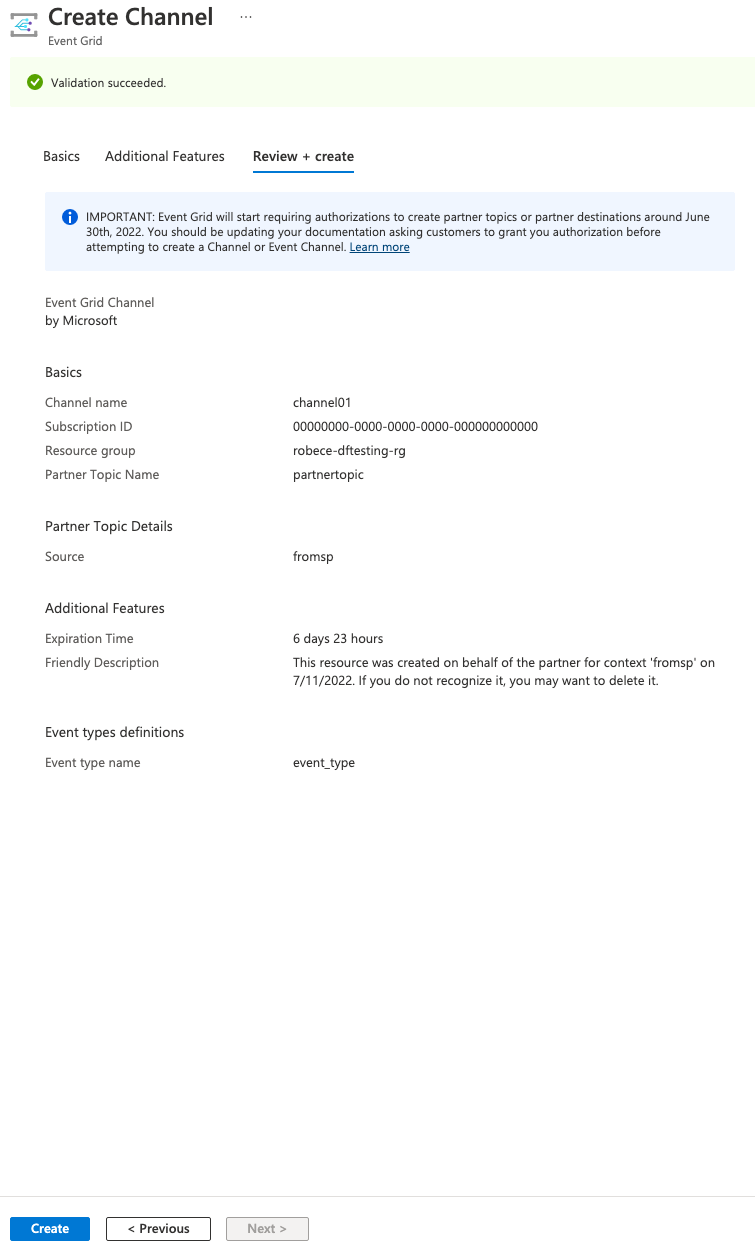
On the Review + create page, review all the settings for the channel, and select Create at the bottom of the page.
Partner topic option:

Manage a channel
If you created a channel you may be interested to update the configuration once the resource has been created.
Go to the Configuration on the channel. You may update message for partner topic activation, expiration time if not activated, and event type definitions.
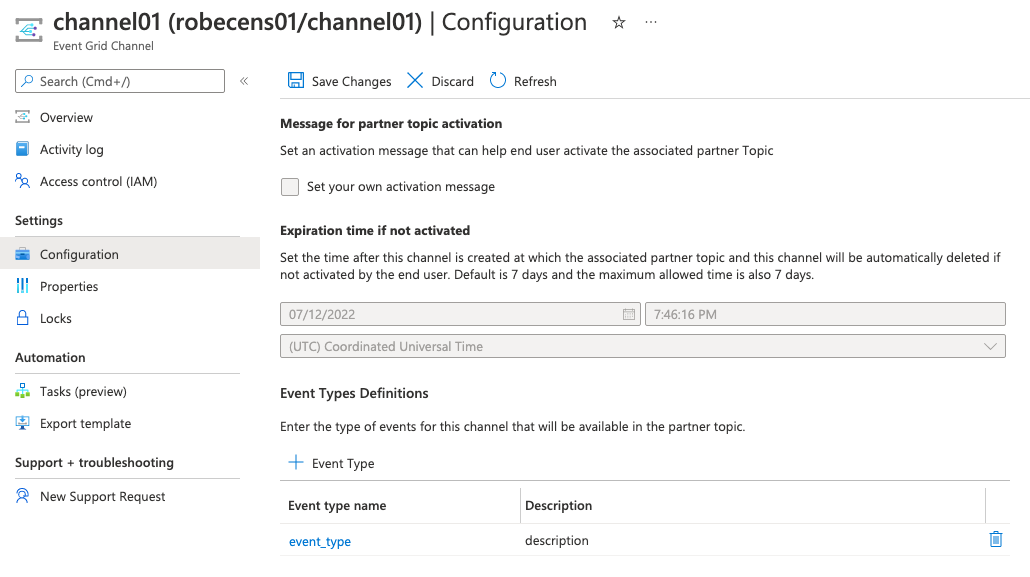
Important
Don't forget to save changes before leaving the configuration page.
Create an event channel
If you selected Source attribute in event for Partner topic routing mode, create an event channel by following steps in this section.
Important
- Channel is the new routing resource type and is the preferred option.
Go to the Overview page of the namespace you created.
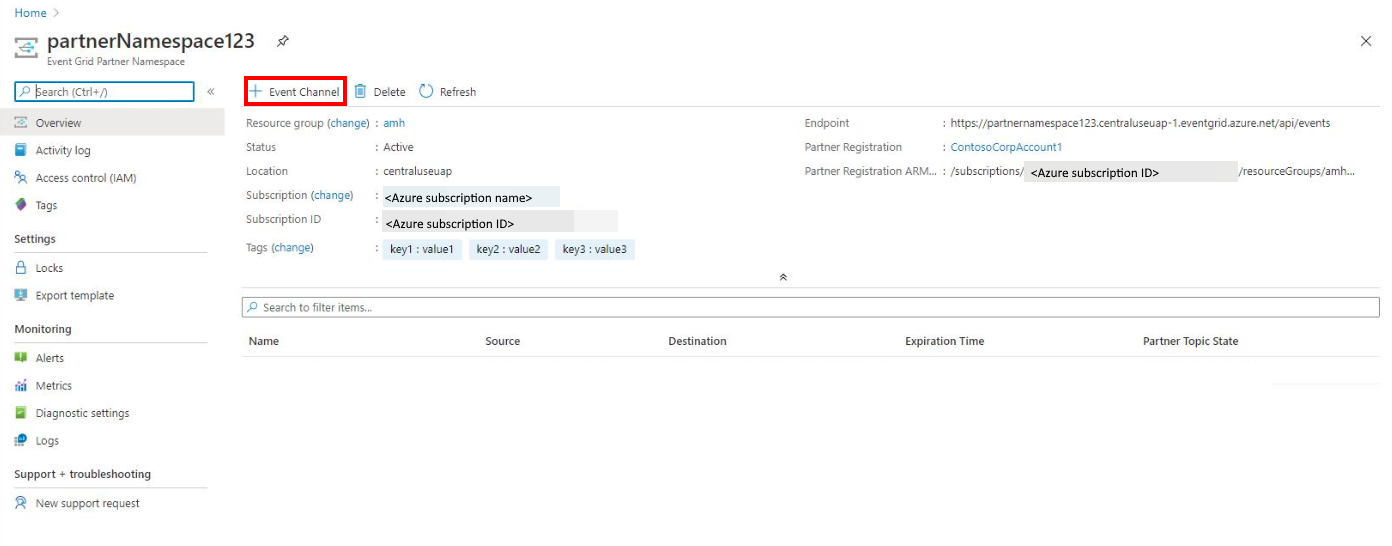 partner-namespace-overview.png
Select + Event Channel on the toolbar.
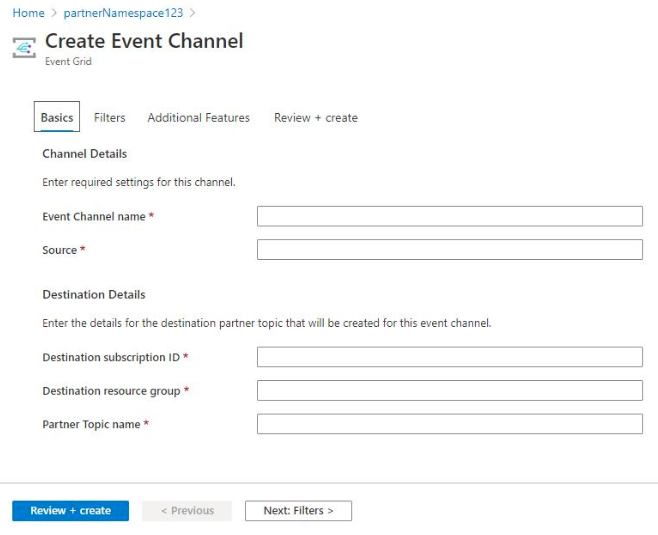
On the Create Event Channel - Basics page, specify the following information.
In the Channel details section, do these steps:
- For Event channel name, enter a name for the event channel.
- Enter the source. See Cloud Events 1.0 specifications to get an idea of a suitable value for the source. Also, see this Cloud Events schema example.
In the Destination details section, enter details for the destination partner topic that will be created for this event channel.
- Enter the ID of the subscription in which the partner topic will be created.
- Enter the name of the resource group in which the partner topic resource will be created.
- Enter a name for the partner topic.
Select Next: Filters at the bottom of the page.
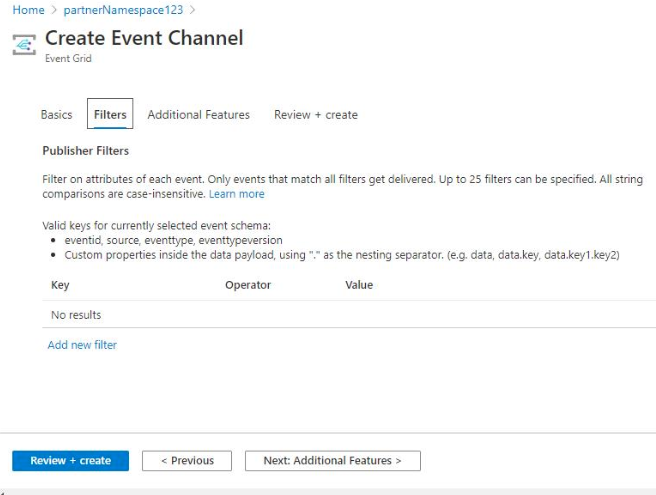
On the Filters page, add filters. do the following steps:
Filter on attributes of each event. Only events that match all filters get delivered. Up to 25 filters can be specified. Comparisons are case-insensitive. Valid keys used for filters vary based on the event schema. In the following example,
eventid,source,eventtype, andeventtypeversioincan be used for keys. You can also use custom properties inside the data payload, using the.as the nesting operator. For example:data,data.key,data.key1.key2.Select Next: Additional features at the bottom of the page.
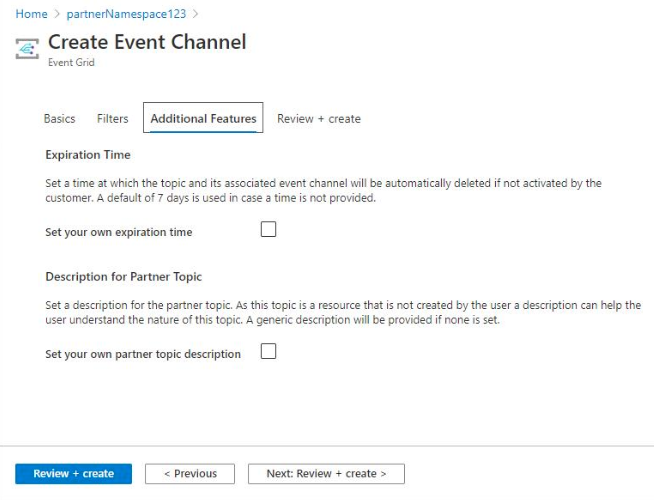
On the Additional features page, you can set an expiration time and description for the partner topic.
The expiration time is the time at which the topic and its associated event channel will be automatically deleted if not activated by the customer. A default of seven days is used in case a time isn't provided. Select the checkbox to specify your own expiration time.
As this topic is a resource that's not created by the user, a description can help the user with understanding the nature of this topic. A generic description will be provided if none is set. Select the checkbox to set your own partner topic description.
Select Next: Review + create.
On the Review + create, review the settings, and select Create to create the event channel.
Activate partner topics
Before your users can subscribe to partner topics you create in their Azure subscriptions, they'll have activate partner topics first. For details, see Activate a partner topic.
Next steps
See the following articles for more details about the Partner Events feature: