Note
Access to this page requires authorization. You can try signing in or changing directories.
Access to this page requires authorization. You can try changing directories.
Azure Event Hubs supports Microsoft Entra authentication with managed identities for Azure resources. Managed identities for Azure resources can authorize access to Event Hubs resources using Microsoft Entra credentials from applications running in Azure Virtual Machines (VMs), Function apps, Virtual Machine Scale Sets, and other services. By using managed identities for Azure resources together with Microsoft Entra authentication, you can avoid storing credentials with your applications that run in the cloud. This article shows how to authorize access to an event hub by using a managed identity from an Azure VM.
Enable managed identities on a VM
Before you use managed identities for Azure resources to access Event Hubs resources from your VM, you must first enable managed identities for Azure Resources on the VM. To learn how to enable managed identities for Azure resources, see Configure managed identities on Azure VMs.
Grant permissions to a managed identity in Microsoft Entra ID
To authorize a request to Event Hubs service from a managed identity in your application, first configure Azure role-based access control (RBAC) settings for that managed identity. Azure Event Hubs defines Azure roles that encompass permissions for sending events to and receiving events from Event Hubs. When an Azure role is assigned to a managed identity, the managed identity is granted access to Event Hubs data at the appropriate scope. For more information about assigning Azure roles, see Authenticate with Microsoft Entra ID for access to Event Hubs resources.
Sample application
The procedure in this section uses a simple application that runs under a managed identity and accesses Event Hubs resources.
Here we're using a sample web application hosted in Azure App Service. For step-by-step instructions for creating a web application, see Create an ASP.NET Core web app in Azure
Once the application is created, follow these steps:
Go to Settings and select Identity.
Select the Status to be On.
Select Save to save the setting.
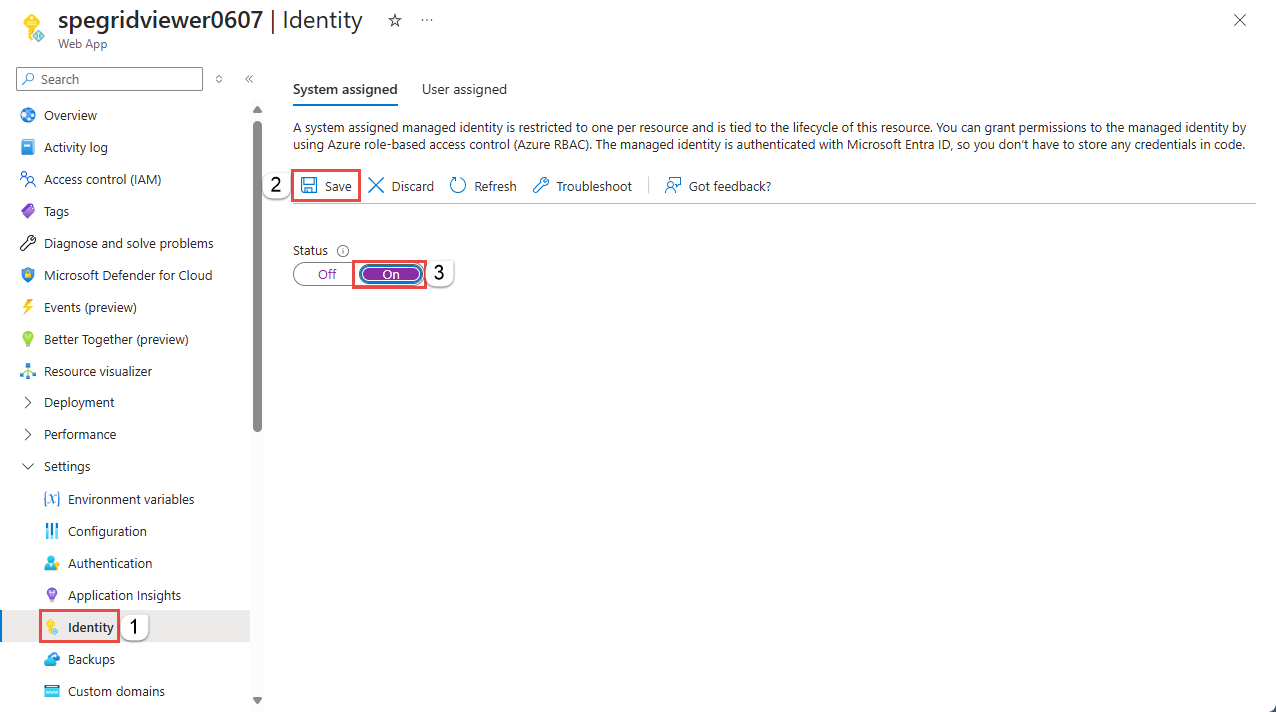
Select Yes on the information message.
Once you've enabled this setting, a new service identity is created in your Microsoft Entra ID and configured into the App Service host.
Now, assign this service identity to a role in the required scope in your Event Hubs resources.
To Assign Azure roles using the Azure portal
Assign one of the Event Hubs roles to the managed identity at the desired scope (Event Hubs namespace, resource group, subscription). For detailed steps, see Assign Azure roles using the Azure portal.
Note
For a list of services that support managed identities, see Services that support managed identities for Azure resources.
Test the web application
- Create an Event Hubs namespace and an event hub.
- Deploy the web app to Azure. See the following tabbed section for links to the sample web application on GitHub.
- Ensure that the SendReceive.aspx is set as the default document for the web app.
- Enable identity for the web app.
- Assign this identity to the Event Hubs Data Owner role at the namespace level or event hub level.
- Run the web application, enter the namespace name and event hub name, a message, and select Send. To receive the event, select Receive.
You can find the sample web application that sends and receives data from Event Hubs resources in the GitHub repo.
Install the latest package from NuGet, and start sending events to Event Hubs using EventHubProducerClient and receiving events using EventHubConsumerClient.
Note
For a Java sample that uses a managed identity to publish events to an event hub, see Publish events with Azure identity sample on GitHub.
protected async void btnSend_Click(object sender, EventArgs e)
{
    await using (EventHubProducerClient producerClient = new EventHubProducerClient(txtNamespace.Text, txtEventHub.Text, new DefaultAzureCredential()))
    {
        // create a batch
        using (EventDataBatch eventBatch = await producerClient.CreateBatchAsync())
        {

            // add events to the batch. only one in this case.
            eventBatch.TryAdd(new EventData(Encoding.UTF8.GetBytes(txtData.Text)));

            // send the batch to the event hub
            await producerClient.SendAsync(eventBatch);
        }

        txtOutput.Text = $"{DateTime.Now} - SENT{Environment.NewLine}{txtOutput.Text}";
    }
}
protected async void btnReceive_Click(object sender, EventArgs e)
{
    await using (var consumerClient = new EventHubConsumerClient(EventHubConsumerClient.DefaultConsumerGroupName, $"{txtNamespace.Text}.servicebus.windows.net", txtEventHub.Text, new DefaultAzureCredential()))
    {
        int eventsRead = 0;
        try
        {
            using CancellationTokenSource cancellationSource = new CancellationTokenSource();
            cancellationSource.CancelAfter(TimeSpan.FromSeconds(5));

            await foreach (PartitionEvent partitionEvent in consumerClient.ReadEventsAsync(cancellationSource.Token))
            {
                txtOutput.Text = $"Event Read: { Encoding.UTF8.GetString(partitionEvent.Data.Body.ToArray()) }{ Environment.NewLine}" + txtOutput.Text;
                eventsRead++;
            }
        }
        catch (TaskCanceledException ex)
        {
            txtOutput.Text = $"Number of events read: {eventsRead}{ Environment.NewLine}" + txtOutput.Text;
        }
    }
}
Note
If the source service or app doesn't restart after the access to the event hub is disabled by removing the source's managed identity from the Event Hubs RBAC role, the source app may continue to publish events to or receiev events from the event hub until the token expires (default token validity is 24 hours). This behavior is by design.
Therefore, after you remove the source's managed identity from the RBAC role, restart the source app or service to immediately expire the token and prevent it from sending events to or receiving events from the event hub.
Event Hubs for Kafka
You can use Apache Kafka applications to send messages to and receive messages from Azure Event Hubs using managed identity OAuth. See the following sample on GitHub: Event Hubs for Kafka - send and receive messages using managed identity OAuth.
Samples
- .NET.
- For a sample that uses the latest Azure.Messaging.EventHubs package, see Publish events with a managed identity
- For a sample that uses the legacy Microsoft.Azure.EventHubs package, see this .NET sample on GitHub
- Java - see the following samples.
- Publish events with Azure identity sample on GitHub.
- To learn how to use the Apache Kafka protocol to send events to and receive events from an event hub using a managed identity, see Event Hubs for Kafka sample to send and receive messages using a managed identity.
Related content
- See the following article to learn about managed identities for Azure resources: What is managed identities for Azure resources?
- See the following related articles: