Note
Access to this page requires authorization. You can try signing in or changing directories.
Access to this page requires authorization. You can try changing directories.
You can configure a custom DNS server and enable DNS proxy for Azure Firewall. Configure these settings when you deploy the firewall, or configure them later from the DNS settings page. By default, Azure Firewall uses Azure DNS and DNS Proxy is disabled.
DNS servers
A DNS server maintains and resolves domain names to IP addresses. By default, Azure Firewall uses Azure DNS for name resolution. The DNS server setting lets you configure your own DNS servers for Azure Firewall name resolution. You can configure a single server or multiple servers. If you configure multiple DNS servers, the server used is chosen randomly. You can configure a maximum of 15 DNS servers in Custom DNS.
Note
For instances of Azure Firewall that are managed by using Azure Firewall Manager, the DNS settings are configured in the associated Azure Firewall policy.
Configure custom DNS servers
- Under Azure Firewall Settings, select DNS Settings.
- Under DNS servers, you can type or add existing DNS servers that were previously specified in your virtual network.
- Select Apply.
The firewall now directs DNS traffic to the specified DNS servers for name resolution.
DNS proxy
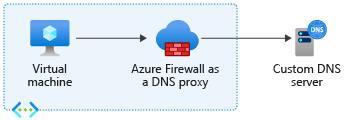
You can configure Azure Firewall to act as a DNS proxy. A DNS proxy is an intermediary for DNS requests from client virtual machines to a DNS server.
If you want to enable FQDN (fully qualified domain name) filtering in network rules, enable DNS proxy and update the virtual machine configuration to use the firewall as a DNS proxy.
If you enable FQDN filtering in network rules but don't configure client virtual machines to use the Azure Firewall as their DNS proxy, DNS requests from these clients might be resolved at different times or return different results than those seen by the Azure Firewall. To ensure consistent DNS resolution and FQDN filtering, configure client virtual machines to use Azure Firewall as their DNS proxy. This setup ensures that all DNS requests pass through the firewall, preventing inconsistencies.
When Azure Firewall is a DNS proxy, two caching function types are possible:
Positive cache: DNS resolution is successful. The firewall caches these responses according to the TTL (time to live) in the response up to a maximum of 1 hour.
Negative cache: DNS resolution results in no response or no resolution. The firewall caches these responses according to the TTL in the response, up to a max of 30 minutes.
The DNS proxy stores all resolved IP addresses from FQDNs in network rules. As a best practice, use FQDNs that resolve to one IP address.
Policy inheritance
Policy DNS settings applied to a standalone firewall override the standalone firewall’s DNS settings. A child policy inherits all parent policy DNS settings, but it can override the parent policy.
For example, to use FQDNs in network rule, DNS proxy should be enabled. But if a parent policy does not have DNS proxy enabled, the child policy doesn't support FQDNs in network rules unless you locally override this setting.
DNS proxy configuration
DNS proxy configuration requires three steps:
- Enable the DNS proxy in Azure Firewall DNS settings.
- Optionally, configure your custom DNS server or use the provided default.
- Configure the Azure Firewall private IP address as a custom DNS address in your virtual network DNS server settings to direct DNS traffic to the Azure Firewall.
Note
If you use a custom DNS server, select an IP address from your virtual network that isn't part of the Azure Firewall subnet.
To configure DNS proxy, you must configure your virtual network DNS servers setting to use the firewall private IP address. Then enable the DNS proxy in the Azure Firewall DNS settings.
Configure virtual network DNS servers
- Select the virtual network where the DNS traffic is routed through the Azure Firewall instance.
- Under Settings, select DNS servers.
- Under DNS servers, select Custom.
- Enter the firewall's private IP address.
- Select Save.
- Restart the VMs that are connected to the virtual network so they're assigned the new DNS server settings. VMs continue to use their current DNS settings until they're restarted.
Enable DNS proxy
- Select your Azure Firewall instance.
- Under Settings, select DNS.
- Select Enabled for DNS settings.
- By default, DNS Proxy is disabled. When this setting is enabled, the firewall listens on port 53 and forwards DNS requests to the configured DNS servers.
- Review the DNS servers configuration to make sure that the settings are appropriate for your environment.
- Select Save.
High availability failover
DNS proxy has a failover mechanism that stops using a detected unhealthy server and uses another DNS server that is available.
If all DNS servers are unavailable, there's no fallback to another DNS server.
Health checks
DNS proxy performs five-second health check loops for as long as the upstream servers report as unhealthy. The health checks are a recursive DNS query to the root name server. Once an upstream server is considered healthy, the firewall stops health checks until the next error. When a healthy proxy returns an error, the firewall selects another DNS server in the list.
Azure Firewall with Azure Private DNS Zones
Azure Firewall supports integration with Azure Private DNS zones, allowing it to resolve private domain names. When you associate a Private DNS zone with the virtual network where Azure Firewall is deployed, the firewall can resolve names defined in that zone.
Note
This integration applies to name resolution performed by Azure Firewall itself (for example, when the firewall resolves FQDNs in network rules or application rules). DNS queries from downstream clients sent to Azure Firewall’s DNS Proxy are not resolved using Azure Private DNS zones unless the configured upstream DNS server also has access to those zones. The DNS Proxy simply forwards client queries to its configured upstream servers and does not merge results from Azure DNS.
Important
Avoid creating DNS records in Private DNS zones that override Microsoft-owned default domains. Overriding these domains can prevent Azure Firewall from resolving critical endpoints, which can disrupt management traffic and cause features such as logging, monitoring, and updates to fail.
The following is a nonexhaustive list of Microsoft-owned domains that should not be overridden, as Azure Firewall management traffic might require access to them:
azclient.msazure.comcloudapp.netcore.windows.netlogin.microsoftonline.commicrosoft.commsidentity.comtrafficmanager.netvault.azure.netwindows.netmanagement.azure.comtable.core.windows.netstore.core.windows.netazure-api.netmicrosoftmetrics.comtime.windows.comservicebus.windows.netblob.storage.azure.netblob.core.windows.netarm-msedge.netcloudapp.azure.commonitoring.core.windows.net
For example, Azure Firewall management traffic requires access to storage accounts using the domain blob.core.windows.net. If you create a Private DNS zone for *.blob.core.windows.net and associate it with the firewall's virtual network, you override the default DNS resolution and disrupt essential firewall operations. To avoid this issue, don't override the default domain. Instead, create a Private DNS zone for a unique subdomain, such as *.<unique-domain-name>.blob.core.windows.net.
Alternatively, to prevent Private DNS zones from affecting Azure Firewall, deploy the services that require Private DNS zones in a separate virtual network. This way, Private DNS zones are only associated with the service virtual network and don't affect DNS resolution for Azure Firewall.