Note
Access to this page requires authorization. You can try signing in or changing directories.
Access to this page requires authorization. You can try changing directories.
Azure Firewall Premium includes a TLS inspection feature, which requires a certificate authentication chain. For production deployments, you should use an Enterprise PKI to generate the certificates that you use with Azure Firewall Premium. Use this article to create and manage an Intermediate CA certificate for Azure Firewall Premium.
For more information about certificates used by Azure Firewall Premium, see Azure Firewall Premium certificates.
Prerequisites
If you don't have an Azure subscription, create a free account before you begin.
To use an Enterprise CA to generate a certificate to use with Azure Firewall Premium, you must have the following resources:
- an Active Directory Forest
- an Active Directory Certification Services Root CA with Web Enrollment enabled
- an Azure Firewall Premium with Premium tier Firewall Policy
- an Azure Key Vault
- a Managed Identity with Read permissions to Certificates and Secrets defined in the Key Vault Access Policy
Create a new Subordinate Certificate Template
Run
certtmpl.mscto open the Certificate Template Console.Find the Subordinate Certification Authority template in the console.
Right-click on the Subordinate Certification Authority template and select Duplicate Template.
In the Properties of New Template window, go to the Compatibility tab and set the appropriate compatibility settings or leave them as default.
Go to the General tab, set the Template Display Name (for example:
My Subordinate CA), and adjust the validity period if necessary. Optionally, select the Publish certificate in Active Directory checkbox.In the Settings tab, ensure the required users and groups have read and
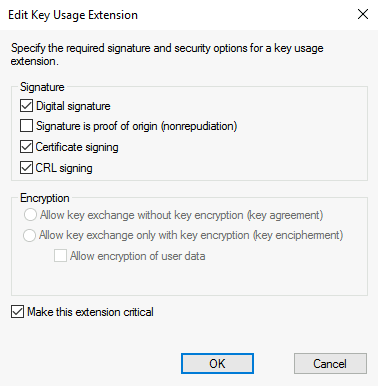
enrollpermissions.Navigate to the Extensions tab, select Key Usage, and select Edit.
- Ensure that the Digital signature, Certificate signing, and CRL signing checkboxes are selected.
- Select the Make this extension critical checkbox and select OK.
Select OK to save the new certificate template.
Ensure the new template is enabled so it can be used to issue certificates.
Request and export a certificate
Access the web enrollment site on the Root CA, usually
https://<servername>/certsrvand select Request a Certificate.Select Advanced Certificate Request.
Select Create and Submit a Request to this CA.
Fill out the form using the Subordinate Certification Authority template created in the previous section.
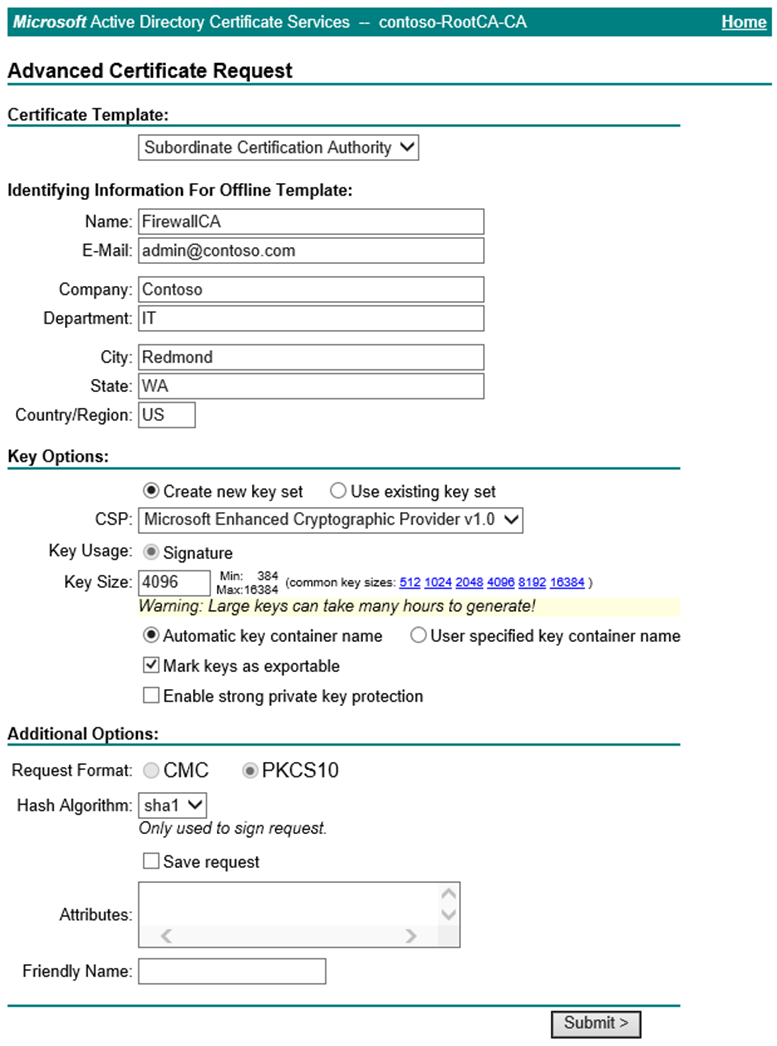
Submit the request and install the certificate.
Assuming this request is made from a Windows Server using Internet Explorer, open Internet Options.
Navigate to the Content tab and select Certificates.
Select the certificate that was just issued and then select Export.
Select Next to begin the wizard. Select Yes, export the private key, and then select Next.
.pfx file format is selected by default. Uncheck Include all certificates in the certification path if possible. If you export the entire certificate chain, the import process to Azure Firewall will fail.
Assign and confirm a password to protect the key, and then select Next.
Choose a file name and export location and then select Next.
Select Finish and move the exported certificate to a secure location.
Add the certificate to a Firewall Policy
In the Azure portal, navigate to the Certificates page of your Key Vault, and select Generate/Import.
Select Import as the method of creation, name the certificate, select the exported .pfx file, enter the password, and then select Create.
Navigate to the TLS Inspection page of your Firewall policy and select your Managed identity, Key Vault, and certificate.
Select Save.
Validate TLS inspection
Create an Application Rule using TLS inspection to the destination URL or FQDN of your choice. For example:
*bing.com.From a domain-joined machine within the Source range of the rule, navigate to your Destination and select the lock symbol next to the address bar in your browser. The certificate should show that it was issued by your Enterprise CA rather than a public CA.

Show the certificate to display more details, including the certificate path.

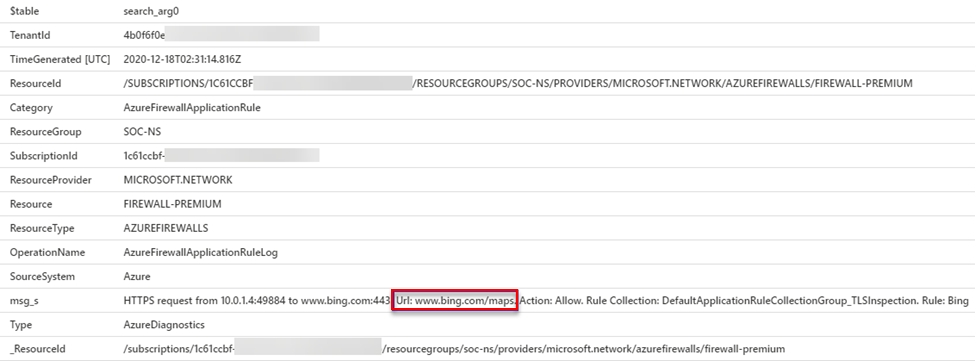
In Log Analytics, run the following KQL query to return all requests that have been subject to TLS Inspection:
AzureDiagnostics
| where ResourceType == "AZUREFIREWALLS"
| where Category == "AzureFirewallApplicationRule"
| where msg_s contains "Url:"
| sort by TimeGenerated desc
The result shows the full URL of inspected traffic: