Note
Access to this page requires authorization. You can try signing in or changing directories.
Access to this page requires authorization. You can try changing directories.
Use this article to create a Foundry project and confirm that your environment is ready before you start building agents, evaluations, and files.
This article describes how to create a Foundry project in Microsoft Foundry. Projects let you organize your work—such as agents, evaluations, and files—as you build stateful apps and explore new ideas.
If your organization requires customized Azure configurations like alternative names, security controls, or cost tags, you might need to use the Azure portal or template options to comply with your organization's Azure Policy requirements.
Prerequisites
-
An Azure account with an active subscription. If you don't have one, create a free Azure account, which includes a free trial subscription.
If you're creating the project for yourself:
- Access to a role that allows you to create a Foundry resource, such as Azure Account AI Owner or Azure AI Owner on the subscription or resource group. For more information about permissions, see Role-based access control for Microsoft Foundry.
If you're creating the project for a team:
- Access to a role that allows you to complete role assignments, such as Owner. For more information about permissions, see Role-based access control for Microsoft Foundry.
- A list of user email addresses or Microsoft Entra security group IDs for team members who need access.
Use the following tabs to select the method you want to use to create a Foundry project:
- No other prerequisites necessary when using the portal.
Create a Foundry project
Use one of the following methods.
These steps provide a way to create a new Azure resource with basic default settings.
To create a Foundry project, follow these steps:
-
Sign in to Microsoft Foundry. Make sure the New Foundry toggle is on. These steps refer to Foundry (new).

The project you're working on appears in the upper-left corner.
To create a new project, select the project name, and then select Create new project.
Give your project a name and select Create project. Or see the next section for advanced options.
Advanced options
You create a Foundry project on a
Foundryresource. The portal automatically creates this resource when you create the project. Select an existing Resource group to use, or leave the default to create a new resource group.Tip
Especially for getting started, create a new resource group for your project. The resource group makes it easy to manage the project and all its resources together.
Select a Location or use the default. The location is the region where the project resources are hosted.
Select Create. You see the progress of resource creation. The project is created when the process is complete.
Create multiple projects on the same resource
Create multiple Foundry projects on an existing Foundry resource to enable team collaboration and shared resource access including security, deployments, and connected tools. This setup is ideal in restricted Azure subscriptions where developers need self-serve exploration ability within the setup of a preconfigured environment.
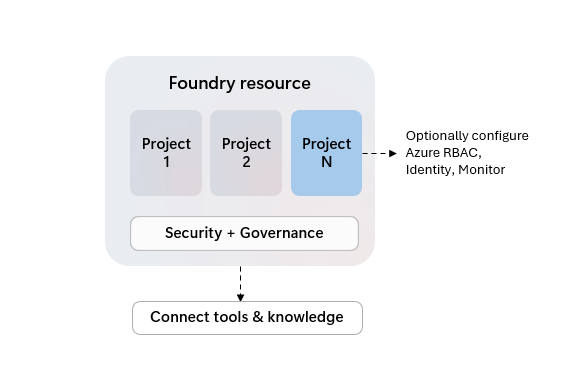
Foundry projects as Azure child resources may get assigned their own access controls, but share common settings such as network security, deployments, and Azure tool integration from their parent resource.
While not all Foundry capabilities support organizing work in projects yet, your resource's first "default" project is more powerful. You can identify it by the tag "default" in UX experiences and the resource property "is_default" when using code options.
| Feature | Default project | Other projects |
|---|---|---|
| Model inference | ✅ | ✅ |
| Playgrounds | ✅ | ✅ |
| Agents | ✅ | ✅ |
| Evaluations | ✅ | ✅ |
| Tracing | ✅ | ✅ |
| Datasets | ✅ | ✅ |
| Indexes | ✅ | ✅ |
| Foundry SDK and API | ✅ | ✅ |
| Content understanding | ✅ | ✅ |
| OpenAI SDK and API | ✅ | Responses, Files, Conversations |
| OpenAI Batch, Fine-tuning, Stored completions | ✅ | - |
| Language fine-tuning | ✅ | ✅ |
| Speech fine-tuning | ✅ | - |
| Connections | ✅ | ✅ |
To add a project to a Foundry resource:
- Select Operate in the upper-right navigation.
- Select Admin in the left pane.
- Select the Parent resource you want to add a project to.
- Select Add project.
If you delete your Foundry resource's default project, the next project created will become the default project.
View project settings
On the Home project page, you see the project endpoint and API key for the project. You don't need the API key if you use Microsoft Entra ID authentication.
Grant access to team members
If you created the project for a team, assign the Azure AI User role to team members so they can use the project and its resources. This role provides the minimum permissions needed to build and test AI applications. For other roles you might need to assign, see Role-based access control for Microsoft Foundry.
Important
To complete role assignments, you need a role such as Owner on the project. For more information, see Role-based access control for Microsoft Foundry.
- In the Foundry portal, select Operate in the upper-right navigation.
- Select Admin in the left pane.
- Select your project name in the table.
- Select Add user in the upper right.
- Enter the email address of the team member.
- Select Add.
Repeat these steps for each team member or security group.
Tip
To add multiple users at once, use a Microsoft Entra security group instead of individual email addresses.
Verify team member access
Ask a team member to verify their access by signing in to Microsoft Foundry and selecting the project from the project list.
If the team member can't access the project, verify that the role assignment completed successfully. Check that you used the correct email address or security group ID. Make sure the team member's Azure account is in the same Microsoft Entra tenant.
Delete projects
- Sign in to Microsoft Foundry. Make sure the New Foundry toggle is on. These steps refer to Foundry (new).
- In the upper-right navigation, select Operate.
- In the left pane, select Admin.
- Select your project.
- In the upper right, select the trash can icon to delete the project.
Important
Use with caution. You can't recover a project after it's deleted.