Note
Access to this page requires authorization. You can try signing in or changing directories.
Access to this page requires authorization. You can try changing directories.
Important
Azure Front Door (classic) will be retired on March 31, 2027. To avoid any service disruption, it's important that you migrate your Azure Front Door (classic) profiles to Azure Front Door Standard or Premium tier by March 2027. For more information, see Azure Front Door (classic) retirement.
This guide explains how to redirect traffic from HTTP to HTTPS for an Azure Front Door (classic) profile using the Azure portal. This setup ensures that all traffic to your domain is securely redirected to HTTPS.
Prerequisites
- An existing Azure Front Door (classic) profile. For more information, see create a Front Door (classic) profile.
Create HTTP to HTTPS redirect rule
Sign in to the Azure portal.
Navigate to the Azure Front Door (classic) profile you want to configure. Select Front Door designer under Settings in the left-hand menu.
Select the + icon under Routing rules to create a new route. Name the route, for example, HttpToHttpsRedirect, and set the Accepted Protocol to HTTP only. Choose the Frontend/domains you want to redirect from HTTP to HTTPS.
In the Route Details section, set the Route Type to Redirect. Choose Moved (301) for Redirect type and HTTPS only for Redirect protocol.
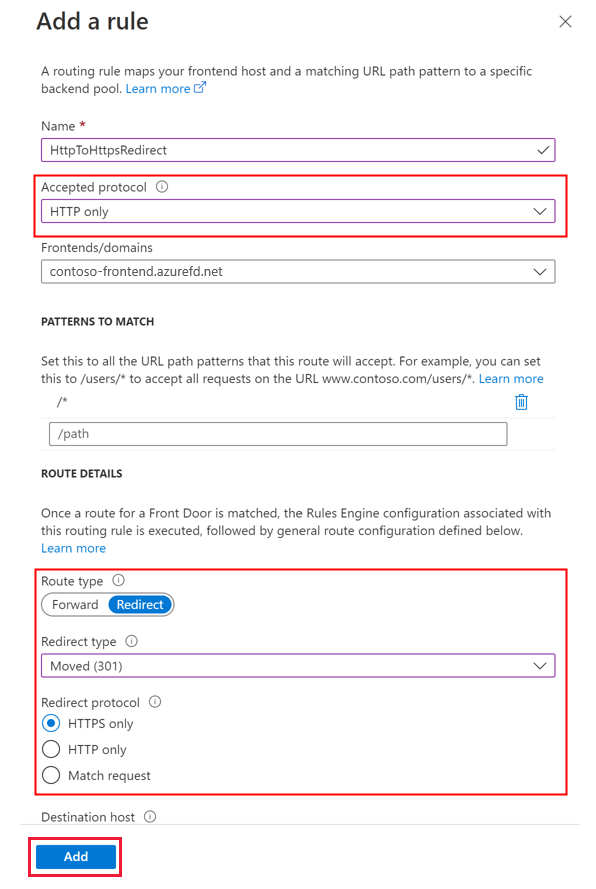
Select Add to create the routing rule for HTTP to HTTPS redirection.
Create forwarding rule
Add another routing rule for handling HTTPS traffic. Select the + icon under Routing rules to add a new route. Name the route, for example, DefaultForwardingRoute, and set the Accepted Protocols to HTTPS only. Select the appropriate Frontend/domains for accepting this traffic.
In the Route Details section, set the Route Type to Forward. Choose a backend pool to forward the traffic to and set the Forwarding Protocol to HTTPS only.
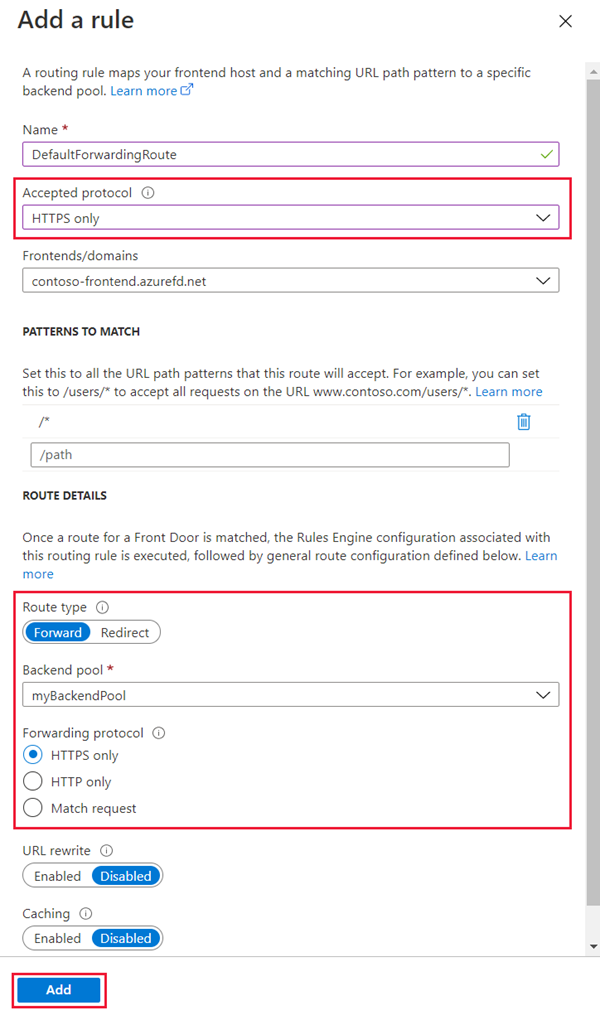
Select Add to create the forwarding route, then select Save to apply the changes to the Front Door profile.
Note
Creating this redirect rule will incur a small charge.
Next steps
- Learn more about Azure Front Door routing architecture.
- Learn more about Azure Front Door URL redirect.