Note
Access to this page requires authorization. You can try signing in or changing directories.
Access to this page requires authorization. You can try changing directories.
Applies to: ✔️ Front Door (classic)
Important
- Starting August 15, 2025, Azure Front Door (classic) will no longer support new domain onboarding. Migrate to AFD Standard and Premium to create new domains or profiles and avoid service disruption. Learn more
- Starting August 15, 2025, Azure Front Door (classic) will no longer support Managed certificates. To avoid service disruption, either switch to Bring Your Own Certificate (BYOC) or migrate to AFD Standard and Premium by August 15, 2025. Existing managed certificates will be auto renewed before August 15, 2025, and remain valid until April 14, 2026. Learn more
- Azure Front Door (classic) will be retired on March 31, 2027. To avoid service disruption, migrate to AFD Standard or Premium. Learn more.
This tutorial shows how to create a Rules engine configuration and your first rule in both Azure portal and CLI.
In this tutorial, you learn how to:
- Configure Rules Engine using the portal.
- Configure Rules Engine using Azure CLI.
Prerequisites
- Before you can complete the steps in this tutorial, you must first create an Azure Front Door (classic). For more information, see Create an Azure Front Door (classic).
Configure Rules Engine in Azure portal
Within your Azure Front Door (classic) resource, select Rule Engine configuration from under Settings on the left side menu pane. Select + Add, give your configuration a name, and start creating your first Rules Engine configuration.
Enter a name for your first rule. Then select + Add condition or + Add action to define your rule.
Note
- To delete a condition or action from a rule, use the trash can icon on the right-hand side of the specific condition or action.
- To create a rule that applies to all incoming traffic, do not specify any conditions.
- To stop evaluating rules once the first match condition is met, check Stop evaluating remaining rule. If this is checked and all of the match conditions of a particular rule are met, then the remaining rules in the configuration will not be executed.
- All paths in the rules engine configuration are case sensitive.
- Header names should adhere to RFC 7230.
Determine the priority of the rules within your configuration by using the Move up, Move down, and Move to top buttons. The priority is in ascending order, meaning the rule first listed is the most important rule.
Tip
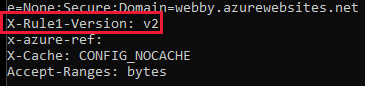
If you want to verify when the changes are propagated to Azure Front Door (classic), you can create a custom response header in the rule using the the following example. You can add a response header
_X-<RuleName>-Version_and change the value each time the rule is updated.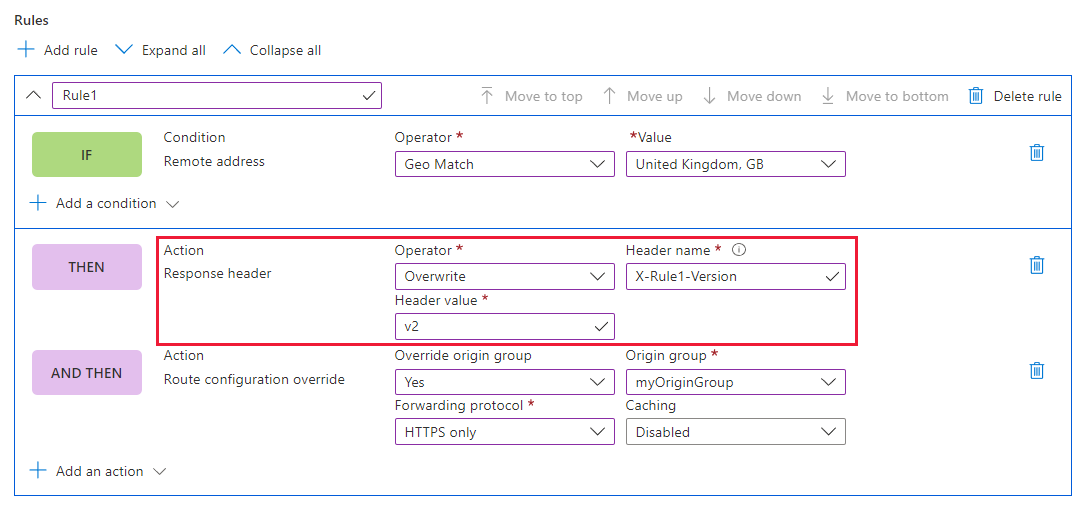 After the changes are updated, you can go to the URL to confirm the rule version being invoked:
Once you create one or more rules, select Save. This action creates your rules engine configuration.
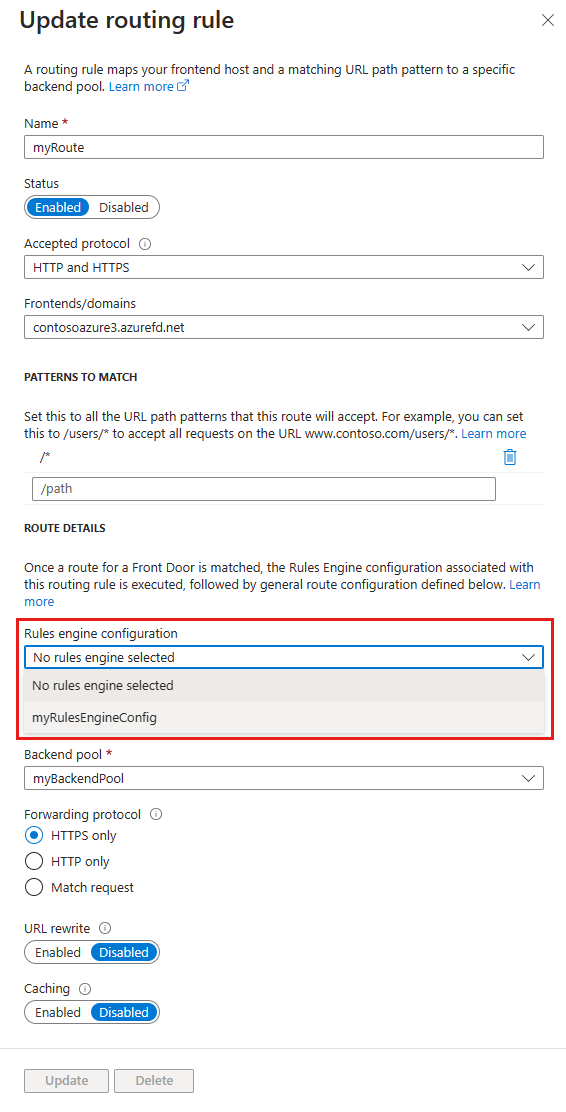
Once you create a rules engine configuration, you can associate the configuration with a routing rule. A single configuration can be applied to multiple routing rules, but a routing rule can only have one rules engine configuration. To associate the configuration, go to the Azure Front Door (classic) designer and select a Route. Then select the Rules engine configuration to associate with the routing rule.

Configure Rules Engine in Azure CLI
Install the Azure CLI and add the "front-door" extension:
az extension add --name front-doorSign in and switch to your subscription:
az account set --subscription <name_or_Id>Create a Rules Engine with one rule, including a header-based action and a match condition:
az network front-door rules-engine rule create -f {front_door} -g {resource_group} --rules-engine-name {rules_engine} --name {rule1} --priority 1 --action-type RequestHeader --header-action Overwrite --header-name Rewrite --header-value True --match-variable RequestFilenameExtension --operator Contains --match-values jpg png --transforms LowercaseList all the rules:
az network front-door rules-engine rule list -f {front_door} -g {rg} --name {rules_engine}Add a forwarding route override action:
az network front-door rules-engine rule action add -f {front_door} -g {rg} --rules-engine-name {rules_engine} --name {rule1} --action-type ForwardRouteOverride --backend-pool {backend_pool_name} --caching DisabledList all the actions in a rule:
az network front-door rules-engine rule action list -f {front_door} -g {rg} -r {rules_engine} --name {rule1}Link a rules engine configuration to a routing rule:
az network front-door routing-rule update -g {rg} -f {front_door} -n {routing_rule_name} --rules-engine {rules_engine}Unlink the rules engine:
az network front-door routing-rule update -g {rg} -f {front_door} -n {routing_rule_name} --remove rulesEngine
For more information, see the full list of Azure Front Door (classic) Rules engine commands.
Clean up resources
To remove the Rules Engine configuration from your Front Door (classic):
Disassociate any routing rules from the rule engine configuration by selecting the three dots next to the rule engine name and selecting Associate routing rule:
Uncheck all routing rules associated with this Rule Engine configuration and select Save:
Delete the Rule Engine configuration from your Front Door:

Next steps
In this tutorial, you learned how to:
- Create a Rule engine configuration
- Associate a configuration to a routing rule.
To learn how to add security headers with Rule engine, continue to the next tutorial.