Create a remote network using Azure virtual networks
Organizations might want to extend the capabilities of Microsoft Entra Internet Access to entire networks not just individual devices they can install the Global Secure Access Client on. This article shows how to extend these capabilities to an Azure virtual network hosted in the cloud. Similar principles might be applied to a customer's on-premises network equipment.
Prerequisites
To complete the steps in this process, you must have the following prerequisites in place:
- An Azure subscription and permission to create resources in the Azure portal.
- A basic understanding of site-to-site VPN connections.
- A Microsoft Entra tenant with the Global Secure Access Administrator role assigned.
Components of the virtual network
Building this functionality out in Azure provides organizations the ability to understand how Microsoft Entra Internet Access works in a more broad implementation. The resources we create in Azure correspond to on-premises concepts in the following ways:

| Azure resource | Traditional on-premises component |
|---|---|
| Virtual network | Your on-premises IP address space |
| Virtual network gateway | Your on-premises router, sometimes referred to as customer premises equipment (CPE) |
| Local network gateway | The Microsoft gateway that your router (Azure virtual network gateway) creates an IPsec tunnel to |
| Connection | IPsec VPN tunnel created between the virtual network gateway and local network gateway |
| Virtual machine | Client devices on your on-premises network |
In this document, we use the following default values. Feel free to configure these settings according to your own requirements.
- Subscription: Visual Studio Enterprise
- Resource group name: Network_Simulation
- Region: East US
High-level steps
The steps to simulate remote network connectivity with Azure virtual networks are completed in the Azure portal and the Microsoft Entra admin center. It might be helpful to have multiple tabs open so you can switch between them easily.
Before creating your virtual resources, you need a resource group and virtual network to use throughout the following sections. If you already have a test resource group and virtual network configured, you can start at step #3.
- Create a resource group (Azure portal)
- Create a virtual network (Azure portal)
- Create a virtual network gateway (Azure portal)
- Create a remote network with device links (Microsoft Entra admin center)
- Create local network gateway (Azure portal)
- Create site-to-site (S2S) VPN connection (Azure portal)
- Verify connectivity (Both)
Create a resource group
Create a resource group to contain all of the necessary resources.
- Sign in to the Azure portal with permission to create resources.
- Browse to Resource groups.
- Select Create.
- Select your Subscription, Region, and provide a name for your Resource group.
- Select Review + create.
- Confirm your details, then select Create.

Create a virtual network
Create a virtual network inside your new resource group.
- From the Azure portal, browse to Virtual Networks.
- Select Create.
- Select the Resource group you just created.
- Provide your network with a Virtual network Name.
- Leave the default values for the other fields.
- Select Review + create.
- Select Create.

Create a virtual network gateway
Create a virtual network gateway inside your new resource group.
From the Azure portal, browse to Virtual network gateways.
Select Create.
Provide your virtual network gateway with a Name and select the appropriate region.
Select the Virtual network created in the previous section.

Create a Public IP address and provide it with descriptive name.
- OPTIONAL: If you want a secondary IPsec tunnel, under the SECOND PUBLIC IP ADDRESS section, create another public IP address and give it a name. If you create a second IPsec tunnel, you need to create two device links in the Create a remote network step.
- Set the Enable active-active mode to Disabled if you don't need a second public IP address.
- The sample in this article uses a single IPsec tunnel.
Select an Availability zone.
Set Configure BGP to Enabled.
Set the Autonomous system number (ASN) to an appropriate value. Refer to the valid ASN values list for reserved values that can't be used.

Leave all other settings to their defaults or blank.
Select Review + create, confirm your settings.
Select Create.

Note
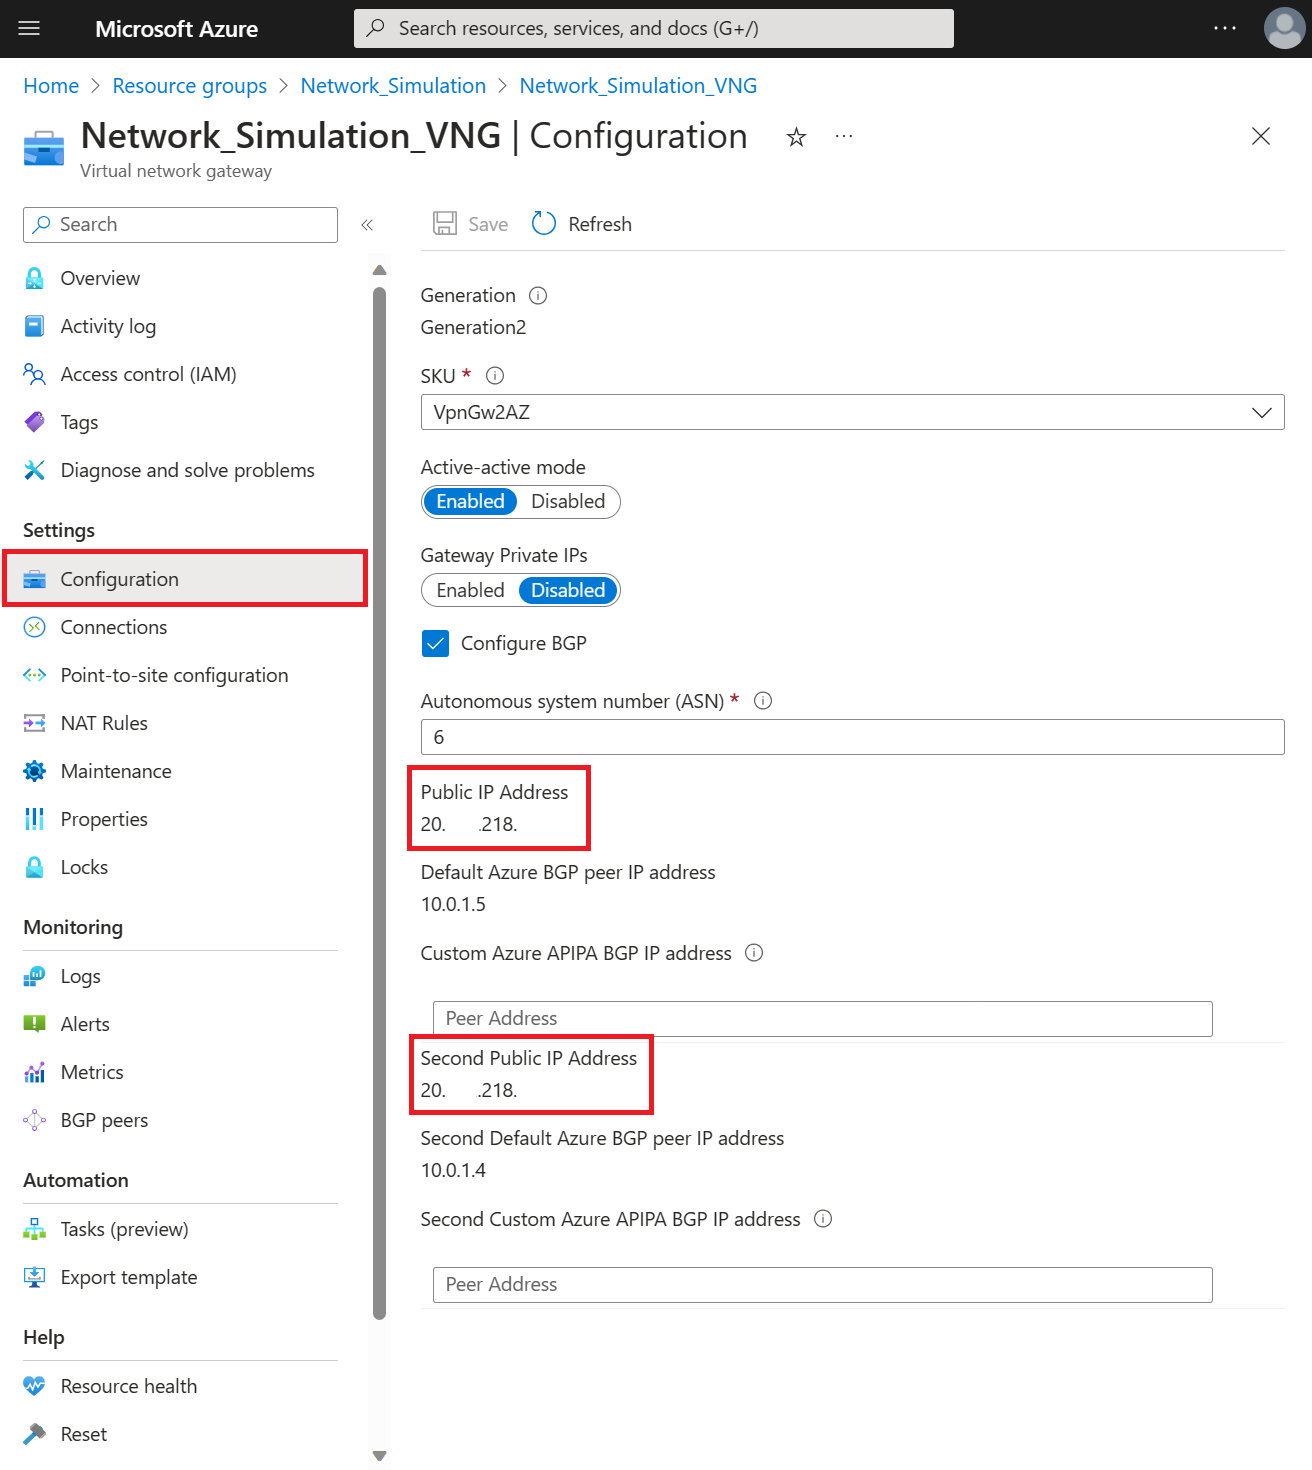
The virtual network gateway might take several minutes to deploy and create. You can start the next section while it's being created, but you need the public IP addresses of your virtual network gateway to complete the next step.
These IP addresses can be found by browsing to the Configuration page of your virtual network gateway once it's created.
Create a remote network
The process for creating a remote network is completed in the Microsoft Entra admin center. There are two sets of tabs where you enter the information.

The following steps provide the basic information needed to create a remote network with Global Secure Access. This process is covered in greater detail in two separate articles. There are several details that can be easily mixed up, so review the following articles for more information:
Zone redundancy
Before you create your remote network for Global Secure Access, take a moment to review the two options about redundancy. Remote networks can be created with or without redundancy. You can add redundancy in two ways:
- Choose Zone redundancy while creating a device link in the Microsoft Entra admin center.
- In this scenario, we create another gateway for you in a different availability zone within the same datacenter Region you picked while creating your remote network.
- In this scenario, you need just one public IP address on your virtual network gateway.
- Two IPSec tunnels are created from the same public IP address of your router to different Microsoft gateways in different availability zones.
- Create a secondary public IP address in the Azure portal and create two device links with different public IP addresses in the Microsoft Entra admin center.
- You can choose No redundancy then when adding device links to your remote network in the Microsoft Entra admin center.
- In this scenario, you need primary and secondary public IP addresses on your virtual network gateway.
Create the remote network and add device links
For this article, we choose the zone redundancy path.
Tip
Local BGP address must be a private IP address that is outside the address space of the virtual network associated with your virtual network gateway. For example, if the address space of your virtual network is 10.1.0.0/16, then you can use 10.2.0.0 as your Local BGP address.
Refer to the valid BGP addresses list for reserved values that can't be used.
Sign in to the Microsoft Entra admin center as a Global Secure Access Administrator.
Browse to Global Secure Access (preview) > Connect > Remote networks.
Select the Create remote network button and provide the following details on the Basics tab:
- Name
- Region

On the Connectivity tab, select Add a link.
On the Add a link - General tab enter the following details:
- Link name: Name of your device link.
- Device type: Set to Other.
- IP address: Public IP address of your virtual network gateway.
- Local BGP address: Private IP address that is outside the address space of the virtual network associated with your virtual network gateway.
- For example, if the address space of your virtual network is 10.1.0.0/16, then you can use 10.2.0.0 as your Local BGP address.
- Refer to the valid BGP addresses list for reserved values that can't be used.
- Peer BGP address: BGP IP address of your virtual network gateway.
- Link ASN: ASN of your virtual network gateway. Refer to the valid ASN values list for reserved values that can't be used.
- Redundancy: Set to Zone redundancy.
- Zone redundancy local BGP address: Private IP address that is outside the address space of the virtual network associated with your virtual network gateway. This address must be different from Local BGP address.
- Bandwidth capacity (Mbps): Specify tunnel bandwidth. Available options are 250, 500, 750, and 1000 Mbps.

On the Add a link - Details tab leave the default values selected, unless you made a different selection previously, and select the Next button.
On the Add a link - Security tab, enter the Pre-shared key (PSK) and select the Save button. You return to the main Create a remote network set of tabs.
On the Traffic profiles tab, select the appropriate traffic forwarding profile.
Select the Review + Create button.
If everything looks correct, select the Create remote network button.
View connectivity configuration
After you create a remote network and add a device link, the configuration details are available in the Microsoft Entra admin center. You need several details from this configuration to complete the next step.
Browse to Global Secure Access (Preview) > Connect > Remote networks.
In the last column on the right in the table, select View configuration for the remote network you created. The configuration is shown as a JSON blob.
Locate and save Microsoft's public IP address
endpoint,asn, andbgpAddressfrom the pane that opens.- These details are used to set up your connectivity in next step.
- For more information about viewing these details, see Configure customer premises equipment.

The following diagram connects the key details of these configuration details to their correlating role in the simulated remote network. A text description of the diagram follows the image.

The center of the diagram depicts a resource group that contains a virtual machine connected to a virtual network. A virtual network gateway then connects to the local network gateway through a site-to-site redundant VPN connection.
A screenshot of the connectivity details has two sections highlighted. The first highlighted section under localConfigurations contains the details of the Global Secure Access gateway, which is your local network gateway.
Local Network Gateway 1
- Public IP address/endpoint: 120.x.x.76
- ASN: 65476
- BGP IP address/bgpAddress: 192.168.1.1
Local Network Gateway 2
- Public IP address/endpoint: 4.x.x.193
- ASN: 65476
- BGP IP address/bgpAddress: 192.168.1.2
The second highlighted section under peerConfiguration contains the details of the virtual network gateway, which is your local router equipment.
Virtual Network Gateway
- Public IP address/endpoint: 20.x.x.1
- ASN: 65533
- BGP IP address/bgpAddress: 10.1.1.1
Another callout points to the virtual network you created in your resource group. The address space for the virtual network is 10.2.0.0/16. The Local BGP address and Peer BGP address can't be in the same address space.
Create local network gateway
This step is completed in the Azure portal. Several details from the previous step are needed to complete this step.
If you selected No redundancy while creating device links in the Microsoft Entra admin center, you need to create just one local network gateway.
If you selected Zone redundancy, then you need to create two local network gateways. You have two sets of endpoint, asn and bgpAddress in localConfigurations for the device links. This information is provided in View Configuration details for that remote network in the Microsoft Entra admin center.
From the Azure portal, browse to Local network gateways.
Select Create.
Select the Resource group created previously.
Select the appropriate region.
Provide your local network gateway with a Name.
For Endpoint, select IP address, then provide the
endpointIP address provided in the Microsoft Entra admin center.Select Next: Advanced.
Set Configure BGP to Yes.
Enter the Autonomous system number (ASN) from the
localConfigurationssection of the View configuration details.- Refer to the Local network gateway section of the graphic in the View connectivity configuration section.
Enter the BGP peer IP address from the
localConfigurationssection of the View configuration details.
Select Review + create and confirm your settings.
Select Create.
If you used zone redundancy, repeat these steps to create another local network gateway with second set of values.
Navigate to the Configurations to review the details of your local network gateway.

Create Site-to-site (S2S) VPN connection
This step is completed in the Azure portal. You need to create two connections here if you created a second gateway, one for your primary and secondary gateways. For this step, keep all settings set to the default value unless noted.
- From the Azure portal, browse to Connections.
- Select Create.
- Select the Resource group created previously.
- Under Connection type, select Site-to-site (IPsec).
- Provide a Name for the connection, and select the appropriate Region.
- Select Next: Settings.
- Select your Virtual network gateway and Local network gateway created previously.
- Enter the same Shared key (PSK) that you entered while creating the device link in previous step.
- Check the box for Enable BGP.
- Select Review + create, confirm your settings.
- Select Create.
Repeat these steps to create another connection with second local network gateway.

Verify connectivity
To verify connectivity, you need to simulate the traffic flow. One method is to create a virtual machine (VM) to initiate the traffic.
Simulate traffic with a virtual machine
This step creates a VM and initiates traffic to Microsoft 365 services. Leave all settings set to the default value unless noted.
- From the Azure portal, browse to Virtual machines.
- Select Create > Azure virtual machine.
- Select the Resource group created previously.
- Provide a Virtual machine name.
- Select the Image you want to use, for this example we choose Windows 11 Pro, version 22H2 - x64 Gen2
- Select Run with Azure Spot discount for this test.
- Provide a Username and Password for your VM.
- Confirm that you have an eligible Windows 10/11 license with multitenant hosting rights at the bottom of the page.
- Move to the Networking tab.
- Select the Virtual network created previously.
- Move to the Management tab
- Check the box Login with Microsoft Entra ID.
- Select Review + create, confirm your settings.
- Select Create.
You might choose to lock down remote access to the network security group to only a specific network or IP.
Verify connectivity status
After you create the remote networks and connections in the previous steps, it might take a few minutes for the connection to be established. From the Azure portal, you can validate that the VPN tunnel is connected and that BGP peering is successful.
- In the Azure portal, browse to the virtual network gateway created earlier and select Connections.
- Each of the connections should show a Status of Connected once the configuration is applied and successful.
- Browse to BGP peers under the Monitoring section to confirm that BGP peering is successful. Look for the peer addresses provided by Microsoft. Once configuration is applied and successful, the Status should show Connected.

You can use the virtual machine you created to validate that traffic is flowing to Microsoft 365 locations like SharePoint Online. Browsing to resources in SharePoint or Exchange Online should result in traffic on your virtual network gateway. This traffic can be seen by browsing to Metrics on the virtual network gateway or by Configuring packet capture for VPN gateways.
Tip
If you're using this article for testing Microsoft Entra Internet Access, clean up all related Azure resources by deleting the new resource group after you're done.
Next steps
Feedback
Coming soon: Throughout 2024 we will be phasing out GitHub Issues as the feedback mechanism for content and replacing it with a new feedback system. For more information see: https://aka.ms/ContentUserFeedback.
Submit and view feedback for