As your environment expands, so does the demand for a controlled continuous deployment (CD)
pipeline with progressive exposure control. Accordingly, Microsoft recommends DevOps teams follow
the safe deployment practices (SDP) framework. The
safe deployment of Azure Policy definitions and assignments helps limiting the impact of
unintended behaviors of policy resources.
The high-level approach of implementing SDP with Azure Policy is to gradually rollout policy assignments
by rings to detect policy changes that affect the environment in early stages before it
affects the critical cloud infrastructure.
Deployment rings can be organized in diverse ways. In this how-to tutorial, rings are divided by
different Azure regions with Ring 0 representing non-critical, low traffic locations,
and Ring 5 denoting the most critical, highest traffic locations.
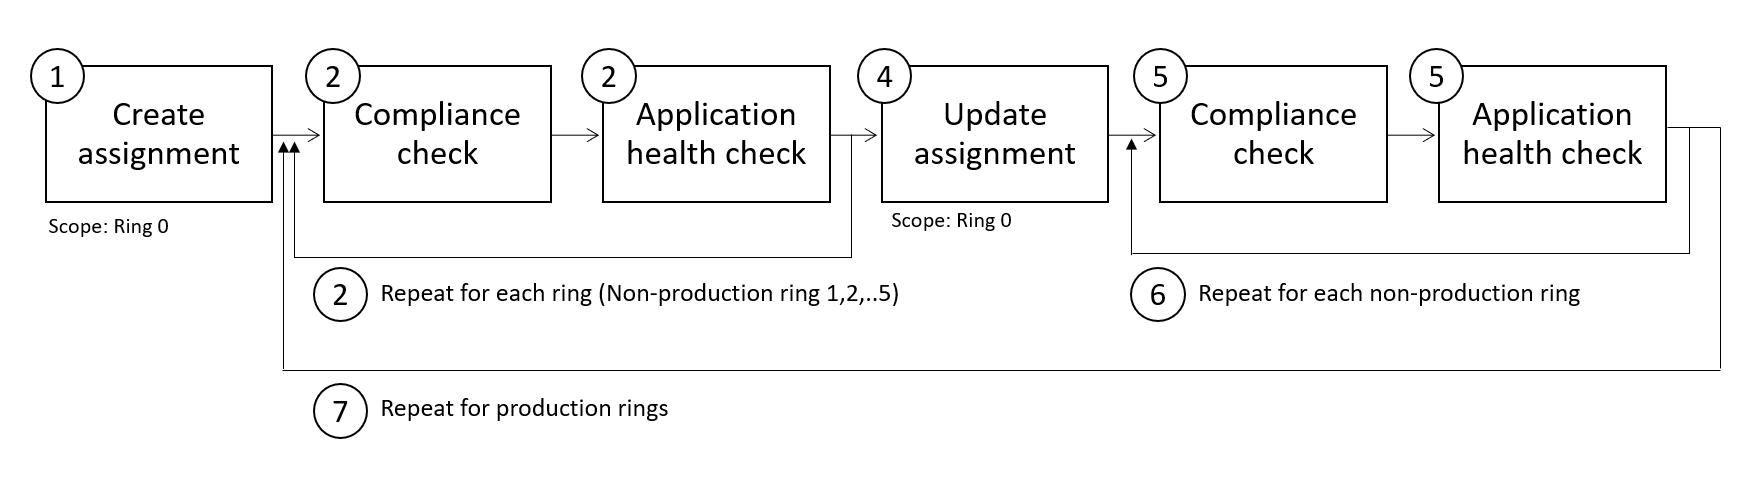
Steps for safe deployment of Azure Policy assignments with deny or append effects
Use the following flowchart as a reference as we work through how to apply the SDP framework to Azure
Policy assignments that use the deny or append policy effects.
Once you've selected your policy definition, assign the policy at the highest-level scope inclusive
of all deployment rings. Apply resource selectors to narrow the applicability to the least
critical ring by using the "kind": "resource location" property. Configure the audit effect type
by using assignment overrides. Sample selector with eastUS location and effect as audit:
Once the assignment is deployed and the initial compliance scan has completed,
validate that the compliance result is as expected.
You should also configure automated tests that run compliance checks. A compliance check should
encompass the following logic:
Gather compliance results
If compliance results are as expected, the pipeline should continue
If compliance results aren't as expected, the pipeline should fail and you should start debugging
For example, you can configure the compliance check by using other tools within
your particular continuous integration/continuous deployment (CI/CD) pipeline.
At each rollout stage, the application health checks should confirm the stability of the service
and impact of the policy. If the results aren't as expected due to application configuration,
refactor the application as appropriate.
Repeat by expanding the resource selector property values to include the next rings.
locations and validating the expected compliance results and application health. Example selector with an added location value:
Once you have successfully assigned the policy to all rings using audit mode,
the pipeline should trigger a task that changes the policy effect to deny and reset
the resource selectors to the location associated with Ring 0. Example selector with one region and effect set to deny:
Once the effect is changed, automated tests should check whether enforcement is taking place as
expected.
Repeat by including more rings in your resource selector configuration.
Repeat this process for all production rings.
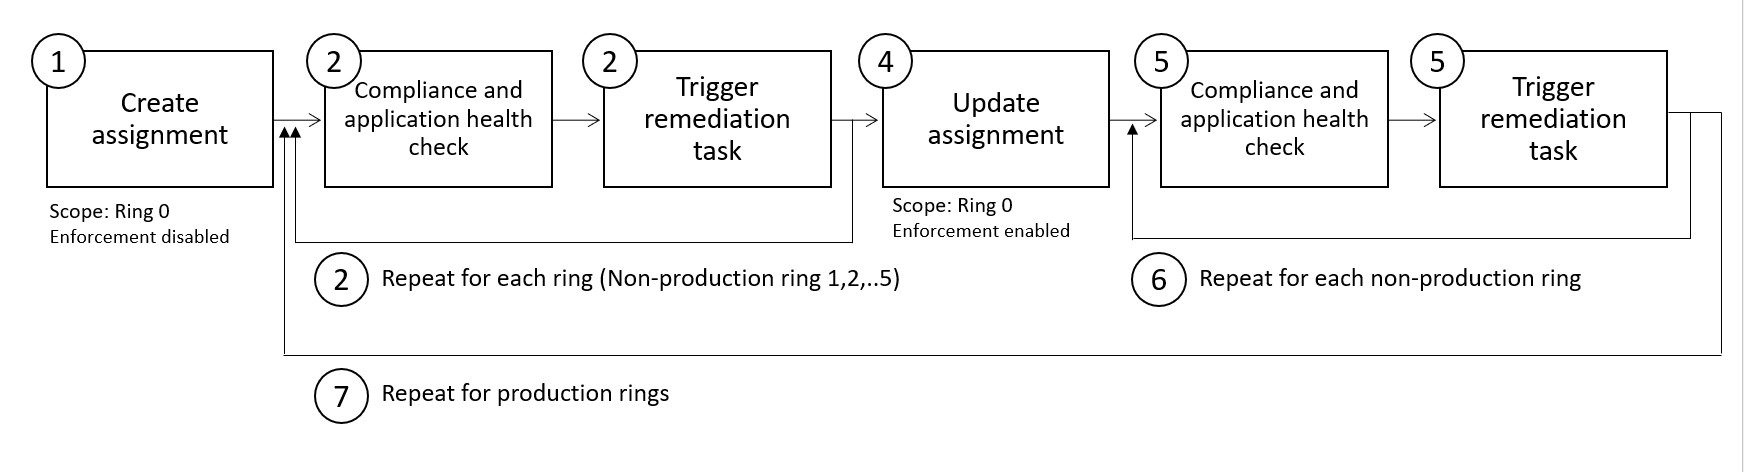
Steps for safe deployment of Azure Policy assignments with modify or deployIfNotExists effects
The steps for policies using the modify or deployIfNotExists effects are similar to steps previously explained with the additional action of using enforcement mode and triggering a remediation task.
Review the following flowchart with modified steps 5-9:
Flowchart step numbers:
Once you've selected your policy definition, assign the policy at the highest-level scope inclusive
of all deployment rings. Apply resource selectors to narrow the applicability to the least
critical ring by using the "kind": "resource location" property. Configure the enforcement mode of the assignment to DoNotEnforce. Sample selector with eastUS location and enforcementMode as DoNotEnforce:
Once the assignment is deployed and the initial compliance scan has completed,
validate that the compliance result is as expected.
You should also configure automated tests that run compliance checks. A compliance check should
encompass the following logic:
Gather compliance results
If compliance results are as expected, the pipeline should continue
If compliance results aren't as expected, the pipeline should fail and you should start debugging
You can configure the compliance check by using other tools within
your continuous integration/continuous deployment (CI/CD) pipeline.
At each rollout stage, the application health checks should confirm the stability of the service
and impact of the policy. If the results aren't as expected due to application configuration,
refactor the application as appropriate.
You may also trigger remediation tasks to remediate existing non-compliant resources. Ensure the remediation tasks are bringing resources into compliance as expected.
Repeat by expanding the resource selector property values to include the next ring's
locations and validating the expected compliance results and application health. Example selector with an added location value:
Once you have successfully assigned the policy to all rings using DoNotEnforce mode,
the pipeline should trigger a task that changes the policy enforcementMode to Default enablement and reset
the resource selectors to the location associated with Ring 0. Example selector with one region and effect set to deny:
Once the effect is changed, automated tests should check whether enforcement is taking place as
expected.
Repeat by including more rings in your resource selector configuration.
Repeat this process for all production rings.
Steps for safely updating built-in definition version within Azure Policy assignment
Within the existing assignment, apply overrides to update the version of the definition for the least
critical ring. We're using a combination of overrides to change the definitionVersion and selectors within the overrides condition to narrow the applicability by "kind": "resource location" property. Any resources that are outside of the locations specified will continue to be assessed against the version from the definitionVersion top-level property in the assignment. Example override updating the version of the definition to 2.0.* and only apply it to resources in EastUs.
Once the assignment is updated and the initial compliance scan has completed,
validate that the compliance result is as expected.
You should also configure automated tests that run compliance checks. A compliance check should
encompass the following logic:
Gather compliance results
If compliance results are as expected, the pipeline should continue
If compliance results aren't as expected, the pipeline should fail and you should start debugging
For example, you can configure the compliance check by using other tools within
your particular continuous integration/continuous deployment (CI/CD) pipeline.
At each rollout stage, the application health checks should confirm the stability of the service
and impact of the policy. If the results aren't as expected due to application configuration,
refactor the application as appropriate.
Repeat by expanding the resource selector property values to include the next rings.
locations and validating the expected compliance results and application health. Example with an added location value:
Once you have successfully included all the necessary locations within the _selectors, you can remove the override and update the definitionVersion property within the assignment:
JSON
"properties": {
        "displayName": "Enforce resource naming rules",
        "description": "Force resource names to begin with DeptA and end with -LC",
        "definitionVersion": "2.0.*",
}
Plan and execute an endpoint deployment strategy, using essential elements of modern management, co-management approaches, and Microsoft Intune integration.