Tutorial: Route policy state change events to Event Grid with Azure CLI
In this article, you learn how to set up Azure Policy event subscriptions to send policy state change events to a web endpoint. Azure Policy users can subscribe to events emitted when policy state changes occur on resources. These events can trigger web hooks, Azure Functions, Azure Storage Queues, or any other event handler supported by Azure Event Grid. Typically, you send events to an endpoint that processes the event data and takes actions. To simplify this tutorial, you send the events to a web app that collects and displays the messages.
Prerequisites
- If you don't have an Azure subscription, create a free account before you begin.
- This quickstart requires that you run Azure CLI version 2.0.76 or later. To find the version, run
az --version. If you need to install or upgrade, see Install Azure CLI.
Create a resource group
Event Grid topics are Azure resources, and must be placed in an Azure resource group. The resource group is a logical collection into which Azure resources are deployed and managed.
Create a resource group with the az group create command.
The following example creates a resource group named <resource_group_name> in the westus location. Replace <resource_group_name> with a unique name for your resource group.
# Log in first with az login if you're not using Cloud Shell

az group create --name <resource_group_name> --location westus
Create an Event Grid system topic
Now that we have a resource group, we create a system topic. A system topic in Event Grid represents one or more events published by Azure services such as Azure Policy and Azure Event Hubs. This system topic uses the Microsoft.PolicyInsights.PolicyStates topic type for Azure Policy state changes.
First, you need to register the PolicyInsights and EventGrid resource providers (RPs) at the appropriate management scope. Azure portal autoregisters any RPs you invoke for the first time, but Azure CLI doesn't.
# Log in first with az login if you're not using Cloud Shell

# Register the required RPs at the management group scope
az provider register --namespace Microsoft.PolicyInsights -m <managementGroupId>
az provider register --namespace Microsoft.EventGrid -m <managementGroupId>

# Alternatively, register the required RPs at the subscription scope (defaults to current subscription context)
az provider register --namespace Microsoft.PolicyInsights
az provider register --namespace Microsoft.EventGrid
Next, replace <subscriptionId> in the scope parameter with the ID of your subscription and <resource_group_name> in resource-group parameter with the previously created resource group.
az eventgrid system-topic create --name PolicyStateChanges --location global --topic-type Microsoft.PolicyInsights.PolicyStates --source "/subscriptions/<subscriptionId>" --resource-group "<resource_group_name>"
If your Event Grid system topic is applied to the management group scope, then the Azure CLI --source parameter syntax is a bit different. Here's an example:
az eventgrid system-topic create --name PolicyStateChanges --location global --topic-type Microsoft.PolicyInsights.PolicyStates --source "/tenants/<tenantID>/providers/Microsoft.Management/managementGroups/<management_group_name>" --resource-group "<resource_group_name>"
Create a message endpoint
Before subscribing to the topic, let's create the endpoint for the event message. Typically, the endpoint takes actions based on the event data. To simplify this quickstart, you deploy a prebuilt web app that displays the event messages. The deployed solution includes an App Service plan, an App Service web app, and source code from GitHub.
Replace <your-site-name> with a unique name for your web app. The web app name must be unique because it's part of the Domain Name System (DNS) entry.
# Log in first with az login if you're not using Cloud Shell

az deployment group create \
  --resource-group <resource_group_name> \
  --template-uri "https://raw.githubusercontent.com/Azure-Samples/azure-event-grid-viewer/master/azuredeploy.json" \
  --parameters siteName=<your-site-name> hostingPlanName=viewerhost
The deployment might take a few minutes to complete. After a successful deployment, view your web app to make sure it's running. In a web browser, navigate to: https://<your-site-name>.azurewebsites.net
You should see the site with no messages currently displayed.
Subscribe to the system topic
You subscribe to a topic to tell Event Grid which events you want to track and where to send those events. The following example subscribes to the system topic you created, and passes the URL from your web app as the endpoint to receive event notifications. Replace <event_subscription_name> with a name for your event subscription. For <resource_group_name> and <your-site-name>, use the values you created earlier.
The endpoint for your web app must include the suffix /api/updates/.
# Log in first with az login if you're not using Cloud Shell

# Create the subscription
az eventgrid system-topic event-subscription create \
  --name <event_subscription_name> \
  --resource-group <resource_group_name> \
  --system-topic-name PolicyStateChanges \
  --endpoint https://<your-site-name>.azurewebsites.net/api/updates
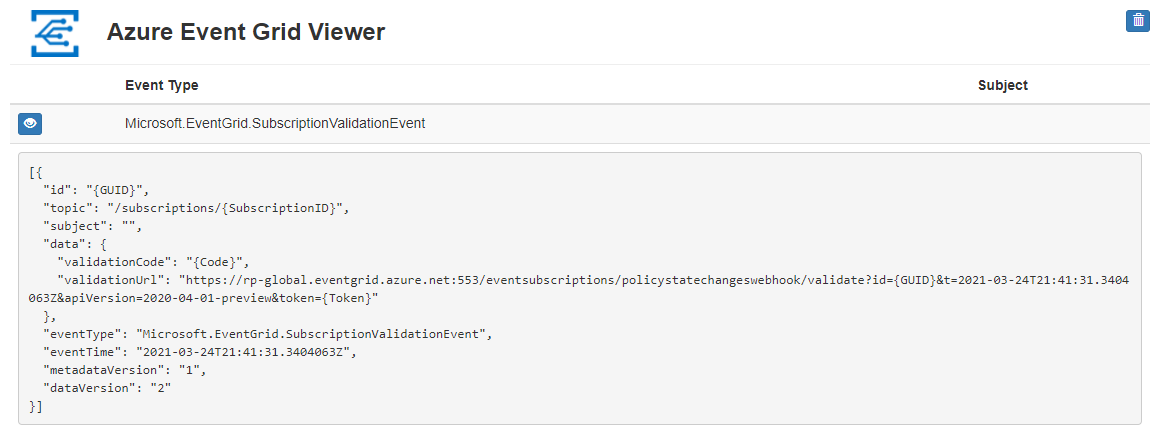
View your web app again, and notice that a subscription validation event was sent to it. Select the eye icon to expand the event data. Event Grid sends the validation event so the endpoint can verify that it wants to receive event data. The web app includes code to validate the subscription.
Create a policy assignment
In this quickstart, you create a policy assignment and assign the Require a tag on resource groups definition. This policy definition identifies resource groups that are missing the tag configured during policy assignment.
Run the following command to create a policy assignment scoped to the resource group you created to hold the Event Grid topic:
# Log in first with az login if you're not using Cloud Shell

az policy assignment create --name 'requiredtags-events' --display-name 'Require tag on RG' --scope '<resourceGroupScope>' --policy '<policy definition ID>' --params '{ \"tagName\": { \"value\": \"EventTest\" } }'
The preceding command uses the following information:
- Name - The actual name of the assignment. For this example, requiredtags-events was used.
- DisplayName - Display name for the policy assignment. In this case, you're using Require tag on RG.
- Scope - A scope determines what resources or grouping of resources the policy assignment gets enforced on. It could range from a subscription to resource groups. Be sure to replace
<scope>with the name of your resource group. The format for a resource group scope is/subscriptions/<subscriptionId>/resourceGroups/<resourceGroup>. - Policy - The policy definition ID, based on which you're using to create the assignment. In this case, it's the ID of policy definition Require a tag on resource groups. To get the policy definition ID, run this command:
az policy definition list --query "[?displayName=='Require a tag on resource groups']"
After creating the policy assignment, wait for a Microsoft.PolicyInsights.PolicyStateCreated event notification to appear in the web app. The resource group we created show a data.complianceState value of NonCompliant to start.

Note
If the resource group inherits other policy assignments from the subscription or management group
hierarchy, events for each is also displayed. Confirm the event is for the assignment in this
tutorial by evaluating the data.policyDefinitionId property.
Trigger a change on the resource group
To make the resource group compliant, a tag with the name EventTest is required. Add the tag to the resource group with the following command replacing <subscriptionId> with your subscription ID and <resourceGroup> with the name of the resource group:
# Log in first with az login if you're not using Cloud Shell

az tag create --resource-id '/subscriptions/<SubscriptionID>/resourceGroups/<resourceGroup>' --tags EventTest=true
After adding the required tag to the resource group, wait for a Microsoft.PolicyInsights.PolicyStateChanged event notification to appear in the web app. Expand the event and the data.complianceState value now shows Compliant.
Troubleshooting
If you see an error similar to one of the following, make sure that you registered both resource providers at the scope to which you're subscribing (management group or subscription):
Deployment has failed with the following error: {"code":"Publisher Notification Error","message":"Failed to enable publisher notifications.","details":[{"code":"Publisher Provider Error","message":"GET request for <uri> failed with status code: Forbidden, code: AuthorizationFailed and message: The client '<identifier>' with object id '<identifier>' does not have authorization to perform action 'microsoft.policyinsights/eventGridFilters/read' over scope '<scope>/providers/microsoft.policyinsights/eventGridFilters/_default' or the scope is invalid. If access was recently granted, please refresh your credentials.."}]}Deployment has failed with the following error: {'code':'Publisher Notification Error','message':'Failed to enable publisher notifications.','details':[{'code':'ApiVersionNotSupported','message':'Event Grid notifications are currently not supported by microsoft.policyinsights in global. Try re-registering Microsoft.EventGrid provider if this is your first event subscription in this region.'}]}
Clean up resources
If you plan to continue working with this web app and Azure Policy event subscription, don't clean up the resources created in this article. If you don't plan to continue, use the following command to delete the resources you created in this article.
Replace <resource_group_name> with the resource group you created.
az group delete --name <resource_group_name>
Next steps
Now that you know how to create topics and event subscriptions for Azure Policy, learn more about policy state change events and Event Grid: