Tutorial: Create and share an Azure Resource Graph query in the Azure portal
Azure Resource Graph Explorer lets you save your Resource Graph queries directly in the Azure portal. There are two types of queries: Private and Shared. A Private query is saved in your Azure portal settings. Whereas a Shared query is an Azure Resource Manager resource that can be managed with Azure role-based access control (Azure RBAC) and protected with resource locks. Both types of queries are encrypted at rest.
By saving queries in the Azure portal, you save the time you might otherwise spend looking for your favorite or commonly used queries. When you share queries, you help your team realize goals of consistency and efficiency through repetition.
In this tutorial, you'll complete the following tasks:
- Create and delete a Private query
- Create a Shared query
- Discover Shared queries
- Delete a Shared query
Prerequisites
To complete this tutorial, you need an Azure subscription. If you don't have one, create a free account before you begin.
Create and delete a Private query
Private queries are accessible and visible only to the account that creates them. As they're saved in an account's Azure portal settings, they can be created, used, and deleted only from inside the Azure portal. A Private query isn't a Resource Manager resource. To create a new Private query, follow these steps:
From the portal menu, select All services or use the Azure search box at the top of all pages. Search for and then select Resource Graph Explorer.
On the Query 1 tab on the Azure Resource Graph Explorer page, enter the following query:
Resources
| where type =~ 'Microsoft.Compute/virtualMachines'
| summarize count() by tostring(properties.storageProfile.osDisk.osType)
Select Run query to see the query results in the bottom pane.
For more information about this query, see Samples - Count virtual machines by OS type.
Select Save or Save as, enter Count VMs by OS as the name, leave the type as Private query, and then select Save at the bottom of the Save query pane. The tab title changes from Query 1 to Count VMs by OS.
Move away from Azure Resource Graph Explorer in the Azure portal and then return to it. Notice that the saved query is no longer displayed and the Query 1 tab has returned.
Select Open a query. Make sure that the type is Private query. The saved name Count VMs by OS now appears in the Query Name list. When you select the title link of the saved query, it's loaded into a new tab with that query's name.
Note
When a saved query is open and the tab shows its name, selecting the Save button updates it with any changes that have been made. To create a new saved query from this open query, select Save as and proceed as if you were saving a brand new query.
To delete the saved query, select Open a query again, and verify that the Type field is set to Private query. On the row of the saved
Count VMs by OSquery, select Delete (Recycle bin icon). In the confirmation dialog box, select Yes to finish deleting the query. Then, close the Open a query pane.
Create a Shared query
Unlike a Private query, a Shared query is a Resource Manager resource. This fact means the query gets saved to a resource group, can be managed and controlled with Azure RBAC, and can even be protected with resource locks. As a resource, anyone who has the appropriate permissions can see and use it. To create a new Shared query, follow these steps:
From the portal menu, select All services, or use the Azure search box at the top of all pages to search for and select Resource Graph Explorer.
On the Query 1 tab on the Azure Resource Graph Explorer page, enter the following query:
Resources
| where type =~ 'Microsoft.Compute/virtualMachines'
| summarize count() by tostring(properties.storageProfile.osDisk.osType)
Select Run query to see the query results in the bottom pane.
For more information about this query, see Samples - Count virtual machines by OS type.
Select Save or Save as.

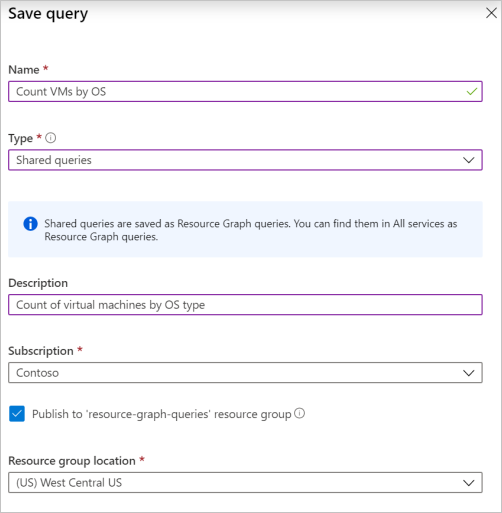
In the Save query pane, enter Count VMs by OS for the name.
Change the type to Shared query, set the description to Count of virtual machines by OS type, and set Subscription to specify where the query resource gets created.
Leave the Publish to resource-graph-queries resource group check box selected and the Resource Group location set to (US) West Central US.
Select Save at the bottom of the Save query pane. The tab title changes from Query 1 to Count VMs by OS. The first time the resource-graph-queries resource group is used, the save takes longer than expected as the resource group gets created.
Note
You can clear the Publish to resource-graph-queries resource group check box if you want to provide the name of an existing resource group to save the shared query into. Using the default named resource group for queries makes Shared queries easier to discover. It also makes the purpose of that resource group more apparent. However, you might opt to select an existing resource group for security reasons based on existing permissions.
Move away from Azure Resource Graph Explorer in the Azure portal and then return to it. Notice that the saved query is no longer displayed and the Query 1 tab has returned.
Select Open a query. Verify that the type is set to Shared query and the combination of Subscription and Resource group match where you saved the query. The saved Count VMs by OS item now appears in the Query Name list. Select the title link of the saved query to load it into a new tab with that query's name. As a Shared query, it displays an icon in the tab next to the title, denoting it as shared.

Note
When a saved query is open and the tab shows its name, the Save button updates it with any changes that have been made. To create a new saved query, select Save as and proceed as if you were saving a brand new query.
Discover Shared queries
Because a Shared query is a Resource Manager resource, there are several ways to find one:
- From Resource Graph Explorer. Select Open a query and set the type to Shared query.
- From the Resource Graph queries portal page.
- From the resource group that the Shared query was saved in.
- Through a query to Resource Graph.
View Resource Graph queries
In the Azure portal, the Resource Graph queries page displays Shared queries that the logged-in account has access to. This page enables filtering by name, subscription, resource group, and other properties of the Resource Graph query. You can also tag, export, and delete Resource Graph queries by using this interface.
Selecting one of the queries opens the Resource Graph query page. Like other Resource Manager resources, this page offers an interactive overview along with the Activity log, access control, and tags. You can also apply a resource lock directly from this page.
Get to the Resource Graph queries page from the portal menu by selecting All services or by using the Azure search box at the top of all pages. Search for and select Resource Graph Explorer.
List Resource groups resources
The Resource Graph query is listed alongside other resources that are part of a resource group. Selecting the Resource Graph query opens the page for that query. The ellipsis and shortcut menu options, triggered by select and hold (or right-click), work the same as on the Resource Graph query page.
Query Resource Graph
You can find Resource Graph queries through a query to Resource Graph. The following Resource Graph
query limits by type Microsoft.ResourceGraph/queries, and then uses project to list only the
name, time modified, and the query itself:
Resources
| where type == "microsoft.resourcegraph/queries"
| project name, properties.timeModified, properties.query
Run a shared query
A Resource Graph shared query can be run with the {{shared-query-uri}} syntax (preview). For more
information, see Shared query syntax.
Delete a Shared query
If a Shared query is no longer needed, delete it. By deleting a Shared query, you remove the corresponding Resource Manager resource. Any dashboards that the results chart was pinned to now display an error message. When that error message is displayed, use the Remove from dashboard button to clean your dashboard.
You can delete a Shared query through the following interfaces:
- Resource Graph queries page
- Resource Graph query page
- The Open a query page in Resource Graph Explorer
- Resource groups page
Clean up resources
When you're finished with this tutorial, delete the Private and Shared queries you created if you no longer want them.
Next steps
In this tutorial, you've created Private and Shared queries. To learn more about the Resource Graph language, continue to the query language details page.
Feedback
Coming soon: Throughout 2024 we will be phasing out GitHub Issues as the feedback mechanism for content and replacing it with a new feedback system. For more information see: https://aka.ms/ContentUserFeedback.
Submit and view feedback for