Note
Access to this page requires authorization. You can try signing in or changing directories.
Access to this page requires authorization. You can try changing directories.
In this article, you learn how to configure Apache Ranger policies for Apache Hive. You create two Ranger policies to restrict access to the hivesampletable. The hivesampletable comes with HDInsight clusters. After you configure the policies, you use Excel and Open Database Connectivity (ODBC) driver to connect to Hive tables in HDInsight.
Prerequisites
- An HDInsight cluster with Enterprise Security Package (ESP). For more information, see Configure HDInsight clusters with ESP.
- A workstation with Microsoft 365 apps for enterprise, Office 2016, Office 2013 Professional Plus, Excel 2013 Standalone, or Office 2010 Professional Plus.
Connect to the Apache Ranger Admin UI
To connect to the Ranger Admin user interface (UI):
From a browser, go to the Ranger Admin UI at
https://CLUSTERNAME.azurehdinsight.net/Ranger/whereCLUSTERNAMEis the name of your cluster.Note
Ranger uses different credentials than Apache Hadoop cluster. To prevent browsers by using cached Hadoop credentials, use a new InPrivate browser window to connect to the Ranger Admin UI.
Sign in by using the cluster administrator domain username and password:
Currently, Ranger only works with Yarn and Hive.
Create domain users
For information on how to create hiveruser1 and hiveuser2, see Create an HDInsight cluster with ESP. You use the two user accounts in this article.
Create Ranger policies
In this section, you create two Ranger policies for accessing hivesampletable. You give select permission on different sets of columns. Both users were created by using Create a HDInsight cluster with ESP. In the next section, you test the two policies in Excel.
To create Ranger policies:
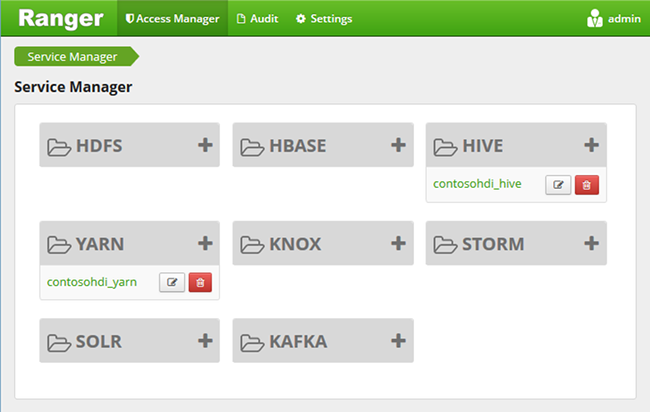
Open the Ranger Admin UI. See the preceding section, Connect to Apache Ranger Admin UI.
Under Hive, select CLUSTERNAME_Hive. You see two preconfigured policies.
Select Add New Policy and then enter the following values:
Property Value Policy Name read-hivesampletable-all Hive Database default table hivesampletable Hive Column * Select User hiveuser1 Permissions select 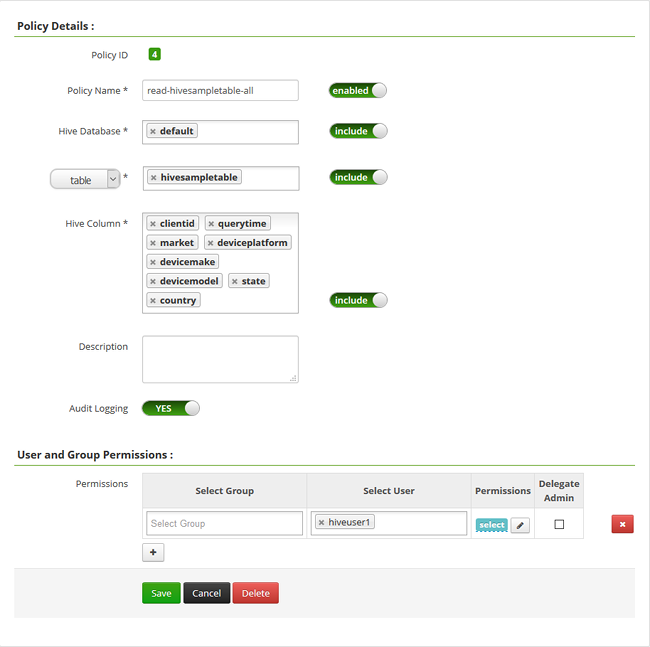 .
.Note
If a domain user isn't populated in Select User, wait a few moments for Ranger to sync with Microsoft Entra ID.
Select Add to save the policy.
Repeat the last two steps to create another policy with the following properties:
Property Value Policy Name read-hivesampletable-devicemake Hive Database default table hivesampletable Hive column clientid, devicemake Select User hiveuser2 Permissions select
Create a Hive ODBC data source
For instructions on how to create a Hive ODBC data source, see Create a Hive ODBC data source.
| Property | Description |
|---|---|
| Data Source Name | Give a name to your data source. |
| Host | Enter CLUSTERNAME.azurehdinsight.net. For example, use myHDICluster.azurehdinsight.net. |
| Port | Use 443. (This port changed from 563 to 443.) |
| Database | Use Default. |
| Hive Server Type | Select Hive Server 2. |
| Mechanism | Select Azure HDInsight Service. |
| HTTP Path | Leave it blank. |
| User Name | Enter hiveuser1@contoso158.onmicrosoft.com. Update the domain name if it's different. |
| Password | Enter the password for hiveuser1. |
Select Test before you save the data source.
Import data into Excel from HDInsight
In the last section, you configured two policies: hiveuser1 has the select permission on all the columns, and hiveuser2 has the select permission on two columns. In this section, you impersonate the two users to import data into Excel.
Open a new or existing workbook in Excel.
On the Data tab, go to Get Data > From Other Sources > From ODBC to open the From ODBC window.
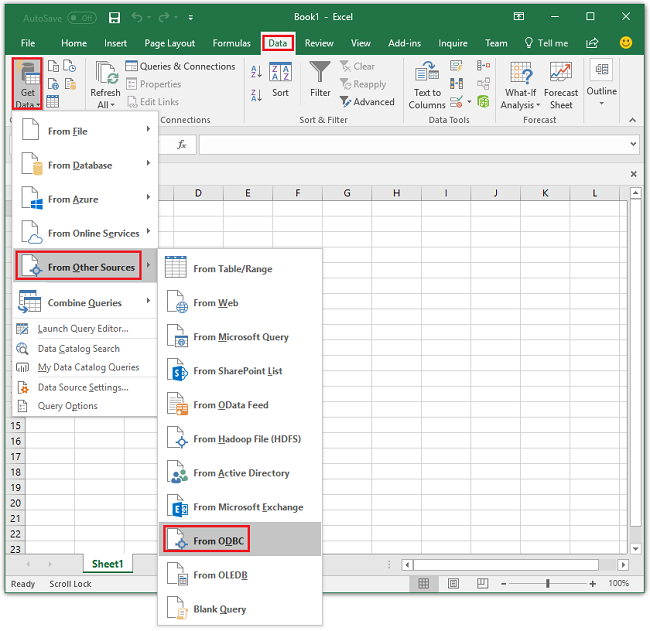
From the dropdown list, select the data source name that you created in the last section and then select OK.
For the first use, an ODBC driver dialog opens. Select Windows from the left menu. Then select Connect to open the Navigator window.
Wait for the
Select Database and Tabledialog to open. This step can take a few seconds.Select hivesampletable > Next.
Select Finish.
In the Import Data dialog, you can change or specify the query. To do so, select Properties. This step can take a few seconds.
Select the Definition tab. The command text is:
SELECT * FROM "HIVE"."default"."hivesampletable"`By the Ranger policies you defined,
hiveuser1has select permission on all the columns. This query works with the credentials forhiveuser1, but this query doesn't work with the credentials forhiveuser2.Select OK to close the Connection Properties dialog.
Select OK to close the Import Data dialog.
Reenter the password for
hiveuser1and then select OK. It takes a few seconds before the data gets imported to Excel. When it's finished, you see 11 columns of data.
To test the second policy (read-hivesampletable-devicemake) that you created in the last section:
Add a new sheet in Excel.
Follow the last procedure to import the data. The only change you make is to use the credentials for
hiveuser2instead ofhiveuser1. This action fails becausehiveuser2has permission to see only two columns. You see the following error:[Microsoft][HiveODBC] (35) Error from Hive: error code: '40000' error message: 'Error while compiling statement: FAILED: HiveAccessControlException Permission denied: user [hiveuser2] does not have [SELECT] privilege on [default/hivesampletable/clientid,country ...]'.Follow the same procedure to import data. This time, use the credentials for
hiveuser2and also modify the select statement from:SELECT * FROM "HIVE"."default"."hivesampletable"To:
SELECT clientid, devicemake FROM "HIVE"."default"."hivesampletable"When it's finished, you see two columns of imported data.
Next steps
- To configure an HDInsight cluster with ESP, see Configure HDInsight clusters with ESP.
- To manage an HDInsight cluster with ESP, see Manage HDInsight clusters with ESP.
- To run Hive queries by using Secure Shell (SSH) on HDInsight clusters with ESP, see Use SSH with HDInsight.
- To connect Hive by using Hive Java Database Connectivity (JDBC), see Connect to Apache Hive on Azure HDInsight by using the Hive JDBC driver.
- To connect Excel to Hadoop by using Hive ODBC, see Connect Excel to Apache Hadoop with the Microsoft Hive ODBC drive.
- To connect Excel to Hadoop by using Power Query, see Connect Excel to Apache Hadoop by using Power Query.