Note
Access to this page requires authorization. You can try signing in or changing directories.
Access to this page requires authorization. You can try changing directories.
This article provides the steps for you to secure outbound traffic from your HDInsight cluster using Azure Firewall. The steps below assume you're configuring an Azure Firewall for an existing cluster. If you're deploying a new cluster behind a firewall, create your HDInsight cluster and subnet first. Then follow the steps in this guide.
Background
HDInsight clusters are normally deployed in a virtual network. The cluster has dependencies on services outside of that virtual network.
The inbound management traffic can't be sent through a firewall. You can use NSG service tags for the inbound traffic as documented here.
The HDInsight outbound traffic dependencies are almost entirely defined with FQDNs. Which don't have static IP addresses behind them. The lack of static addresses means Network Security Groups (NSGs) can't lock down outbound traffic from a cluster. The IP addresses change often enough one can't set up rules based on the current name resolution and use.
Secure outbound addresses with a firewall that can control outbound traffic based on FQDNs. Azure Firewall restricts outbound traffic based on the FQDN of the destination or FQDN tags.
Configuring Azure Firewall with HDInsight
A summary of the steps to lock down egress from your existing HDInsight with Azure Firewall are:
- Create a subnet.
- Create a firewall.
Add applicationrules to the firewall.- Add network rules to the firewall.
- Create a routing table.
Create new subnet
Create a subnet named AzureFirewallSubnet in the virtual network where your cluster exists.
Create a new firewall for your cluster
Create a firewall named Test-FW01 using the steps in Deploy the firewall from Tutorial: Deploy and configure Azure Firewall using the Azure portal.
Configure the firewall with application rules
Create an application rule collection that allows the cluster to send and receive important communications.
Select the new firewall Test-FW01 from the Azure portal.
Navigate to Settings > Rules > Application rule collection > +
Add application rule collection.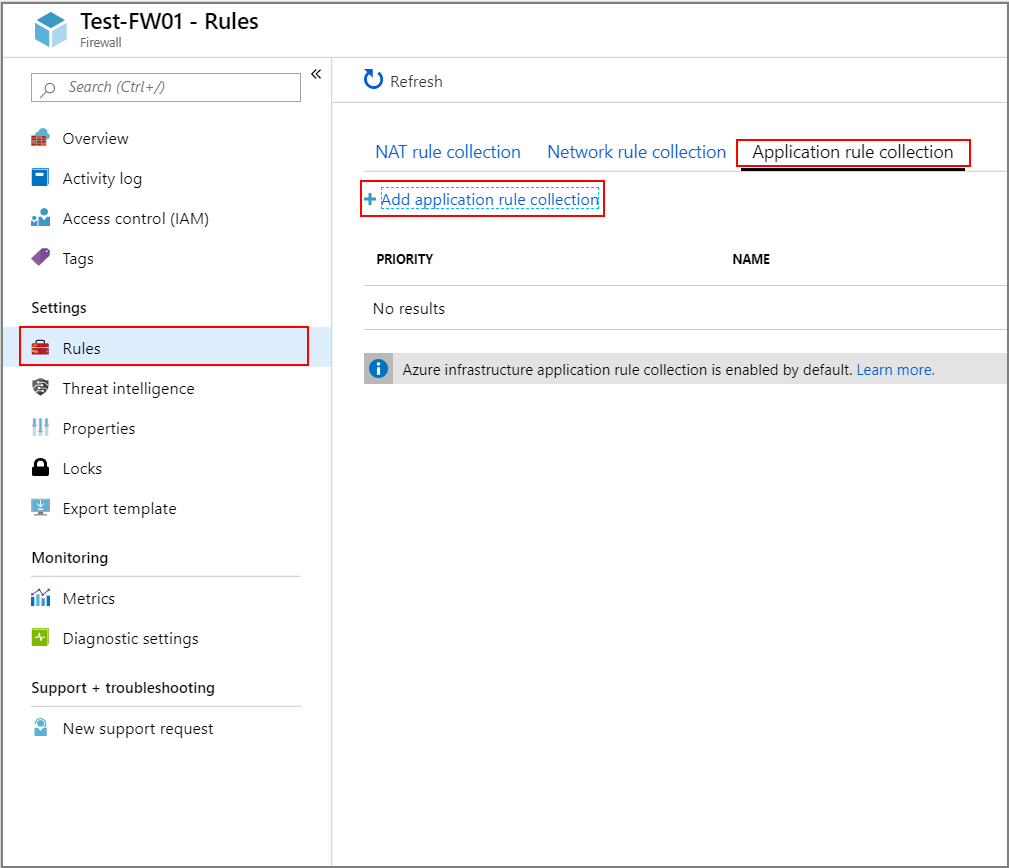
On the
Add application rule collectionscreen, provide the following information:Top section
Property Value Name FwAppRule Priority 200 Action Allow FQDN tags section
Name Source address FQDN tag Notes Rule_1 * WindowsUpdate and HDInsight Required for HDI services Target FQDNs section
Name Source addresses Protocol: Port Target FQDNS Notes Rule_2 * https:443 login.windows.net Allows Windows login activity Rule_3 * https:443 login.microsoftonline.com Allows Windows login activity Rule_4 * https:443 storage_account_name.blob.core.windows.net Replace storage_account_namewith your actual storage account name. Make sure "secure transfer required" is enabled on the storage account. If you're using Private endpoint to access storage accounts, this step isn't needed and storage traffic isn't forwarded to the firewall.Rule_5 * http:80 azure.archive.ubuntu.com Allows Ubuntu security updates to be installed on the cluster Rule_6 * https:443 pypi.org, pypi.python.org, files.pythonhosted.org Allows Python package installations for Azure monitoring 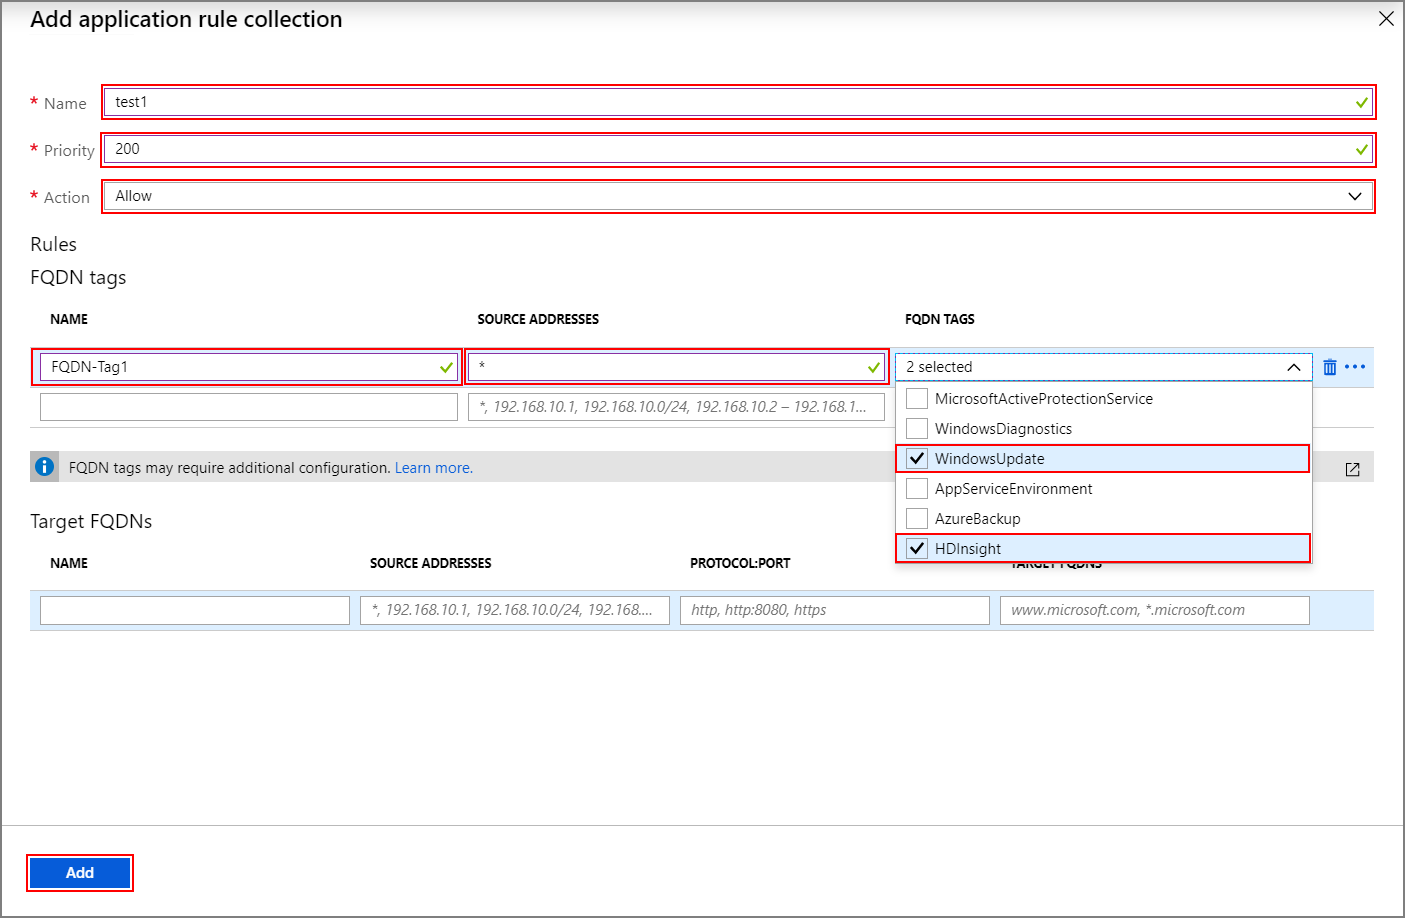
Select Add.
Configure the firewall with network rules
Create the network rules to correctly configure your HDInsight cluster.
Continuing from the prior step, navigate to Network rule collection >
+ Add network rule collection.On the
Add network rule collectionscreen, provide the following information:Top section
Property Value Name FwNetRule Priority 200 Action Allow Service Tags section
Name Protocol Source Addresses Service Tags Destination Ports Notes Rule_6 TCP * SQL 1433, 11000-11999 If you're using the default sql servers provided by HDInsight, configure a network rule in the Service Tags section for SQL that will allow you to log and audit SQL traffic. Unless you configured Service Endpoints for SQL Server on the HDInsight subnet, which will bypass the firewall. If you're using custom SQL server for Ambari, Oozie, Ranger and Hive metastore then you only need to allow the traffic to your own custom SQL Servers. Refer to Azure SQL Database and Azure Synapse Analytics connectivity architecture to see why 11000-11999 port range is also needed in addition to 1433. Rule_7 TCP * Azure Monitor * (optional) Customers who plan to use auto scale feature should add this rule. 
Select Add.
Create and configure a route table
Create a route table with the following entries:
All IP addresses and service tags from Health and management services with a next hop type of Internet. It should include 4 IPs of the generic regions as well as service tags for your specific region. This rule is only needed if the ResourceProviderConnection is set to Inbound. If the ResourceProviderConnection is set to Outbound then these IPs aren't needed in the UDR.
One Virtual Appliance route for IP address 0.0.0.0/0 with the next hop being your Azure Firewall private IP address.
For example, to configure the route table for a cluster created in the US region of "East US", use following steps:
Select your Azure firewall Test-FW01. Copy the Private IP address listed on the Overview page. For this example, we'll use a sample address of 10.0.2.4.
Then navigate to All services > Networking > Route tables and Create Route Table.
From your new route, navigate to Settings > Routes > + Add. Add the following routes:
| Route name | Address prefix | Next hop type | Next hop address |
|---|---|---|---|
| 168.61.49.99 | 168.61.49.99/32 | Internet | N/A |
| 23.99.5.239 | 23.99.5.239/32 | Internet | N/A |
| 168.61.48.131 | 168.61.48.131/32 | Internet | N/A |
| 138.91.141.162 | 138.91.141.162/32 | Internet | N/A |
| 52.164.210.96 | 52.164.210.96/32 | Internet | N/A |
| 13.74.153.132 | 3.74.153.132/32 | Internet | N/A |
| HDInsight.EastUS | HDInsight.EastUS | Internet | N/A |
| HDInsight.WestUS | HDInsight.WestUS | Internet | N/A |
| 0.0.0.0 | 0.0.0.0/0 | Virtual appliance | 10.0.2.4 |
Complete the route table configuration:
Assign the route table you created to your HDInsight subnet by selecting Subnets under Settings.
Select + Associate.
On the Associate subnet screen, select the virtual network that your cluster was created into. And the Subnet you used for your HDInsight cluster.
Select OK.
Edge-node or custom application traffic
The above steps will allow the cluster to operate without issues. You still need to configure dependencies to accommodate your custom applications running on the edge-nodes, if applicable.
Application dependencies must be identified and added to the Azure Firewall or the route table.
Routes must be created for the application traffic to avoid asymmetric routing issues.
If your applications have other dependencies, they need to be added to your Azure Firewall. Create Application rules to allow HTTP/HTTPS traffic and Network rules for everything else.
Logging and scale
Azure Firewall can send logs to a few different storage systems. For instructions on configuring logging for your firewall, follow the steps in Tutorial: Monitor Azure Firewall logs and metrics.
Once you've completed the logging setup, if you're using Log Analytics, you can view blocked traffic with a query such as:
AzureDiagnostics | where msg_s contains "Deny" | where TimeGenerated >= ago(1h)
Integrating Azure Firewall with Azure Monitor logs is useful when first getting an application working. Especially when you'ren't aware of all of the application dependencies. You can learn more about Azure Monitor logs from Analyze log data in Azure Monitor
To learn about the scale limits of Azure Firewall and request increases, see this document or refer to the FAQs.
Access to the cluster
After having the firewall set up successfully, you can use the internal endpoint (https://CLUSTERNAME-int.azurehdinsight.net) to access the Ambari from inside the virtual network.
To use the public endpoint (https://CLUSTERNAME.azurehdinsight.net) or ssh endpoint (CLUSTERNAME-ssh.azurehdinsight.net), make sure you have the right routes in the route table and NSG rules to avoid the asymmetric routing issue explained here. Specifically in this case, you need to allow the client IP address in the Inbound NSG rules and also add it to the user-defined route table with the next hop set as internet. If the routing isn't set up correctly, you'll see a timeout error.