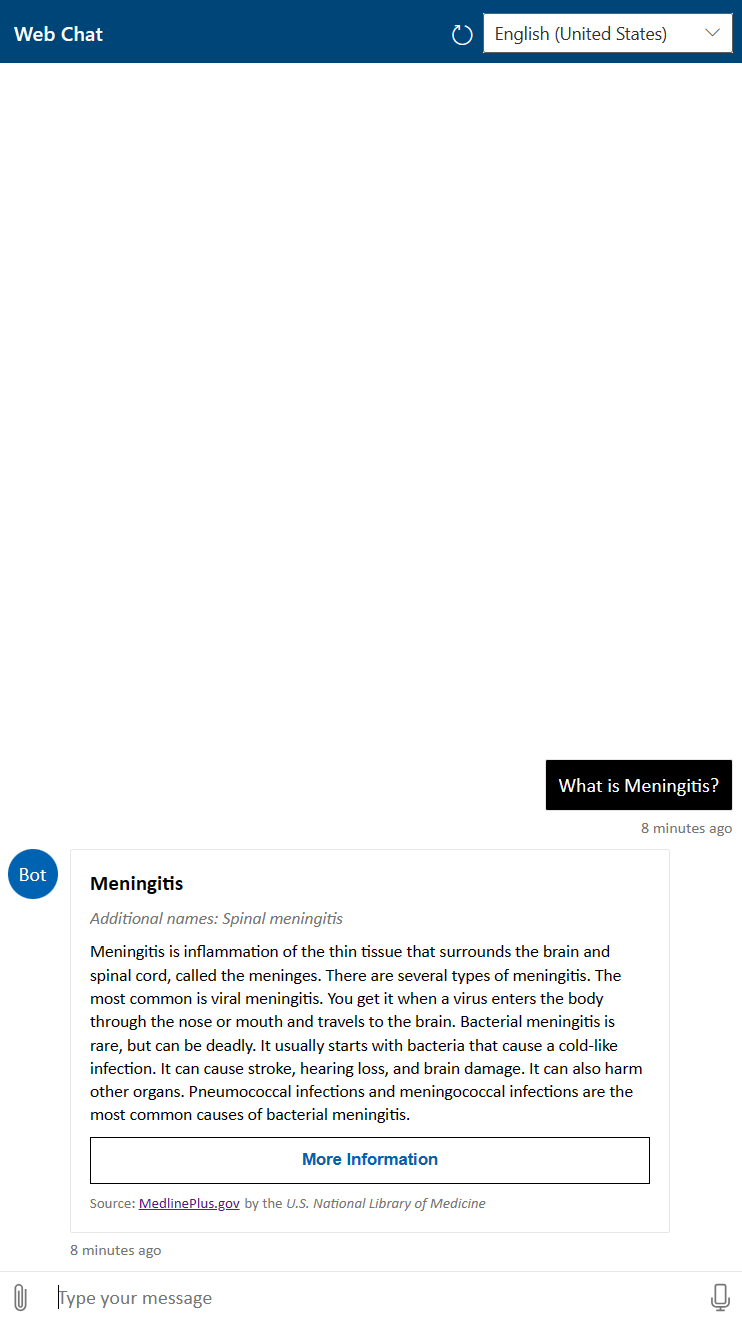
Embed your healthcare agent service instance in your application using WebChat
You can connect your healthcare agent service to interact with your web application’s users through a web chat control
- Sign-in to the healthcare agent service Management Portal
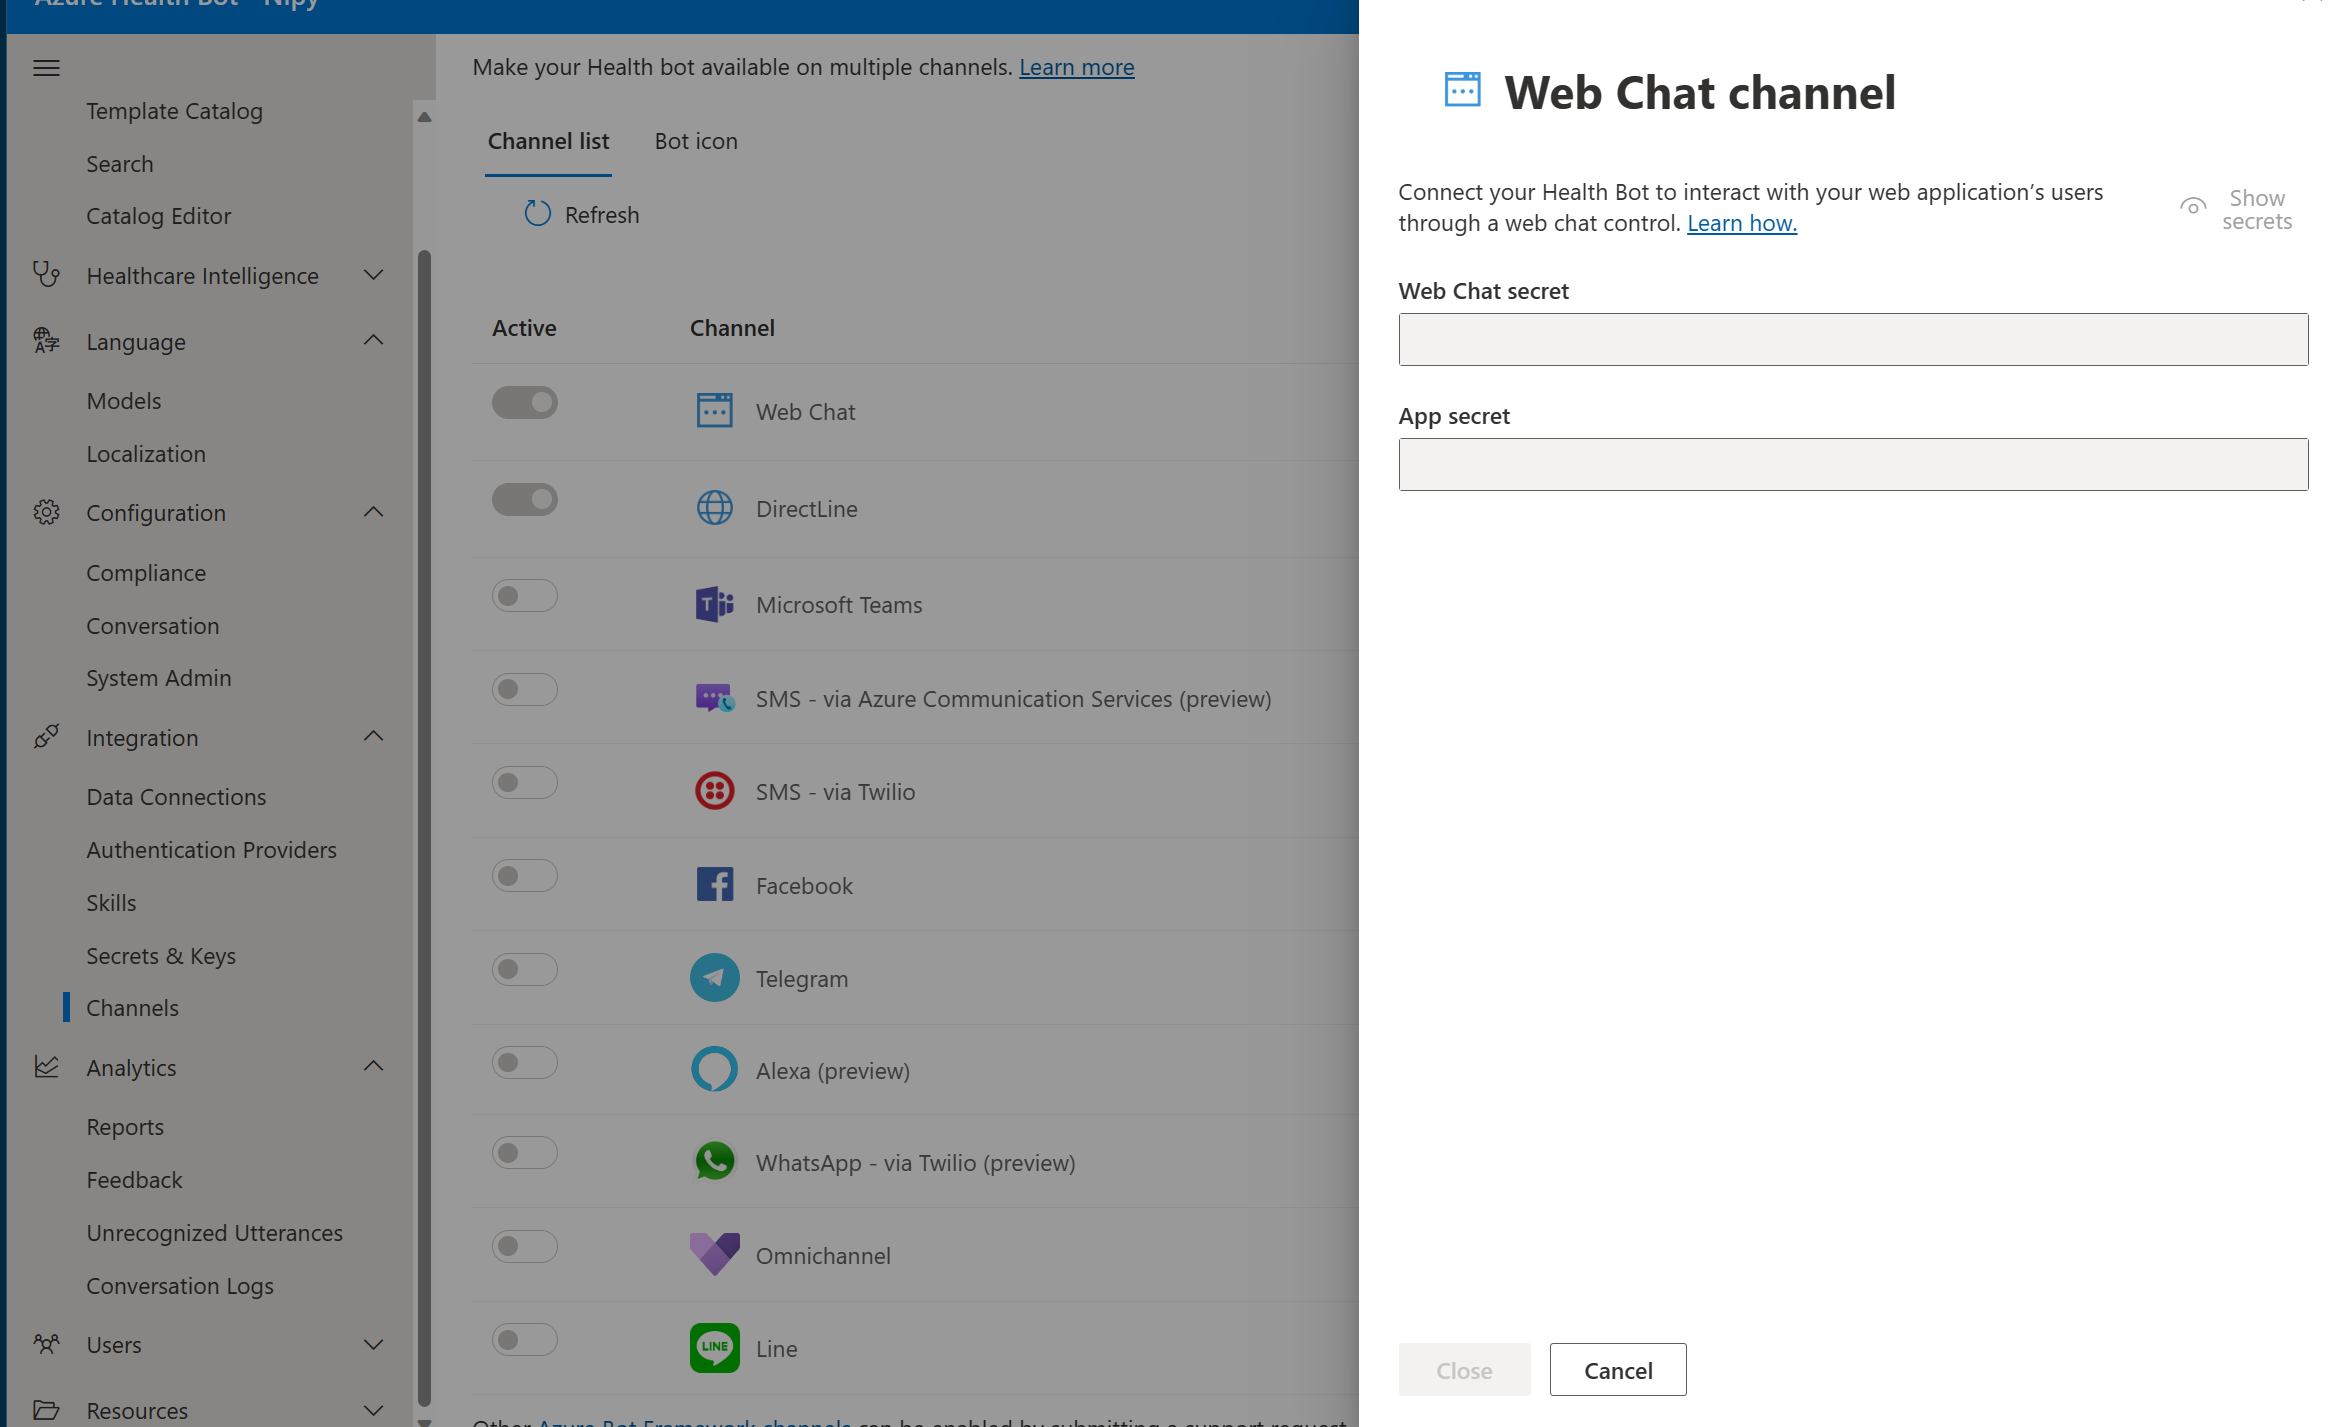
- In the left menu blade, select Channels under Integration.
- Select the View action of the Web Chat channel
- Follow the steps demonstrated in the GitHub repository to embed the healthcare agent service in the web application as an iFrame or as a web page element (div embedding).
Securing communications between the healthcare agent service instance and the host application
To secure the communications with the healthcare agent service instance, the host application should retrieve in advance two secrets, the app_secret and the webchat_secret. Secrets can be found in the WebChat channel configuration page.
Steps to securing communications
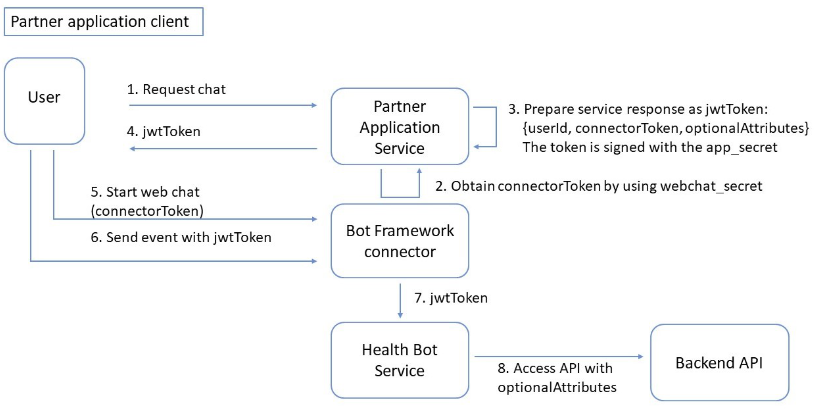
Before the chat with the bot begins, the partner's service should create a security JWT token. This is typically triggered by a client-side chat request.
The partner's service should acquire connectorToken---a token used to connect with the Microsoft Bot Framework Connector (also known as Bot Connector). This token is provisioned as described in the Microsoft article Bot Framework Authentication. The webchat secret is required.
The application service should prepare a security JWT token that is returned as a response to the chat request. The JWT security token is signed with the app_secret, and will contain the following elements:
- user ID: A unique, consistent and unidentifiable user identifier that will help the healthcare agent service instance retrieve data about this user for better personalization. The tenant is expected to obfuscate the user ID in a way that only the tenant will be able to restore.
Important
the tenant should make sure to generate a different user ID for different end-users, rather than use the same user ID for all end-users
- connectorToken: as described above.
- optionalAttributes: This is a JSON structure that describes optional application attributes that may be used in the healthcare agent service scenarios---, for example, user location. An example of how to create the JWT token is provided in this healthcare agent service Container Sample GitHub repository.
The application client side should start a web chat against the Bot Connector. This request should include the previously acquired connectorToken.
Right after the chat connection is initiated the application client side should post an "InitAuthenticatedConversation" event that contains the previously acquired jwtToken. An example of the client-side code is provided in this healthcare agent service Container Sample GitHub repository.
Note: The secrets should be stored in a secure way on the partner application side and not exposed to the client side.
Require end user authentication via the JWT token The JWT token isn't a strict requirement to communicate with the bot unless you enforce it in the healthcare agent service configuration. Navigate to Configuration >> Compliance >> Security >> End user authentication and enable the setting.
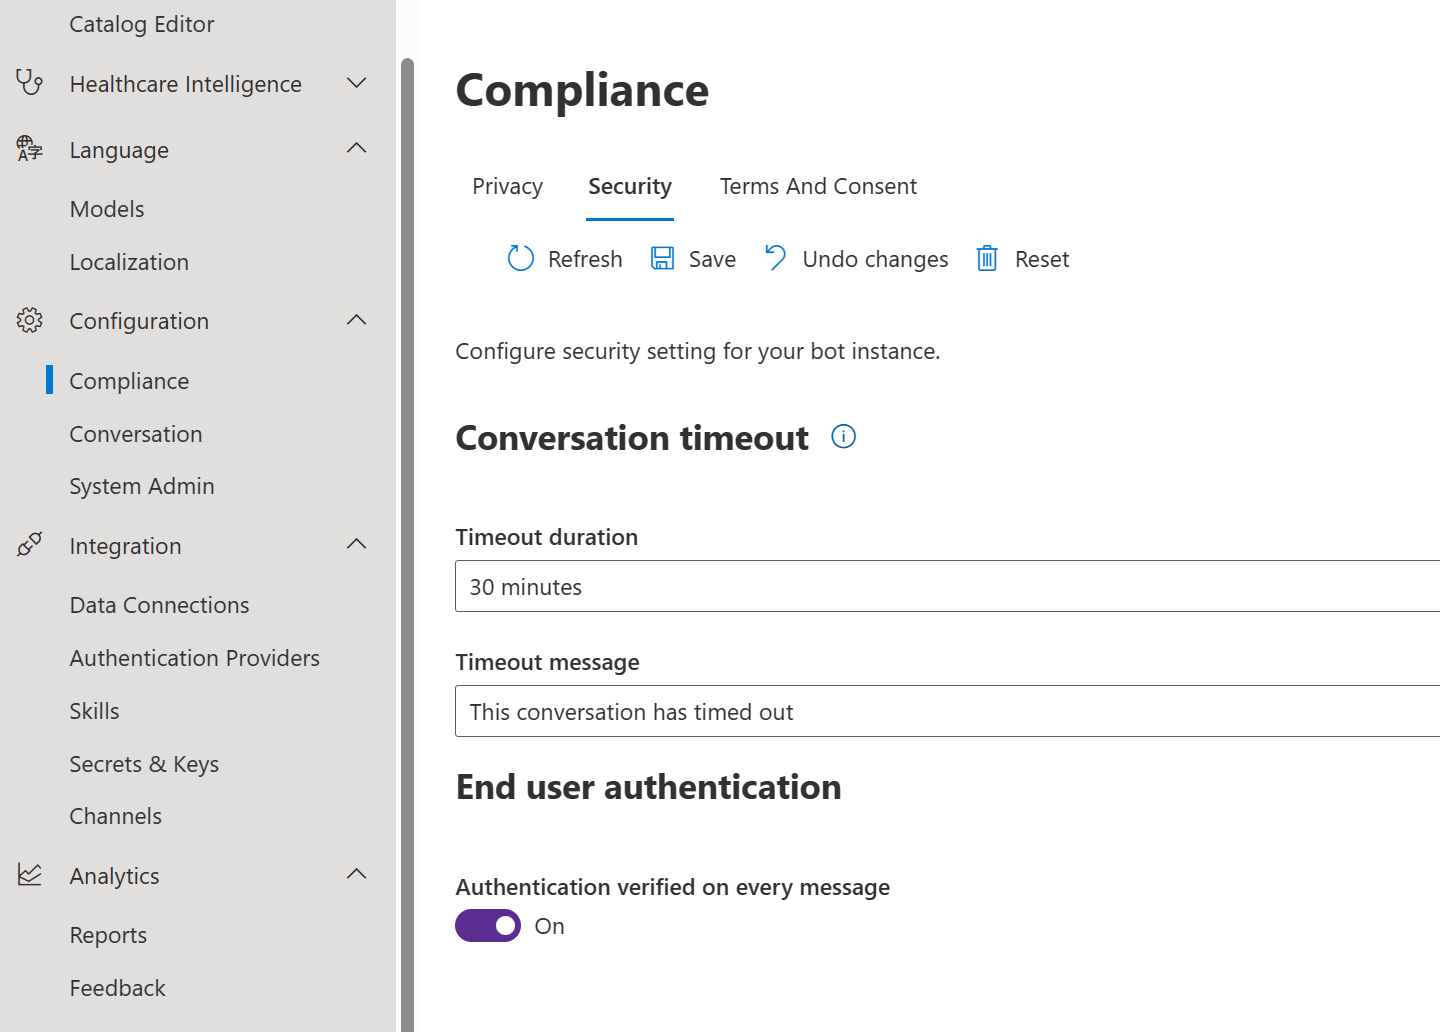
This forces the bot expect a JWT token and the conversation won't start unless the JWT token is received as part of every message sent from the webchat client.
Example Code
In this snippet you can see how to generate a token via an Azure Function. The userID is a new GUID for every request. In production use cases, this could be linked to an internal userID
using System;
using System.IO;
using System.Threading.Tasks;
using Microsoft.AspNetCore.Mvc;
using Microsoft.Azure.WebJobs;
using Microsoft.Azure.WebJobs.Extensions.Http;
using Microsoft.AspNetCore.Http;
using Microsoft.Extensions.Logging;
using Newtonsoft.Json;
using System.Net.Http;
using System.Net.Http.Headers;
using System.Text;
using System.Security.Claims;
using TokenGenerator;
using Microsoft.IdentityModel.Tokens;
using System.IdentityModel.Tokens.Jwt;

namespace TokenGenerator
{
    public static class TokenGenerator
    {
        [FunctionName("GenereratorFunction")]
        public static async Task<IActionResult> Run(
            [HttpTrigger(AuthorizationLevel.Anonymous, "get", "post", Route = null)] HttpRequest req,
            ILogger log)
        {
            using (HttpClient client = new HttpClient())
            {
                client.DefaultRequestHeaders.Authorization = new AuthenticationHeaderValue("Bearer", Environment.GetEnvironmentVariable("WEBCHAT_SECRET"));
                client.DefaultRequestHeaders.Accept.Add(new MediaTypeWithQualityHeaderValue("application/json"));

                HttpResponseMessage response = await client.PostAsync("https://directline.botframework.com/v3/directline/tokens/generate", null);

                var token = GenerateToken(JsonConvert.DeserializeObject<DirectLinePayload>(await response.Content.ReadAsStringAsync()));
                return new OkObjectResult(token);
            }
        }

        private static string GenerateToken(DirectLinePayload payload, int expireMinutes = 200)
        {
            var symmetricKey = Encoding.UTF8.GetBytes(Environment.GetEnvironmentVariable("APP_SECRET"));
            var tokenHandler = new JwtSecurityTokenHandler();

            var now = DateTime.UtcNow;
            var claims = new ClaimsIdentity(new[]
                {
                    new Claim("userId", Guid.NewGuid().ToString()),
                    new Claim("userName", "you"),
                    new Claim("connectorToken", payload.token)
                });
            var tokenDescriptor = new SecurityTokenDescriptor
            {
                Subject = claims,
                Expires = now.AddMinutes(Convert.ToInt32(expireMinutes)),
                SigningCredentials = new SigningCredentials(new SymmetricSecurityKey(symmetricKey), SecurityAlgorithms.HmacSha256Signature)
            };

            var stoken = tokenHandler.CreateToken(tokenDescriptor);
            var token = tokenHandler.WriteToken(stoken);

            return token;
        }
    }

    public class DirectLinePayload
    {
        public string conversationId { get; set; }
        public string token { get; set; }
        public int expires_in { get; set; }
    }
}
Exchange of ad-hoc information between the host application and the healthcare agent service instance
The partner application service can send optional attributes while in chat session or as part of service side response. (See step 3 in the diagram above.)
Sending ad-hoc information in chat initiation
This GitHub code sample provides an example of how to pass unplanned location information about the user.
The following is an example of the extraction code in the healthcare agent service Scenario Editor action element:
${lat} = @{initConversationEvent}.location.lat
Sending ad-hoc information while in chat
For example, to send user location while in chat, in the Scenario Editor you'll have to write an action with this code:
var msg = new builder.Message(session);
msg.data.type = "event";
msg.data.name = "shareLocation";
msg.data.value = <your value object>;
session.send(msg);
On the client side, you'll have to write this code:
botConnection.activity$.filter(
    activity => activity.type === "event" && activity.name === "shareLocation"
).subscribe(activity => getUserLocation(activity.value));
The getUserLocation method can be implemented based on browser supported capabilities.