Configure customer-managed keys at rest
Important
Azure API for FHIR will be retired on September 30, 2026. Follow the migration strategies to transition to Azure Health Data Services FHIR service by that date. Due to the retirement of Azure API for FHIR, new deployments won't be allowed beginning April 1, 2025. Azure Health Data Services FHIR service is the evolved version of Azure API for FHIR that enables customers to manage FHIR, DICOM, and MedTech services with integrations into other Azure services.
When you create a new Azure API for FHIR account, your data is encrypted using Microsoft-managed keys by default. Now, you can add a second layer of encryption for the data using your own key that you choose and manage yourself.
In Azure, this is typically accomplished using an encryption key in the customer's Azure Key Vault. Azure SQL, Azure Storage, and Azure Cosmos DB are some examples that provide this capability today. Azure API for FHIR leverages this support from Azure Cosmos DB. When you create an account, you'll have the option to specify an Azure Key Vault key URI. This key will be passed on to Azure Cosmos DB when the DB account is provisioned. When a Fast Healthcare Interoperability Resources (FHIR®) request is made, Azure Cosmos DB fetches your key and uses it to encrypt/decrypt the data.
To get started, refer to the following links:
- Register the Azure Cosmos DB resource provider for your Azure subscription
- Configure your Azure Key Vault instance
- Add an access policy to your Azure Key Vault instance
- Generate a key in Azure Key Vault
Using Azure portal
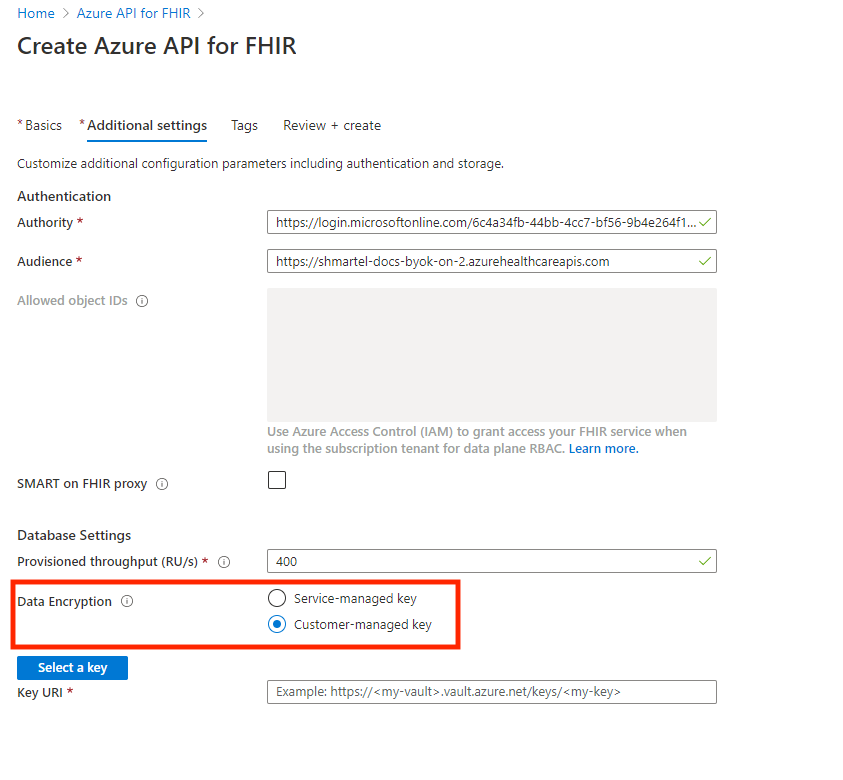
When creating your Azure API for FHIR account on Azure portal, you'll notice Data Encryption configuration option under the Database Settings on the Additional Settings tab. By default, the service-managed key option will be selected.
Important
The data encryption option is only available when the Azure API for FHIR is created and cannot be changed afterwards. However, you can view and update the encryption key if the Customer-managed key option is selected.
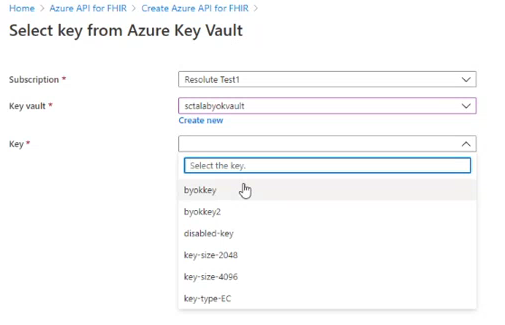
You can choose your key from the KeyPicker:
You can also specify your Azure Key Vault key here by selecting Customer-managed key option.
You can also enter the key URI here:
Important
Ensure all permissions for Azure Key Vault are set appropriately. For more information, see Add an access policy to your Azure Key Vault instance. Additionally, ensure that the soft delete is enabled in the properties of the Key Vault. Not completing these steps will result in a deployment error. For more information, see Verify if soft delete is enabled on a key vault and enable soft delete.
Note
Using customer-managed keys in the Brazil South, East Asia, and Southeast Asia Azure regions requires an Enterprise Application ID generated by Microsoft. You can request Enterprise Application ID by creating a one-time support ticket through the Azure portal. After receiving the Application ID, follow the instructions to register the application.
For existing FHIR accounts, you can view the key encryption choice (Service-managed key or Customer-managed key) in the Database blade as shown below. The configuration option can't be modified once it's selected. However, you can modify and update your key.
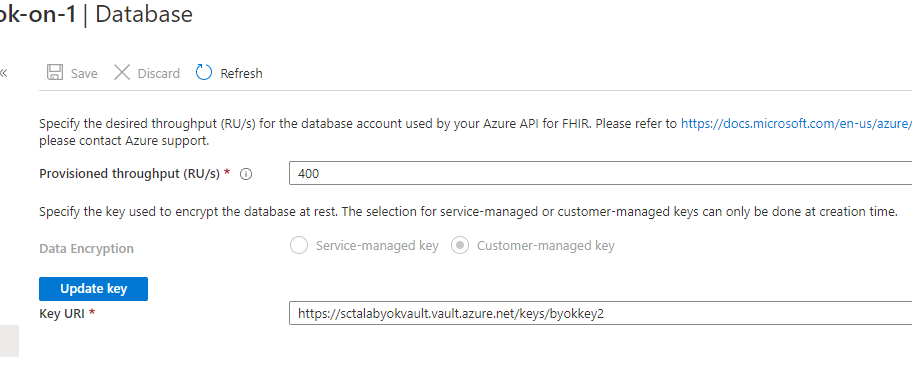
In addition, you can create a new version of the specified key, after which your data will get encrypted with the new version without any service interruption. You can also remove access to the key to remove access to the data. When the key is disabled, queries will result in an error. If the key is re-enabled, queries will succeed again.
Using Azure PowerShell
With your Azure Key Vault key URI, you can configure CMK using PowerShell by running the PowerShell command below:
New-AzHealthcareApisService
    -Name "myService"
    -Kind "fhir-R4"
    -ResourceGroupName "myResourceGroup"
    -Location "westus2"
    -CosmosKeyVaultKeyUri "https://<my-vault>.vault.azure.net/keys/<my-key>"
Using Azure CLI
As with PowerShell method, you can configure CMK by passing your Azure Key Vault key URI under the key-vault-key-uri parameter and running the CLI command below:
az healthcareapis service create
    --resource-group "myResourceGroup"
    --resource-name "myResourceName"
    --kind "fhir-R4"
    --location "westus2"
    --cosmos-db-configuration key-vault-key-uri="https://<my-vault>.vault.azure.net/keys/<my-key>"
Using Azure Resource Manager Template
With your Azure Key Vault key URI, you can configure CMK by passing it under the keyVaultKeyUri property in the properties object.
{
    "$schema": "https://schema.management.azure.com/schemas/2015-01-01/deploymentTemplate.json#",
    "contentVersion": "1.0.0.0",
    "parameters": {
        "services_myService_name": {
            "defaultValue": "myService",
            "type": "String"
        }
    },
    "variables": {},
    "resources": [
        {
            "type": "Microsoft.HealthcareApis/services",
            "apiVersion": "2020-03-30",
            "name": "[parameters('services_myService_name')]",
            "location": "westus2",
            "kind": "fhir-R4",
            "properties": {
                "accessPolicies": [],
                "cosmosDbConfiguration": {
                    "offerThroughput": 400,
                    "keyVaultKeyUri": "https://<my-vault>.vault.azure.net/keys/<my-key>"
                },
                "authenticationConfiguration": {
                    "authority": "https://login.microsoftonline.com/72f988bf-86f1-41af-91ab-2d7cd011db47",
                    "audience": "[concat('https://', parameters('services_myService_name'), '.azurehealthcareapis.com')]",
                    "smartProxyEnabled": false
                },
                "corsConfiguration": {
                    "origins": [],
                    "headers": [],
                    "methods": [],
                    "maxAge": 0,
                    "allowCredentials": false
                }
            }
        }
    ]
}
And you can deploy the template with the following PowerShell script:
$resourceGroupName = "myResourceGroup"
$accountName = "mycosmosaccount"
$accountLocation = "West US 2"
$keyVaultKeyUri = "https://<my-vault>.vault.azure.net/keys/<my-key>"

New-AzResourceGroupDeployment `
    -ResourceGroupName $resourceGroupName `
    -TemplateFile "deploy.json" `
    -accountName $accountName `
    -location $accountLocation `
    -keyVaultKeyUri $keyVaultKeyUri
Next steps
In this article, you learned how to configure customer-managed keys at rest using the Azure portal, PowerShell, CLI, and Resource Manager Template. You can refer to the Azure Cosmos DB FAQ section for more information.
FHIR® is a registered trademark of HL7 and is used with the permission of HL7.
Feedback
Coming soon: Throughout 2024 we will be phasing out GitHub Issues as the feedback mechanism for content and replacing it with a new feedback system. For more information see: https://aka.ms/ContentUserFeedback.
Submit and view feedback for