Configure export settings and set up a storage account
The FHIR® service supports the $export operation specified by HL7 for exporting FHIR data from a FHIR server. In the FHIR service implementation, calling the $export endpoint causes the FHIR service to export data into a pre-configured Azure storage account.
Ensure you are granted the application role 'FHIR Data exporter role' prior to configuring export. To understand more on application roles, see Authentication and Authorization for FHIR service.
There are three steps in setting up the $export operation for the FHIR service-
- Enable a managed identity for the FHIR service.
- Configure a new or existing Azure Data Lake Storage Gen2 (ADLS Gen2) account and give permission for the FHIR service to access the account.
- Set the ADLS Gen2 account as the export destination for the FHIR service.
Enable managed identity for the FHIR service
The first step in configuring your environment for FHIR data export is to enable a system-wide managed identity for the FHIR service. This managed identity is used to authenticate the FHIR service, allowing access to the ADLS Gen2 account during an $export operation. For more information about managed identities in Azure, see About managed identities for Azure resources.
In this step, browse to your FHIR service in the Azure portal and select Identity. Set the Status option to On, and then click Save. When the Yes and No buttons display, select Yes to enable the managed identity for the FHIR service. Once the system identity has been enabled, you'll see an Object (principal) ID value for your FHIR service.

Give permission in the storage account for FHIR service access
Go to your ADLS Gen2 account in the Azure portal. If you don't already have an ADSL Gen2 account deployed, follow these instructions for creating an Azure storage account and upgrading to ADLS Gen2. Make sure to enable the hierarchical namespace option in the Advanced tab to create an ADLS Gen2 account.
In your ADLS Gen2 account, select Access control (IAM).
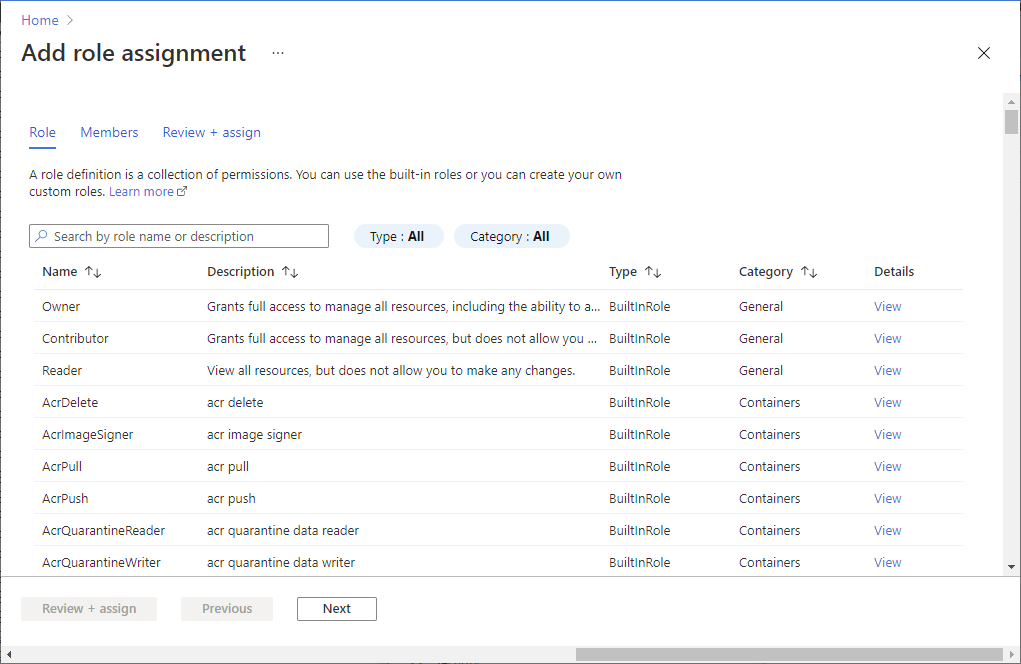
Select Add > Add role assignment. If the Add role assignment option is grayed out, ask your Azure administrator for help with this step.

On the Role tab, select the Storage Blob Data Contributor role.
On the Members tab, select Managed identity, and then click Select members.
Select your Azure subscription.
Select System-assigned managed identity, and then select the managed identity that you previously enabled for your FHIR service.
On the Review + assign tab, click Review + assign to assign the Storage Blob Data Contributor role to your FHIR service.

For more information about assigning roles in the Azure portal, see Azure built-in roles.
Now you're ready to configure the FHIR service by setting the ADLS Gen2 account as the default storage account for export.
Specify the storage account for FHIR service export
The final step is to specify the ADLS Gen2 account the FHIR service uses when exporting data.
Note
In the storage account, if you haven't assigned the Storage Blob Data Contributor role to the FHIR service, the $export operation will fail.
Go to your FHIR service settings.
Select Export.
Select the name of the storage account from the list. If you need to search for your storage account, use the Name, Resource group, or Region filters.

After you've completed this configuration step, you're ready to export data from the FHIR service. See How to export FHIR data for details on performing $export operations with the FHIR service.
Note
Only storage accounts in the same subscription as the FHIR service are allowed to be registered as the destination for $export operations.
Securing the FHIR service $export operation
For securely exporting from the FHIR service to an ADLS Gen2 account, there are two options:
Allowing the FHIR service to access the storage account as a Microsoft Trusted Service.
Allowing specific IP addresses associated with the FHIR service to access the storage account. This option permits two different configurations depending on whether or not the storage account is in the same Azure region as the FHIR service.
Allowing FHIR service as a Microsoft Trusted Service
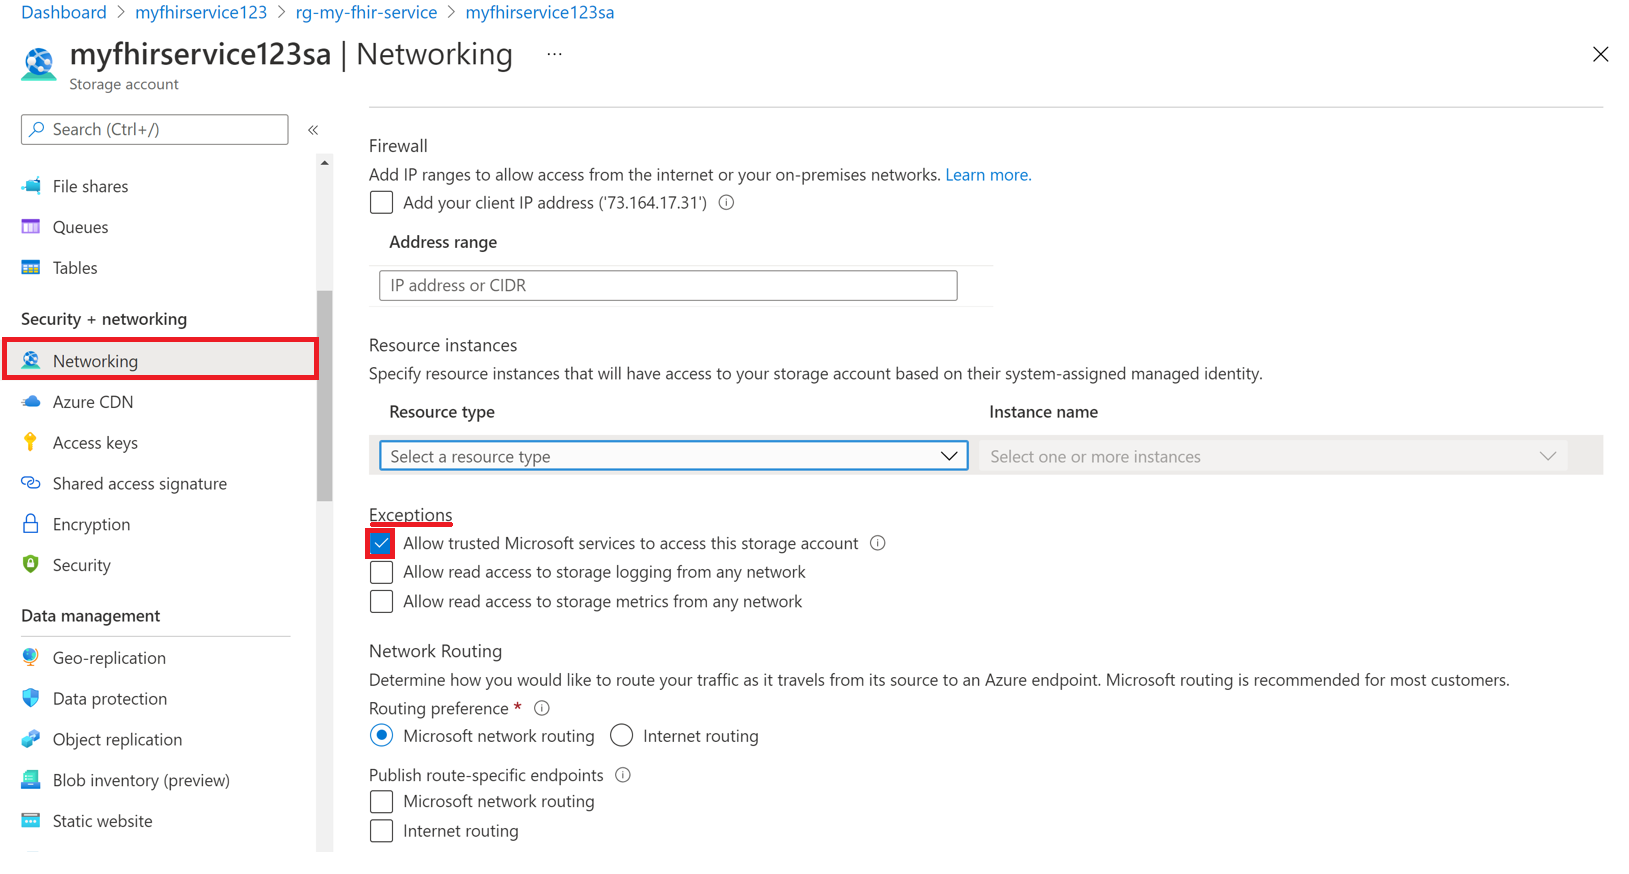
Go to your ADLS Gen2 account in the Azure portal and select Networking. Select Enabled from selected virtual networks and IP addresses under the Firewalls and virtual networks tab.

Select Microsoft.HealthcareApis/workspaces from the Resource type dropdown list and then select your workspace from the Instance name dropdown list.
Under the Exceptions section, select the box Allow Azure services on the trusted services list to access this storage account. Make sure to click Save to retain the settings.
Next, run the following PowerShell command to install the Az.Storage PowerShell module in your local environment. This allows you to configure your Azure storage accounts using PowerShell.
Install-Module Az.Storage -Repository PsGallery -AllowClobber -Force
Now, use the following PowerShell command to set the selected FHIR service instance as a trusted resource for the storage account. Make sure that all listed parameters are defined in your PowerShell environment.
You'll need to run the Add-AzStorageAccountNetworkRule command as an administrator in your local environment. For more information, see Configure Azure Storage firewalls and virtual networks.
$subscription="xxx"
$tenantId = "xxx"
$resourceGroupName = "xxx"
$storageaccountName = "xxx"
$workspacename="xxx"
$fhirname="xxx"
$resourceId = "/subscriptions/$subscription/resourceGroups/$resourceGroupName/providers/Microsoft.HealthcareApis/workspaces/$workspacename/fhirservices/$fhirname"

Add-AzStorageAccountNetworkRule -ResourceGroupName $resourceGroupName -Name $storageaccountName -TenantId $tenantId -ResourceId $resourceId
After running this command, in the Firewall section under Resource instances you will see 2 selected in the Instance name dropdown list. These are the names of the workspace instance and FHIR service instance that you registered as Microsoft Trusted Resources.

You're now ready to securely export FHIR data to the storage account.
The storage account is on selected networks and isn't publicly accessible. To securely access the files, you can enable private endpoints for the storage account.
Allow specific IP addresses to access the Azure storage account from other Azure regions
In the Azure portal, go to the Azure Data Lake Storage Gen2 account.
On the left menu, select Networking.
Select Enabled from selected virtual networks and IP addresses.
In the Firewall section, in the Address range box, specify the IP address. Add IP ranges to allow access from the internet or your on-premises networks. You can find the IP address in the following table for the Azure region where the FHIR service is provisioned.
Azure region Public IP address Australia East 20.53.44.80 Canada Central 20.48.192.84 Central US 52.182.208.31 East US 20.62.128.148 East US 2 20.49.102.228 East US 2 EUAP 20.39.26.254 Germany North 51.116.51.33 Germany West Central 51.116.146.216 Japan East 20.191.160.26 Korea Central 20.41.69.51 North Central US 20.49.114.188 North Europe 52.146.131.52 South Africa North 102.133.220.197 South Central US 13.73.254.220 Southeast Asia 23.98.108.42 Switzerland North 51.107.60.95 UK South 51.104.30.170 UK West 51.137.164.94 West Central US 52.150.156.44 West Europe 20.61.98.66 West US 2 40.64.135.77
Allow specific IP addresses to access the Azure storage account in the same region
The configuration process for IP addresses in the same region is just like the previous procedure, except that you use a specific IP address range in Classless Inter-Domain Routing (CIDR) format instead (that is, 100.64.0.0/10). You must specify the IP address range (100.64.0.0 to 100.127.255.255) because an IP address for the FHIR service is allocated each time you make an operation request.
Note
It's possible to use a private IP address within the range of 10.0.2.0/24, but there's no guarantee that the operation will succeed in such a case. You can retry if the operation request fails, but until you use an IP address within the range of 100.64.0.0/10, the request won't succeed.
This network behavior for IP address ranges is by design. The alternative is to configure the storage account in a different region.
Next steps
In this article, you learned about the three steps in configuring your environment to allow export of data from your FHIR service to an Azure storage account. For more information about Bulk Export capabilities in the FHIR service, see the following.
Note
FHIR® is a registered trademark of HL7 and is used with the permission of HL7.