Note
Access to this page requires authorization. You can try signing in or changing directories.
Access to this page requires authorization. You can try changing directories.
Use the following information to help you configure your on-premises servers that will use the Azure Rights Management (RMS) connector. These procedures cover step 5 from Deploying the Microsoft Rights Management connector.
Prerequisites: Before you begin, make sure that you have: - Installed and configured the RMS connector - Checked any prerequisites relevant for the servers that will use the connector.
Configuring servers to use the RMS connector
After you have installed and configured the RMS connector, you are ready to configure the on-premises servers that will connect to the Azure Rights Management service, and use this protection technology by using the connector.
This means configuring the following servers:
| Environment | Servers to configure |
|---|---|
| Exchange 2013 | Client Access Servers and Mailbox Servers |
| Exchange 2016 and Exchange 2019 | Mailbox Servers (includes Client Access and Hub Transport server roles) |
| SharePoint | Front-end SharePoint webservers, including those hosting the Central Administration server |
| File Classification Infrastructure | Windows Server computers that have installed File Resource Manager |
This configuration requires registry settings, with the following options:
Important
In both cases, you must manually install any prerequisites and configure Exchange, SharePoint, and File Classification Infrastructure to use Rights Management.
Note
For most organizations, automatic configuration by using the server configuration tool for Microsoft RMS connector will be the better option, because it provides greater efficiency and reliability than manual configuration.
After making the configuration changes on these servers, you must restart them if they are running Exchange or SharePoint, and were previously configured to use AD RMS. There is no need to restart these servers if you are configuring them for Rights Management for the first time.
You must always restart the file server that is configured to use File Classification Infrastructure after you make these configuration changes.
Edit registry settings automatically - advantages and disadvantages
Edit your registry settings automatically, by using the server configuration tool for Microsoft RMS connector.
Advantages include:
No direct editing of the registry. This is automated for you by using a script.
No need to run a Windows PowerShell cmdlet to obtain your Microsoft RMS URL.
The prerequisites are automatically checked for you (but not automatically remediated) if you run it locally.
Disadvantages include: When you run the tool, you must make a connection to a server that is already running the RMS connector.
For more information, see How to use the server configuration tool for Microsoft RMS connector.
Edit registry settings manually - advantages and disadvantages
Advantages include: No connectivity to a server running the RMS connector is required.
Disadvantages include:
More administrative overheads that are error-prone.
You must obtain your Microsoft RMS URL, which requires you to run a Windows PowerShell command.
You must always make all the prerequisites checks yourself.
How to use the server configuration tool for Microsoft RMS connector
If you haven't already downloaded the script for the server configuration tool for Microsoft RMS connector (GenConnectorConfig.ps1), download it from the Microsoft Download Center.
Save the GenConnectorConfig.ps1 file on the computer where you will run the tool.
If you will run the tool locally, this must be the server that you want to configure to communicate with the RMS connector. Otherwise, you can save it on any computer.
Decide how to run the tool:
Method Description Locally Run the tool interactively, from the server to be configured to communicate with the RMS connector.
Tip: This is useful for a one-off configuration, such as a testing environment.Software deployment Run the tool to produce registry files, which you then deploy to one or more relevant servers.
Deploy the registry files using a systems management application that supports software deployment, such as System Center Configuration Manager.Group policy Run the tool to produce a script that you give to an administrator who can create Group Policy objects for the servers to be configured.
This script creates one Group Policy object for each server type to be configured, which the administrator can then assign to the relevant servers.Note
This tool configures the servers that will communicate with the RMS connector and that are listed at the beginning of this section. Do not run this tool on the servers that run the RMS connector.
Start Windows PowerShell with the Run as an administrator option, and use the Get-help command to read instructions how to the use the tool for your chosen configuration method:
Get-help .\GenConnectorConfig.ps1 -detailed
To run the script, you must enter the URL of the RMS connector for your organization.
Enter the protocol prefix (HTTP:// or HTTPS://) and the name of the connector that you defined in DNS for the load balanced address of your connector. For example, https:\//connector.contoso.com.
The tool then uses that URL to contact the servers running the RMS connector and obtain other parameters that are used to create the required configurations.
Important
When you run this tool, make sure that you specify the name of the load-balanced RMS connector for your organization and not the name of a single server that runs the RMS connector service.
Use the following sections for specific information for each service type:
When to install client applications on separate computers, which are not configured to use the connector
After these servers are configured to use the connector, client applications that are installed locally on these servers might not work with RMS. When this happens, it is because the applications try to use the connector rather than use RMS directly, which is not supported.
You must install the client applications on separate computers that are not configured to use the connector. They will then correctly use RMS directly.
Configuring an Exchange server to use the connector
The following Exchange roles communicate with the RMS connector:
For Exchange 2016 and Exchange 2013: Client access server and mailbox server
For Exchange 2019: Client access server and hub transport server
To use the RMS connector, these servers running Exchange must be running one of the following software versions:
Exchange Server 2016
Exchange Server 2013 with Exchange 2013 Cumulative Update 3
Exchange Server 2019
You will also need on these servers, a version 1 of the RMS client (also known as MSDRM) that includes support for RMS Cryptographic Mode 2. All Windows operating systems include the MSDRM client but early versions of the client did not support Cryptographic Mode 2. If your Exchange servers are running at least Windows Server 2012, no further action is required because the RMS client installed with these operating systems natively supports Cryptographic Mode 2.
Important
If these versions or later versions of Exchange and the MSDRM client are not installed, you will not be able to configure Exchange to use the connector. Check that these versions are installed before you continue.
To configure Exchange servers to use the connector
Make sure that the Exchange servers are authorized to use the RMS connector, by using the RMS connector administration tool and the information from the Authorizing servers to use the RMS connector section.
This configuration is required so that Exchange can use the RMS connector.
On the Exchange server roles that communicate with the RMS connector, do one of the following:
Run the server configuration tool for Microsoft RMS connector.
For more information, see How to use the server configuration tool for Microsoft RMS connector.
For example, to run the tool locally to configure a server running Exchange 2016 or Exchange 2013:
.\GenConnectorConfig.ps1 -ConnectorUri https://rmsconnector.contoso.com -SetExchange2013Make manual registry edits. For more information, see Registry settings for the RMS connector.
Enable IRM functionality for Exchange by using the Exchange PowerShell cmdlet Set-IRMConfiguration. Set
InternalLicensingEnabled $trueandClientAccessServerEnabled $true.
Configuring a SharePoint server to use the connector
Front-end SharePoint webservers, including those hosting the Central Administration server, communicate with the RMS connector.
To use the RMS connector, these servers running SharePoint must be running one of the following software versions:
SharePoint Server 2019
SharePoint Server 2016
SharePoint Server 2013
A server running SharePoint 2019, 2016 or SharePoint 2013 must also be running a version of the MSIPC client 2.1 that is supported with the RMS connector.
To make sure that you have a supported version, download the latest client from the Microsoft Download Center.
Warning
There are multiple versions of the MSIPC 2.1 client, so make sure that you have version 1.0.2004.0 or later.
You can verify the client version by checking the version number of MSIPC.dll, which is located in \Program Files\Active Directory Rights Management Services Client 2.1. The properties dialog box shows the version number of the MSIPC 2.1 client.
To configure SharePoint servers to use the connector
Make sure that the SharePoint servers are authorized to use the RMS connector, by using the RMS connector administration tool and the information from the Authorizing servers to use the RMS connector section.
This configuration is required so that your SharePoint servers can use the RMS connector.
On the SharePoint servers that communicate with the RMS connector, do one of the following:
Run the server configuration tool for Microsoft RMS connector
For more information, see How to use the server configuration tool for Microsoft RMS connector.
For example, to run the tool locally to configure a server running SharePoint 2019, 2016 or SharePoint 2013:
.\GenConnectorConfig.ps1 -ConnectorUri https://rmsconnector.contoso.com -SetSharePoint2013If you are using SharePoint 2019, 2016 or SharePoint 2013, make manual registry edits by using the information in Registry settings for the RMS connector to manually add registry settings on the servers.
Enable IRM in SharePoint. When you follow these instructions, you must configure SharePoint to use the connector by specifying Use this RMS server, and then enter the load-balancing connector URL that you configured.
Enter the protocol prefix (HTTP:// or HTTPS://) and the name of the connector that you defined in DNS for the load balanced address of your connector.
For example, if your connector name is
https:\//connector.contoso.com, your configuration will look like the following picture: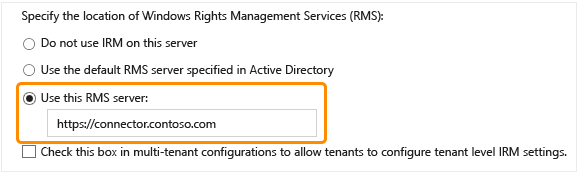
After IRM is enabled on a SharePoint farm, you can enable IRM on individual libraries by using the Information Rights Management option on the Library Settings page for each of the libraries.
Configuring a file server for File Classification Infrastructure to use the connector
To use the RMS connector and File Classification Infrastructure to protect Office documents, the file server must be running one of the following operating systems:
Windows Server 2016
Windows Server 2012 R2
Windows Server 2012
To configure file servers to use the connector
Make sure that the file servers are authorized to use the RMS connector, by using the RMS connector administration tool and the information from the Authorizing servers to use the RMS connector section.
This configuration is required so that your file servers can use the RMS connector.
On the file servers configured for File Classification Infrastructure and that will communicate with the RMS connector, do one of the following:
Run the server configuration tool for Microsoft RMS connector
For more information, see How to use the server configuration tool for Microsoft RMS connector.
For example, to run the tool locally to configure a file server running FCI:
.\GenConnectorConfig.ps1 -ConnectorUri https://rmsconnector.contoso.com -SetFCI2012Make manual registry edits by using the information in Registry settings for the RMS connector to manually add registry settings on the servers.
Create classification rules and file management tasks to protect documents with RMS Encryption, and then specify an RMS template to automatically apply RMS policies.
For more information, see File Server Resource Manager Overview in the Windows Server documentation library.
Next steps
Now that the RMS connector is installed and configured, and your servers are configured to use it, IT administrators and users can protect and consume email messages and documents by using the Azure Rights Management service.
To make this easy for users, deploy the Azure Information Protection client, which installs an add-on for Office and adds new right-click options to File Explorer.
For more information, see the Azure Information Protection client administrator guide.
Note that if you configure departmental templates that you want to use with Exchange transport rules or Windows Server FCI, the scope configuration must include the application compatibility option such that the Show this template to all users when the applications do not support user identity check box is selected.
You can use the Azure Information Protection deployment roadmap to check whether there are other configuration steps that you might want to do before you roll out Azure Rights Management to users and administrators.
To monitor the RMS connector, see Monitor the Microsoft Rights Management connector.