Note
Access to this page requires authorization. You can try signing in or changing directories.
Access to this page requires authorization. You can try changing directories.
This article describes how you manage devices in your Azure IoT Central application. You can:
- Use the Devices page to view, add, and delete devices connected to your Azure IoT Central application.
- Keep your device metadata up to date by changing the values stored in the device properties from your views.
- Control the behavior of your devices by updating a setting on a specific device from your views.
To learn how to manage devices in bulk, see Manage devices in bulk in your Azure IoT Central application.
To learn how to manage devices by using the IoT Central REST API, see How to use the IoT Central REST API to manage devices.
View your devices
To view an individual device:
Choose Devices on the left pane. Here you see a list of your device templates and a list of all the devices accessible to your organization.
Choose a device template.
In the right-hand pane of the Devices page, you see a list of devices accessible to your organization created from that device template:
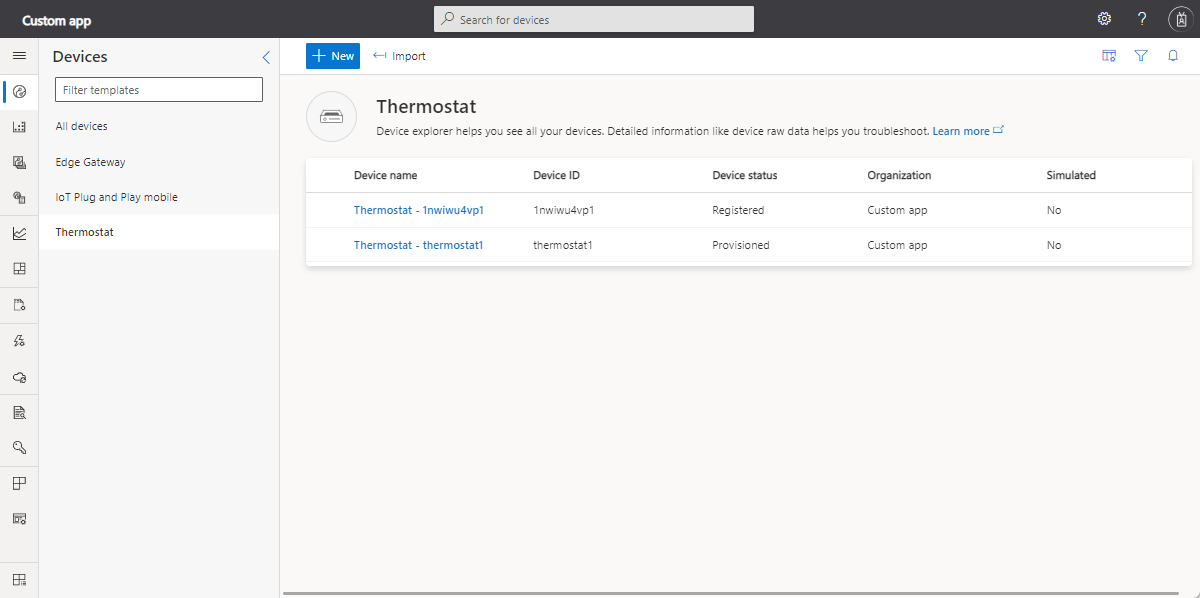
Choose an individual device to see the device details page for that device.
Tip
You can use the filter tool on this page to view devices in a specific organization.

Monitor your devices
Use the Devices page to monitor and manage your devices.
The following video walks you through monitoring device connectivity status:
Device status values
Every device has a single status value in the UI. The device status can be one of:
The device status is first Registered. This status means the device is created in IoT Central, and has a device ID. A device is registered when:
- A new real device is added on the Devices page.
- A set of devices is added using Import on the Devices page.
The device status changes to Provisioned when a registered device completes the provisioning step by using the Device Provisioning Service (DPS). To complete the provisioning process, the device needs the Device ID that was used to register the device, either a SAS key or X.509 certificate, and the ID scope. After DPS provisions the device, it can connect to your IoT Central application and start sending data.
Blocked devices have a status of Blocked. An operator can block and unblock devices. When a device is blocked, it can't send data to your IoT Central application. An operator must unblock the device before it can resume sending data. When an operator unblocks a device the status returns to its previous value, Registered or Provisioned.
If the device status is Waiting for Approval, it means the Auto approve option is disabled on the Device connection groups page. An operator must explicitly approve a device before it can be provisioned and sending data. Devices not registered manually on the Devices page, but connected with valid credentials have the device status Waiting for Approval. Operators can approve these devices from the Devices page using the Approve button.
The following table shows how the status value for a device in the UI maps to the values used by the REST API to interact with devices:
| UI Device status | Notes | REST API Get |
|---|---|---|
| Waiting for approval | The auto approve option is disabled in the device connection group and the device wasn't added through the UI. A user must manually approve the device through the UI before it can be used. |
Provisioned: false Enabled: false |
| Registered | A device was approved either automatically or manually. | Provisioned: false Enabled: true |
| Provisioned | The device was provisioned and can connect to your IoT Central application. | Provisioned: true Enabled: true |
| Blocked | The device isn't allowed to connect to your IoT Central application. You can block a device that is in any of the other states. | Provisioned: depends on Waiting for approval/Registered/Provisioned status Enabled: false |
A device can also have a status of Unassigned. This status isn't shown in the Device status field in the UI, it's shown in the Device template field in the UI. However, you can filter the device list for devices with the Unassigned status. If the device status is Unassigned, the device connecting to IoT Central isn't assigned to a device template. This situation typically happens in the following scenarios:
- A set of devices is added using Import on the Devices page without specifying the device template.
- A device was registered manually on the Devices page without specifying the device template. The device then connected with valid credentials.
An operator can assign a device to a device template from the Devices page by using the Migrate button.
Device connection status
When a device or edge device connects using the MQTT protocol, connected and disconnected events for the device are generated. The device doesn't send these events, IoT Central generates them internally.
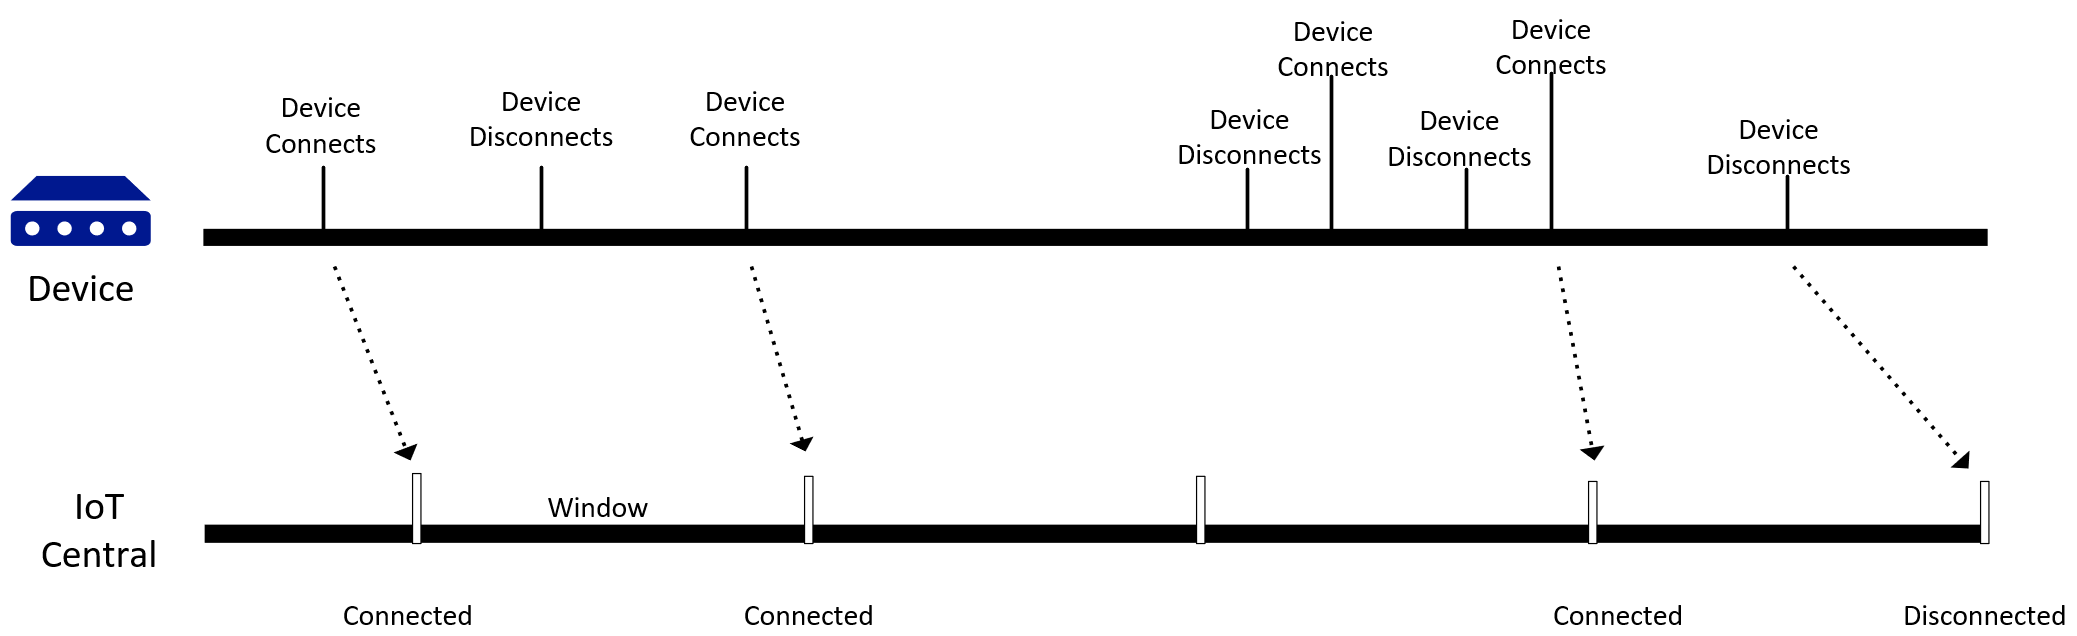
The following diagram shows how, when a device connects, the connection is registered at the end of a time window. If multiple connection and disconnection events occur, IoT Central registers the one that's closest to the end of the time window. For example, if a device disconnects and reconnects within the time window, IoT Central registers the connection event. Currently, the time window is approximately one minute.
Watch the following video to learn more about how to monitor device connection status:
You can include connection and disconnection events in Export IoT data to cloud destinations using Blob Storage. To learn more, see React to IoT Hub events by using Event Grid to trigger actions > Limitations for device connection state events.
Add a device
To add a device to your Azure IoT Central application:
Choose Devices on the left pane.
Choose the device template from which you want to create a device.
Choose + New.
Enter a device name and ID or accept the default. The maximum length of a device name is 148 characters. The maximum length of a device ID is 128 characters.
Turn the Simulated toggle to On or Off. A real device is for a physical device that you connect to your Azure IoT Central application. A simulated device has sample data generated for you by Azure IoT Central.
If your application uses organizations, choose the organization the device belongs to.
Tip
You can set a default organization to appear in the organization drop-down.
Select Create.
This device now appears in your device list for this template. Select the device to see the device details page that contains all views for the device.
Get device connection information
When a device provisions and connects to IoT Central, it needs connection information from your IoT Central application:
- The ID Scope that identifies the application to DPS.
- The Device ID that was used to register the device.
- Either a SAS key or X.509 certificate.
To find these values:
Choose Devices on the left pane.
To see the device details, select the device in the device list.
Select Connect to view the connection information. The QR code encodes a JSON document that includes the ID Scope, Device ID, and Primary key derived from the default SAS-IoT-Devices device connection group.
Note
If the authentication type is Shared access signature, the keys displayed are derived from the default SAS-IoT-Devices device connection group.
Change organization
To move a device to a different organization, you must have access to both the source and destination organizations. To move a device:
Choose Devices on the left pane.
Select the device to move in the device list.
Select Manage Device and Organization from the drop-down menu.
Select the new organization for the device:
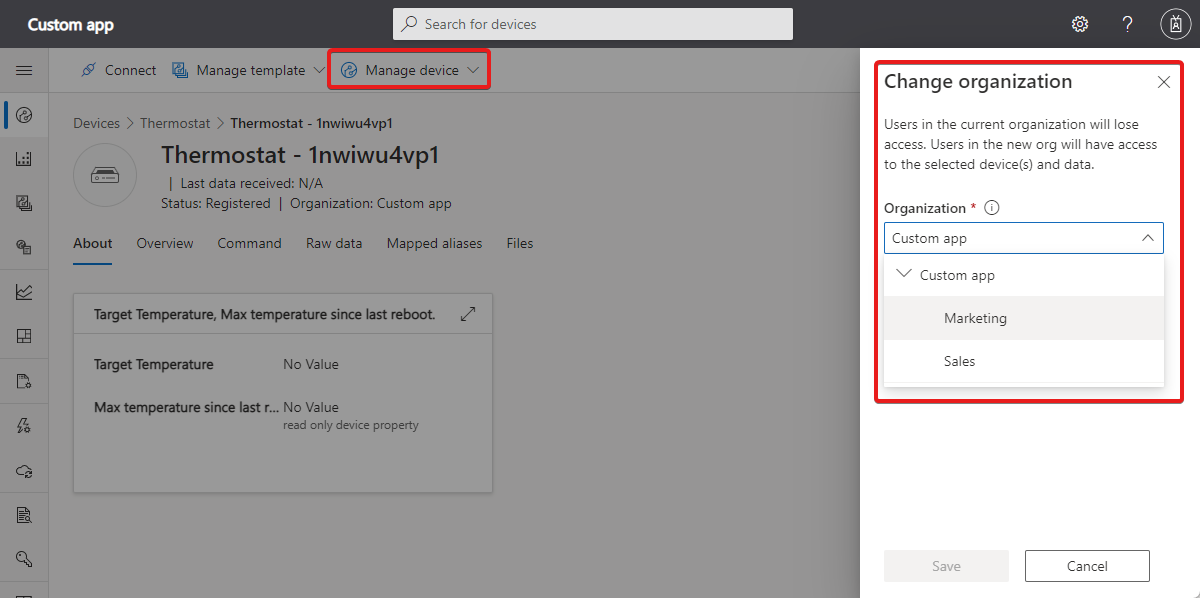
Select Save.

Migrate devices to a template
If you register devices by starting the import under All devices, then the devices are created without any device template association. Devices must be assigned to a template to explore the data and other details about the device. Follow these steps to assign devices to a template:
Choose Devices on the left pane.
On the left panel, choose All devices.
Select the unassigned devices you want to assign to a template:
Select Migrate:
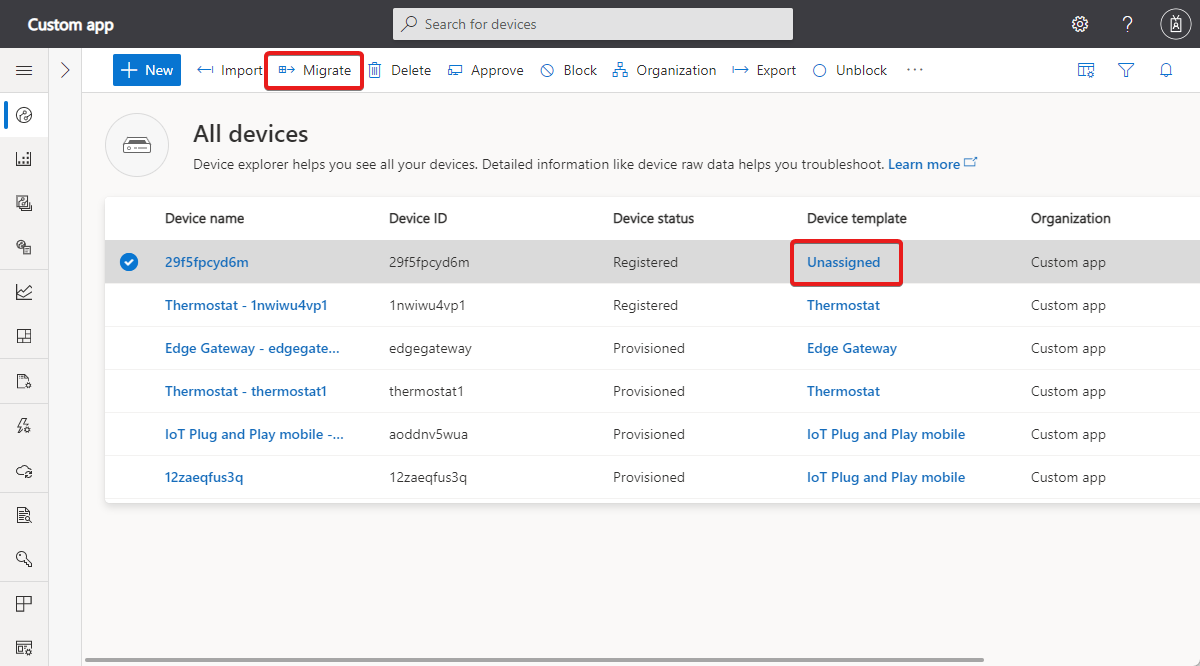
Choose the template from the list of available templates and select Migrate.
The selected devices are assigned to the device template you chose.

Delete a device
To delete either a real or simulated device from your Azure IoT Central application:
Choose Devices on the left pane.
Choose the device template of the device you want to delete.
Use the filter tools to filter and search for your devices. Check the box next to the devices to delete.
Choose Delete. You can track the status of this deletion in your Device Operations panel.
Change a property
Cloud properties are the device metadata associated with the device, such as city and serial number. Cloud properties only exist in the IoT Central application and aren't synchronized to your devices. Writable properties control the behavior of a device and let you set the state of a device remotely, for example by setting the target temperature of a thermostat device. The device sets device properties, which are read-only within IoT Central. You can view and update properties on the Device Details views for your device.
Choose Devices on the left pane.
Choose the device template of the device whose properties you want to change and select the target device.
Choose the view that contains properties for your device, this view enables you to input values and select Save at the top of the page. Here you see the properties your device has and their current values. Cloud properties and writable properties have editable fields, while device properties are read-only. For writable properties, you can see their sync status at the bottom of the field.
Modify the properties to the values you need. You can modify multiple properties at a time and update them all at the same time.
Choose Save. If you saved writable properties, the values are sent to your device. When the device confirms the change for the writable property, the status returns back to synced. If you saved a cloud property, the value is updated.