Note
Access to this page requires authorization. You can try signing in or changing directories.
Access to this page requires authorization. You can try changing directories.
A device template is a blueprint that defines the characteristics and behaviors of a type of device that connects to an Azure IoT Central application. For example, you can create a device template for a sensor that sends telemetry, such as temperature and properties, such as location. To learn more, see What are device templates?.
This article describes some of the ways to create a device template in IoT Central such as autogenerating a device template from a telemetry message or defining one in the IoT Central UI.
From a device template, an operator can create and connect real devices.
The following screenshot shows an example of a device template:

The device template has the following sections:
- Model - Use the model to define how your device interacts with your IoT Central application. Each model has a unique model ID and defines the capabilities of the device. Capabilities are grouped into interfaces. Interfaces let you reuse components across models or use inheritance to extend the set of capabilities.
- Raw data - View the raw data sent by your designated preview device. This view is useful when you're debugging or troubleshooting a device template.
- Views - Use views to visualize the data from the device and forms to manage and control a device.
To learn how to manage device templates by using the IoT Central REST API, see How to use the IoT Central REST API to manage device templates.
You have several options to create device templates:
- Design the device template in the IoT Central UI.
- Import a device template from the list of featured device templates. Optionally, customize the device template to your requirements in IoT Central.
- When the device connects to IoT Central, have it send the model ID of the model it implements. IoT Central uses the model ID to retrieve the model from the model repository and to create a device template. Add any cloud properties and views your IoT Central application needs to the device template.
- When the device connects to IoT Central, let IoT Central autogenerate a device template definition from the data the device sends.
- Author a device model using the Digital Twin Definition Language (DTDL) v2 and IoT Central DTDL extension. Manually import the device model into your IoT Central application. Then add the cloud properties and views your IoT Central application needs.
- You can also add device templates to an IoT Central application using the How to use the IoT Central REST API to manage device templates.
Note
In each case, the device code must implement the capabilities defined in the model. The device code implementation isn't affected by the cloud properties and views sections of the device template.
Import a device template
This section shows you how to import a device template from the list of featured device templates and how to customize it using the IoT Central UI. This example uses the Onset Hobo MX-100 Temp Sensor device template from the list of featured device templates:
- To add a new device template, select + New on the Device templates page.
- On the Select type page, scroll down until you find the Onset Hobo MX-100 Temp Sensor tile in the Featured device templates section.
- Select the Onset Hobo MX-100 Temp Sensor tile, and then select Next: Review.
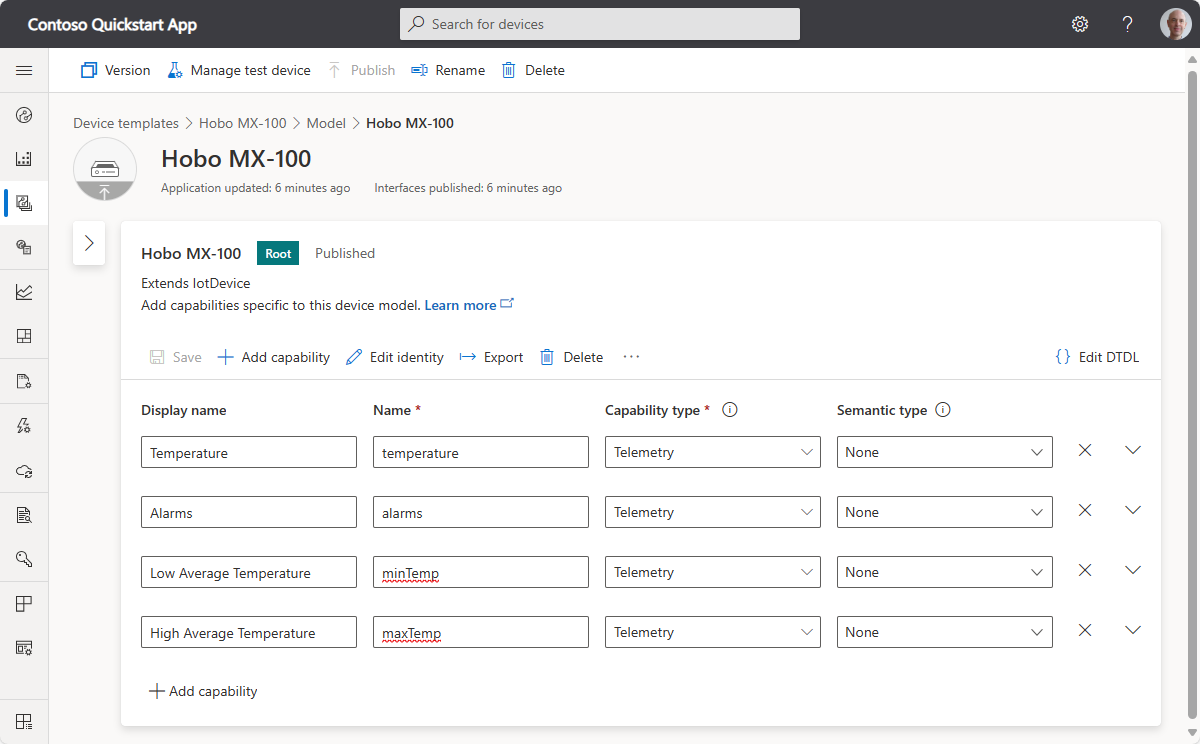
- On the Review page, select Create. The name of the template you created is Hobo MX-100. The model includes components such as Hobo MX-100 and IotDevice. Components define the capabilities of a Hobo MX-100 device. Capabilities can include telemetry, properties, and commands. This device only has telemetry capabilities.
Autogenerate a device template
You can also automatically create a device template from a currently unassigned device. IoT Central uses the telemetry and property values the device sends to infer a device model.
Note
Currently, this preview feature can't use telemetry and properties from components. It can only generate capabilities from root telemetry and properties.
The following steps show how to use this feature:
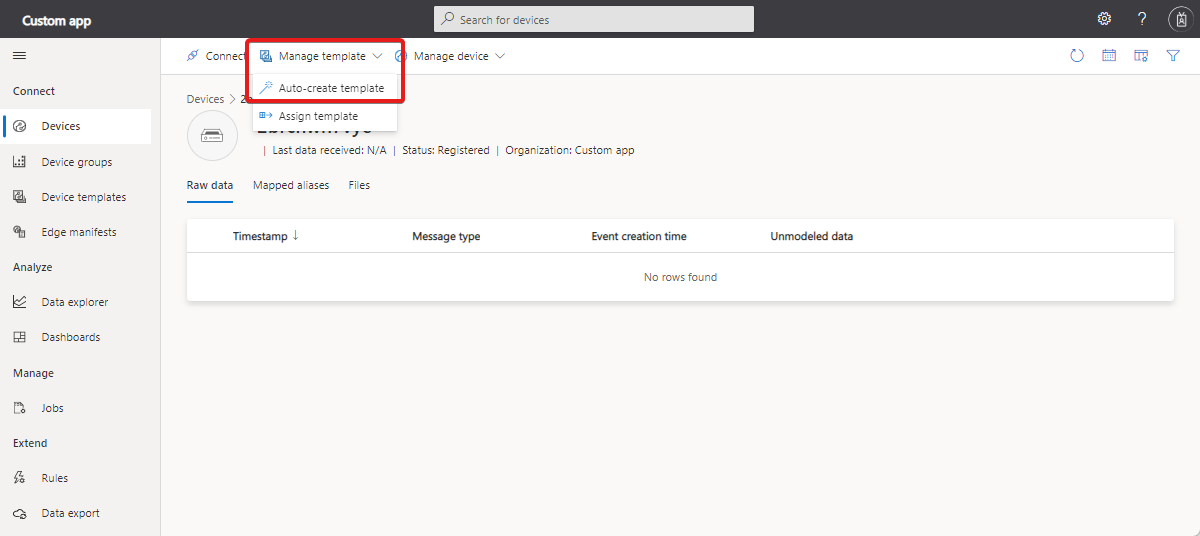
Connect your device to IoT Central, and start sending the data. When you see the data in the Raw data view, select Auto-create template in the Manage template drop-down:
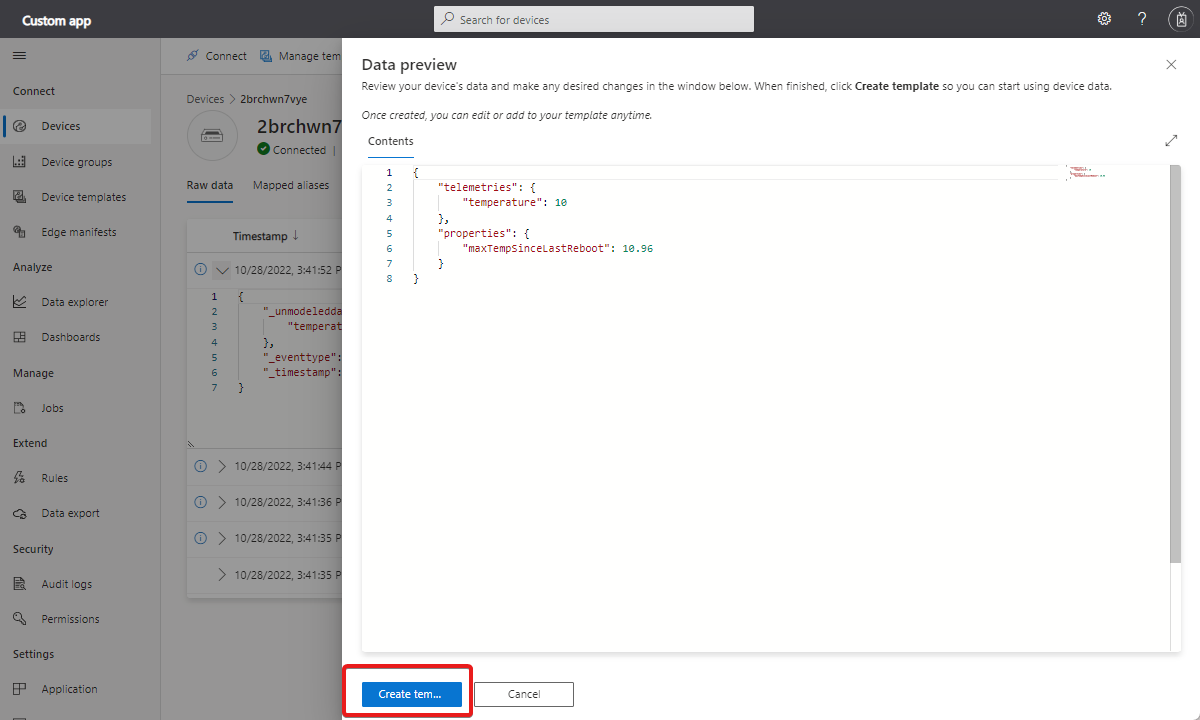
On the Data preview page, make any required changes to the raw data, and select Create template:
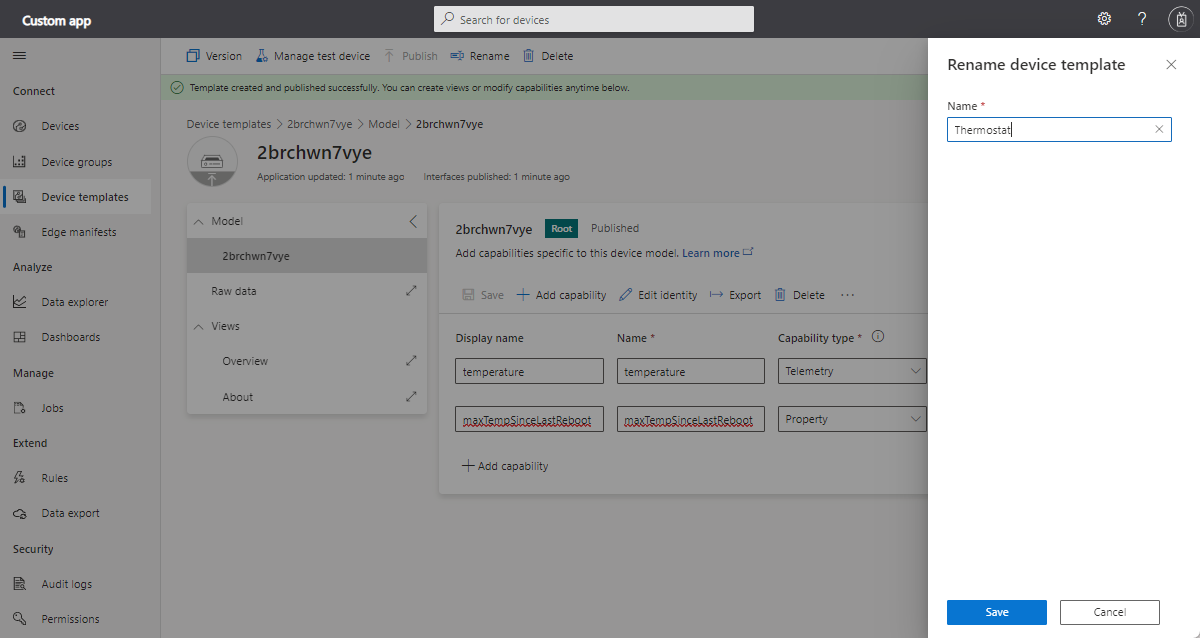
IoT Central generates a template based on the data format shown on the Data preview page and assigns the device to it. You can make further changes to the device template, such as renaming it or adding capabilities, on the Device templates page:


Manage device templates in the UI
You can create, edit, rename, or delete a template from the template's editor page.
After you define the template, you can publish it. Until the template is published, you can't connect a device to it, and it doesn't appear on the Devices page.
To learn more about modifying and versioning device templates, see Edit an existing device template.
Models
The model defines how your device interacts with your IoT Central application. Customize your model with more capabilities, add interfaces to inherit capabilities, or add new components that are based on other interfaces.
To create a device model, you can:
- Use IoT Central to create a custom model from scratch.
- Import a DTDL model from a JSON file. A device builder might use Visual Studio Code to author a device model for your application.
- Select one of the devices from the list of featured device templates. This option imports the device model that the manufacturer published for this device. A device model imported like this is automatically published.
To view the model ID, select the root interface in the model and select Edit identity:

To view the component ID, select Edit Identity on any of the component interfaces in the model.
To learn more, see the IoT Plug and Play modeling guide.
Interfaces and components
To view and manage the interfaces in your device model:
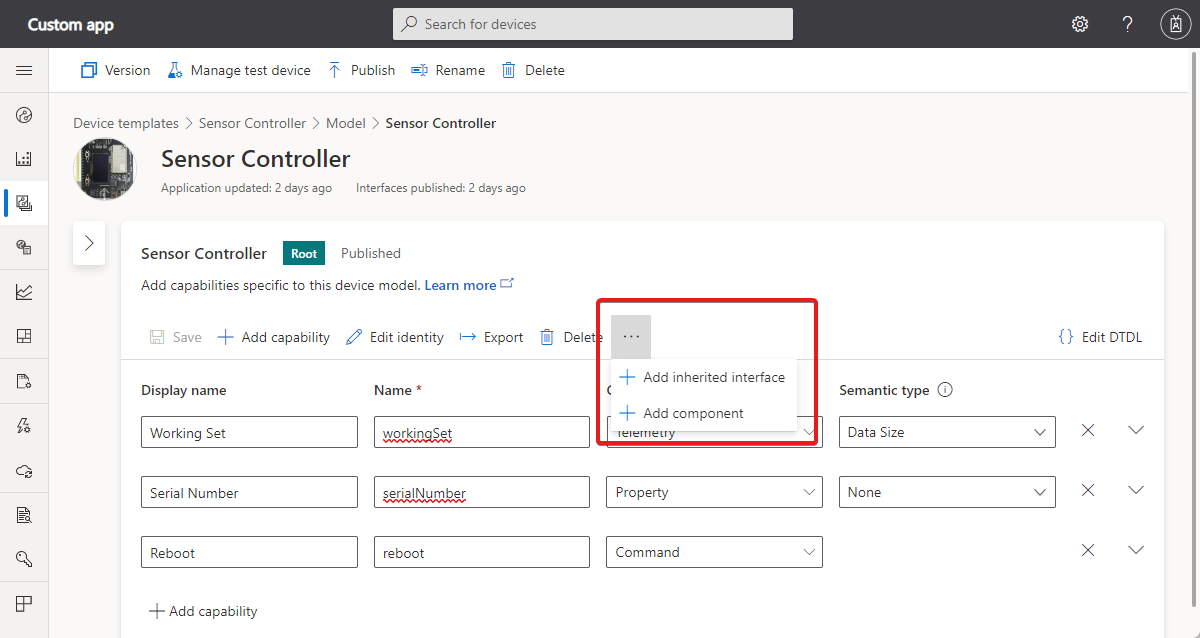
Go to Device Templates page and select the device template you created. The interfaces are listed in the Models section of the device template. The following screenshot shows an example of the Sensor Controller root interface in a device template:
Select the ellipsis to add an inherited interface or component to the root interface. To learn more about interfaces and component see multiple components in the modeling guide.
To export a model or interface select Export.
To view or edit the DTDL for an interface or a capability, select Edit DTDL.

Capabilities
Select + Add capability to add capability to an interface or component. For example, you can add Target Temperature capability to a SensorTemp component.

Telemetry
Telemetry is a stream of values sent from the device, typically from a sensor. For example, a sensor might report the ambient temperature as shown in the following screenshot:

The following table shows the configuration settings for a telemetry capability:
| Field | Description |
|---|---|
| Display Name | The display name for the telemetry value used on views and forms. |
| Name | The name of the field in the telemetry message. IoT Central generates a value for this field from the display name, but you can choose your own value if necessary. This field needs to be alphanumeric. |
| Capability Type | Telemetry. |
| Semantic Type | The semantic type of the telemetry, such as temperature, state, or event. The choice of semantic type determines which of the following fields are available. |
| Schema | The telemetry data type, such as double, string, or vector. The semantic type determines the available choices. Schema isn't available for the event and state semantic types. |
| Severity | Only available for the event semantic type. The severities are Error, Information, or Warning. |
| State Values | Only available for the state semantic type. Define the possible state values, each of which has display name, name, enumeration type, and value. |
| Unit | A unit for the telemetry value, such as mph, %, or °C. |
| Display Unit | A display unit for use on views and forms. |
| Comment | Any comments about the telemetry capability. |
| Description | A description of the telemetry capability. |
Properties
Properties represent point-in-time values. You can set writable properties from IoT Central. For example, a device can use a writable property to let an operator set the target temperature as shown in the following screenshot:

The following table shows the configuration settings for a property capability:
| Field | Description |
|---|---|
| Display Name | The display name for the property value used on views and forms. |
| Name | The name of the property. IoT Central generates a value for this field from the display name, but you can choose your own value if necessary. This field needs to be alphanumeric. |
| Capability Type | Property. |
| Semantic Type | The semantic type of the property, such as temperature, state, or event. The choice of semantic type determines which of the following fields are available. |
| Schema | The property data type, such as double, string, or vector. The semantic type determines the available choices. Schema isn't available for the event and state semantic types. |
| Writable | If the property isn't writable, the device can report property values to IoT Central. If the property is writable, the device can report property values to IoT Central, and IoT Central can send property updates to the device. |
| Severity | Only available for the event semantic type. The severities are Error, Information, or Warning. |
| State Values | Only available for the state semantic type. Define the possible state values, each of which has display name, name, enumeration type, and value. |
| Unit | A unit for the property value, such as mph, %, or °C. |
| Display Unit | A display unit for use on views and forms. |
| Comment | Any comments about the property capability. |
| Description | A description of the property capability. |
| Color | An IoT Central extension to DTDL. |
| Min value | Set minimum value - An IoT Central extension to DTDL. |
| Max value | Set maximum value - An IoT Central extension to DTDL. |
| Decimal places | An IoT Central extension to DTDL. |
Commands
You can call device commands from IoT Central. Commands optionally pass parameters to the device and receive a response from the device. For example, you can call a command to reboot a device in 10 seconds as shown in the following screenshot:

The following table shows the configuration settings for a command capability:
| Field | Description |
|---|---|
| Display Name | The display name for the command used on views and forms. |
| Name | The name of the command. IoT Central generates a value for this field from the display name, but you can choose your own value if necessary. This field needs to be alphanumeric. |
| Capability Type | Command. |
| Queue if offline | If enabled, you can call the command even if the device is offline. If not enabled, you can only call the command when the device is online. |
| Comment | Any comments about the command capability. |
| Description | A description of the command capability. |
| Request | If enabled, a definition of the request parameter, including: name, display name, schema, unit, and display unit. |
| Response | If enabled, a definition of the command response, including: name, display name, schema, unit, and display unit. |
| Initial value | The default parameter value. This parameter is an IoT Central extension to DTDL. |
To learn more about how devices implement commands, see Telemetry, property, and command payloads > Commands and long running commands.
Offline commands
You can choose queue commands if a device is currently offline by enabling the Queue if offline option for a command in the device template.
This option uses IoT Hub cloud-to-device messages to send notifications to devices. To learn more, see the IoT Hub article Send cloud-to-device messages.
Cloud-to-device messages:
- Are one-way notifications to the device from your solution.
- Guarantee at-least-once message delivery. IoT Hub persists cloud-to-device messages in per-device queues, guaranteeing resiliency against connectivity and device failures.
- Require the device to implement a message handler to process the cloud-to-device message.
Note
Offline commands are marked as durable if you export the model as DTDL.
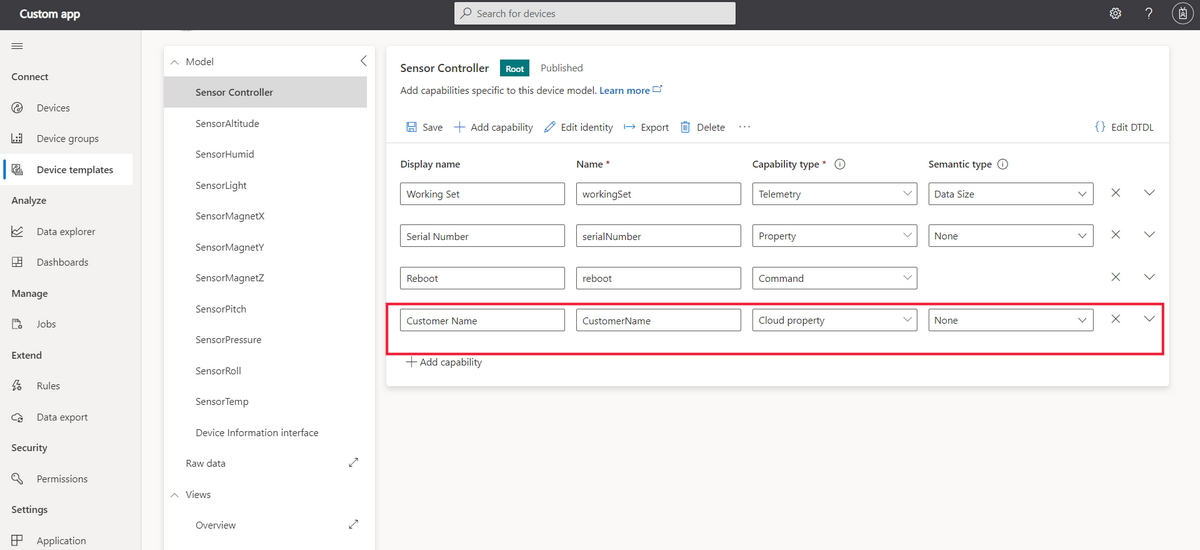
Cloud properties
Use cloud properties to store information about devices in IoT Central. Cloud properties are never sent to a device. For example, you can use cloud properties to store the name of the customer who installed the device, or the device's last service date.
Tip
You can only add cloud properties to the Root component in the model.
The following table shows the configuration settings for a cloud property:
| Field | Description |
|---|---|
| Display Name | The display name for the cloud property value used on views and forms. |
| Name | The name of the cloud property. IoT Central generates a value for this field from the display name, but you can choose your own value if necessary. |
| Semantic Type | The semantic type of the property, such as temperature, state, or event. The choice of semantic type determines which of the following fields are available. |
| Schema | The cloud property data type, such as double, string, or vector. The semantic type determines the available choices. |
Views
Views let you define views and forms that let an operator monitor and interact with a device. Views use visualizations such as charts to show telemetry and property values.
Generating default views is a quick way to visualize your important device information. The three default views are:
Default views
- Commands: A view with device commands, and allows your operator to dispatch them to your device.
- Overview: A view with device telemetry, displaying charts and metrics.
- About: A view with device information, displaying device properties.
After you select Generate default views, they're automatically added under the Views section of your device template.
Custom views
Add views to a device template to enable operators to visualize a device by using charts and metrics. You can add your own custom views to a device template.
To add a view to a device template:
- Go to your device template, and select Views.
- Select Visualizing the Device.
- Enter a name for your view in View name.
- Select Start with a visual under add tiles and choose the type of visual for your tile. Then either select Add tile or drag and drop the visual onto the canvas. To configure the tile, select the gear icon.


To test your view, select Configure preview device. This feature lets you see the view as an operator sees it after it publishes. Use this feature to validate that your views show the correct data. Choose from the following options:
- No preview device.
- The real test device you configured for your device template.
- An existing device in your application, by using the device ID.
Forms
Add forms to a device template to enable operators to manage a device by viewing and setting properties. Operators can only edit cloud properties and writable device properties. You can have multiple forms for a device template.
Select the Views node, and then select the Editing device and cloud data tile to add a new view.
Change the form name to Manage device.
Select the properties and cloud properties to add to the form. Then select Add section.
Select Save to save your new form.

Publish a device template
Before you can connect a device that implements your device model, you must publish your device template.
To publish a device template, go to your device template, and select Publish.
After you publish a device template, an operator can go to the Devices page, and add either real or simulated devices that use your device template. You can continue to modify and save your device template as you're making changes. When you want to push these changes out to the operator to view under the Devices page, you must select Publish each time.