Note
Access to this page requires authorization. You can try signing in or changing directories.
Access to this page requires authorization. You can try changing directories.
This how-to guide shows you how to use commands that are defined in a device template.
An operator can use the IoT Central UI to call a command on a device. Commands control the behavior of a device. For example, an operator might call a command to reboot a device or collect diagnostics data.
A device can:
- Respond to a command immediately.
- Respond to IoT Central when it receives the command and then later notify IoT Central when the long-running command is complete.
By default, commands expect a device to be connected and fail if the device can't be reached. If you select the Queue if offline option in the device template UI a command can be queued until a device comes online. These offline commands are described in a separate section later in this article.
To learn about the IoT Pug and Play command conventions, see IoT Plug and Play conventions.
To learn more about the command data that a device exchanges with IoT Central, see Telemetry, property, and command payloads.
To learn how to manage commands by using the IoT Central REST API, see How to use the IoT Central REST API to control devices.
To learn how to implement commands in a device without using the device SDKs, see Communicate with an IoT hub using the MQTT protocol.
Define your commands
Standard commands are sent to a device to instruct the device to do something. A command can include parameters with additional information. For example, a command to open a valve on a device could have a parameter that specifies how much to open the valve. Commands can also receive a return value when the device completes the command. For example, a command that asks a device to run some diagnostics could receive a diagnostics report as a return value.
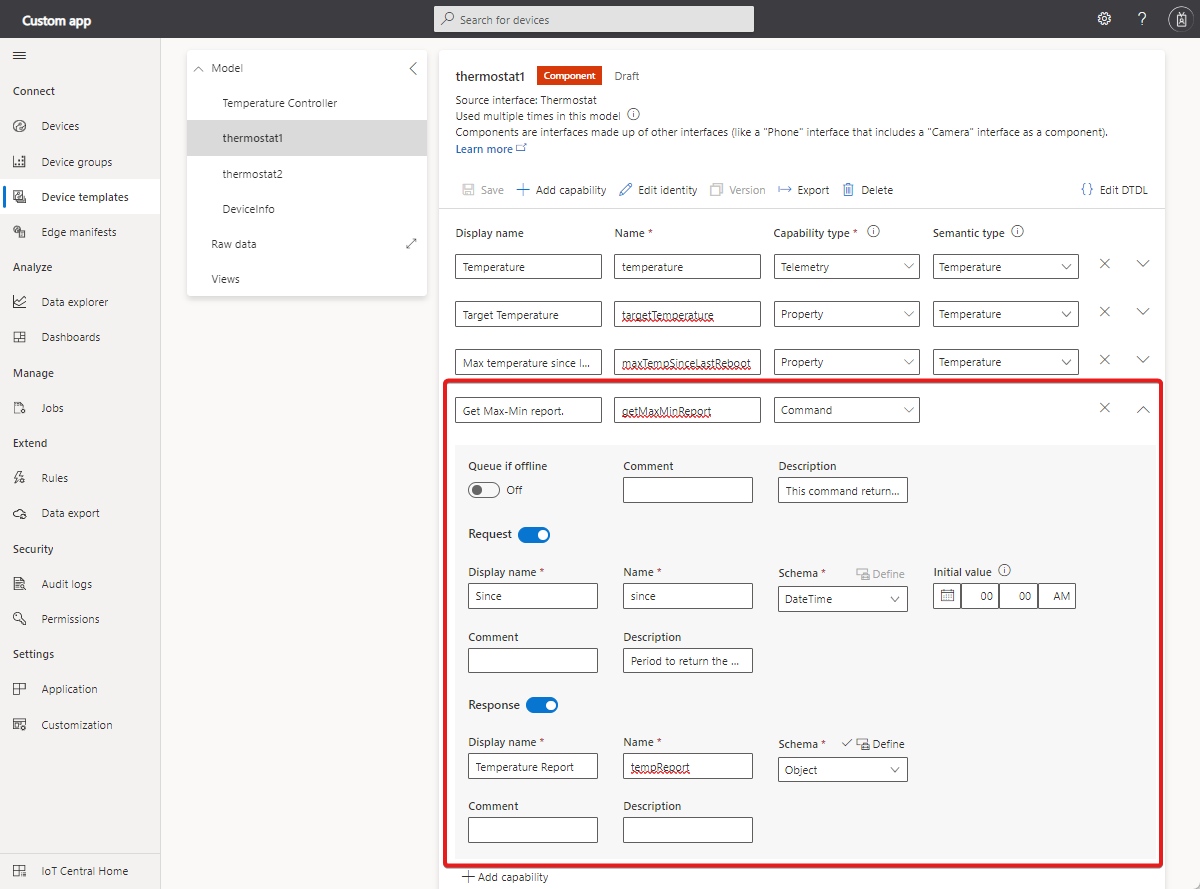
Commands are defined as part of a device template. The following screenshot shows the Get Max-Min report command definition in the Thermostat device template. This command has both request and response parameters:
The following table shows the configuration settings for a command capability:
| Field | Description |
|---|---|
| Display Name | The command value used on dashboard tiles and device forms. |
| Name | The name of the command. IoT Central generates a value for this field from the display name, but you can choose your own value if necessary. This field needs to be alphanumeric. The device code uses this Name value. |
| Capability Type | Command. |
| Queue if offline | Whether to make this command an offline command. |
| Description | A description of the command capability. |
| Comment | Any comments about the command capability. |
| Request | The payload for the device command. |
| Response | The payload of the device command response. |
To learn about the Digital Twin Definition Language (DTDL) that Azure IoT Central uses to define commands in a device template, see IoT Plug and Play conventions > Commands.
Optional fields, such as display name and description, let you add more details to the interface and capabilities.
Standard commands
To handle a standard command, a device sends a response value as soon as it receives the command from IoT Central. You can use the Azure IoT device SDK to handle standard commands invoked by your IoT Central application.
For example implementations in multiple languages, see Tutorial: Create and connect a client application to your Azure IoT Central application.
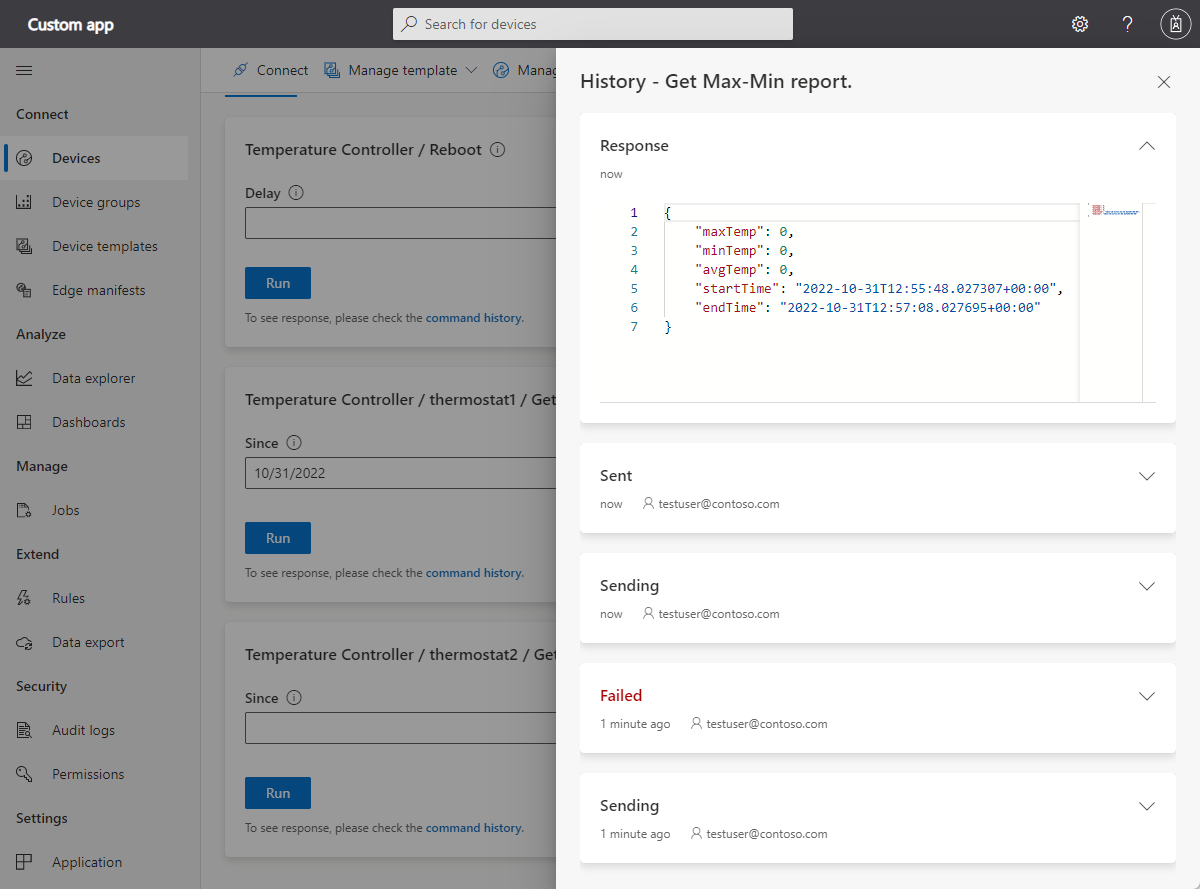
The following screenshot shows how the successful command response displays in the IoT Central UI:
Note
For standard commands, there's a timeout of 30 seconds. If a device doesn't respond within 30 seconds, IoT Central assumes that the command failed. This timeout period isn't configurable.
Long-running commands
In a long-running command, a device doesn't immediately complete the command. Instead, the device acknowledges receipt of the command and then later confirms that the command completed. This approach lets a device complete a long-running operation without keeping the connection to IoT Central open.
Note
Long-running commands aren't part of the IoT Plug and Play conventions. IoT Central has its own convention to implement long-running commands.
This section shows you how a device can delay sending a confirmation that the command completed.
The following code snippet shows how a device can implement a long-running command:
Note
This article uses Node.js for simplicity.
client.onDeviceMethod('rundiagnostics', commandHandler);

// ...

const commandHandler = async (request, response) => {
  switch (request.methodName) {
  case 'rundiagnostics': {
    console.log('Starting long-running diagnostics run ' + request.payload);
    await sendCommandResponse(request, response, 202, 'Diagnostics run started');

    // Long-running operation here
    // ...

    const patch = {
      rundiagnostics: {
        value: 'Diagnostics run complete at ' + new Date().toLocaleString()
      }
    };

    deviceTwin.properties.reported.update(patch, function (err) {
      if (err) throw err;
      console.log('Properties have been reported for component');
    });
    break;
  }
  default:
    await sendCommandResponse(request, response, 404, 'unknown method');
    break;
  }
};
The call to onDeviceMethod sets up the commandHandler method. This command handler:
- Checks the name of the command.
- Calls
sendCommandResponseto send the response back to IoT Central. This response includes the202response code to indicate pending results. - Completes the long-running operation.
- Uses a reported property with the same name as the command to tell IoT Central that the command completed.
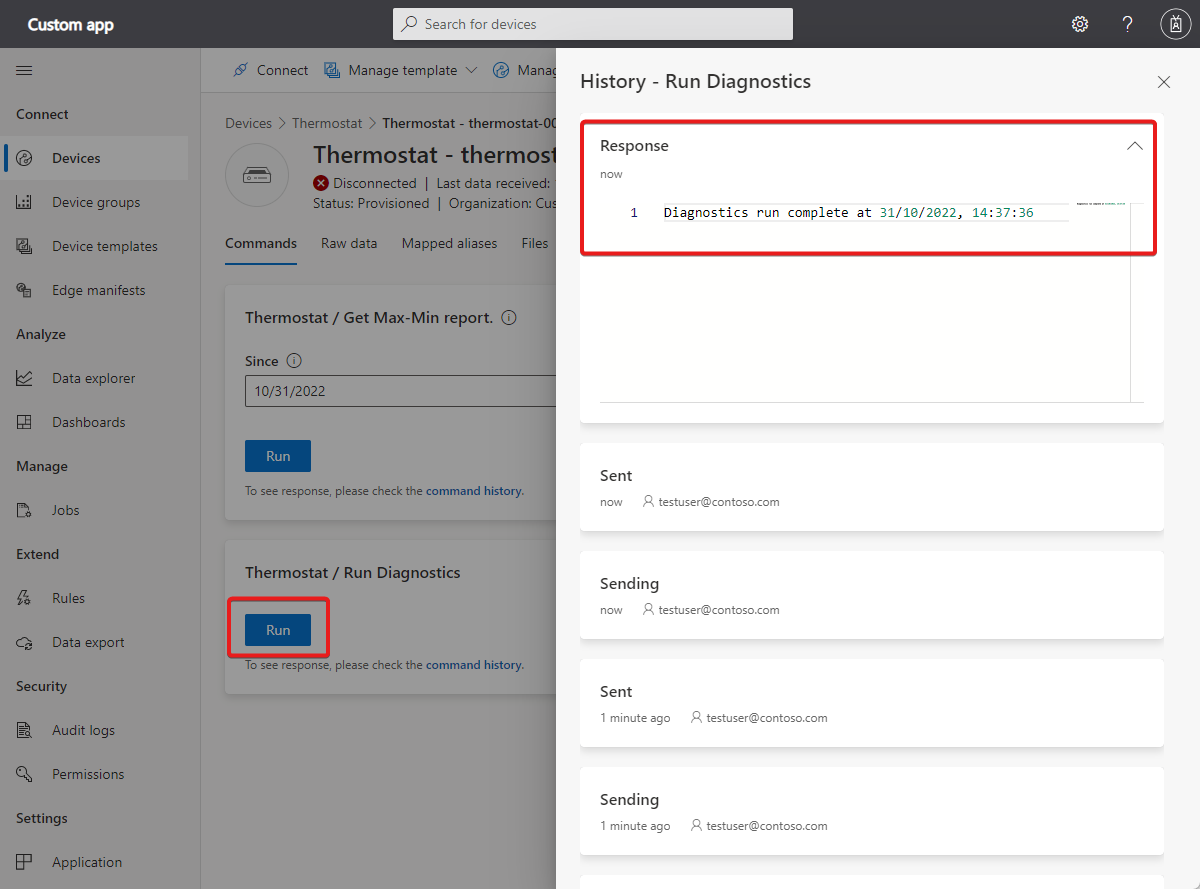
The following screenshot shows the IoT Central UI when it receives the property update that indicates the command is complete:
Offline commands
This section shows you how a device handles an offline command. If a device is online, it can handle the offline command as soon it's received. If a device is offline, it handles the offline command when it next connects to IoT Central. Devices can't send a return value in response to an offline command.
Note
Offline commands aren't part of the IoT Plug and Play conventions. IoT Central has its own convention to implement offline commands.
Note
This article uses Node.js for simplicity.
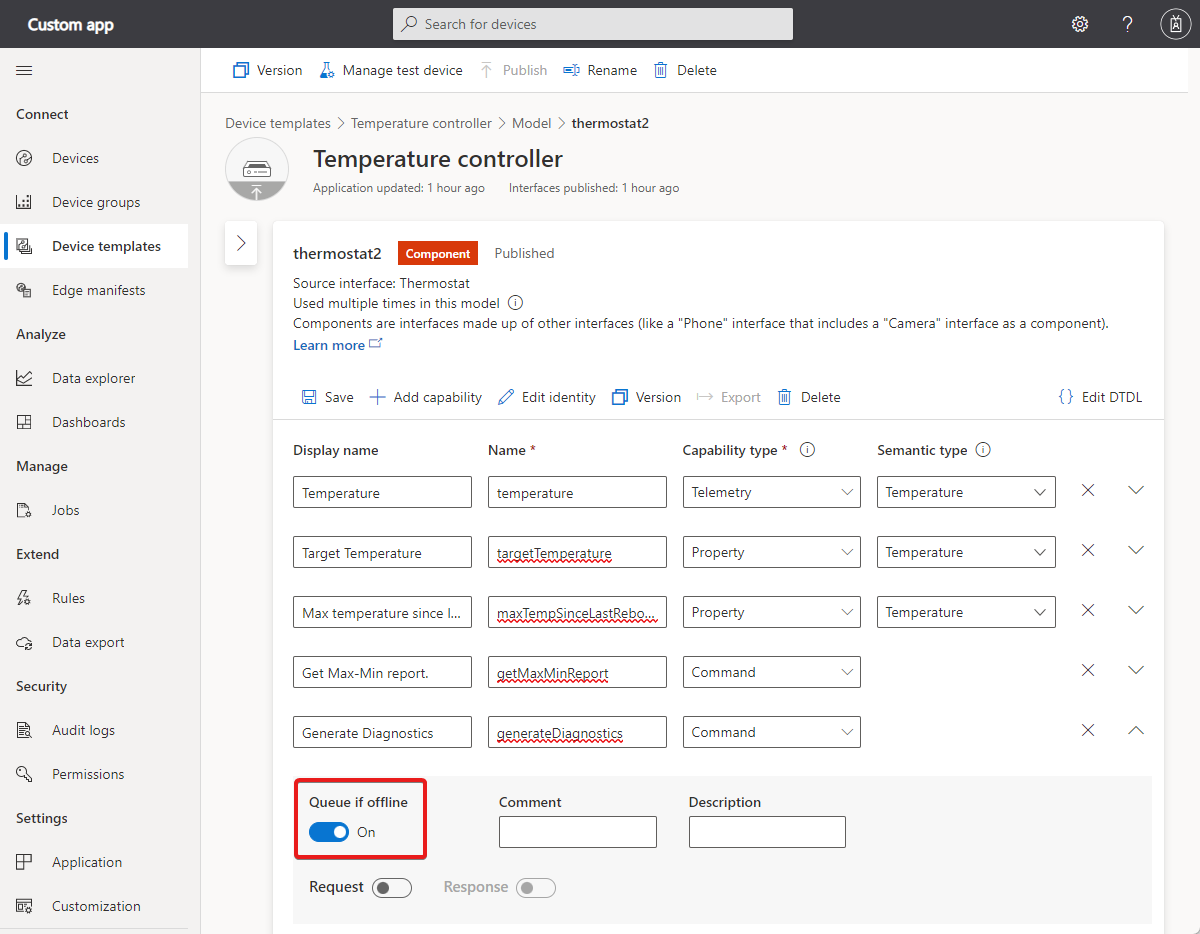
The following screenshot shows an offline command called GenerateDiagnostics. The request parameter is an object with datetime property called StartTime and an integer enumeration property called Bank:
The following code snippet shows how a client can listen for offline commands and display the message contents:
client.on('message', function (msg) {
  console.log('Body: ' + msg.data);
  console.log('Properties: ' + JSON.stringify(msg.properties));
  client.complete(msg, function (err) {
    if (err) {
      console.error('complete error: ' + err.toString());
    } else {
      console.log('complete sent');
    }
  });
});
The output from the previous code snippet shows the payload with the StartTime and Bank values. The property list includes the command name in the method-name list item:
Body: {"StartTime":"2021-01-06T06:00:00.000Z","Bank":2}
Properties: {"propertyList":[{"key":"iothub-ack","value":"none"},{"key":"method-name","value":"GenerateDiagnostics"}]}
Note
The default time-to-live for offline commands is 24 hours, after which the message expires.
Commands on unassigned devices
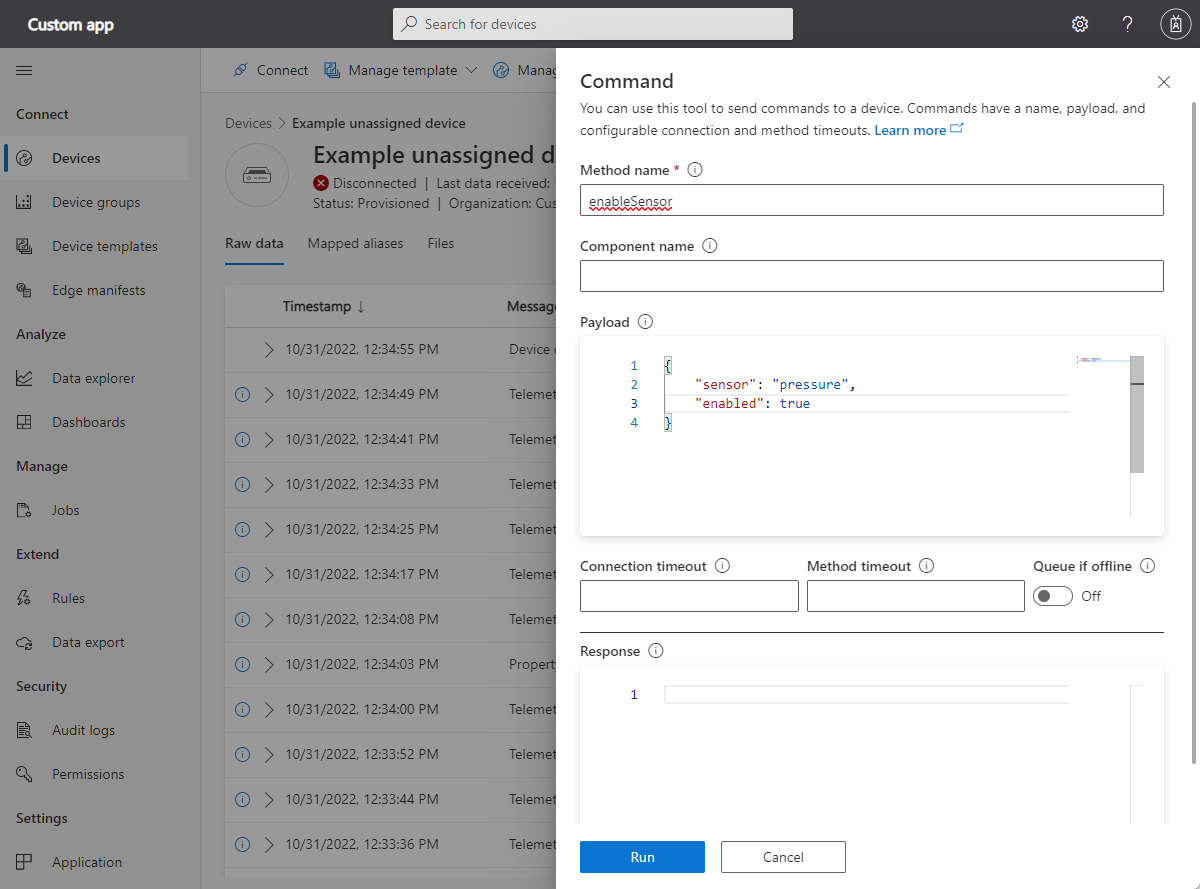
You can call commands on a device that isn't assigned to a device template. To call a command on an unassigned device navigate to the device in the Devices section, select Manage device and then Command. Enter the method name, payload, and any other required values. The following screenshot shows the UI you use to call a command:
Next steps
Now that you know how to use commands in your Azure IoT Central application, see Telemetry, property, and command payloads to learn more about command parameters and Create and connect a client application to your Azure IoT Central application to see complete code samples in different languages.
