Note
Access to this page requires authorization. You can try signing in or changing directories.
Access to this page requires authorization. You can try changing directories.

In this tutorial, you use Eclipse ThreadX to connect the STMicroelectronics B-L475E-IOT01A Discovery kit (from now on, the STM DevKit) to Azure IoT.
You complete the following tasks:
- Install a set of embedded development tools for programming the STM DevKit in C
- Build an image and flash it onto the STM DevKit
- Use Azure CLI to create and manage an Azure IoT hub that the STM DevKit securely connects to
- Use Azure IoT Explorer to register a device with your IoT hub, view device properties, view device telemetry, and call direct commands on the device
Prerequisites
A PC running Windows 10 or Windows 11
An active Azure subscription. If you don't have an Azure subscription, create a free account before you begin.
Git for cloning the repository
Azure CLI. You have two options for running Azure CLI commands in this tutorial:
- Use the Azure Cloud Shell, an interactive shell that runs CLI commands in your browser. This option is recommended because you don't need to install anything. If you're using Cloud Shell for the first time, sign in to the Azure portal. Follow the steps in Cloud Shell quickstart to Start Cloud Shell and Select the Bash environment.
- Optionally, run Azure CLI on your local machine. If Azure CLI is already installed, run
az upgradeto upgrade the CLI and extensions to the current version. To install Azure CLI, see Install Azure CLI.
Hardware
- The B-L475E-IOT01A (STM DevKit)
- Wi-Fi 2.4 GHz
- USB 2.0 A male to Micro USB male cable
Prepare the development environment
To set up your development environment, first you clone a GitHub repo that contains all the assets you need for the tutorial. Then you install a set of programming tools.
Clone the repo
Clone the following repo to download all sample device code, setup scripts, and offline versions of the documentation. If you previously cloned this repo in another tutorial, you don't need to do it again.
To clone the repo, run the following command:
git clone --recursive https://github.com/eclipse-threadx/getting-started.git
Install the tools
The cloned repo contains a setup script that installs and configures the required tools. If you installed these tools in another embedded device tutorial, you don't need to do it again.
Note
The setup script installs the following tools:
To install the tools:
Navigate to the following path in the repo and run the setup script named get-toolchain.bat:
getting-started\tools\get-toolchain.bat
Open a new console window to recognize the configuration changes made by the setup script. Use this console to complete the remaining programming tasks in the tutorial. You can use Windows CMD, PowerShell, or Git Bash for Windows.
Run the following code to confirm that CMake version 3.14 or later is installed.
cmake --version
Create the cloud components
Create an IoT hub
You can use Azure CLI to create an IoT hub that handles events and messaging for your device.
To create an IoT hub:
Launch your CLI app. To run the CLI commands in the rest of this quickstart, copy the command syntax, paste it into your CLI app, edit variable values, and press Enter.
- If you're using Cloud Shell, right-click the link for Cloud Shell, and select the option to open in a new tab.
- If you're using Azure CLI locally, start your CLI console app and sign in to Azure CLI.
Run az extension add to install or upgrade the azure-iot extension to the current version.
az extension add --upgrade --name azure-iotRun the az group create command to create a resource group. The following command creates a resource group named MyResourceGroup in the centralus region.
Note
You can optionally set an alternate
location. To see available locations, run az account list-locations.az group create --name MyResourceGroup --location centralusRun the az iot hub create command to create an IoT hub. It might take a few minutes to create an IoT hub.
YourIotHubName. Replace this placeholder in the code with the name you chose for your IoT hub. An IoT hub name must be globally unique in Azure. This placeholder is used in the rest of this quickstart to represent your unique IoT hub name.
The
--sku F1parameter creates the IoT hub in the Free tier. Free tier hubs have a limited feature set and are used for proof of concept applications. For more information on IoT Hub tiers, features, and pricing, see Azure IoT Hub pricing.az iot hub create --resource-group MyResourceGroup --name {YourIoTHubName} --sku F1 --partition-count 2After the IoT hub is created, view the JSON output in the console, and copy the
hostNamevalue to use in a later step. ThehostNamevalue looks like the following example:{Your IoT hub name}.azure-devices.net
Configure IoT Explorer
In the rest of this quickstart, you use IoT Explorer to register a device to your IoT hub, to view the device properties and telemetry, and to send commands to your device. In this section, you configure IoT Explorer to connect to the IoT hub you created, and to read plug and play models from the public model repository.
To add a connection to your IoT hub:
Install Azure IoT Explorer. This tool is a cross-platform utility to monitor and manage Azure IoT resources.
In your CLI app, run the az iot hub connection-string show command to get the connection string for your IoT hub.
az iot hub connection-string show --hub-name {YourIoTHubName}Copy the connection string without the surrounding quotation characters.
In Azure IoT Explorer, select IoT hubs on the left menu.
Select + Add connection.
Paste the connection string into the Connection string box.
Select Save.
If the connection succeeds, IoT Explorer switches to the Devices view.
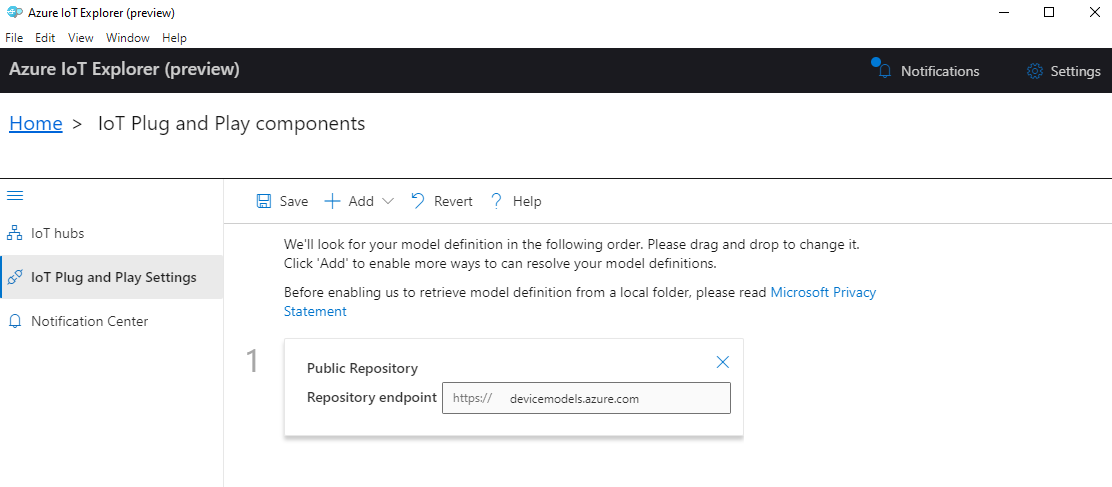
To add the public model repository:
In IoT Explorer, select Home to return to the home view.
On the left menu, select IoT Plug and Play Settings.
Confirm that there's an existing Public Repository entry with an endpoint of
https://devicemodels.azure.com.Note
If there's not an entry the public repository, select +Add, select Public repository from the drop-down menu, specify the
https://devicemodels.azure.comendpoint value, and then select Save.The completed entry for the public repository looks like the following screenshot:
Register a device
In this section, you create a new device instance and register it with the IoT hub you created. You use the connection information for the newly registered device to securely connect your physical device in a later section.
To register a device:
From the home view in IoT Explorer, select IoT hubs.
The connection you previously added should appear. Select View devices in this hub below the connection properties.
Select + New and enter a device ID for your device; for example,
mydevice. Leave all other properties the same.Select Create.
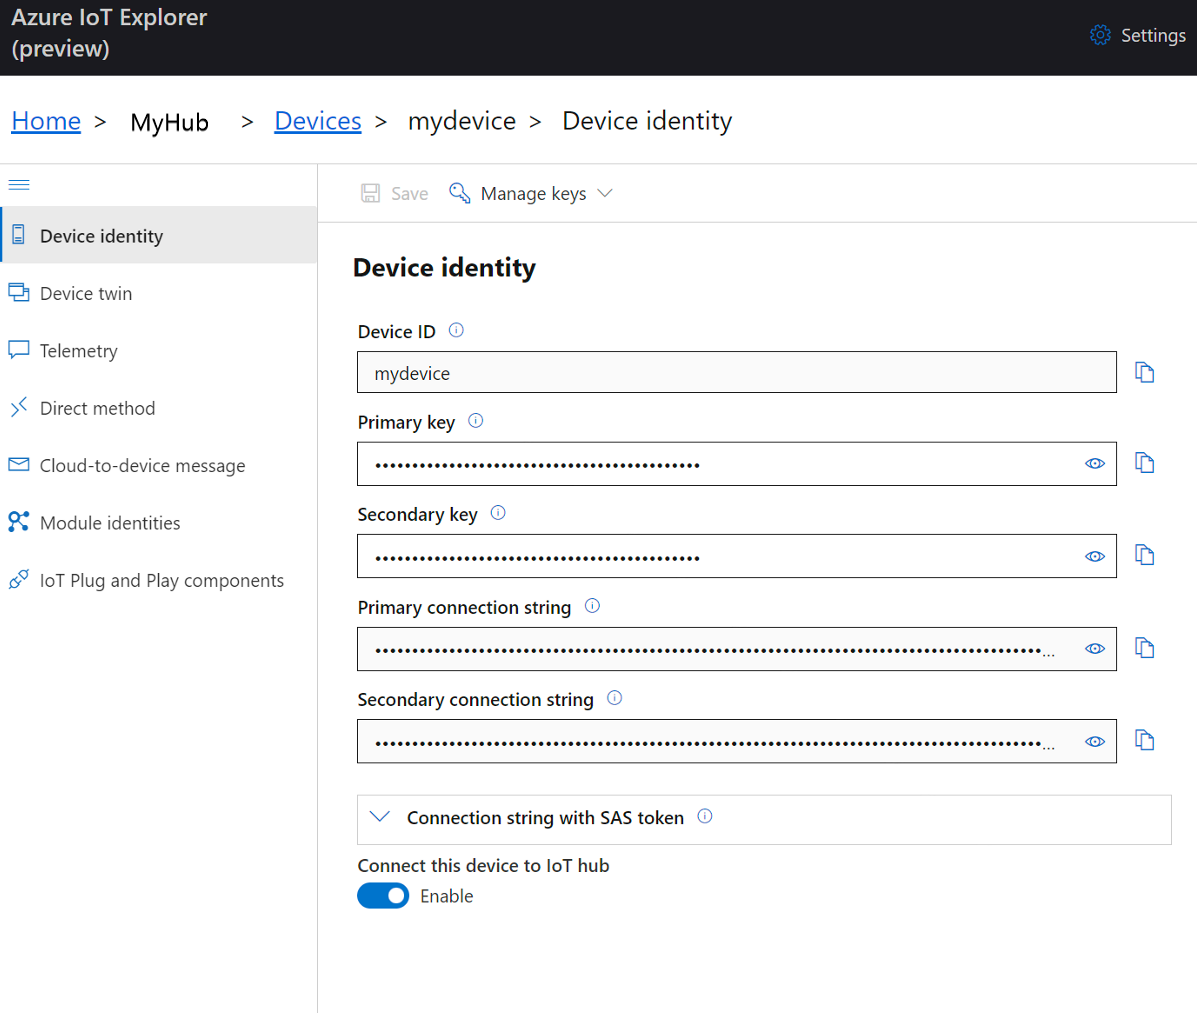
Use the copy buttons to copy the Device ID and Primary key fields.
Before continuing to the next section, save each of the following values retrieved from earlier steps, to a safe location. You use these values in the next section to configure your device.
hostNamedeviceIdprimaryKey
Prepare the device
To connect the STM DevKit to Azure, you modify a configuration file for Wi-Fi and Azure IoT settings, rebuild the image, and flash the image to the device.
Add configuration
Open the following file in a text editor:
getting-started\STMicroelectronics\B-L475E-IOT01A\app\azure_config.h
Comment out the following line near the top of the file as shown:
// #define ENABLE_DPSSet the Wi-Fi constants to the following values from your local environment.
Constant name Value WIFI_SSID{Your Wi-Fi SSID} WIFI_PASSWORD{Your Wi-Fi password} WIFI_MODE{One of the enumerated Wi-Fi mode values in the file} Set the Azure IoT device information constants to the values that you saved after you created Azure resources.
Constant name Value IOT_HUB_HOSTNAME{Your Iot hub hostName value} IOT_HUB_DEVICE_ID{Your Device ID value} IOT_DEVICE_SAS_KEY{Your Primary key value} Save and close the file.
Build the image
In your console or in File Explorer, run the batch file rebuild.bat at the following path to build the image:
getting-started\STMicroelectronics\B-L475E-IOT01A\tools\rebuild.bat
After the build completes, confirm that the binary file was created in the following path:
getting-started\STMicroelectronics\B-L475E-IOT01A\build\app\stm32l475_azure_iot.bin
Flash the image
On the STM DevKit MCU, locate the Reset button (1), the Micro USB port (2), which is labeled USB STLink, and the board part number (3). You'll refer to these items in the next steps. All of them are highlighted in the following picture:

Connect the Micro USB cable to the USB STLINK port on the STM DevKit, and then connect it to your computer.
Note
For detailed setup information about the STM DevKit, see the instructions on the packaging, or see B-L475E-IOT01A Resources
In File Explorer, find the binary files that you created in the previous section.
Copy the binary file named stm32l475_azure_iot.bin.
In File Explorer, find the STM Devkit connected to your computer. The device appears as a drive on your system with the drive label DIS_L4IOT.
Paste the binary file into the root folder of the STM Devkit. Flashing starts automatically and completes in a few seconds.
Note
During the flashing process, an LED toggles between red and green on the STM DevKit.
Confirm device connection details
You can use the Termite app to monitor communication and confirm that your device is set up correctly.
Start Termite.
Tip
If you are unable to connect Termite to your devkit, install the ST-LINK driver and try again. See Troubleshooting for additional steps.
Select Settings.
In the Serial port settings dialog, check the following settings and update if needed:
- Baud rate: 115,200
- Port: The port that your STM DevKit is connected to. If there are multiple port options in the dropdown, you can find the correct port to use. Open Windows Device Manager, and view Ports to identify which port to use.

Select OK.
Press the Reset button on the device. The button is black and is labeled on the device.
In the Termite app, check the following checkpoint values to confirm that the device is initialized and connected to Azure IoT.
Starting Azure thread


Initializing WiFi
    Module: ISM43362-M3G-L44-SPI
    MAC address: ****************
    Firmware revision: C3.5.2.5.STM
SUCCESS: WiFi initialized

Connecting WiFi
    Connecting to SSID 'iot'
    Attempt 1...
SUCCESS: WiFi connected

Initializing DHCP
    IP address: 192.168.0.35
    Mask: 255.255.255.0
    Gateway: 192.168.0.1
SUCCESS: DHCP initialized

Initializing DNS client
    DNS address 1: ************
    DNS address 2: ************
SUCCESS: DNS client initialized

Initializing SNTP time sync
    SNTP server 0.pool.ntp.org
    SNTP time update: Nov 18, 2022 0:56:56.127 UTC
SUCCESS: SNTP initialized

Initializing Azure IoT Hub client
    Hub hostname: *******.azure-devices.net
    Device id: mydevice
    Model id: dtmi:eclipsethreadx:devkit:gsgstml4s5;2
SUCCESS: Connected to IoT Hub
Important
If the DNS client initialization fails and notifies you that the Wi-Fi firmware is out of date, you'll need to update the Wi-Fi module firmware. Download and install the Inventek ISM 43362 Wi-Fi module firmware update from STMicroelectronics. Then press the Reset button on the device to recheck your connection, and continue with this tutorial.
Keep Termite open to monitor device output in the following steps.
View device properties
You can use Azure IoT Explorer to view and manage the properties of your devices. In the following sections, you use the Plug and Play capabilities that are visible in IoT Explorer to manage and interact with the STM DevKit. These capabilities rely on the device model published for the STM DevKit in the public model repository. You configured IoT Explorer to search this repository for device models earlier in this tutorial. In many cases, you can perform the same action without using plug and play by selecting IoT Explorer menu options. However, using plug and play often provides an enhanced experience. IoT Explorer can read the device model specified by a plug and play device and present information specific to that device.
To access IoT Plug and Play components for the device in IoT Explorer:
From the home view in IoT Explorer, select IoT hubs, then select View devices in this hub.
Select your device.
Select IoT Plug and Play components.
Select Default component. IoT Explorer displays the IoT Plug and Play components that are implemented on your device.

On the Interface tab, view the JSON content in the device model Description. The JSON contains configuration details for each of the IoT Plug and Play components in the device model.
Note
The name and description for the default component refer to the STM L4S5 board. The STM L4S5 plug and play device model is also used for the STM L475E board in this tutorial.
Each tab in IoT Explorer corresponds to one of the IoT Plug and Play components in the device model.
Tab Type Name Description Interface Interface STM Getting Started GuideExample model for the STM DevKit Properties (read-only) Property ledStateWhether the led is on or off Properties (writable) Property telemetryIntervalThe interval that the device sends telemetry Commands Command setLedStateTurn the LED on or off
To view device properties using Azure IoT Explorer:
Select the Properties (read-only) tab. There's a single read-only property to indicate whether the led is on or off.
Select the Properties (writable) tab. It displays the interval that telemetry is sent.
Change the
telemetryIntervalto 5, and then select Update desired value. Your device now uses this interval to send telemetry.
IoT Explorer responds with a notification. You can also observe the update in Termite.
Set the telemetry interval back to 10.
To use Azure CLI to view device properties:
Run the az iot hub device-twin show command.
az iot hub device-twin show --device-id mydevice --hub-name {YourIoTHubName}Inspect the properties for your device in the console output.
View telemetry
With Azure IoT Explorer, you can view the flow of telemetry from your device to the cloud. Optionally, you can do the same task using Azure CLI.
To view telemetry in Azure IoT Explorer:
From the IoT Plug and Play components (Default Component) pane for your device in IoT Explorer, select the Telemetry tab. Confirm that Use built-in event hub is set to Yes.
Select Start.
View the telemetry as the device sends messages to the cloud.

Note
You can also monitor telemetry from the device by using the Termite app.
Select the Show modeled events checkbox to view the events in the data format specified by the device model.

Select Stop to end receiving events.
To use Azure CLI to view device telemetry:
Run the az iot hub monitor-events command. Use the names that you created previously in Azure IoT for your device and IoT hub.
az iot hub monitor-events --device-id mydevice --hub-name {YourIoTHubName}View the JSON output in the console.
{
    "event": {
        "origin": "mydevice",
        "module": "",
        "interface": "dtmi:eclipsethreadx:devkit:gsgmxchip;1",
        "component": "",
        "payload": "{\"humidity\":41.21,\"temperature\":31.37,\"pressure\":1005.18}"
    }
}
Select CTRL+C to end monitoring.
Call a direct method on the device
You can also use Azure IoT Explorer to call a direct method that you implemented on your device. Direct methods have a name, and can optionally have a JSON payload, configurable connection, and method timeout. In this section, you call a method that turns an LED on or off. Optionally, you can do the same task using Azure CLI.
To call a method in Azure IoT Explorer:
From the IoT Plug and Play components (Default Component) pane for your device in IoT Explorer, select the Commands tab.
For the setLedState command, set the state to true.
Select Send command. You should see a notification in IoT Explorer, and the green LED light on the device should turn on.

Set the state to false, and then select Send command. The LED should turn off.
Optionally, you can view the output in Termite to monitor the status of the methods.
To use Azure CLI to call a method:
Run the az iot hub invoke-device-method command, and specify the method name and payload. For this method, setting
method-payloadtotrueturns on the LED, and setting it tofalseturns it off.az iot hub invoke-device-method --device-id mydevice --method-name setLedState --method-payload true --hub-name {YourIoTHubName}The CLI console shows the status of your method call on the device, where
204indicates success.{ "payload": {}, "status": 200 }Check your device to confirm the LED state.
View the Termite terminal to confirm the output messages:
Received command: setLedState
    Payload: true
    LED is turned ON
Sending property: $iothub/twin/PATCH/properties/reported/?$rid=15{"ledState":true}
Troubleshoot and debug
If you experience issues building the device code, flashing the device, or connecting, see Troubleshooting.
For debugging the application, see Debugging with Visual Studio Code.
Clean up resources
If you no longer need the Azure resources created in this quickstart, you can use the Azure CLI to delete the resource group and all of its resources.
Important
Deleting a resource group is irreversible. The resource group and all the resources contained in it are permanently deleted. Make sure that you do not accidentally delete the wrong resource group or resources.
To delete a resource group by name:
Run the az group delete command. This command removes the resource group, the IoT Hub, and the device registration you created.
az group delete --name MyResourceGroupRun the az group list command to confirm the resource group is deleted.
az group list
Next step
In this tutorial, you built a custom image that contains Eclipse ThreadX sample code, and then flashed the image to the STM DevKit device. You connected the STM DevKit to Azure, and carried out tasks such as viewing telemetry and calling a method on the device.
As a next step, explore the following article to learn more about embedded development options.
Important
Eclipse ThreadX provides OEMs with components to secure communication and to create code and data isolation using underlying MCU/MPU hardware protection mechanisms. However, each OEM is ultimately responsible for ensuring that their device meets evolving security requirements.