Note
Access to this page requires authorization. You can try signing in or changing directories.
Access to this page requires authorization. You can try changing directories.
Azure IoT Hub Device Provisioning Service (DPS) can provision devices across one or more IoT hubs. Before DPS can provision devices to an IoT hub, it must be able to write to the IoT hub device registry. This article provides instruction on how to link IoT hubs and manage them in your DPS instance. Once linked, an IoT hub can be used in an allocation policy. Allocation policies determine how devices are assigned to IoT hubs by DPS.
Linked IoT hub settings
The Device Provisioning Service can only provision devices to IoT hubs that have been linked to it. Linking an IoT hub to a DPS instance gives the DPS instance read/write permissions to the IoT hub's device registry. With these permissions, DPS can register a device ID and set the initial configuration in the device twin. Linked IoT hubs may be in any Azure region. You may link hubs in other subscriptions to your DPS instance.
After an IoT hub is linked to DPS, it's eligible to participate in allocation. Whether and how it participates in allocation depends on settings in the enrollment that a device provisions through and settings on the linked IoT hub itself.
The following settings control how DPS uses linked IoT hubs:
Connection string: Sets the IoT Hub connection string that DPS uses to connect to the linked IoT hub. The connection string is based on one of the IoT hub's shared access policies. DPS needs the following permissions on the IoT hub: RegistryWrite and ServiceConnect. The connection string must be for a shared access policy that has these permissions. To learn more about IoT Hub shared access policies, see IoT Hub access control and permissions.
Allocation weight: Determines the likelihood of an IoT hub being selected when DPS hashes device assignment across a set of IoT hubs. The value can be between one and 1000. The default is one (or null). Higher values increase the IoT hub's probability of being selected.
Apply allocation policy: Sets whether the IoT hub participates in allocation policy. The default is Yes (true). If set to No (false), devices aren't assigned to the IoT hub. The IoT hub can still be selected on an enrollment, but it won't participate in allocation. You can use this setting to temporarily or permanently remove an IoT hub from participating in allocation; for example, if it's approaching the allowed number of devices.
To learn about DPS allocation policies and how linked IoT hubs participate in them, see Manage allocation policies.
Limitations
There are some limitations when working with linked IoT hubs and private endpoints. For more information, see Private endpoint limitations.
The linked IoT Hub must have Connect using shared access policies set to Allow.
Add a linked IoT hub
You can add IoT hubs that are inside or outside of your subscription. When you link an IoT hub, it might or might not be available for allocations in existing enrollments:
For enrollments that don't explicitly set the IoT hubs to apply allocation policy to, a newly linked IoT hub immediately begins participating in allocation.
For enrollments that do explicitly set the IoT hubs to apply allocation policy to, you'll need to manually or programmatically add the new IoT hub to the enrollment settings for it to participate in allocation.
In the Azure portal, you can link an IoT hub either from the left menu of your DPS instance or from the enrollment when creating or updating an enrollment. In both cases, the IoT hub is scoped to the DPS instance (not just the enrollment).
To link an IoT hub to your DPS instance in the Azure portal:
On the left menu of your DPS instance, select Linked IoT hubs.
At the top of the page, select + Add.
On the Add link to IoT hub page, select the subscription that contains the IoT hub and then choose the name of the IoT hub from the IoT hub list.
After you select the IoT hub, choose an access policy that DPS will use to connect to the IoT hub. The Access Policy list shows all shared access policies defined on the selected IoT Hub that have both RegistryWrite and ServiceConnect permissions defined. The default is the iothubowner policy. Select the policy you want to use.
Select Save.
Note
In the Azure portal, you can't set the Allocation weight and Apply allocation policy settings when you add a linked IoT hub. Instead, update these settings after the IoT hub is linked.
DPS also supports linking IoT Hubs using the Create or Update DPS resource REST API, Resource Manager templates, and the DPS Management SDKs.
Update a linked IoT hub
You can update the settings on a linked IoT hub to change its allocation weight, whether it can have allocation policies applied to it, and the connection string that DPS uses to connect to it. When you update the settings for an IoT hub, the changes take effect immediately, whether the IoT hub is specified on an enrollment or used by default.
In the Azure portal, you can update the Allocation weight and Apply allocation policy settings.
To update the settings for a linked IoT hub using the Azure portal:
On the left menu of your DPS instance, select Linked IoT hubs, then select the IoT hub from the list.
On the Linked IoT hub details page:
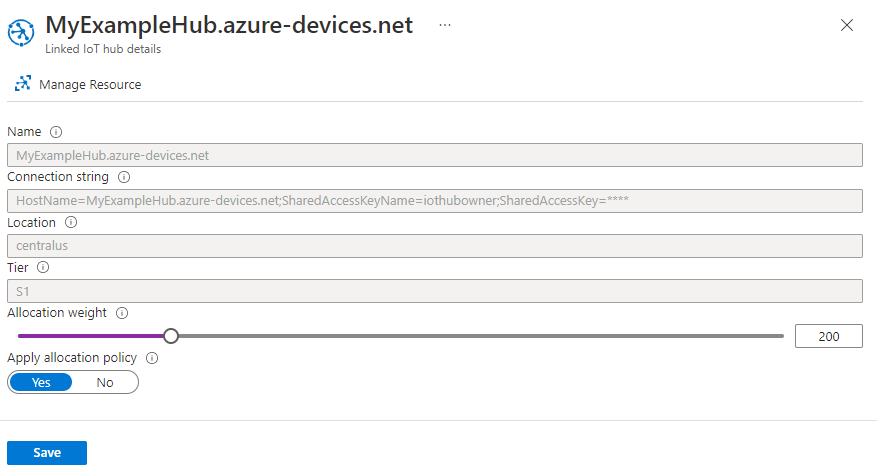
Use the Allocation weight slider or text box to choose a weight between one and 1000. The default is one.
Set the Apply allocation policy switch to specify whether the linked IoT hub should be included in allocation.
Save your settings.
Note
You can't update the connection string that DPS uses to connect to the IoT hub from the Azure portal. Instead, use the Azure CLI to update the connection string, or delete the linked IoT hub from your DPS instance and relink it. To learn more, see the Update keys for linked IoT hubs section.
DPS also supports updating linked IoT Hubs using the Create or Update DPS resource REST API, Resource Manager templates, and the DPS Management SDKs.
Delete a linked IoT hub
When you delete a linked IoT hub from your DPS instance, it will no longer be available to set in future enrollments. However, it might or might not be removed from allocations in existing enrollments:
For enrollments that don't explicitly set the IoT hubs to apply allocation policy to, a deleted linked IoT hub is no longer available for allocation.
For enrollments that do explicitly set the IoT hubs to apply allocation policy to, you'll need to manually or programmatically remove the IoT hub from the enrollment settings for it to be removed from participation in allocation. Failure to do so might result in an error when a device tries to provision through the enrollment.
To delete a linked IoT hub from your DPS instance in the Azure portal:
On the left menu of your DPS instance, select Linked IoT hubs.
From the list of IoT hubs, select the check box next to the IoT hub or IoT hubs you want to delete. Then select Delete at the top of the page and confirm your choice when prompted.
DPS also supports deleting linked IoT Hubs from the DPS instance using the Create or Update DPS resource REST API, Resource Manager templates, and the DPS Management SDKs.
Update keys for linked IoT hubs
It may become necessary to either rotate or update the symmetric keys for an IoT hub that's been linked to DPS. In this case, you'll also need to update the connection string setting in DPS for the linked IoT hub.
Provisioning to an IoT hub will fail during the interim between updating a key on the IoT hub and updating your DPS instance with the new connections string based on that key. For this reason, we recommend using the Azure CLI to update your keys because you can update the connection string on the linked hub directly. With the Azure portal, you have to delete the IoT hub from your DPS instance and then relink it in order to update the connection string.
You can't update the connection string setting for a linked IoT Hub when using Azure portal. Instead, you need to delete the linked IoT hub from your DPS instance and then readd it.
To update symmetric keys for a linked IoT hub in the Azure portal:
On the left menu of your DPS instance in the Azure portal, select the IoT hub that you want to update one or more keys for.
On the Linked IoT hub details page, note down the values for Allocation weight and Apply allocation policy. You need these values when you relink the IoT hub to your DPS instance later. Then, select Manage Resource to go to the IoT hub.
On the left menu of the IoT hub, under Security settings, select Shared access policies.
On Shared access policies, under Manage shared access policies, select the policy that your DPS instance uses to connect to the linked IoT hub.
At the top of the page, select Regenerate primary key, Regenerate secondary key, or Swap keys, and confirm your choice when prompted.
Navigate back to your DPS instance.
Follow the steps in the Delete a linked IoT hub section to delete the IoT hub from your DPS instance.
Follow the steps in the Add a linked IoT hub section to relink the IoT hub to your DPS instance with the new connection string for the policy.
If you need to restore the allocation weight and apply allocation policy settings, follow the steps in the Update a linked IoT hub section using the values you saved in step 2.
Next steps
- To learn more about allocation policies, see Manage allocation policies.