Note
Access to this page requires authorization. You can try signing in or changing directories.
Access to this page requires authorization. You can try changing directories.
Use automation tools like GitHub Actions to manage your IoT device lifecycle. This tutorial demonstrates a GitHub Actions workflow that connects a device to an IoT hub using Azure Device Provisioning Service (DPS).
In this tutorial, you learn how to:
- Save authentication credentials as repository secrets.
- Create a workflow to provision IoT Hub and Device Provisioning Service resources.
- Run the workflow and monitor a simulated device as it connects to IoT Hub.
Prerequisites
An Azure subscription
If you don't have an Azure subscription, create a free account before you begin.
The Azure CLI
Use the Bash environment in Azure Cloud Shell.

Or, if you prefer to run CLI reference commands locally, install the Azure CLI. If you're running on Windows or macOS, consider running Azure CLI in a Docker container.
If you're using a local installation, sign in to the Azure CLI by using the az login command.
Run az version to find the version and dependent libraries that are installed. To upgrade to the latest version, run az upgrade.
A GitHub account with either a repository that you own or a repository where you have admin access. For more information, see Get started with GitHub.
1 - Create repository secrets
The workflow that you define in the next section requires access to your Azure subscription to create and manage resources. You don't want to put that information in an unprotected file where it could be discovered, so instead we use repository secrets to store this information but still make it accessible as an environment variable in the workflow. For more information, see Using secrets in GitHub Actions.
Only repository owners and admins can manage repository secrets.
Create a service principal
Rather than providing your personal access credentials, we create a service principal and then add those credentials as repository secrets. Use the Azure CLI to create a new service principal. For more information, see Create an Azure service principal with Azure CLI.
Use the az ad sp create-for-rbac command to create a service principal with contributor access to a specific resource group. Replace
<SUBSCRIPTION_ID>and<RESOURCE_GROUP_NAME>with your own information.This command requires owner or user access administrator roles in the subscription.
az ad sp create-for-rbac --name github-actions-sp --role contributor --scopes /subscriptions/<SUBSCRIPTION_ID>/resourceGroups/<RESOURCE_GROUP_NAME>Copy the following items from the output of the service principal creation command to use in the next section:
- The clientId.
- The clientSecret. This value is a generated password for the service principal that you aren't able to access again.
- The tenantId.
Use the az role assignment create command to assign two more access roles to the service principal: Device Provisioning Service Data Contributor and IoT Hub Data Contributor. Replace
<SP_CLIENT_ID>with the clientId value that you copied from the previous command's output.az role assignment create --assignee "<SP_CLIENT_ID>" --role "Device Provisioning Service Data Contributor" --resource-group "<RESOURCE_GROUP_NAME>"az role assignment create --assignee "<SP_CLIENT_ID>" --role "IoT Hub Data Contributor" --resource-group "<RESOURCE_GROUP_NAME>"
Save service principal credentials as secrets
On GitHub.com, navigate to the Settings for your repository.
Select Secrets from the navigation menu, then select Actions.
Select New repository secret.
Create a secret for your service principal ID.
- Name:
APP_ID - Secret: Paste the clientId that you copied from the output of the service principal creation command.
- Name:
Select Add secret, then select New repository secret to add a second secret.
Create a secret for your service principal password.
- Name:
SECRET - Secret: Paste the clientSecret that you copied from the output of the service principal creation command.
- Name:
Select Add secret, then select New repository secret to add the final secret.
Create a secret for your Azure tenant.
- Name:
TENANT - Secret: Paste the tenantId that you copied from the output of the service principal creation command.
- Name:
Select Add secret.
2 - Create a workflow
A GitHub Actions workflow defines the tasks that run once an event triggers the workflow. A workflow contains one or more jobs that can run in parallel or sequentially. For more information, see Understanding GitHub Actions.
For this tutorial, we create one workflow that contains jobs for each of the following tasks:
- Provision an IoT Hub instance and a DPS instance.
- Link the IoT Hub and DPS instances to each other.
- Create an individual enrollment on the DPS instance, and register a device to the IoT hub using symmetric key authentication via the DPS enrollment.
- Simulate the device for five minutes and monitor the IoT hub events.
Workflows are YAML files that are located in the .github/workflows/ directory of a repository.
In your GitHub repository, navigate to the Actions tab.
In the Actions pane, select New workflow.
On the Choose a workflow page, you can choose prebuilt templates to use. We're going to create out own workflow for this tutorial, so select Set up a workflow yourself.
GitHub creates a new workflow file for you. Notice that it's in the
.github/workflows/directory. Give the new file a meaningful name, likedps-tutorial.yml.Add the name parameter to give your workflow a name.
name: DPS TutorialAdd the on.workflow_dispatch parameter. The
onparameter defines when a workflow runs. Theworkflow_dispatchparameter indicates that we want to manually trigger the workflow. With this parameter, we could defineinputsthat would be passed to the workflow at each run, but we don't useinputsfor this tutorial.on: workflow_dispatchDefine the environment variables for the resources you're creating in the workflow. These variables are available to all the jobs in the workflow. You can also define environment variables for individual jobs, or for individual steps within jobs.
Replace the placeholder values with your own values. Make sure that you specify the same resource group that the service principal has access to.
env:
  HUB_NAME: <Globally unique IoT hub name>
  DPS_NAME: <Desired Device Provisioning Service name>
  DEVICE_NAME: <Desired device name>
  RESOURCE_GROUP: <Solution resource group where resources will be created>
Define environment variables for the secrets that you created in the previous section.
  SP_USER: ${{ secrets.APP_ID }}
  SP_SECRET: ${{ secrets.SECRET }}
  SP_TENANT: ${{ secrets.TENANT }}
Add the jobs parameter to the workflow file.
jobs:Define the first job for our workflow, which we call the
provisionjob. This job provisions the IoT Hub and DPS instances:provision: runs-on: ubuntu-latest steps: - name: Provision Infra run: | az --version az login --service-principal -u "$SP_USER" -p "$SP_SECRET" --tenant "$SP_TENANT" az iot hub create -n "$HUB_NAME" -g "$RESOURCE_GROUP" az iot dps create -n "$DPS_NAME" -g "$RESOURCE_GROUP"For more information about the commands run in this job, see:
Define a job to
configurethe DPS and IoT Hub instances. Notice that this job uses the needs parameter, which means that theconfigurejob doesn't run until the listed job completes its own run successfully.configure: runs-on: ubuntu-latest needs: provision steps: - name: Configure Infra run: | az login --service-principal -u "$SP_USER" -p "$SP_SECRET" --tenant "$SP_TENANT" az iot dps linked-hub create --dps-name "$DPS_NAME" --hub-name "$HUB_NAME"For more information about the commands run in this job, see:
Define a job called
registerthat creates an individual enrollment and then use that enrollment to register a device to IoT Hub.register: runs-on: ubuntu-latest needs: configure steps: - name: Create enrollment run: | az login --service-principal -u "$SP_USER" -p "$SP_SECRET" --tenant "$SP_TENANT" az extension add --name azure-iot az iot dps enrollment create -n "$DPS_NAME" --eid "$DEVICE_NAME" --attestation-type symmetrickey --auth-type login - name: Register device run: | az iot device registration create -n "$DPS_NAME" --rid "$DEVICE_NAME" --auth-type loginNote
This job and others use the parameter
--auth-type loginin some commands to indicate that the operation should use the service principal from the current Microsoft Entra session. The alternative,--auth-type keydoesn't require the service principal configuration, but is less secure.For more information about the commands run in this job, see:
Define a job to
simulatean IoT device that connects to the IoT hub and sends sample telemetry messages.simulate: runs-on: ubuntu-latest needs: register steps: - name: Simulate device run: | az login --service-principal -u "$SP_USER" -p "$SP_SECRET" --tenant "$SP_TENANT" az extension add --name azure-iot az iot device simulate -n "$HUB_NAME" -d "$DEVICE_NAME"For more information about the commands run in this job, see:
Define a job to
monitorthe IoT hub endpoint for events, and watch messages coming in from the simulated device. Notice that the simulate and monitor jobs both define the register job in theirneedsparameter. This configuration means that once the register job completes successfully, both these jobs run in parallel.monitor: runs-on: ubuntu-latest needs: register steps: - name: Monitor d2c telemetry run: | az login --service-principal -u "$SP_USER" -p "$SP_SECRET" --tenant "$SP_TENANT" az extension add --name azure-iot az iot hub monitor-events -n "$HUB_NAME" -yFor more information about the commands run in this job, see:
The complete workflow file should look like this example, with your information replacing the placeholder values in the environment variables:
name: DPS Tutorial

on: workflow_dispatch

env:
  HUB_NAME: <Globally unique IoT hub name>
  DPS_NAME: <Desired Device Provisioning Service name>
  DEVICE_NAME: <Desired device name>
  RESOURCE_GROUP: <Solution resource group where resources will be created>
  SP_USER: ${{ secrets.APP_ID }}
  SP_SECRET: ${{ secrets.SECRET }}
  SP_TENANT: ${{ secrets.TENANT }}

jobs:
  provision:
    runs-on: ubuntu-latest
    steps:
      - name: Provision Infra
        run: |
          az --version
          az login --service-principal -u "$SP_USER" -p "$SP_SECRET" --tenant "$SP_TENANT"
          az iot hub create -n "$HUB_NAME" -g "$RESOURCE_GROUP"
          az iot dps create -n "$DPS_NAME" -g "$RESOURCE_GROUP"
  configure:
    runs-on: ubuntu-latest
    needs: provision
    steps:
      - name: Configure Infra
        run: |
          az login --service-principal -u "$SP_USER" -p "$SP_SECRET" --tenant "$SP_TENANT"
          az iot dps linked-hub create --dps-name "$DPS_NAME" --hub-name "$HUB_NAME"
  register:
    runs-on: ubuntu-latest
    needs: configure
    steps:
      - name: Create enrollment
        run: |
          az login --service-principal -u "$SP_USER" -p "$SP_SECRET" --tenant "$SP_TENANT"
          az extension add --name azure-iot
          az iot dps enrollment create -n "$DPS_NAME" --eid "$DEVICE_NAME" --attestation-type symmetrickey --auth-type login
      - name: Register device
        run: |
          az iot device registration create -n "$DPS_NAME" --rid "$DEVICE_NAME" --auth-type login
  simulate:
    runs-on: ubuntu-latest
    needs: register
    steps:
      - name: Simulate device
        run: |
          az login --service-principal -u "$SP_USER" -p "$SP_SECRET" --tenant "$SP_TENANT"
          az extension add --name azure-iot
          az iot device simulate -n "$HUB_NAME" -d "$DEVICE_NAME"
  monitor:
    runs-on: ubuntu-latest
    needs: register
    steps:
      - name: Monitor d2c telemetry
        run: |
          az login --service-principal -u "$SP_USER" -p "$SP_SECRET" --tenant "$SP_TENANT"
          az extension add --name azure-iot
          az iot hub monitor-events -n "$HUB_NAME" -y
Save, commit, and push this new file to your GitHub repository.
3 - Run the workflow
Navigate to the Actions tab of your GitHub repository.
In the Actions pane, select DPS Tutorial, which is the name that we defined in the workflow file, then select the Run workflow drop-down box.
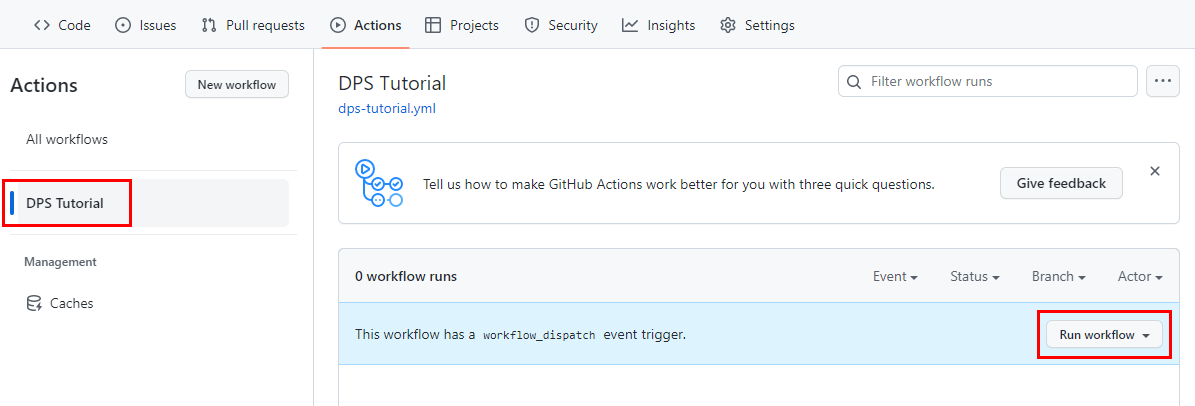
Change the branch if you created your workflow in a branch other than main, then select Run workflow.
A new workflow run appears in progress. Select the name to view details of the run.
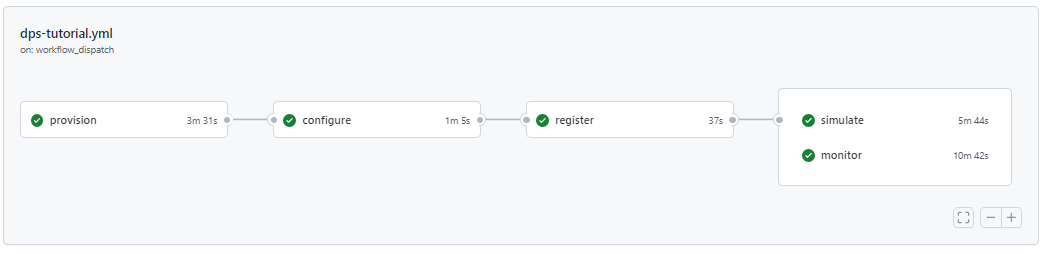
In the workflow summary, you can watch as each job begins and completes. Select any job name to view its details. The simulated device job runs for five minutes and sends telemetry to IoT Hub. During this time, select the simulate job to watch messages being sent from the device, and the monitor job to watch those messages being received by IoT Hub.
When all the jobs complete successfully, you should see green checkmarks by each one.
Clean up resources
If you're not going to continue to use these resources created in this tutorial, delete them with the following steps.
Use the Azure CLI:
List the resources in your resource group.
az resource list --resource-group <RESOURCE_GROUP_NAME>To delete individual resources, use the resource ID.
az resource delete --resource-group <RESOURCE_GROUP_NAME> --ids <RESOURCE_ID>If you want to delete the whole resource group and all resources within it, run the following command:
az group delete --resource-group <RESOURCE_GROUP_NAME>
Use the Azure portal:
- In the Azure portal, navigate to the resource group where you created the new resources.
- You can either delete the entire resource group or select the individual resources that you want to remove, then select Delete.
Next steps
Learn how to provision DPS instances with other automation tools.