Note
Access to this page requires authorization. You can try signing in or changing directories.
Access to this page requires authorization. You can try changing directories.
Applies to: ![]() IoT Edge 1.5
IoT Edge 1.5
Important
IoT Edge 1.5 LTS is the supported release. IoT Edge 1.4 LTS is end of life as of November 12, 2024. If you are on an earlier release, see Update IoT Edge.
The Azure IoT Edge for Linux on Windows (EFLOW) virtual machine is isolated from the Windows host OS, and the virtual machine can't access the host file system. By default, the EFLOW virtual machine has its own file system and can't access folders or files on the host computer. The EFLOW file and folder sharing mechanism lets you share Windows files and folders with the CBL-Mariner Linux EFLOW VM.
This article shows you how to share a folder between the Windows host OS and the EFLOW virtual machine.
Prerequisites
- Azure IoT Edge for Linux on Windows 1.4.4 LTS update or higher. For more information about EFLOW release notes, see EFLOW Releases.
- A machine with an x64 or x86 processor.
- Windows 10 or 11 (21H2) or higher with the November 2022 update applied.
If you don't have an EFLOW device ready, create one before you continue with this guide. Follow the steps in Create and provision an IoT Edge for Linux on Windows device using symmetric keys to install, deploy, and provision EFLOW.
How it works
Azure IoT Edge for Linux on Windows uses virtiofs technology for file and folder sharing. Virtiofs is a shared file system that lets virtual machines use a directory tree on the host OS. Unlike other approaches, it's designed for local file system semantics and performance. Virtiofs isn't a network file system repurposed for virtualization. It uses the locality of virtual machines and the hypervisor to avoid the overhead of network file systems.
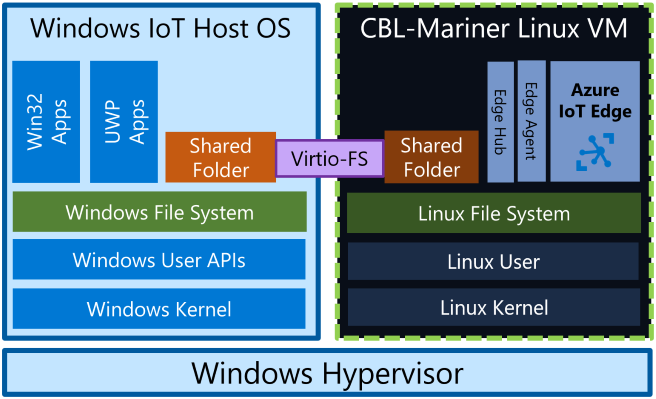
You can only share Windows folders to the EFLOW Linux VM, not the other way. For security, when you set up folder sharing, you need to provide a root folder, and all shared folders must be under that root folder.
Before you add or remove shared folders, review these four concepts:
- Root folder: The Windows folder that is the root path for subfolders you share with the EFLOW VM. The root folder itself isn't shared. Only subfolders under the root folder are shared.
- Shared folder: A Windows folder under the root folder that you share with the EFLOW VM. All content in this folder is shared with the EFLOW VM.
- Mounting point: The path inside the EFLOW VM where the Windows folder content appears.
- Mounting option: Read-only or read and write access. This setting controls file access for the mounted folder inside the EFLOW VM.
Add shared folders
These steps show example EFLOW PowerShell commands to share one or more Windows host OS folders with the EFLOW virtual machine.
Note
If you're using Windows 10, reboot your Windows host OS after a fresh MSI installation or update before adding the Windows shared folders to the EFLOW VM.
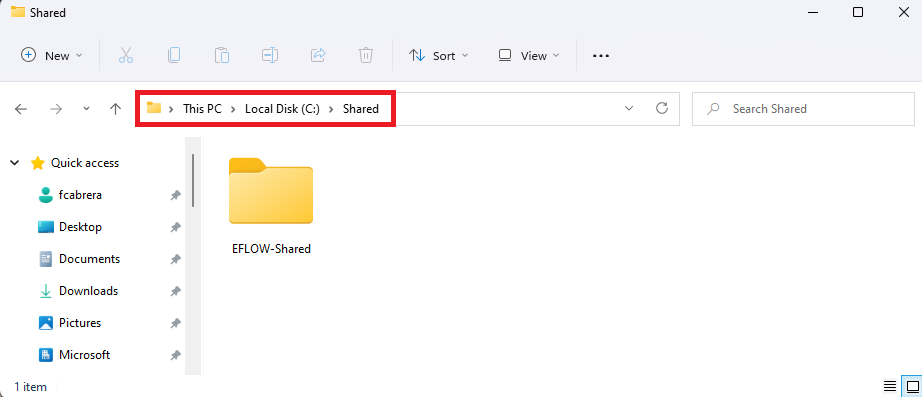
Create a new root shared folder. Go to File Explorer, choose a location for the root folder, and create the folder.
For example, create a root folder named EFLOW-Shared under C:\Shared.
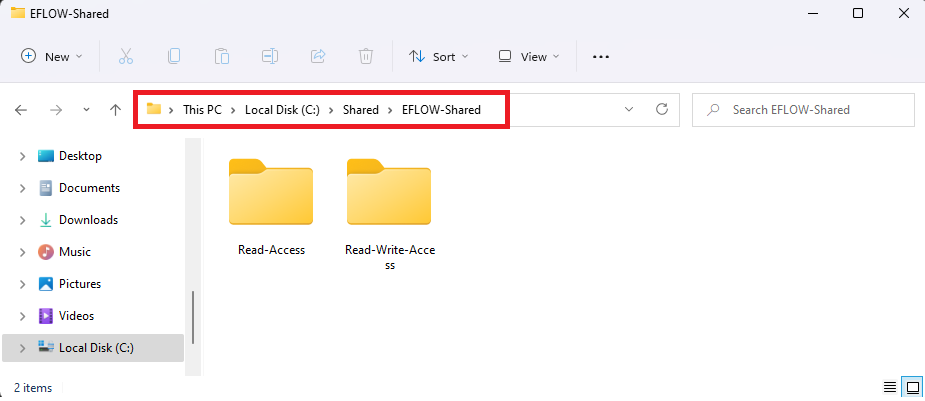
Create one or more shared folders under the root folder to share with the EFLOW virtual machine.
For example, create two folders: one named Read-Access and one named Read-Write-Access.
Within the Read-Access shared folder, create a sample file that we'll later read inside the EFLOW virtual machine.
For example, use a text editor to create a file named Hello-World.txt in the Read-Access folder and save some text in the file.
Use a text editor to create the shared folder configuration file. This file has information about the folders to share with the EFLOW VM, including the mount points and options. For more information about the JSON configuration file, see PowerShell functions for IoT Edge for Linux on Windows.
For example, in this scenario, share the two shared folders you created under the root folder.
- The Read-Access shared folder is mounted in the EFLOW virtual machine under the path /tmp/host-read-access with read-only access.
- The Read-Write-Access shared folder is mounted in the EFLOW virtual machine under the path /tmp/host-read-write-access with read and write access.
Create a JSON configuration file named sharedFolders.json in the root folder EFLOW-Shared with the following contents:
[
    {
        "sharedFolderRoot": "C:\\Shared\\EFLOW-Shared",
        "sharedFolders": [
            {
                "hostFolderPath": "Read-Access",
                "readOnly": true,
                "targetFolderOnGuest": "/tmp/host-read-access"
            },
            {
                "hostFolderPath": "Read-Write-Access",
                "readOnly": false,
                "targetFolderOnGuest": "/tmp/host-read-write-access"
            }
        ]
    }
]
Open an elevated PowerShell session by selecting Run as Administrator.
Create the shared folder assignment by using the configuration file (sharedFolders.json) you created earlier.
Add-EflowVmSharedFolder -sharedFoldersJsonPath "C:\Shared\EFLOW-Shared\sharedFolders.json"After the cmdlet finishes, the EFLOW virtual machine can access the shared folders. Connect to the EFLOW virtual machine and check that the folders are shared correctly.
Go to the Read-Access shared folder (mounted under /tmp/host-read-access) and check the contents of the Hello-World.txt file.
Note
By default, all shared folders are owned by root. To access the folder, sign in as root using
sudo suor change the folder ownership to iotedge-user using thechowncommand.sudo su cd /tmp/host-read-access cat Hello-World.txt
If everything was successful, you see the contents of the Hello-World.txt file in the EFLOW virtual machine. To verify write access, create a file in /tmp/host-read-write-access and then check the contents of the new file in the Read-Write-Access Windows host folder.
Check shared folders
The following steps provide example EFLOW PowerShell commands to check the Windows shared folders and options (access permissions and mounting point) with the EFLOW virtual machine.
Open an elevated PowerShell session by starting with Run as Administrator.
List the information of the Windows shared folders under the root folder. For example, using the scenario in the previous section, we can list the information of both Read-Access and Read-Write-Access shared folders.
Get-EflowVmSharedFolder -sharedfolderRoot "C:\Shared\EFLOW-Shared" -hostFolderPath @("Read-Access", "Read-Write-Access")
For more information about the Get-EflowVmSharedFolder cmdlet, see PowerShell functions for IoT Edge for Linux on Windows.
Remove shared folders
The following steps provide example EFLOW PowerShell commands to stop sharing a Windows shared folder with the EFLOW virtual machine.
Open an elevated PowerShell session by starting with Run as Administrator.
Stop sharing the folder named Read-Access under the Root folder with the EFLOW virtual machine.
Remove-EflowVmSharedFolder -sharedfolderRoot "C:\Shared\EFLOW-Shared" -hostFolderPath "Read-Access"
For more information about the Remove-EflowVmSharedFolder cmdlet, see PowerShell functions for IoT Edge for Linux on Windows.
Next steps
Follow the steps in Common issues and resolutions for Azure IoT Edge for Linux on Windows to troubleshoot issues you encounter when setting up IoT Edge for Linux on Windows.