Note
Access to this page requires authorization. You can try signing in or changing directories.
Access to this page requires authorization. You can try changing directories.
X.509 certificates are digital documents that represent a user, computer, service, or device. A certificate authority (CA), subordinate CA, or registration authority issues X.509 certificates. The certificates contain the public key of the certificate subject. They don't contain the subject's private key, which must be stored securely. RFC 5280 documents public key certificates, including their fields and extensions. Public key certificates are digitally signed and typically contain the following information:
- Information about the certificate subject
- The public key that corresponds to the subject's private key
- Information about the issuing CA
- The supported encryption and/or digital signing algorithms
- Information to determine the revocation and validity status of the certificate
Certificate fields
There are three incremental versions of the X.509 certificate standard, and each subsequent version added certificate fields to the standard:
- Version 1 (v1), published in 1988, follows the initial X.509 standard for certificates.
- Version 2 (v2), published in 1993, adds two fields to the fields included in Version 1.
- Version 3 (v3), published in 2008, represents the current version of the X.509 standard. This version adds support for certificate extensions.
This section is meant as a general reference for the certificate fields and certificate extensions available in X.509 certificates. For more information about certificate fields and certificate extensions, including data types, constraints, and other details, see the RFC 5280 specification.
Version 1 fields
The following table describes Version 1 certificate fields for X.509 certificates. All of the fields included in this table are available in subsequent X.509 certificate versions.
| Name | Description |
|---|---|
| Version | An integer that identifies the version number of the certificate. |
| Serial Number | An integer that represents the unique number for each certificate issued by a certificate authority (CA). |
| Signature | The identifier for the cryptographic algorithm used by the CA to sign the certificate. The value includes both the identifier of the algorithm and any optional parameters used by that algorithm, if applicable. |
| Issuer | The distinguished name (DN) of the certificate's issuing CA. |
| Validity | The inclusive time period for which the certificate is valid. |
| Subject | The distinguished name (DN) of the certificate subject. |
| Subject Public Key Info | The public key owned by the certificate subject. |
Version 2 fields
The following table describes the fields added for Version 2, containing information about the certificate issuer. These fields are, however, rarely used. All of the fields included in this table are available in subsequent X.509 certificate versions.
| Name | Description |
|---|---|
| Issuer Unique ID | A unique identifier that represents the issuing CA, as defined by the issuing CA. |
| Subject Unique ID | A unique identifier that represents the certificate subject, as defined by the issuing CA. |
Version 3 fields
The following table describes the field added for Version 3, representing a collection of X.509 certificate extensions.
| Name | Description |
|---|---|
| Extensions | A collection of standard and Internet-specific certificate extensions. For more information about the certificate extensions available to X.509 v3 certificates, see Certificate extensions. |
Certificate extensions
Certificate extensions, introduced with Version 3, provide methods for associating more attributes with users or public keys and for managing relationships between certificate authorities. For more information about certificate extensions, see the Certificate Extensions section of the RFC 5280 specification.
Standard extensions
The X.509 standard defines the extensions included in this section, for use in the Internet public key infrastructure (PKI).
| Name | Description |
|---|---|
| Authority Key Identifier | An identifier that represents either the certificate subject and the serial number of the CA certificate that issued this certificate, or a hash of the public key of the issuing CA. |
| Subject Key Identifier | A hash of the current certificate's public key. |
| Key Usage | A bitmapped value that defines the services for which a certificate can be used. |
| Private Key Usage Period | The validity period for the private key portion of a key pair. |
| Certificate Policies | A collection of policy information, used to validate the certificate subject. |
| Policy Mappings | A collection of policy mappings, each of which maps a policy in one organization to policy in another organization. |
| Subject Alternative Name | A collection of alternate names for the subject. |
| Issuer Alternative Name | A collection of alternate names for the issuing CA. |
| Subject Directory Attributes | A collection of attributes from an X.500 or LDAP directory. |
| Basic Constraints | A collection of constraints that allow the certificate to designate whether it's issued to a CA, or to a user, computer, device, or service. This extension also includes a path length constraint that limits the number of subordinate CAs that can exist. |
| Name Constraints | A collection of constraints that designate which namespaces are allowed in a CA-issued certificate. |
| Policy Constraints | A collection of constraints that can be used to prohibit policy mappings between CAs. |
| Extended Key Usage | A collection of key purpose values that indicate how a certificate's public key can be used, beyond the purposes identified in the Key Usage extension. |
| CRL Distribution Points | A collection of URLs where the base certificate revocation list (CRL) is published. |
| Inhibit anyPolicy | Inhibits the use of the All Issuance Policies OID (2.5.29.32.0) in subordinate CA certificates |
| Freshest CRL | This extension, also known as the Delta CRL Distribution Point, contains one or more URLs where the issuing CA's delta CRL is published. |
Private Internet extensions
The extensions included in this section are similar to standard extensions, and may be used to direct applications to online information about the issuing CA or certificate subject.
| Name | Description |
|---|---|
| Authority Information Access | A collection of entries that describe the format and location of additional information provided by the issuing CA. |
| Subject Information Access | A collection of entries that describe the format and location of additional information provided by the certificate subject. |
Certificate formats
Certificates can be saved in various formats. Azure IoT Hub authentication typically uses the Privacy-Enhanced Mail (PEM) and Personal Information Exchange (PFX) formats. The following table describes commonly used files and formats used to represent certificates.
| Format | Description |
|---|---|
| Binary certificate | A raw form binary certificate using Distinguished Encoding Rules (DER) ASN.1 encoding. |
| ASCII PEM format | A PEM certificate (.pem) file contains a Base64-encoded certificate beginning with -----BEGIN CERTIFICATE----- and ending with -----END CERTIFICATE-----. One of the most common formats for X.509 certificates, PEM format is required by IoT Hub when uploading certain certificates, such as device certificates. |
| ASCII PEM key | Contains a Base64-encoded DER key, optionally with more metadata about the algorithm used for password protection. |
| PKCS #7 certificate | A format designed for the transport of signed or encrypted data. It can include the entire certificate chain. RFC 2315 defines this format. |
| PKCS #8 key | The format for a private key store. RFC 5208 defines this format. |
| PKCS #12 key and certificate | A complex format that can store and protect a key and the entire certificate chain. It's commonly used with a .p12 or .pfx extension. PKCS #12 is synonymous with the PFX format. RFC 7292 defines this format. |
Self-signed certificates
You can authenticate a device to your IoT hub for testing purposes by using two self-signed certificates. This type of authentication is sometimes called thumbprint authentication because the certificates are identified by calculated hash values called fingerprints or thumbprints. These calculated hash values are used by IoT Hub to authenticate your devices.
Important
We recommend that you use certificates signed by an issuing Certificate Authority (CA), even for testing purposes. Never use self-signed certificates in production.
Create a self-signed certificate
You can use OpenSSL to create self-signed certificates. The following steps show you how to run OpenSSL commands in a bash shell to create a self-signed certificate and retrieve a certificate fingerprint that can be used for authenticating your device in IoT Hub.
Note
If you want to use self-signed certificates for testing, you must create two certificates for each device.
Run the following command to generate a private key and create a PEM-encoded private key (.key) file, replacing the following placeholders with their corresponding values. The private key generated by the following command uses the RSA algorithm with 2048-bit encryption.
{KeyFile}. The name of your private key file.
openssl genpkey -out {KeyFile} -algorithm RSA -pkeyopt rsa_keygen_bits:2048Run the following command to generate a PKCS #10 certificate signing request (CSR) and create a CSR (.csr) file, replacing the following placeholders with their corresponding values. Make sure that you specify the device ID of the IoT device for your self-signed certificate when prompted.
{KeyFile}. The name of your private key file.
{CsrFile}. The name of your CSR file.
{DeviceID}. The name of your IoT device.
openssl req -new -key {KeyFile} -out {CsrFile}

Country Name (2 letter code) [XX]:.
State or Province Name (full name) []:.
Locality Name (eg, city) [Default City]:.
Organization Name (eg, company) [Default Company Ltd]:.
Organizational Unit Name (eg, section) []:.
Common Name (eg, your name or your server hostname) []:{DeviceID}
Email Address []:.

Please enter the following 'extra' attributes
to be sent with your certificate request
A challenge password []:.
An optional company name []:.
Run the following command to examine and verify your CSR, replacing the following placeholders with their corresponding values.
{CsrFile}. The name of your certificate file.
openssl req -text -in {CsrFile} -verify -nooutRun the following command to generate a self-signed certificate and create a PEM-encoded certificate (.crt) file, replacing the following placeholders with their corresponding values. The command converts and signs your CSR with your private key, generating a self-signed certificate that expires in 365 days.
{KeyFile}. The name of your private key file.
{CsrFile}. The name of your CSR file.
{CrtFile}. The name of your certificate file.
openssl x509 -req -days 365 -in {CsrFile} -signkey {KeyFile} -out {CrtFile}Run the following command to retrieve the fingerprint of the certificate, replacing the following placeholders with their corresponding values. The fingerprint of a certificate is a calculated hash value that is unique to that certificate. You need the fingerprint to configure your IoT device in IoT Hub for testing.
{CrtFile}. The name of your certificate file.
openssl x509 -in {CrtFile} -noout -fingerprint
Verify certificate manually after upload
When you upload your root certificate authority (CA) certificate or subordinate CA certificate to your IoT hub, you can choose to automatically verify the certificate. If you didn't choose to automatically verify your certificate during upload, your certificate is shown with its status set to Unverified. You must perform the following steps to manually verify your certificate.
Select the certificate to view the Certificate Details dialog.
Select Generate Verification Code in the dialog.
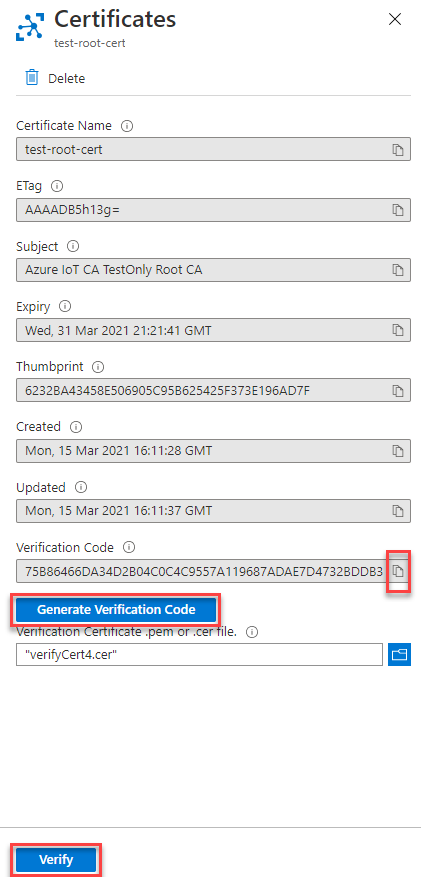
Copy the verification code to the clipboard. You must use this verification code as the certificate subject in subsequent steps. For example, if the verification code is
75B86466DA34D2B04C0C4C9557A119687ADAE7D4732BDDB3, add that as the subject of your certificate as shown in the next step.There are three ways to generate a verification certificate:
If you're using the PowerShell script supplied by Microsoft, run
New-CACertsVerificationCert "<verification code>"to create a certificate namedVerifyCert4.cer, replacing<verification code>with the previously generated verification code. For more information, see Managing test CA certificates for samples and tutorials in the GitHub repository for the Azure IoT Hub Device SDK for C.If you're using the Bash script supplied by Microsoft, run
./certGen.sh create_verification_certificate "<verification code>"to create a certificate named verification-code.cert.pem, replacing<verification code>with the previously generated verification code. For more information, see Managing test CA certificates for samples and tutorials in the GitHub repository for the Azure IoT Hub Device SDK for C.If you're using OpenSSL to generate your certificates, you must first generate a private key, then generate a certificate signing request (CSR) file. In the following example, replace
<verification code>with the previously generated verification code:
openssl genpkey -out pop.key -algorithm RSA -pkeyopt rsa_keygen_bits:2048

openssl req -new -key pop.key -out pop.csr

-----
Country Name (2 letter code) [XX]:.
State or Province Name (full name) []:.
Locality Name (eg, city) [Default City]:.
Organization Name (eg, company) [Default Company Ltd]:.
Organizational Unit Name (eg, section) []:.
Common Name (eg, your name or your server hostname) []:<verification code>
Email Address []:

Please enter the following 'extra' attributes
to be sent with your certificate request
A challenge password []:
An optional company name []:
Then, create a certificate using the appropriate configuration file for either the root CA or the subordinate CA, and the CSR file. The following example demonstrates how to use OpenSSL to create the certificate from a root CA configuration file and the CSR file.
openssl ca -config rootca.conf -in pop.csr -out pop.crt -extensions client_extFor more information, see Tutorial - Create and upload certificates for testing.
Select the new certificate in the Certificate Details view.
After the certificate uploads, select Verify. The certificate status should change to Verified.
For more information
For more information about X.509 certificates and how they're used in IoT Hub, see the following articles: