Note
Access to this page requires authorization. You can try signing in or changing directories.
Access to this page requires authorization. You can try changing directories.
As part of the device lifecycle, you may need to configure your IoT devices from your back-end service. When you send a desired configuration to your devices, you also want to receive status and compliance updates from those devices. For example, you might set a target operational temperature range for a device or collect firmware version information from your devices.
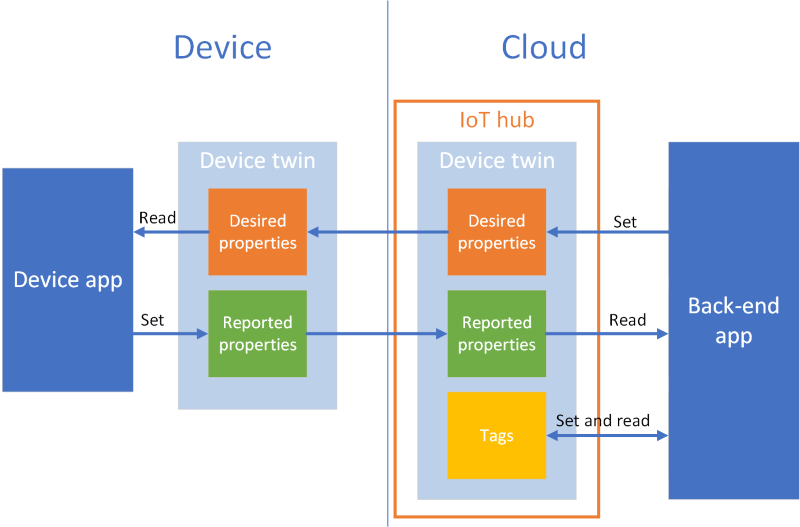
To synchronize state information between a device and an IoT hub, you use device twins. A device twin is a JSON document, associated with a specific device, and stored by IoT Hub in the cloud where you can query them. A device twin contains desired properties, reported properties, and tags.
- A desired property is set by a back-end application and read by a device.
- A reported property is set by a device and read by a back-end application.
- A tag is set by a back-end application and is never sent to a device. You use tags to organize your devices.
This tutorial shows you how to use desired and reported properties to synchronize state information.
In this tutorial, you perform the following tasks:
- Create an IoT hub and add a test device to the identity registry.
- Use desired properties to send state information to your simulated device.
- Use reported properties to receive state information from your simulated device.
If you don't have an Azure subscription, create a free account before you begin.
Prerequisites
This tutorial uses the Azure CLI to create cloud resources. If you already have an IoT hub with a device registered to it, you can skip those steps. There are two ways to run CLI commands:
Use the Bash environment in Azure Cloud Shell. For more information, see Azure Cloud Shell Quickstart - Bash.

If you prefer to run CLI reference commands locally, install the Azure CLI. If you're running on Windows or macOS, consider running Azure CLI in a Docker container. For more information, see How to run the Azure CLI in a Docker container.
- Sign in to the Azure CLI by using the az login command.
- When you're prompted, install Azure CLI extensions on first use. For more information about extensions, see Use extensions with the Azure CLI.
- Run az version to find the version and dependent libraries that are installed. To upgrade to the latest version, run az upgrade.
The two sample applications you run in this tutorial are written using Node.js. You need Node.js v10.x.x or later on your development machine.
You can download Node.js for multiple platforms from nodejs.org.
You can verify the current version of Node.js on your development machine using the following command:
node --version
Clone or download the sample Node.js project from Azure IoT samples for Node.js.
Make sure that port 8883 is open in your firewall. The device sample in this tutorial uses MQTT protocol, which communicates over port 8883. This port may be blocked in some corporate and educational network environments. For more information and ways to work around this issue, see Connecting to IoT Hub (MQTT).
Set up Azure resources
To complete this tutorial, your Azure subscription must contain an IoT hub with a device added to the device identity registry. The entry in the device identity registry enables the simulated device you run in this tutorial to connect to your hub.
If you don't already have an IoT hub set up in your subscription, you can set one up with the following CLI script. This script uses the name tutorial-iot-hub with a random number appended for the IoT hub name. You can replace this name with your own globally unique name when you run it. The script creates the resource group and hub in the Central US region, which you can change to a region closer to you. The script retrieves your IoT hub service connection string, which you use in the back-end sample to connect to your IoT hub:
let "randomIdentifier=$RANDOM*$RANDOM"
hubname="tutorial-iot-hub-$randomIdentifier"
location=centralus

# Install the IoT extension if it's not already installed:
az extension add --name azure-iot

# Create a resource group:
az group create --name tutorial-iot-hub-rg --location $location

# Create your free-tier IoT hub. You can only have one free IoT hub per subscription.
# Change the sku to S1 to create a standard-tier hub if necessary.
az iot hub create --name $hubname --location $location --resource-group tutorial-iot-hub-rg --partition-count 2 --sku F1

# Make a note of the service connection string, you need it later:
az iot hub connection-string show --hub-name $hubname --policy-name service -o table
This tutorial uses a simulated device called MyTwinDevice. The following script adds this device to your identity registry and retrieves its connection string:
# Create the device in the identity registry:
az iot hub device-identity create --device-id MyTwinDevice --hub-name $hubname --resource-group tutorial-iot-hub-rg

# Retrieve the device connection string, you need this later:
az iot hub device-identity connection-string show --device-id MyTwinDevice --hub-name $hubname --resource-group tutorial-iot-hub-rg -o table
Send state information to a device
You use desired properties to send state information from a back-end application to a device. In this section, you see how to:
- Configure a device to receive and process desired properties.
- Send desired properties from a back-end application to a device.
Sample desired properties
You can structure your desired properties in any way that's convenient to your application. This example uses one top-level property called fanOn and groups the remaining properties into separate components. The following JSON snippet shows the structure of the desired properties this tutorial uses. The JSON is in the desired.json file.
{
  "fanOn": "true",
  "components": {
    "system": {
      "id": "17",
      "units": "farenheit",
      "firmwareVersion": "9.75"
    },
    "wifi" : {
      "channel" : "6",
      "ssid": "my_network"
    },
    "climate" : {
      "minTemperature": "68",
      "maxTemperature": "76"
    }
  }
}
Receive desired properties in a device application
To view the simulated device sample code that receives desired properties, navigate to the iot-hub/Tutorials/DeviceTwins folder in the sample Node.js project you downloaded. Then open the SimulatedDevice.js file in a text editor.
The following sections describe the code that runs on the simulated device that responds to desired property changes sent from the back end application.
Retrieve the device twin object
When you registered your device with the IoT hub, you got a device connection string as output. A device connection string is used by the device to authenticate with its registered identity in the cloud. The following code connects to your IoT hub using a device connection string:
// Get the device connection string from a command line argument
var connectionString = process.argv[2];
The following code gets a twin from the client object:
// Get the device twin
client.getTwin(function(err, twin) {
  if (err) {
    console.error(chalk.red('Could not get device twin'));
  } else {
    console.log(chalk.green('Device twin created'));
Create handlers
You can create handlers for desired property updates that respond to updates at different levels in the JSON hierarchy. For example, this handler sees all desired property changes sent to the device from a back-end application. The delta variable contains the desired properties sent from the solution back end:
// Handle all desired property updates
twin.on('properties.desired', function(delta) {
    console.log(chalk.yellow('\nNew desired properties received in patch:'));
The following handler only reacts to changes made to the fanOn desired property:
// Handle changes to the fanOn desired property
twin.on('properties.desired.fanOn', function(fanOn) {
    console.log(chalk.green('\nSetting fan state to ' + fanOn));

    // Update the reported property after processing the desired property
    reportedPropertiesPatch.fanOn = fanOn ? fanOn : '{unknown}';
});
Handlers for multiple properties
In the sample desired properties JSON for this tutorial, the climate node under components contains two properties, minTemperature and maxTemperature.
A device's local twin object stores a complete set of desired and reported properties. The delta sent from the back end might update just a subset of desired properties. In the following code snippet, if the simulated device receives an update to just one of minTemperature and maxTemperature, it uses the value in the local twin for the other value to configure the device:
// Handle desired properties updates to the climate component
twin.on('properties.desired.components.climate', function(delta) {
    if (delta.minTemperature || delta.maxTemperature) {
      console.log(chalk.green('\nUpdating desired tempertures in climate component:'));
      console.log('Configuring minimum temperature: ' + twin.properties.desired.components.climate.minTemperature);
      console.log('Configuring maximum temperture: ' + twin.properties.desired.components.climate.maxTemperature);

      // Update the reported properties and send them to the hub
      reportedPropertiesPatch.minTemperature = twin.properties.desired.components.climate.minTemperature;
      reportedPropertiesPatch.maxTemperature = twin.properties.desired.components.climate.maxTemperature;
      sendReportedProperties();
    }
});
Handle insert, update, and delete operations
The desired properties sent from the back end don't indicate what operation is being performed on a particular desired property. Your code needs to infer the operation from the current set of desired properties stored locally and the changes sent from the hub.
The following snippet shows how the simulated device handles insert, update, and delete operations on the list of components in the desired properties. You can see how to use null values to indicate that a component should be deleted:
// Keep track of all the components the device knows about
var componentList = {};

// Use this componentList list and compare it to the delta to infer
// if anything was added, deleted, or updated.
twin.on('properties.desired.components', function(delta) {
  if (delta === null) {
    componentList = {};
  }
  else {
    Object.keys(delta).forEach(function(key) {

      if (delta[key] === null && componentList[key]) {
        // The delta contains a null value, and the
        // device has a record of this component.
        // Must be a delete operation.
        console.log(chalk.green('\nDeleting component ' + key));
        delete componentList[key];

      } else if (delta[key]) {
        if (componentList[key]) {
          // The delta contains a component, and the
          // device has a record of it.
          // Must be an update operation.
          console.log(chalk.green('\nUpdating component ' + key + ':'));
          console.log(JSON.stringify(delta[key]));
          // Store the complete object instead of just the delta
          componentList[key] = twin.properties.desired.components[key];

        } else {
          // The delta contains a component, and the
          // device has no record of it.
          // Must be an add operation.
          console.log(chalk.green('\nAdding component ' + key + ':'));
          console.log(JSON.stringify(delta[key]));
          // Store the complete object instead of just the delta
          componentList[key] = twin.properties.desired.components[key];
        }
      }
    });
  }
});
Send desired properties from a back end application
You've seen how a device implements handlers for receiving desired property updates. This section shows you how to send desired property changes to a device from a back-end application.
To view the simulated device sample code that receives desired properties, navigate to the iot-hub/Tutorials/DeviceTwins folder in the sample Node.js project you downloaded. Then open the ServiceClient.js file in a text editor.
The following code snippet shows how to connect to the device identity registry and access the twin for a specific device:
// Create a device identity registry object
var registry = Registry.fromConnectionString(connectionString);

// Get the device twin and send desired property update patches at intervals.
// Print the reported properties after some of the desired property updates.
registry.getTwin(deviceId, async (err, twin) => {
  if (err) {
    console.error(err.message);
  } else {
    console.log('Got device twin');
The following snippet shows different desired property patches the back end application sends to the device:
// Turn the fan on
var twinPatchFanOn = {
  properties: {
    desired: {
      patchId: "Switch fan on",
      fanOn: "false",
    }
  }
};

// Set the maximum temperature for the climate component
var twinPatchSetMaxTemperature = {
  properties: {
    desired: {
      patchId: "Set maximum temperature",
      components: {
        climate: {
          maxTemperature: "92"
        }
      }
    }
  }
};

// Add a new component
var twinPatchAddWifiComponent = {
  properties: {
    desired: {
      patchId: "Add WiFi component",
      components: {
        wifi: {
          channel: "6",
          ssid: "my_network"
        }
      }
    }
  }
};

// Update the WiFi component
var twinPatchUpdateWifiComponent = {
  properties: {
    desired: {
      patchId: "Update WiFi component",
      components: {
        wifi: {
          channel: "13",
          ssid: "my_other_network"
        }
      }
    }
  }
};

// Delete the WiFi component
var twinPatchDeleteWifiComponent = {
  properties: {
    desired: {
      patchId: "Delete WiFi component",
      components: {
        wifi: null
      }
    }
  }
};
The following snippet shows how the back-end application sends a desired property update to a device:
// Send a desired property update patch
async function sendDesiredProperties(twin, patch) {
  twin.update(patch, (err, twin) => {
    if (err) {
      console.error(err.message);
    } else {
      console.log(chalk.green(`\nSent ${twin.properties.desired.patchId} patch:`));
      console.log(JSON.stringify(patch, null, 2));
    }
  });
}
Receive state information from a device
Your back-end application receives state information from a device as reported properties. A device sets the reported properties, and sends them to your hub. A back-end application can read the current values of the reported properties from the device twin stored in your hub.
Send reported properties from a device
You can send updates to reported property values as a patch. The following snippet shows a template for the patch the simulated device sends. The simulated device updates the fields in the patch before sending it to the hub:
// Create a patch to send to the hub
var reportedPropertiesPatch = {
  firmwareVersion:'1.2.1',
  lastPatchReceivedId: '',
  fanOn:'',
  minTemperature:'',
  maxTemperature:''
};
The simulated device uses the following function to send the patch that contains the reported properties to the hub:
// Send the reported properties patch to the hub
function sendReportedProperties() {
  twin.properties.reported.update(reportedPropertiesPatch, function(err) {
    if (err) throw err;
    console.log(chalk.blue('\nTwin state reported'));
    console.log(JSON.stringify(reportedPropertiesPatch, null, 2));
  });
}
Process reported properties
A back-end application accesses the current reported property values for a device through the device twin. The following snippet shows you how the back-end application reads the reported property values for the simulated device:
// Display the reported properties from the device
function printReportedProperties(twin) {
  console.log("Last received patch: " + twin.properties.reported.lastPatchReceivedId);
  console.log("Firmware version: " + twin.properties.reported.firmwareVersion);
  console.log("Fan status: " + twin.properties.reported.fanOn);
  console.log("Min temperature set: " + twin.properties.reported.minTemperature);
  console.log("Max temperature set: " + twin.properties.reported.maxTemperature);
}
Run the applications
In this section, you run the two sample applications to observe as a back-end application sends desired property updates to a simulated device application.
To run the simulated device and back-end applications, you need the device and service connection strings. You made a note of the connection strings when you created the resources at the start of this tutorial.
To run the simulated device application, open a shell or command prompt window and navigate to the iot-hub/Tutorials/DeviceTwins folder in the Node.js project you downloaded. Then run the following commands:
npm install
node SimulatedDevice.js "{your device connection string}"
To run the back-end application, open another shell or command prompt window. Then navigate to the iot-hub/Tutorials/DeviceTwins folder in the Node.js project you downloaded. Then run the following commands:
npm install
node ServiceClient.js "{your service connection string}"
Observe desired property updates
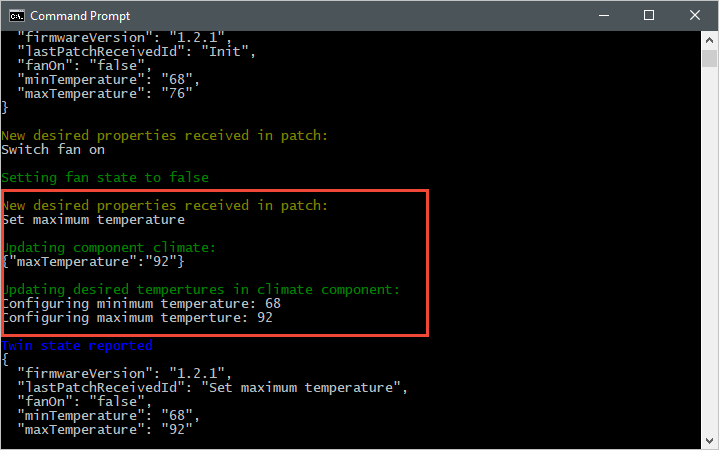
The following screenshot shows the output from the simulated device application and highlights how it handles an update to the maxTemperature desired property. You can see how both the top-level handler and the climate component handlers run:
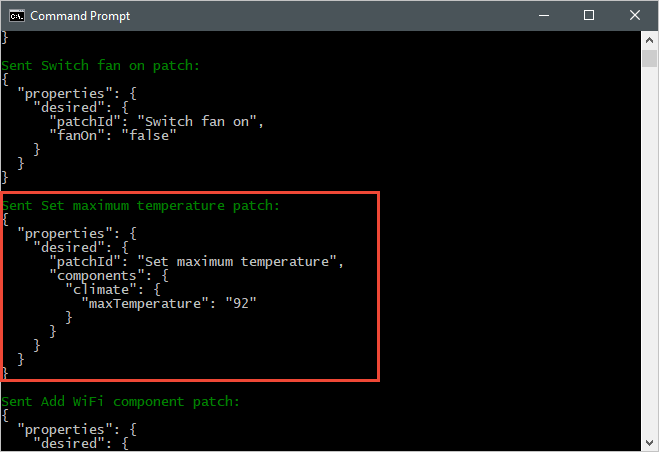
The following screenshot shows the output from the back-end application and highlights how it sends an update to the maxTemperature desired property:
Observe reported property updates
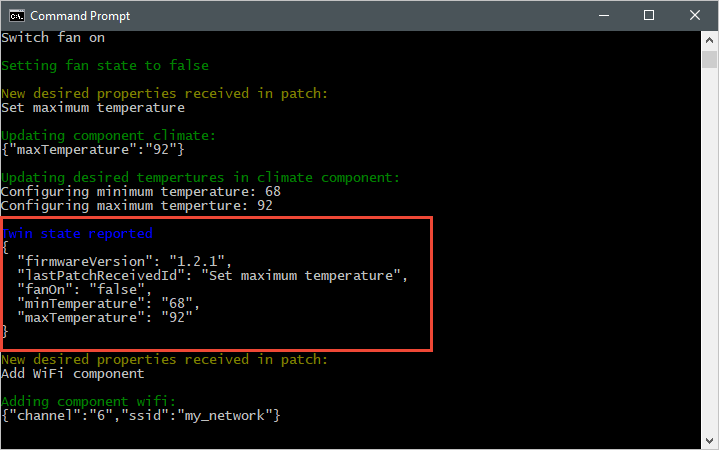
The following screenshot shows the output from the simulated device application and highlights how it sends a reported property update to your hub:
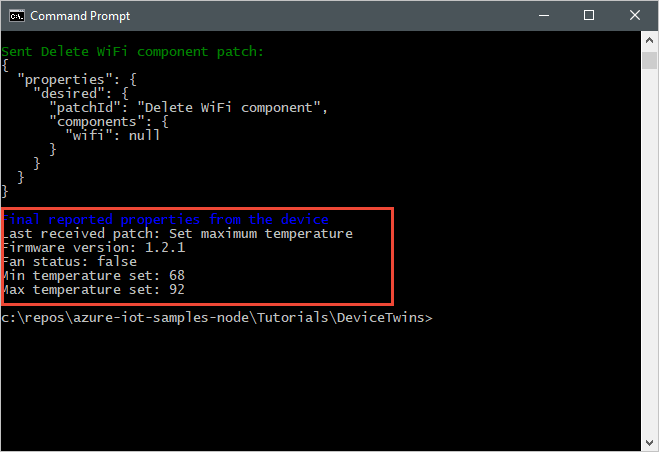
The following screenshot shows the output from the back-end application and highlights how it receives and processes a reported property update from a device:
Clean up resources
If you plan to complete the next tutorial, leave the resource group and the IoT hub to reuse them later.
If you don't need the IoT hub any longer, delete it and the resource group in the portal. To do so, select the tutorial-iot-hub-rg resource group that contains your IoT hub and select Delete.
Alternatively, use the CLI:
# Delete your resource group and its contents
az group delete --name tutorial-iot-hub-rg
Next steps
In this tutorial, you learned how to synchronize state information between your devices and your IoT hub. Advance to the next tutorial to learn how to use device twins to implement the device update process.