Note
Access to this page requires authorization. You can try signing in or changing directories.
Access to this page requires authorization. You can try changing directories.
The built-in inference transform runs inference on each message in a data flow graph. It sends the message payload to the inference connector, and replaces the payload with the model's result. This article shows you how to add the transform to a graph, test the graph, and use file-based payloads.
Important
The inference connector in Azure IoT Operations is in preview. Use a nonproduction environment to evaluate the preview and the examples in this article.
See the Supplemental Terms of Use for Microsoft Azure Previews for legal terms that apply to Azure features that are in beta, preview, or otherwise not yet released into general availability.
Prerequisites
- An instance of Azure IoT Operations deployed in a Kubernetes cluster. For more information, see Deploy Azure IoT Operations.
The Azure CLI installed on your development machine. Check Available Azure CLI extensions for the minimum required version to use the azure-iot-ops extension. Use
az --versionto check your version andaz upgradeto update if necessary. For more information, see Install the Azure CLI.The Azure IoT Operations extension for the Azure CLI. Use the following command to add the extension or update it to the latest version:
az extension add --upgrade --name azure-iot-ops
- An inference connector that serves at least one model with
mrpcsettings. To learn how to deploy the connector, see Deploy the inference connector. The examples in this article use a model namedobject-detection. - A data flow profile. You can use the default profile.
- A data flow endpoint for the source and the destination of the graph. The examples in this article use the default MQTT broker endpoint.
The Azure CLI examples in this article use environment variables so that you can set each value once and then copy and paste the commands as-is. If you're using the Azure IoT Operations Codespaces environment from the quickstart, these variables are already set for you and you can skip this step. Otherwise, set the following environment variables in your shell before you run the commands.
The following scripts set the most commonly used environment variables:
| Environment variable | Description |
|---|---|
SUBSCRIPTION_ID |
The ID of the subscription that contains your Azure IoT Operations instance. |
RESOURCE_GROUP |
The name of the resource group that contains your Azure IoT Operations instance. |
AIO_INSTANCE_NAME |
The name of your Azure IoT Operations instance. To list your instances, run az iot ops list -o table. |
CLUSTER_NAME |
The name of the Azure Arc-enabled Kubernetes cluster that hosts your instance. |
LOCATION |
The Azure region to use for new resources, for example eastus. |
SUBSCRIPTION_ID=<subscription-id>
RESOURCE_GROUP=<resource-group-name>
AIO_INSTANCE_NAME=<instance-name>
CLUSTER_NAME=<cluster-name>
LOCATION=<region>
You only need to set the variables that this article uses. This article might use additional environment variables for resource names that you choose. The article explains how to set them where they're introduced.
Also set the CUSTOM_LOCATION_NAME variable to the name of the custom location of your instance:
CUSTOM_LOCATION_NAME=$(az iot ops show --name $AIO_INSTANCE_NAME --resource-group $RESOURCE_GROUP --query "extendedLocation.name" --output tsv | awk -F'/' '{print $NF}')
How the inference transform works
The following diagram shows how the inference transform in a data flow graph uses the inference connector:
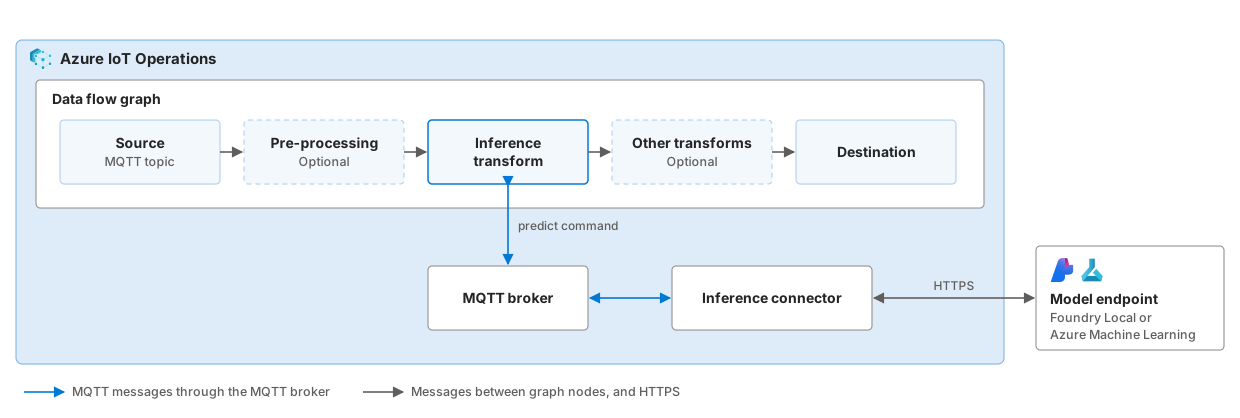
For each message, the transform sends the payload and content type to the connector in a predict command. It then replaces the payload and content type with those of the first result item, and passes the message to the next node. The topic, user properties, and timestamp of the message don't change. If the command fails, the graph drops the message and logs the error.
The transform is a prebuilt graph artifact, azureiotoperations/graph-dataflow-inference, on mcr.microsoft.com. Data flow graphs pull it through the default registry endpoint that Azure IoT Operations creates when you deploy it.
Inference transform configuration
Configure the inference transform with the following keys in the configuration section of the graph node:
| Key | Required | Description |
|---|---|---|
model_name |
Yes | The name of the model in the inference connector configuration. The model must have mrpc settings. The value can't be empty, and it can't contain the /, +, or # characters. |
read_request_from_disk |
No | Set to true if the payload of each message is the path of an input file relative to the read folder of the model's data volume, instead of the input data itself. The default is false. |
Create a data flow graph with the inference transform
Use Azure CLI or Bicep to create a data flow graph in the default data flow profile. Both alternatives pull the azureiotoperations/graph-dataflow-inference:0.2.0-preview.0 artifact through the default registry endpoint. The graph reads images from the camera/images topic, runs inference on each image with the object-detection model, and publishes the results to the camera/inference-results topic.
Save the following graph properties as
inference-graph.json.{ "mode": "Enabled", "nodes": [ { "nodeType": "Source", "name": "images", "sourceSettings": { "endpointRef": "default", "dataSources": [ "camera/images" ] } }, { "nodeType": "Graph", "name": "inference", "graphSettings": { "registryEndpointRef": "default", "artifact": "azureiotoperations/graph-dataflow-inference:0.2.0-preview.0", "configuration": [ { "key": "model_name", "value": "object-detection" } ] } }, { "nodeType": "Destination", "name": "results", "destinationSettings": { "endpointRef": "default", "dataDestination": "camera/inference-results" } } ], "nodeConnections": [ { "from": { "name": "images" }, "to": { "name": "inference" } }, { "from": { "name": "inference" }, "to": { "name": "results" } } ] }Create or replace the graph with
az iot ops dataflowgraph apply:az iot ops dataflowgraph apply \ --name inference-graph \ --instance $AIO_INSTANCE_NAME \ --resource-group $RESOURCE_GROUP \ --profile default \ --config-file inference-graph.jsonTo update the graph, edit the JSON file and run the same
applycommand again. The file replaces the graph properties, so keep all nodes and connections that you want to retain.
Test the data flow graph
The following steps use the mqtt-client pod from Test connectivity to MQTT broker with MQTT clients to send an image through the data flow graph.
Deploy the
mqtt-clientpod if you didn't already, and copy an image that your model accepts to it. This example copies an image namedsample.jpg:kubectl apply -f https://raw.githubusercontent.com/Azure-Samples/explore-iot-operations/main/samples/quickstarts/mqtt-client.yaml kubectl wait --for=condition=Ready pod/mqtt-client -n azure-iot-operations --timeout=120s kubectl cp sample.jpg azure-iot-operations/mqtt-client:/tmp/sample.jpgIn one terminal, subscribe to the destination topic of the graph:
kubectl exec --stdin --tty mqtt-client -n azure-iot-operations -- sh -c ' mosquitto_sub -h aio-broker -p 18883 -q 1 \ -t "camera/inference-results" \ -F "%t | %C | %p" \ --cafile /var/run/certs/ca.crt \ -D CONNECT authentication-method "K8S-SAT" \ -D CONNECT authentication-data "$(cat /var/run/secrets/tokens/broker-sat)"'In a second terminal, publish the image to the source topic of the graph:
kubectl exec --stdin --tty mqtt-client -n azure-iot-operations -- sh -c ' mosquitto_pub -h aio-broker -p 18883 -q 1 \ -t "camera/images" \ -f /tmp/sample.jpg \ -D PUBLISH content-type "image/jpeg" \ --cafile /var/run/certs/ca.crt \ -D CONNECT authentication-method "K8S-SAT" \ -D CONNECT authentication-data "$(cat /var/run/secrets/tokens/broker-sat)"'The subscriber in the first terminal shows the result. Its content type and format depend on your model:
camera/inference-results | <CONTENT_TYPE> | <MODEL_RESULT>
If no result arrives, see Data flow graphs don't produce results.
Use file-based payloads
Producers can write input files to a shared volume and publish the path of each file instead of its contents. The inference connector reads the files, so the data flow graph doesn't need access to the volume.
- Configure the model with a data volume. To learn how, see Enable file-based payloads.
- Add the
read_request_from_diskkey to the configuration of the inference transform, by using the same deployment method that you used to create the graph. See the following examples. - Publish the path of each input file, relative to the read folder of the model's data volume, as the message payload. For example,
images/board-01.jpg. To copy a test file to the volume, see Send file-based requests.
The following examples add the read_request_from_disk key:
In inference-graph.json, replace the inference node's graphSettings.configuration array with the following array. Keep the other graph properties unchanged:
[
{
"key": "model_name",
"value": "object-detection"
},
{
"key": "read_request_from_disk",
"value": "true"
}
]
Apply the updated graph:
az iot ops dataflowgraph apply \
  --name inference-graph \
  --instance $AIO_INSTANCE_NAME \
  --resource-group $RESOURCE_GROUP \
  --profile default \
  --config-file inference-graph.json
The setting applies to every message that the transform processes. To handle both inline data and file paths, use a separate inference transform for each.
If the model sets write-response-to-disk to true, the transform replaces the payload with the name of the result file in the write folder of the model's data volume, and sets the content type to text/plain. To read the result file in a later transform, for example to postprocess it, configure a file store for the write folder in the data flow graph, and read the file from a WASM module. To learn how, see Read and write files from WASM data flow graphs with the file store.
Process data before and after inference
Add other transforms to the graph to prepare the input data and to use the results:
- Before inference: Foundry Local preprocesses image inputs for the model when the message has an image content type, such as
image/jpeg. To convert other input data into the format that the model expects, build a custom WebAssembly (WASM) transform. - After inference: Foundry Local returns the raw output of the model, such as a tensor. To convert it into labels or detections, add a custom WASM transform after the inference transform. The getModelInfo command returns the output names, shapes, and labels of a Foundry Local model. If a model returns JSON, use built-in transforms, such as map and filter, to reshape the results or select the ones to keep.
- In the same step: To prepare the input and use the result in your own code, write a WASM module that calls the connector instead of using the inference transform. See Call the inference connector from a WASM module.
Scale inference
The connector processes up to worker-count commands for each model at the same time, where worker-count is in the model's mrpc settings. If your model server can handle more concurrent requests, for example because it runs several replicas, increase worker-count. To run more instances of the data flow graph, increase the instance count of the data flow profile.
Related content
- What is the inference connector?
- Send inference requests over MQTT
- Call the inference connector from a WASM module
- Run inference on camera images captured by the media connector
- Inference connector command reference
- Data flow graphs in Azure IoT Operations
- Use WebAssembly (WASM) transforms in data flow graphs
- Read and write files from WASM data flow graphs with the file store