Note
Access to this page requires authorization. You can try signing in or changing directories.
Access to this page requires authorization. You can try changing directories.
The command invoker host API lets a WebAssembly (WASM) module call a service through the Azure IoT Operations MQTT broker and use the reply while it processes a message. A WASM module can't open network connections, so the data flow host manages the MQTT connection. Your module supplies the request and handles the response.
In this article, you build a module whose map operator calls a GetValue command and replaces the incoming message payload with the response. You:
- Create the module project and graph definition.
- Write the map operator that invokes the command.
- Build the module, and publish it and the graph definition to your container registry.
- Create a minimal responder that always returns
{"value":37.4}. - Deploy the graph and run the responder.
- Publish a message to the graph and verify that the output payload is
{"value":37.4}.
Prerequisites
Ensure you have:
- An Azure IoT Operations instance and permission to create data flow graphs in its resource group. See Deploy Azure IoT Operations. You need a cluster to test command invocations, because the Azure IoT Operations Data Flow extension for Visual Studio Code and the
dataflow-devCLI don't run the command invoker locally. For a development loop, you can use a single-node cluster, such as K3s. See Prepare your Azure Arc-enabled Kubernetes cluster. kubectlaccess to the Kubernetes cluster that runs Azure IoT Operations.- The prerequisites listed in Build WASM modules for data flows.
- An Azure container registry, a registry endpoint that points to it, and the ORAS CLI. See Deploy WASM modules and graph definitions.
Set the following variables for the instance and graph that you use in this article. Use GRAPH_NAME as the graph name when you deploy it:
RESOURCE_GROUP=<RESOURCE_GROUP>
AIO_INSTANCE_NAME=<AIO_INSTANCE_NAME>
GRAPH_NAME=enrich
You also need an mRPC responder: a service that subscribes to the request topic and answers each command by using a command executor from the Azure IoT Operations Protocol SDK. For an example, see Create a minimal responder.
mRPC commands
mRPC is the request-response convention that Azure IoT Operations layers on top of MQTT. The host publishes your module's request to a request topic and waits for the correlated response:
GetValue("asset-42") -> { "value": 37.4 }
When to use the command invoker
Use the command invoker when you need to combine each message with data or a decision that lives in another service. Common patterns include:
- Remote enrichment. Receive telemetry that carries an asset or device identifier, call
GetValue(identifier)on an edge service, and add the returned fields to the message. - Lookup or validation. Ask another service to confirm, calibrate, or classify a value before the message continues through the graph.
- Routing decisions. Ask a service which destination or path a message should take.
Don't use the command invoker in these cases:
- You only need per-message computation with no external data. Use a plain map operator instead.
- You need durable state that persists across messages. Use the state store.
- You need low-latency, in-process AI inference. Use in-band ONNX inference.
Architecture
The following diagram shows how a command flows from your module to the responder and back:
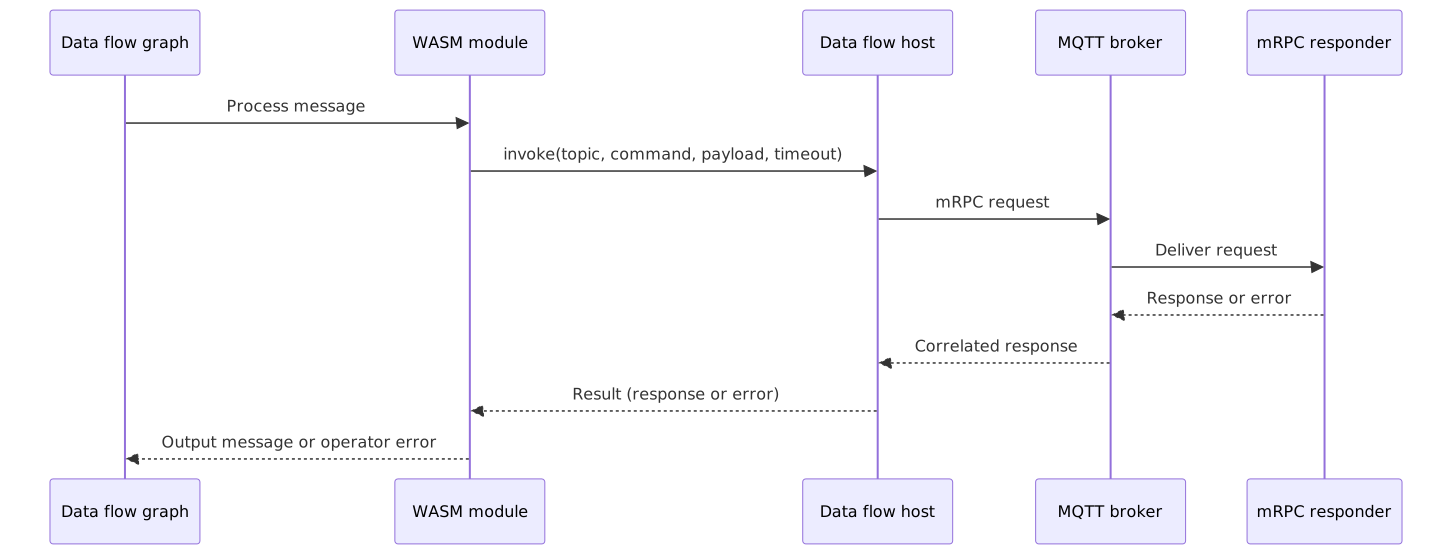
The host validates the request, sends it over the data flow's own connection to the local Azure IoT Operations MQTT broker, waits for the correlated response, and returns the result to your module.
Important
The default MQTT broker listener doesn't configure client authorization, so by default any WASM module can invoke any command on the broker. Treat modules as trusted code. To restrict which request topics a data flow can publish to, configure MQTT broker authorization for the data flow's identity. Rules that match that identity also apply to the data flow's MQTT sources and destinations.
Create the module project
Create a Rust library project named enrich:
cargo new --lib enrich
cd enrich
Configure the SDK registry in .cargo/config.toml and set [lib] crate-type = ["cdylib"] in Cargo.toml by following the Standard tools tab of Build WASM modules for data flows.
Use wasm_graph_sdk 1.7. In your module's Cargo.toml, update the dependencies from the versions in the build article:
[dependencies]
wit-bindgen = "0.38"
wasm_graph_sdk = { version = "~1.7", registry = "aio-wg" }
~1.7 allows 1.7.x patch updates but not 1.8.
Enable the command invoker in your graph definition
The command invoker is a host import that your module requires. Declare the API version that provides it in the moduleRequirements section of your graph definition. For moduleRequirements details, see Version compatibility.
Save the following graph definition as graph.yaml in the enrich project directory. The graph uses a source, a single map operator that calls the command, and a sink:
metadata:
  $schema: "https://www.schemastore.org/aio-wasm-graph-config-1.1.0.json"
  name: "Enrichment graph"
  version: "1.0.0"

moduleRequirements:
  apiVersion: "1.7.0"
  runtimeVersion: "1.1.0"

operations:
  - operationType: "source"
    name: "input"
  - operationType: "map"
    name: "enrich/map"
    module: "enrich:1.0.0"
  - operationType: "sink"
    name: "output"

connections:
  - from: { name: "input" }
    to: { name: "enrich/map" }
  - from: { name: "enrich/map" }
    to: { name: "output" }
Call a command from a map operator
Replace src/lib.rs in the enrich project with the following map operator. It invokes GetValue through wasm_graph_sdk::command_invoker and replaces the message payload with the response:
use wasm_graph_sdk::command_invoker::{self, CommandRequest, FormatIndicator, SerializedPayload};
use wasm_graph_sdk::macros::map_operator;

const COMMAND_TOPIC: &str = "services/value/getvalue";
const COMMAND_NAME: &str = "GetValue";

#[map_operator]
fn enrich(input: DataModel) -> Result<DataModel, Error> {
    let DataModel::Message(mut message) = input else {
        return Err(Error {
            message: "expected a message input".to_string(),
        });
    };

    // This example expects the incoming payload to contain UTF-8 JSON.
    let payload = message.payload.read();

    let invoke_result = command_invoker::invoke(&CommandRequest {
        topic: COMMAND_TOPIC.to_string(),
        command_name: COMMAND_NAME.to_string(),
        payload: SerializedPayload {
            payload,
            content_type: "application/json".to_string(),
            format_indicator: FormatIndicator::Utf8EncodedCharacterData,
        },
        custom_user_data: vec![("caller".to_string(), "enrich-operator".to_string())],
        timeout_secs: 3,
    });

    let response = invoke_result.map_err(|error| Error {
        message: format!("mRPC command invocation failed: {error:?}"),
    })?;

    // The response replaces the payload, so describe it with the response's
    // content type and drop the input schema.
    message.content_type = response.payload.content_type.map(BufferOrString::String);
    message.schema = None;
    message.payload = BufferOrBytes::Bytes(response.payload.payload);
    Ok(DataModel::Message(message))
}
For simplicity, this example replaces the payload with the response. To keep the original fields, deserialize both JSON payloads, merge the response into the input, and serialize the result.
The request and response payloads are opaque bytes. The module and responder can exchange text, Protocol Buffers, CBOR, images, compressed data, or another binary format as long as they agree on the format. Set content_type to the appropriate media type. For binary data, use FormatIndicator::UnspecifiedBytes:
payload: SerializedPayload {
    payload: image_bytes,
    content_type: "image/jpeg".to_string(),
    format_indicator: FormatIndicator::UnspecifiedBytes,
},
Payloads are limited by the broker's maximum message size.
Request fields
The CommandRequest record describes the command to invoke:
| Field | Description |
|---|---|
topic |
The concrete MQTT request topic of the responder. Wildcards (+, #) aren't allowed. |
command_name |
The name of the command that the responder implements. |
payload |
The serialized request body as a SerializedPayload with opaque payload bytes, a content_type string, and a format_indicator. |
custom_user_data |
Optional list of key-value user properties to send with the request. Keys can't be reserved CloudEvents attribute names. |
timeout_secs |
The timeout in seconds. 0 uses the default timeout, which is 5 seconds in data flows. Any other value is used as specified. |
Response fields
On success, invoke returns a CommandResponse:
| Field | Description |
|---|---|
payload |
The serialized response body. content_type is optional; format_indicator describes the encoding. |
custom_user_data |
User properties that the responder returned with the response. |
timestamp |
The response timestamp, when the responder provides one. |
executor_id |
The client ID of the responder's command executor, when provided. |
Handle errors
When an invocation fails, invoke returns an RpcError variant instead of a response. Your module decides how to react:
| Error | Meaning |
|---|---|
ConfigurationInvalid |
The request produced an invalid invoker configuration, such as an empty topic or a topic with a wildcard, or the host has no command invoker connection. |
PayloadInvalid |
The host couldn't build the request, or the response payload is invalid. For example, a custom_user_data key is a reserved CloudEvents attribute name. |
Timeout |
The command didn't complete within the effective timeout. |
ClientError |
The underlying MQTT protocol client returned an error. |
Cancellation |
The invocation was canceled before it completed. |
HeaderInvalid |
A response header was present but invalid. |
HeaderMissing |
A required response header was missing. |
ExecutionException |
The responder reported an error while running the command. |
UnknownError |
An unclassified protocol error occurred. |
InternalLogicError |
An internal protocol error occurred. |
StateInvalid |
The invoker was used from an invalid state. |
Choose an explicit error policy that matches your scenario:
- Fail the message. Return an operator
Error. The runtime drops the message with an execution-error reason. Use this policy when enrichment is required and a message without it isn't useful. - Pass through. Log the failure and return the original message unchanged. Use this policy only when the enrichment is optional.
- Emit a structured result. Write a result such as
{ "ok": false, "error": "timeout" }into the message so a downstream operator can route it.
The following example uses the pass-through policy. Add the logger import at the top of the file:
use wasm_graph_sdk::logger::{self, Level};
In the enrich operator, replace the map_err call and the code after it with:
match invoke_result {
    Ok(response) => {
        message.content_type = response.payload.content_type.map(BufferOrString::String);
        message.schema = None;
        message.payload = BufferOrBytes::Bytes(response.payload.payload);
        Ok(DataModel::Message(message))
    }
    Err(error) => {
        logger::log(Level::Warn, "enrich/map", &format!("mRPC failed: {error:?}"));
        Ok(DataModel::Message(message))
    }
}
Important
Don't automatically retry a failed command. A timeout doesn't prove that the responder didn't run the command, so a retry can cause duplicate side effects. Retry only when the command is idempotent.
Build and publish the module
In the enrich project directory, replace <ACR_NAME> with your registry name and run:
ACR_NAME="<ACR_NAME>"

cargo build --release --target wasm32-wasip2
cp target/wasm32-wasip2/release/enrich.wasm .

az acr login --name "$ACR_NAME"
oras push "$ACR_NAME.azurecr.io/enrich:1.0.0" --artifact-type application/vnd.module.wasm.content.layer.v1+wasm enrich.wasm:application/wasm
oras push "$ACR_NAME.azurecr.io/enrich-graph:1.0.0" --config /dev/null:application/vnd.microsoft.aio.graph.v1+yaml graph.yaml:application/yaml --disable-path-validation
In graph.yaml, enrich:1.0.0 matches the published module. The deployment uses enrich-graph:1.0.0. For other registry layouts, see Choose an artifact layout.
Create a minimal responder
A responder is a service that connects to the same MQTT broker and runs a command executor. The Azure IoT Operations Protocol SDK provides an Executor type that handles request-response correlation. The following example uses the Rust SDK.
A WASM module can invoke commands but can't act as a responder.
The following minimal responder answers the GetValue command on services/value/getvalue with a fixed JSON value.
Important
This responder and its deployment manifest are minimal examples for development and functional testing. They aren't production-ready. A production responder must add application-specific validation, error handling, observability, graceful shutdown, resource limits, and availability safeguards.
From the enrich project directory, create a Rust binary project alongside it:
cd ..
cargo new value-responder
cd value-responder
In Cargo.toml, add the Azure IoT Operations MQTT and Protocol SDK crates and Tokio:
[dependencies]
azure_iot_operations_mqtt = "1.2.2"
azure_iot_operations_protocol = "1.1.0"
tokio = { version = "1.52", features = ["full"] }
Replace src/main.rs with the following code. The responder reads the standard Azure IoT Operations SDK environment variables for the MQTT broker connection.
use azure_iot_operations_mqtt::{
    aio::connection_settings::MqttConnectionSettingsBuilder,
    session::{Session, SessionOptionsBuilder},
};
use azure_iot_operations_protocol::{
    application::ApplicationContextBuilder,
    common::payload_serialize::{BypassPayload, FormatIndicator},
    rpc_command::{
        executor::{OptionsBuilder, ResponseBuilder},
        Executor,
    },
};

const COMMAND_TOPIC: &str = "services/value/getvalue";
const COMMAND_NAME: &str = "GetValue";

#[tokio::main]
async fn main() -> Result<(), Box<dyn std::error::Error>> {
    let connection_settings = MqttConnectionSettingsBuilder::from_environment()?.build()?;
    let session_options = SessionOptionsBuilder::default()
        .connection_settings(connection_settings)
        .build()?;
    let session = Session::new(session_options)?;

    let application_context = ApplicationContextBuilder::default().build()?;
    let options = OptionsBuilder::default()
        .request_topic_pattern(COMMAND_TOPIC)
        .command_name(COMMAND_NAME)
        .build()?;
    let mut executor: Executor<BypassPayload, BypassPayload> = Executor::new(
        application_context,
        session.create_managed_client(),
        options,
    )?;

    let respond = async move {
        while let Some(request) = executor.recv().await.transpose()? {
            // Replace this fixed payload with your command implementation.
            let response_payload = BypassPayload {
                payload: br#"{"value":37.4}"#.to_vec(),
                content_type: "application/json".to_string(),
                format_indicator: FormatIndicator::Utf8EncodedCharacterData,
            };
            let response = ResponseBuilder::default()
                .payload(response_payload)?
                .build()?;

            request.complete(response).await?;
        }
        Ok::<(), Box<dyn std::error::Error>>(())
    };

    // Run the MQTT session and command loop concurrently.
    tokio::select! {
        result = session.run() => result?,
        result = respond => result?,
    }
    Ok(())
}
The responder must subscribe to the request topic that your module uses. The executor selects requests by topic, not by command name, so use a distinct request topic for each command. In this example, COMMAND_TOPIC must be identical in the module and the responder.
Run the responder with the Azure IoT Operations MQTT broker
To test the example responder in Azure IoT Operations, run it as a workload in the cluster. You can access the default MQTT broker listener only inside the cluster at aio-broker:18883. It requires TLS and Kubernetes service account token (SAT) authentication.
Create a file named Dockerfile in the value-responder project directory:
FROM mcr.microsoft.com/azurelinux/base/rust:1 AS build
RUN tdnf install -y openssl-devel && tdnf clean all
WORKDIR /build
COPY . .
RUN cargo build --release

FROM mcr.microsoft.com/azurelinux/base/core:3.0
RUN tdnf install -y openssl && tdnf clean all
COPY --from=build /build/target/release/value-responder /value-responder
ENTRYPOINT ["/value-responder"]
Create a .dockerignore file in the same directory so local build output isn't copied into the image:
target
Build the responder image and push it to a registry that your cluster can access. Replace <REGISTRY> with the registry hostname, for example, <ACR_NAME>.azurecr.io:
docker build --tag <REGISTRY>/value-responder:1.0.0 .
docker push <REGISTRY>/value-responder:1.0.0
Save the following manifest as value-responder.yaml. Replace <REGISTRY> with the same registry hostname:
apiVersion: v1
kind: ServiceAccount
metadata:
  name: value-responder
  namespace: azure-iot-operations
---
apiVersion: apps/v1
kind: Deployment
metadata:
  name: value-responder
  namespace: azure-iot-operations
spec:
  replicas: 1
  selector:
    matchLabels:
      app: value-responder
  template:
    metadata:
      labels:
        app: value-responder
    spec:
      serviceAccountName: value-responder
      containers:
        - name: value-responder
          image: <REGISTRY>/value-responder:1.0.0
          env:
            - name: AIO_MQTT_CLIENT_ID
              value: value-responder
            - name: AIO_BROKER_HOSTNAME
              value: aio-broker
            - name: AIO_BROKER_TCP_PORT
              value: "18883"
            - name: AIO_MQTT_USE_TLS
              value: "true"
            - name: AIO_TLS_CA_FILE
              value: /var/run/certs/aio-ca/ca.crt
            - name: AIO_SAT_FILE
              value: /var/run/secrets/tokens/broker-sat
          volumeMounts:
            - name: aio-ca
              mountPath: /var/run/certs/aio-ca
              readOnly: true
            - name: broker-token
              mountPath: /var/run/secrets/tokens
              readOnly: true
      volumes:
        - name: aio-ca
          configMap:
            name: azure-iot-operations-aio-ca-trust-bundle
        - name: broker-token
          projected:
            sources:
              - serviceAccountToken:
                  path: broker-sat
                  audience: aio-internal
                  expirationSeconds: 86400
Deploy the responder and check its status:
kubectl apply -f value-responder.yaml
kubectl rollout status deployment/value-responder -n azure-iot-operations
kubectl logs deployment/value-responder -n azure-iot-operations
If you configure a BrokerAuthorization resource on the listener, grant the responder's service account permission to connect, subscribe to the command request topic, and publish command responses. If the data flow's listener has authorization, also grant the data flow permission to publish to the request topic and subscribe to clients/{principal.clientId}/<REQUEST_TOPIC>. For more information, see Configure MQTT broker authorization.
Best practices and limitations
- Set a timeout. Set
timeout_secsto suit your responder's latency, or use0for the 5-second default. The host doesn't limit the value you set. Treat a timeout as a normal, expected outcome. - Minimize calls per message. Each call blocks the graph until the response or timeout arrives, so a slow or unavailable responder delays all later messages in the graph. The latency of sequential calls adds up, even across separate operators. For high-volume graphs, keep responder latency low and the timeout short.
- Restrict request topics. The module chooses the concrete request topic, and the host rejects topics that contain MQTT wildcards. Configure broker authorization so the data flow can publish only to the request topics it needs.
Test your module
To run the basic scenario in this article on your Azure IoT Operations cluster:
Deploy the graph you built and published by following Basic deployment with one WASM module. Use these node settings:
Node field Value graphSettings.registryEndpointRefThe name of the registry endpoint that points to your container registry. graphSettings.artifactenrich-graph:1.0.0sourceSettings.dataSourcesA list containing enrichment/requests.destinationSettings.dataDestinationenrichment/resultsRemove the sample's
graphSettings.configurationblock.A successful resource deployment doesn't mean the WASM runtime is ready to process messages. For an Azure Resource Manager deployment, check the graph's health:
az iot ops dataflowgraph show \
  --name $GRAPH_NAME \
  --profile default \
  --instance $AIO_INSTANCE_NAME \
  --resource-group $RESOURCE_GROUP \
  --query properties.status.healthState.status \
  --output tsv
For a Kubernetes debug deployment, use:
kubectl get dataflowgraph $GRAPH_NAME -n azure-iot-operations -o jsonpath='{.status.healthState.status}{"\n"}'Wait until the status is
Availablebefore publishing test messages. If it remains unavailable, check the graph's health message and the data flow pod logs.Run the
value-responderthat you created in Create a minimal responder. The responder must connect to the same Azure IoT Operations MQTT broker as the data flow.To run the responder in the cluster, follow Run the responder with the Azure IoT Operations MQTT broker.
To run the responder on your development machine, install
pkg-configand the OpenSSL development package, such aslibssl-devon Ubuntu, and expose a test broker listener that's reachable from outside the cluster and has TLS and authentication turned off. See Connect clients from outside the cluster. Set the following variables, replace<BROKER_ADDRESS>and<BROKER_PORT>with the listener's address and port, and then run the responder:export AIO_MQTT_CLIENT_ID=value-responder export AIO_BROKER_HOSTNAME=<BROKER_ADDRESS> export AIO_BROKER_TCP_PORT=<BROKER_PORT> export AIO_MQTT_USE_TLS=false cargo run --releaseLeave the responder running while you test the graph. Only turn off TLS and authentication on a development cluster. See Only turn off TLS and authentication for testing.
Subscribe to the
enrichment/resultsMQTT topic and leave the subscriber running. In another terminal, publish{"assetId":"asset-42"}to theenrichment/requeststopic. To connect an MQTT client, see Test connectivity to the MQTT broker. Verify that the graph output payload is{"value":37.4}.
If an invocation times out, verify that the responder is still running, that it's connected to the same broker, and that COMMAND_TOPIC is identical in the module and responder. After the basic round trip succeeds, validate the request payload, response handling, timeout behavior, and error policy.
To debug and test module logic that doesn't call the command invoker, see Debug WASM modules in VS Code and Test WASM modules.