Note
Access to this page requires authorization. You can try signing in or changing directories.
Access to this page requires authorization. You can try changing directories.
In this tutorial, you build an end-to-end scenario that captures media from an ONVIF camera and stores the snapshots and clips in Azure Blob Storage. By centralizing camera media in cloud storage, you can process and analyze it for scenarios such as defect detection on the assembly line, safety monitoring, customer dwell time tracking, and order accuracy verification.
To build the scenario, use the connector for ONVIF to discover the camera and its media endpoints, the media connector to capture snapshots and clips, and Azure Container Storage enabled by Azure Arc (ACSA) to synchronize the captured media to Azure Blob Storage.
In this tutorial, you:
- Configure an Azure Container Storage enabled by Azure Arc persistent volume claim for the media connector to use.
- Deploy the ONVIF and media connector templates.
- Create an ONVIF device with discovery enabled.
- Import the discovered media device and configure a media asset to capture clips.
- Verify that the captured clips synchronize to Azure Blob Storage.
Prerequisites
Before you start this tutorial, complete the following setup steps:
Deploy an instance of Azure IoT Operations with secure settings enabled. Secure settings let you store the credentials you need to connect to your ONVIF camera. See Deploy Azure IoT Operations.
Create an Azure storage account with a blob container. See Create a storage account. Note the name of your storage account and container.
An ONVIF compliant camera that's accessible from your Azure IoT Operations cluster. The camera must support Profile S or Profile T for video streaming.
Access to the operations experience web UI. To sign in, you need a Microsoft Entra ID account with at least contributor permissions for the resource group that contains your Azure IoT Operations instance. See Operations experience web UI.
Azure Container Storage enabled by Azure Arc installed on your cluster, with a cloud ingest subvolume configured for the media connector. To complete this setup:
- Install ACSA. See Install Azure Container Storage enabled by Azure Arc.
- Configure a cloud ingest subvolume that targets your storage account and blob container. See Configure Cloud Ingest subvolumes. During setup, note the name of your persistent volume claim (for example,
media-pvc) and the ingest subvolume path (for example,ingestSubDir). You use both values later in this tutorial.
Configure the persistent volume claim
The media connector writes captured media to a persistent volume claim. ACSA automatically uploads that media from the cloud ingest subvolume to your Azure Blob Storage container.
To prepare the volume claim for use with the media connector, confirm you have the following values from the ACSA setup you completed in Prerequisites:
- The persistent volume claim name, such as
media-pvc. Use this name when you deploy the media connector template. - The ingest subvolume path relative to the volume mount, such as
ingestSubDir. Use this path when you create the media asset.
Deploy the ONVIF and media connector templates
Before you can use the ONVIF and media connectors in the operations experience web UI, an administrator must add connector template instances to your Azure IoT Operations instance.
Tip
You can also deploy connector templates from the command line by using the az iot ops connector template command. Run az iot ops connector template --help to see the available options.
Deploy the ONVIF connector template
In the Azure portal, go to your Azure IoT Operations instance, select Components > Connector templates, and then select Create a connector template.
On the first page of Add an Akri connector template, select Azure IoT Operations connector for ONVIF, and then select Metadata.
On Metadata, enter a name for your connector template such as
onvif-connector-template, and then select Device inbound endpoint type.On Device inbound endpoint type, check that the endpoint type is
Microsoft.Onvif, and then select Diagnostics configurations.On Diagnostics configurations, accept the default settings, and then select Runtime configuration.
On Runtime configuration, accept the default settings, and then select Review.
On Review, review the details of the connector template instance, and then select Create to create the connector template instance.
Deploy the media connector template
The media connector needs a persistent volume claim to save captured media to Azure Blob Storage.
In the Azure portal, go to your Azure IoT Operations instance, select Components > Connector templates, and then select Create a connector template.
On the first page of Add an Akri connector template, select Azure IoT Operations media connector, and then select Metadata.
On Metadata, enter a name for your connector template such as
media-connector-template, and then select Device inbound endpoint type.On the Device inbound endpoint type page, check that the endpoint type is
Microsoft.Media, and then select Diagnostics configurations.On Diagnostics configurations, accept the default settings, and then select Runtime configuration.
On the Runtime configuration page, select Add a volume claim and enter the details of the persistent volume claim you created for ACSA:
Setting Value Claim name The name of your persistent volume claim, such as media-pvcMount path /data. The connector pod mounts the persistent volume claim at this path in its filesystem.Important
The mount path must start with the
/character.Select Review.
On Review, review the details of the connector template instance, and then select Create to create the connector template instance.
Create an ONVIF device
Create a device that represents your ONVIF compliant camera. ONVIF devices automatically enable discovery to find the device's capabilities and media endpoints.
In the operations experience web UI, select Devices.
Select Create new. On the Device details page, enter a name for the device such as
my-onvif-camera.To define the inbound endpoint, select New on the Microsoft.Onvif tile. Enter the details for your ONVIF camera. The example column shows examples from a Tapo C210 camera, but replace these values with the details for your camera:
Setting Value Example Endpoint name A name for the endpoint, such as onvif-endpointonvif-endpointEndpoint address The URL of your ONVIF camera's device service http://192.168.0.158:2020/onvif/device_serviceAuthentication mode Select Username password if your camera requires authentication Username password Username secret reference If you use authentication, the secret reference for the username Reference to username secret in your vault Password secret reference If you use authentication, the secret reference for the password Reference to password secret in your vault Advanced > Accept invalid hostnames Accept invalid hostnames in certificates for the ONVIF connection, such as when you use a self-signed certificate on the camera No Advanced > Accept invalid certificates Accept invalid certificates for the ONVIF connection, such as when you use a self-signed certificate on the camera No Advanced > Fallback to username token auth Fall back to UsernameToken authentication if digest authentication fails for the ONVIF connection Yes Tip
To use username and password authentication, create the secrets in your Azure Key Vault and reference them from the operations experience, or create them directly in the operations experience. For details, see the secrets management guidance in Prerequisites.
Select Save to add the endpoint to the device.
On the Device details page, select Next.
On the Add custom property page, optionally add custom properties to the device. Select Next when you're done.
On the Summary page, review the details, and then select Create to create the device.
After you create the device, the connector for ONVIF automatically discovers the camera's capabilities and media endpoints.
View and import the discovered media device
After the connector for ONVIF discovers the camera's media endpoints, you can import the discovered device to create a media device.
In the operations experience web UI, select Discovery.
Select the Discovered devices tab. You see the discovered media device from your ONVIF camera.
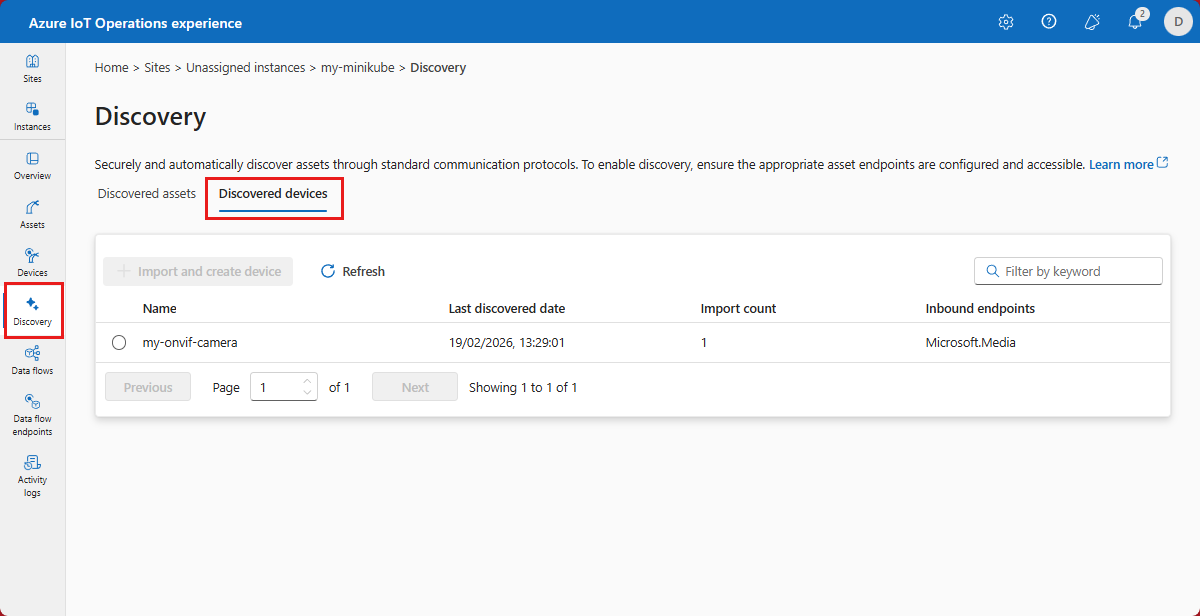
Select the discovered media device, and then select Import and create device.
On Device details, enter a name for the device, such as
my-onvif-camera-media. The page shows all the discovered media streams with their URLs and capabilities.Tip
You can remove any inbound endpoints that you don't need by selecting them and then selecting Remove inbound endpoint.
For each endpoint you want to keep, select an Authentication method. If your camera requires authentication for media streams, select Username password and provide the secret references. If you're using the Tapo C210 camera, select the same username and password secret references you created for the ONVIF device.
Select Next.
On Add custom property, review the discovered properties. Optionally update, delete, or add custom properties. Select Next when you're done.
On Summary, review the details of the device. Select Create.
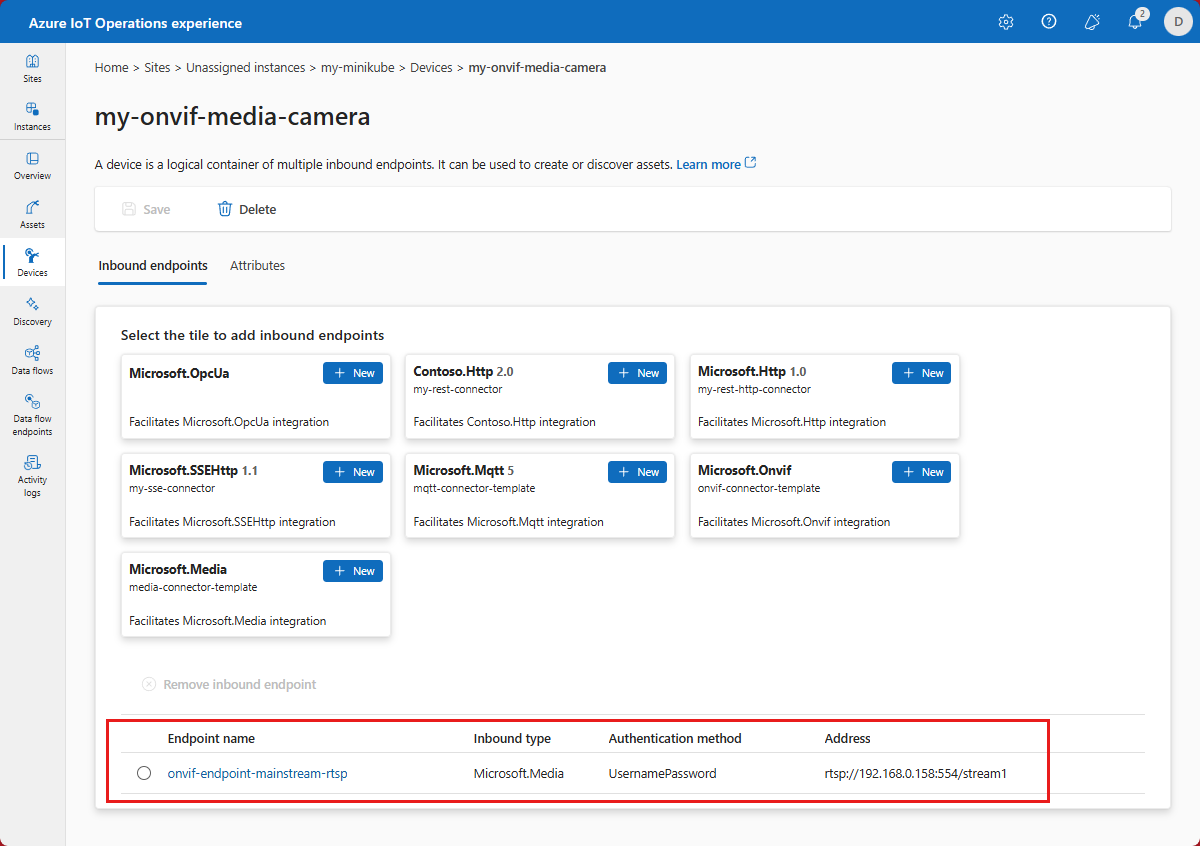
After a few minutes, the Devices page shows the new media device with a Microsoft.Media endpoint.
Create a media asset to save clips to Azure Blob Storage
Create an asset that captures video clips from the camera and saves them to the persistent volume claim. ACSA automatically uploads the clips to your Azure Blob Storage account. This section assumes that you configured Azure Container Storage enabled by Azure Arc with a subvolume called ingestSubDir and mounted the persistent volume claim to the connector template instance at /data.
Find the name of the media endpoint on the media device you created in View and import the discovered media device. The device's details page in the operations experience shows the endpoint name, or run
az iot ops ns device show --name <your-new-media-device-name> --instance <your-instance-name> -g <your-resource-group-name>to list the device's endpoints.Run the following Azure CLI command to create the media asset. Replace
<your-instance-name>,<your-resource-group-name>, and<your-media-endpoint-name>with values for your environment:az iot ops ns asset media create --name my-camera-clips --instance <your-instance-name> -g <your-resource-group-name> --device <your-new-media-device-name> --endpoint <your-media-endpoint-name>Add a stream to the asset that saves 30-second MKV clips to the persistent volume claim:
az iot ops ns asset media stream add --asset my-camera-clips --instance <your-instance-name> -g <your-resource-group-name> --name clipstream --task-type clip-to-fs --format mkv --duration 30 --dest path=/data/ingestSubDir/clips --disable-autostart falseImportant
The path must start with the mount path you configured in the media connector template (
/datain this example), continue with the path you configured in the ingest subvolume (ingestSubDirin this example), and end with the folder for saving clips.
Verify the captured media in Azure Blob Storage
After you create the asset, the media connector starts capturing clips from the camera and saves them to the persistent volume claim. ACSA automatically uploads the clips to your Azure Blob Storage account.
In the Azure portal, go to your storage account and select Containers.
Select the container you configured for ACSA.
Navigate to the folder structure that matches your ACSA edge volume configuration. You see the uploaded clips:
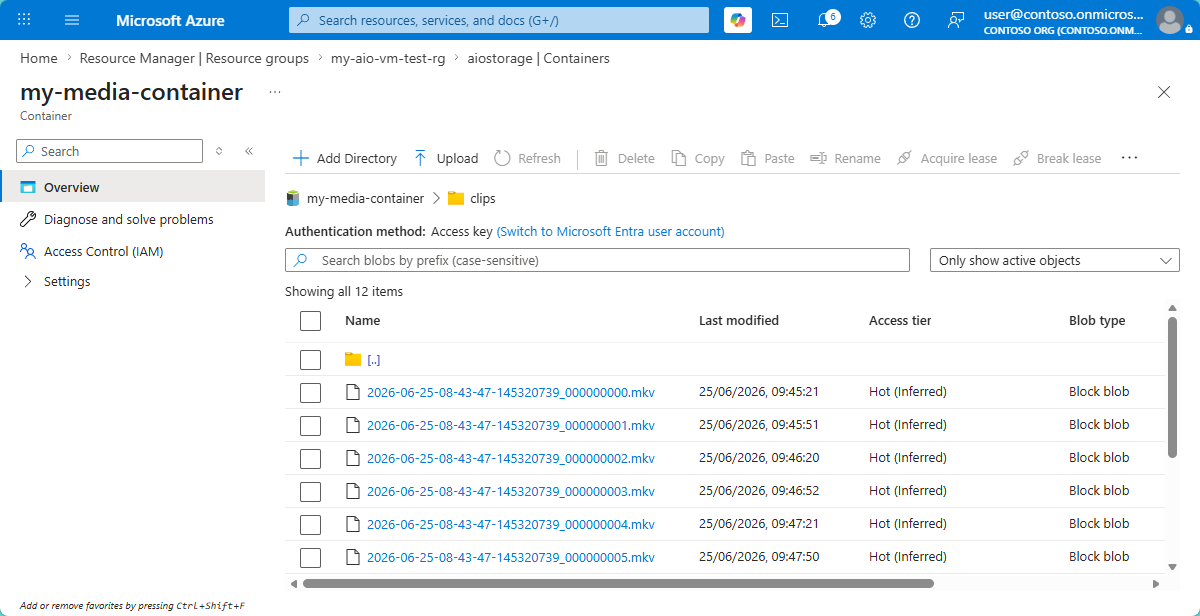
The media connector saves the clips in the
clipsfolder with timestamp-based names.
Troubleshoot ONVIF media capture and Azure Blob Storage upload
If you don't see captured media in Azure Blob Storage:
Verify the media connector pod is running.
kubectl get pods -n azure-iot-operations | grep mediaCheck the media connector logs for errors.
kubectl logs -n azure-iot-operations -l app=media-connectorVerify the persistent volume claim is bound.
kubectl get pvc -n azure-iot-operationsVerify ACSA is running and has the correct configuration.
Make sure your camera is accessible from the cluster and the Real-Time Streaming Protocol (RTSP) stream URL is correct.
Clean up resources
When you no longer need the resources you created in this tutorial, delete them to avoid extra charges and to keep your cluster tidy:
Delete the media asset in the operations experience web UI, or by running the appropriate command.
az iot ops ns asset media delete --name my-camera-clips --instance <your-instance-name> -g <your-resource-group-name>Delete the media device and the ONVIF device in the operations experience web UI.
Delete the ONVIF and media connector templates in the Azure portal, under your Azure IoT Operations instance.
If you no longer need the cloud ingest subvolume or persistent volume claim, remove them from your cluster.
Delete the blob container or storage account if you no longer need the captured media.