Configure level 3 cluster in an isolated network with Azure IoT Layered Network Management Preview
Important
Azure IoT Operations Preview – enabled by Azure Arc is currently in PREVIEW. You shouldn't use this preview software in production environments.
See the Supplemental Terms of Use for Microsoft Azure Previews for legal terms that apply to Azure features that are in beta, preview, or otherwise not yet released into general availability.
You can configure a special isolated network environment for deploying Azure IoT Operations Preview. For example, level 3 or lower in the ISA-95 network architecture. In this article, you set up a Kubernetes cluster to meet all the prerequisites of Azure IoT Operations and Arc-enable the cluster through the Azure IoT Layered Network Management Preview service in the upper level. Before you start this process, the Layered Network Management service has to be ready for accepting the connection request from this level.
You'll complete the following tasks:
- Set up the host system and install all the required software in an internet facing environment.
- Install the Kubernetes of your choice.
- Move the host to the isolated network environment.
- Use a customized DNS setting to direct the network traffic to the Layered Network Management service in parent level.
- Arc-enable the cluster.
Prerequisites
Follow the guidance for hardware requirements and prerequisites sections in Prepare your Azure Arc-enabled Kubernetes cluster.
Configure a Kubernetes cluster
You can choose to use AKS Edge Essentials hosted on Windows 11 or a K3S cluster on Ubuntu for the Kubernetes cluster.
You should complete this step in an internet facing environment outside of the isolated network. Otherwise, you need to prepare the offline installation package for the following software in the next section.
Prepare an Ubuntu machine
Ubuntu 22.04 LTS is the recommended version for the host machine.
Install Helm 3.8.0 or later.
Install Kubectl.
Run the following command to increase the user watch/instance limits.
echo fs.inotify.max_user_instances=8192 | sudo tee -a /etc/sysctl.conf
echo fs.inotify.max_user_watches=524288 | sudo tee -a /etc/sysctl.conf

sudo sysctl -p
For better performance, increase the file descriptor limit:
echo fs.file-max = 100000 | sudo tee -a /etc/sysctl.conf

sudo sysctl -p
Install the following optional software if you plan to try Azure IoT Operations quickstarts or MQTT related scenarios.
Install the Azure CLI. You can install the Azure CLI directly onto the level 3 machine or on another developer or jumpbox machine if you plan to access the level 3 cluster remotely. If you choose to access the Kubernetes cluster remotely to keep the cluster host clean, you run the kubectl and az" related commands from the developer machine for the rest of the steps in this article.
Install Azure CLI. Follow the steps in Install Azure CLI on Linux.
Install connectedk8s and other extensions.
az extension add --name connectedk8s
az extension add --name k8s-extension
az extension add --name customlocation
Install Azure CLI extension using
az extension add --name azure-iot-ops.
Create the K3S cluster
Install K3S with the following command:
curl -sfL https://get.k3s.io | sh -s - --disable=traefik --write-kubeconfig-mode 644Important
Be sure to use the
--disable=traefikparameter to disable treafik. Otherwise, you might have an issue when you try to allocate public IP for the Layered Network Management service in later steps.As an alternative, you can configure the K3S offline using the steps in the Air-Gap Install documentation after you move the device to the isolated network environment.
Copy the K3s configuration yaml file to
.kube/config.mkdir ~/.kube cp ~/.kube/config ~/.kube/config.back sudo KUBECONFIG=~/.kube/config:/etc/rancher/k3s/k3s.yaml kubectl config view --flatten > ~/.kube/merged mv ~/.kube/merged ~/.kube/config chmod 0600 ~/.kube/config export KUBECONFIG=~/.kube/config #switch to k3s context kubectl config use-context default
Move the device to level 3 isolated network
After the device is moved to your level 3 isolated network layer, it's required to have a custom DNS.
- If you choose the CoreDNS approach, complete the steps in the instruction and your cluster is ready to connect to Arc.
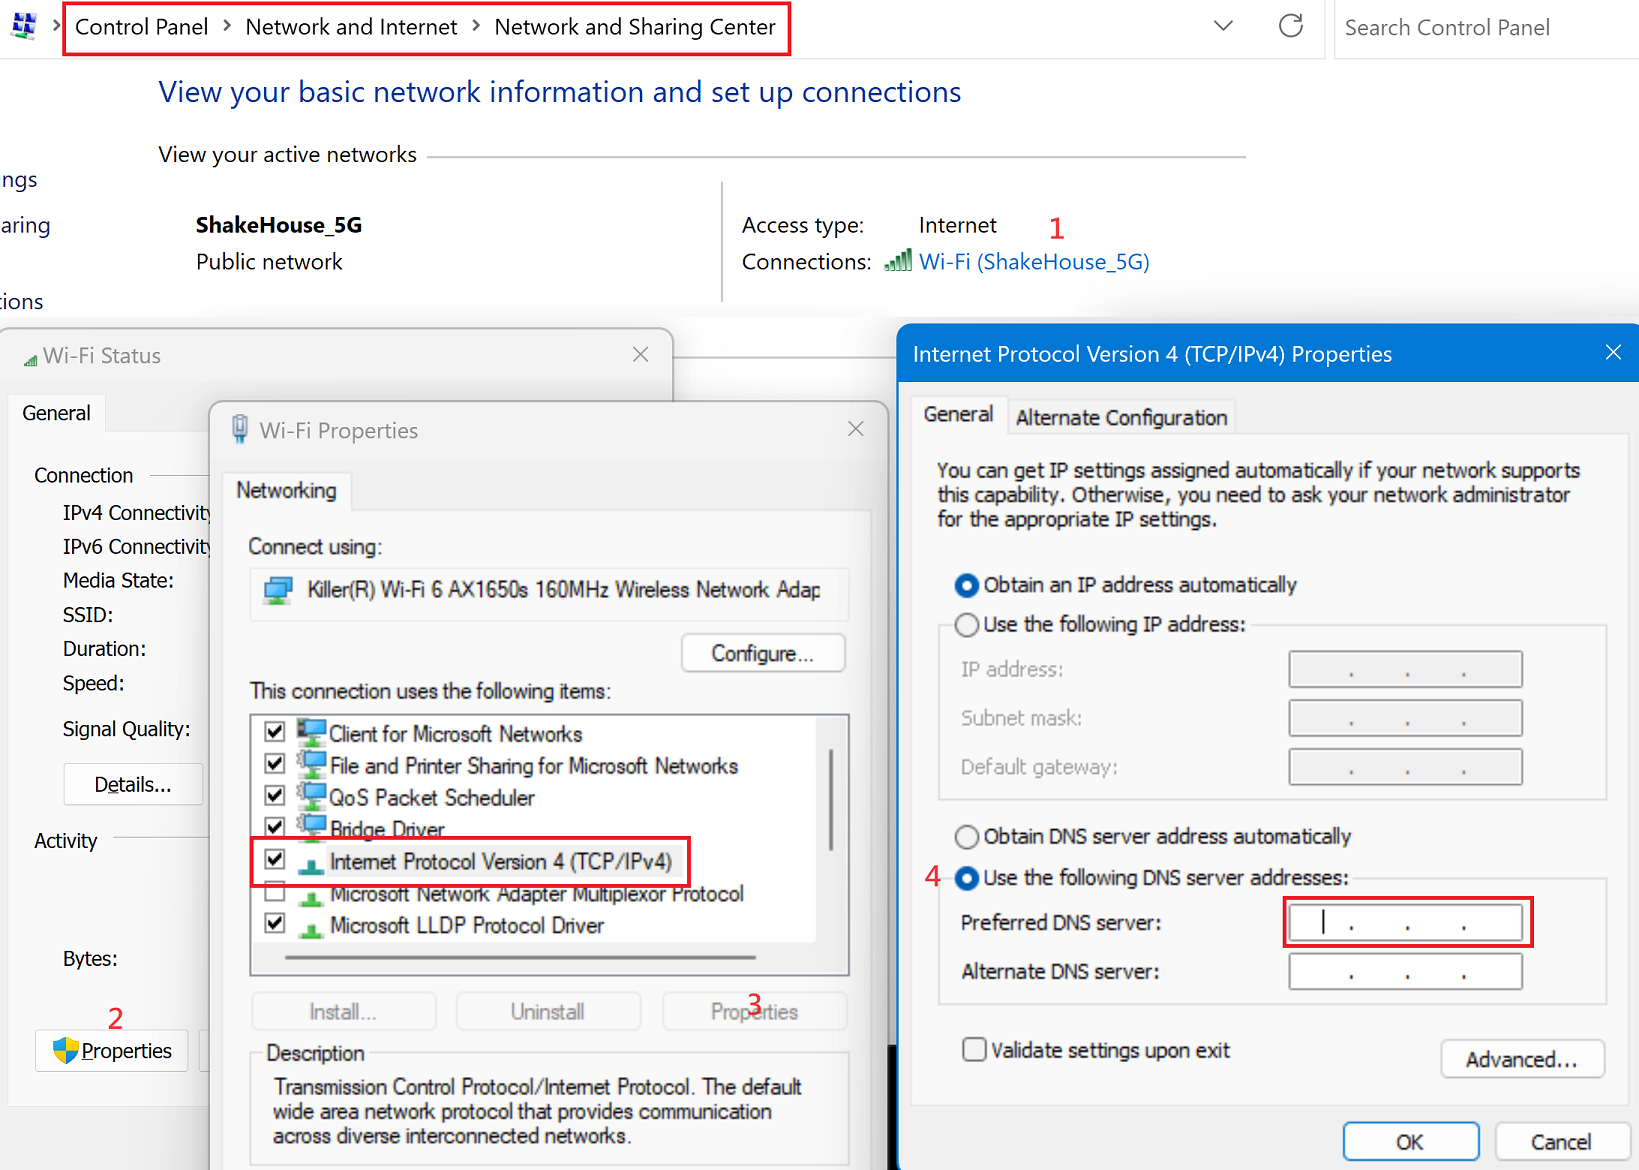
- If you use a DNS server, you need to have the DNS server ready, then configure the DNS setting of Ubuntu. The following example uses Ubuntu UI:
- Open the Wi-Fi Settings.
- Select the setting of the current connection.
- In the IPv4 tab, disable the Automatic setting for DNS and enter the local IP of DNS server.
Provision the cluster to Azure Arc
Before provisioning to Azure Arc, use the following command to make sure the DNS server is working as expected:
dig login.microsoftonline.com
The output should be similar to the following example. In the ANSWER SECTION, verify the IP address is the IP of parent level machine that you set up earlier.
; <<>> DiG 9.18.12-0ubuntu0.22.04.3-Ubuntu <<>> login.microsoftonline.com
;; global options: +cmd
;; Got answer:
;; ->>HEADER<<- opcode: QUERY, status: NOERROR, id: 28891
;; flags: qr rd ra; QUERY: 1, ANSWER: 1, AUTHORITY: 0, ADDITIONAL: 1

;; OPT PSEUDOSECTION:
; EDNS: version: 0, flags:; udp: 65494
;; QUESTION SECTION:
;login.microsoftonline.com.     IN      A

;; ANSWER SECTION:
login.microsoftonline.com. 0    IN      A       100.104.0.165
Arc-enable cluster
Sign in with Azure CLI. To avoid permission issues later, it's important that the sign in happens interactively using a browser window:
az loginSet environment variables for the rest of the setup. Replace values in
<>with valid values or names of your choice. TheCLUSTER_NAMEandRESOURCE_GROUPare created based on the names you provide:# Id of the subscription where your resource group and Arc-enabled cluster will be created $SUBSCRIPTION_ID = "<subscription-id>" # Azure region where the created resource group will be located # Currently supported regions: : "westus3" or "eastus2" $LOCATION = "WestUS3" # Name of a new resource group to create which will hold the Arc-enabled cluster and Azure IoT Operations resources $RESOURCE_GROUP = "<resource-group-name>" # Name of the Arc-enabled cluster to create in your resource group $CLUSTER_NAME = "<cluster-name>"Set the Azure subscription context for all commands:
az account set -s $SUBSCRIPTION_IDRegister the required resource providers in your subscription:
az provider register -n "Microsoft.ExtendedLocation"
az provider register -n "Microsoft.Kubernetes"
az provider register -n "Microsoft.KubernetesConfiguration"
az provider register -n "Microsoft.IoTOperationsOrchestrator"
az provider register -n "Microsoft.IoTOperationsMQ"
az provider register -n "Microsoft.IoTOperationsDataProcessor"
az provider register -n "Microsoft.DeviceRegistry"
Use the az group create command to create a resource group in your Azure subscription to store all the resources:
az group create --location $LOCATION --resource-group $RESOURCE_GROUP --subscription $SUBSCRIPTION_IDUse the az connectedk8s connect command to Arc-enable your Kubernetes cluster and manage it in the resource group you created in the previous step:
az connectedk8s connect -n $CLUSTER_NAME -l $LOCATION -g $RESOURCE_GROUP --subscription $SUBSCRIPTION_IDTip
If the
connectedk8scommands fail, try using the cmdlets in Connect your AKS Edge Essentials cluster to Arc.Fetch the
objectIdoridof the Microsoft Entra ID application that the Azure Arc service uses. The command you use depends on your version of Azure CLI:# If you're using an Azure CLI version lower than 2.37.0, use the following command: az ad sp show --id bc313c14-388c-4e7d-a58e-70017303ee3b --query objectId -o tsv# If you're using Azure CLI version 2.37.0 or higher, use the following command: az ad sp show --id bc313c14-388c-4e7d-a58e-70017303ee3b --query id -o tsvUse the az connectedk8s enable-features command to enable custom location support on your cluster. Use the
objectIdoridvalue from the previous command to enable custom locations on the cluster:az connectedk8s enable-features -n $CLUSTER_NAME -g $RESOURCE_GROUP --custom-locations-oid <objectId/id> --features cluster-connect custom-locations
Configure cluster network
Important
These steps are for AKS Edge Essentials only.
After you've deployed Azure IoT Operations to your cluster, enable inbound connections to Azure IoT MQ Preview broker and configure port forwarding:
- Enable a firewall rule for port 8883:
New-NetFirewallRule -DisplayName "Azure IoT MQ" -Direction Inbound -Protocol TCP -LocalPort 8883 -Action Allow - Run the following command and make a note of the IP address for the service called
aio-mq-dmqtt-frontend:kubectl get svc aio-mq-dmqtt-frontend -n azure-iot-operations -o jsonpath='{.status.loadBalancer.ingress[0].ip}' - Enable port forwarding for port 8883. Replace
<aio-mq-dmqtt-frontend IP address>with the IP address you noted in the previous step:netsh interface portproxy add v4tov4 listenport=8883 listenaddress=0.0.0.0 connectport=8883 connectaddress=<aio-mq-dmqtt-frontend IP address>
Related content
Feedback
Coming soon: Throughout 2024 we will be phasing out GitHub Issues as the feedback mechanism for content and replacing it with a new feedback system. For more information see: https://aka.ms/ContentUserFeedback.
Submit and view feedback for