Note
Access to this page requires authorization. You can try signing in or changing directories.
Access to this page requires authorization. You can try changing directories.
In this article, you learn to create a custom API for HTTP health probes using Python, FLASK, and psutil. Health checks are performed on backend instances using HTTP GET and marked as healthy or unhealthy based on the response. The custom probe in this article marks instances as unhealthy if their CPU usage is over 75%. HTTP health probes can be used for many purposes, not just CPU utilization, when combine with your own logic and health checks.
Prerequisites
- An Azure account with an active subscription. Create an account for free and access to the Azure portal.
- An existing standard SKU Azure Load Balancer. For more information on creating a load balancer, see Create a public load balancer using the Azure portal.
- An Azure Virtual Machine running linux in the backend pool of the Azure Load Balancer, see Create a virtual machine using the Azure portal.
- Linux virtual machine has python3, pip and the following packages installed:
- flask
- flask_restful
- psutil
- Remote access to the virtual machine via SSH or Azure Bastion.
Important
Hourly pricing starts from the moment that Bastion is deployed, regardless of outbound data usage. For more information, see Pricing and SKUs. If you're deploying Bastion as part of a tutorial or test, we recommend that you delete this resource after you finish using it.
Configure API on virtual machine
In this section, you configure the virtual machine to run the custom API for the HTTP health probe.
Connect to the VM using SSH or Azure Bastion. This article uses SSH to connect to the VM.
Create a new folder to store the code for the health API, and enter the new folder:
mkdir health_API && cd health_APICreate a new python file and paste the following code into the file:
touch health.py && vim health.py# Import libraries from flask import Flask from flask_restful import Resource, Api import psutil # Define app and API app = Flask(__name__) api = Api(app) # Define API GET method class check_CPU_VM(Resource): def get(self): # If VM CPU utilization is over 75%, throw an error if psutil.cpu_percent() >= 75.0: return '',408 # Else keep the VM as healthy else: return '',200 # Add the GET method to the API at the path 'health_check' api.add_resource(check_CPU_VM, '/health_check/') # Expose the API on all available IP address on the VM if __name__ == "__main__": app.run(debug=True, host ="0.0.0.0")Once you have copied the code into the file, install python3 and the required packages (flask, flask_restful, psutil) if necessary. The following commands install python3 and the required packages on Ubuntu:
#Install Python
sudo apt-get update
sudo apt-get install python3
sudo apt-get install python3-pip
pip3 install flask flask_restful psutil
Run the API using the following command:
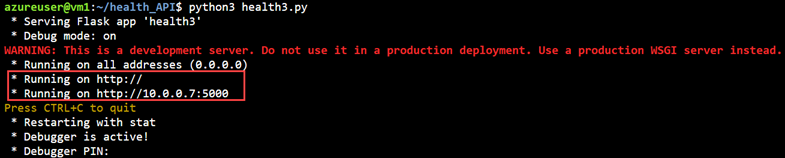
python3 health.pyOnce the API starts running, you see two IP addresses that are exposed to the API on port 5000.
- The first IP address is the local IP address that is only available to the VM.
- The second IP address is the private IP address of the VM, the Load Balancer’s health probe tests this IP address.

Note
The API will need to be running on the VM for the health probe to work. When you close the SSH session, the API will stop running. Keep the window open while creating the health probe or run the API in the background.
Create health probe
In this section, you create the health probe used to check the health of the backend instances running the custom API.
Navigate to the Azure portal and select the load balancer that you would like to add the health probe to.
Select Health probes under Settings.
Select + Add.
In the Add Health Probe page, enter or select the following information:
Setting Value Name Enter HTTP_Health Protocol Select HTTP Port Enter 5000 Path Enter /health_check/ Interval (seconds) Enter 5 Select OK to create the health probe.
Create the load balancer rule
In this section, you create the load balancer rule that uses the HTTP health probe.
From the load balancer overview page, select Load balancing rules under Settings.
Select + Add.
On the Add load balancing rule page, enter the following information:
Setting Value Name Enter custom_HTTP_rule Frontend IP address Select the frontend IP address of your load balancer. Backend pool Select the backend pool that you want to use. Protocol Select TCP Port Enter 5000 Backend port Enter 5000 Health probe Select HTTP_Health (HTTP:5000/health_check/) Session persistence Select None Idle timeout (minutes) Enter 5 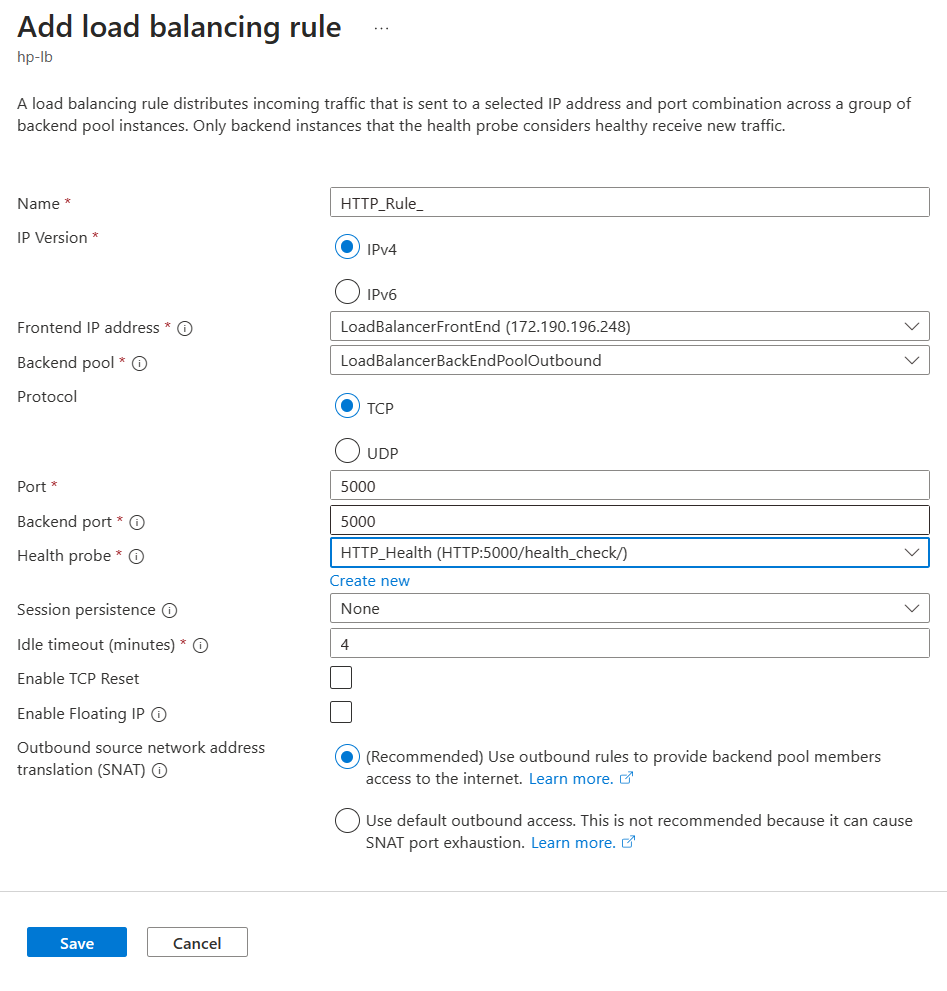
Select Save to create the load balancing rule.
Verify health probe
In this section, you verify that the health probe is working as expected by checking the running API and the load balancer metrics.
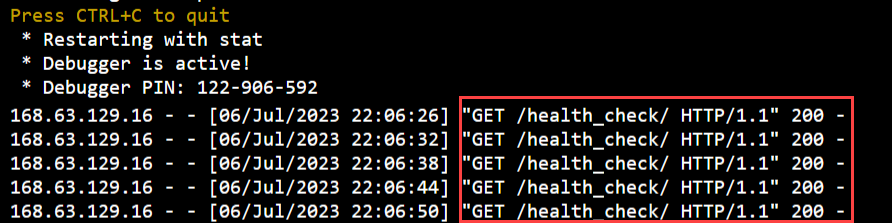
Navigate back to the SSH session to the VM running the API.
In the console window that is running the API, you should see a GET request every 5 seconds checking the health of the VM, and responding with a 200 status code if the VM is healthy.
Enter ctrl+c to stop the API.
Close the SSH session to the VM.
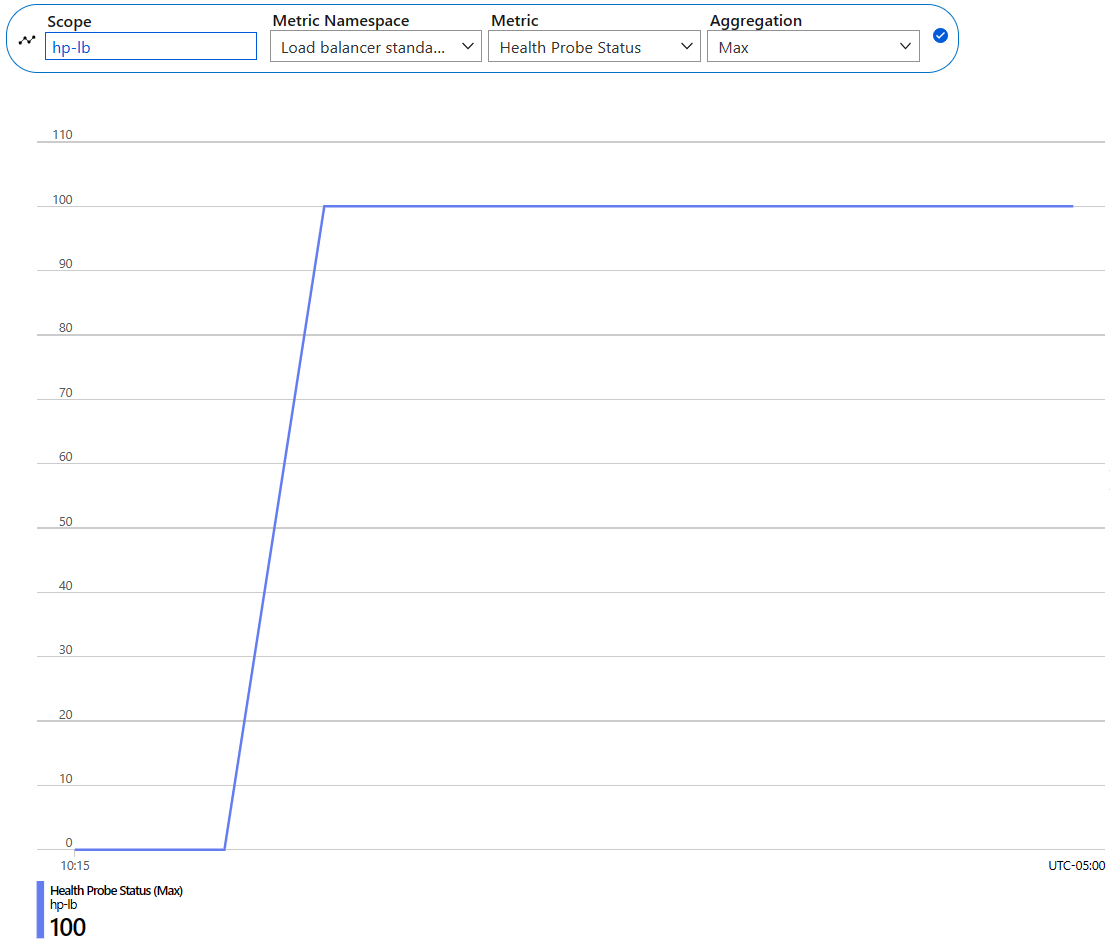
Navigate back to the load balancer overview page.
Select Metrics under Monitoring.
Select + Add metric and enter/select the following information:
Setting Value Scope Select the load balancer to monitor. Metric Namespace Select Load balancer standard Metric Select Health Probe status Aggregation Select Max Select checkmark to add the metric.
Clean up resources
When no longer needed, delete the resource group, load balancer, and all related resources.