Note
Access to this page requires authorization. You can try signing in or changing directories.
Access to this page requires authorization. You can try changing directories.
This article shows you how to add IPv6 connectivity to an existing IPv4 application in an Azure virtual network with a Standard Load Balancer and Public IP. The in-place upgrade includes:
- IPv6 address space for the virtual network and subnet
- Standard Load Balancer with both IPv4 and IPV6 frontend configurations
- VMs with NICs that have both an IPv4 + IPv6 configuration
- IPv6 Public IP so the load balancer has Internet-facing IPv6 connectivity
Azure Cloud Shell
Azure hosts Azure Cloud Shell, an interactive shell environment that you can use through your browser. You can use either Bash or PowerShell with Cloud Shell to work with Azure services. You can use the Cloud Shell preinstalled commands to run the code in this article, without having to install anything on your local environment.
To start Azure Cloud Shell:
| Option | Example/Link |
|---|---|
| Select Try It in the upper-right corner of a code or command block. Selecting Try It doesn't automatically copy the code or command to Cloud Shell. |  |
| Go to https://shell.azure.com, or select the Launch Cloud Shell button to open Cloud Shell in your browser. |  |
| Select the Cloud Shell button on the menu bar at the upper right in the Azure portal. |  |
To use Azure Cloud Shell:
Start Cloud Shell.
Select the Copy button on a code block (or command block) to copy the code or command.
Paste the code or command into the Cloud Shell session by selecting Ctrl+Shift+V on Windows and Linux, or by selecting Cmd+Shift+V on macOS.
Select Enter to run the code or command.
If you choose to install and use PowerShell locally, this article requires the Azure PowerShell module version 6.9.0 or later. Run Get-Module -ListAvailable Az to find the installed version. If you need to upgrade, see Install Azure PowerShell module. If you're running PowerShell locally, you also need to run Connect-AzAccount to create a connection with Azure.
Prerequisites
This article assumes that you deployed a Standard Load Balancer as described in Quickstart: Create a Standard Load Balancer - Azure PowerShell.
Retrieve the resource group
Before you can create your dual-stack virtual network, you must retrieve the resource group with Get-AzResourceGroup.
$rg = Get-AzResourceGroup -ResourceGroupName "myResourceGroupSLB"
Create an IPv6 IP addresses
Create a public IPv6 address with New-AzPublicIpAddress for your Standard Load Balancer. The following example creates an IPv6 public IP address named PublicIP_v6 in the myResourceGroupSLB resource group:
$PublicIP_v6 = New-AzPublicIpAddress `
  -Name "PublicIP_v6" `
  -ResourceGroupName $rg.ResourceGroupName `
  -Location $rg.Location  `
  -Sku Standard  `
  -AllocationMethod Static `
  -IpAddressVersion IPv6
Configure load balancer frontend
Retrieve the existing load balancer configuration and then add the new IPv6 IP address using Add-AzLoadBalancerFrontendIpConfig as follows:
# Retrieve the load balancer configuration
$lb = Get-AzLoadBalancer -ResourceGroupName $rg.ResourceGroupName -Name "MyLoadBalancer"

# Add IPv6 components to the local copy of the load balancer configuration
$lb | Add-AzLoadBalancerFrontendIpConfig `
  -Name "dsLbFrontEnd_v6" `
  -PublicIpAddress $PublicIP_v6

#Update the running load balancer with the new frontend
$lb | Set-AzLoadBalancer
Configure load balancer backend pool
Create the backend pool on the local copy of the load balancer configuration and update the running load balancer with the new backend pool configuration as follows:
$lb | Add-AzLoadBalancerBackendAddressPoolConfig -Name "LbBackEndPool_v6"

# Update the running load balancer with the new backend pool
$lb | Set-AzLoadBalancer
Configure load balancer rules
Retrieve the existing load balancer frontend and backend pool configuration and then add new load-balancing rules using Add-AzLoadBalancerRuleConfig.
# Retrieve the updated (live) versions of the frontend and backend pool
$frontendIPv6 = Get-AzLoadBalancerFrontendIpConfig -Name "dsLbFrontEnd_v6" -LoadBalancer $lb
$backendPoolv6 = Get-AzLoadBalancerBackendAddressPoolConfig -Name "LbBackEndPool_v6" -LoadBalancer $lb

# Create new LB rule with the frontend and backend
$lb | Add-AzLoadBalancerRuleConfig `
  -Name "dsLBrule_v6" `
  -FrontendIpConfiguration $frontendIPv6 `
  -BackendAddressPool $backendPoolv6 `
  -Protocol Tcp `
  -FrontendPort 80 `
  -BackendPort 80

#Finalize all the load balancer updates on the running load balancer
$lb | Set-AzLoadBalancer
Add IPv6 address ranges
Add IPv6 address ranges to the virtual network and subnet hosting the VMs as follows:
#Add IPv6 ranges to the VNET and subnet
#Retrieve the VNET object
$vnet = Get-AzVirtualNetwork  -ResourceGroupName $rg.ResourceGroupName -Name "myVnet"

#Add IPv6 prefix to the VNET
$vnet.addressspace.addressprefixes.add("fd00:db8:deca::/48")

#Update the running VNET
$vnet |  Set-AzVirtualNetwork

#Retrieve the subnet object from the local copy of the VNET
$subnet= $vnet.subnets[0]

#Add IPv6 prefix to the Subnet (subnet of the VNET prefix, of course)
$subnet.addressprefix.add("fd00:db8:deca::/64")

#Update the running VNET with the new subnet configuration
$vnet |  Set-AzVirtualNetwork
Add IPv6 configuration to NIC
Configure all of the VM NICs with an IPv6 address using Add-AzNetworkInterfaceIpConfig as follows:
#Retrieve the NIC objects
$NIC_1 = Get-AzNetworkInterface -Name "myNic1" -ResourceGroupName $rg.ResourceGroupName
$NIC_2 = Get-AzNetworkInterface -Name "myNic2" -ResourceGroupName $rg.ResourceGroupName
$NIC_3 = Get-AzNetworkInterface -Name "myNic3" -ResourceGroupName $rg.ResourceGroupName

#Add an IPv6 IPconfig to NIC_1 and update the NIC on the running VM
$NIC_1 | Add-AzNetworkInterfaceIpConfig -Name MyIPv6Config -Subnet $vnet.Subnets[0]  -PrivateIpAddressVersion IPv6 -LoadBalancerBackendAddressPool $backendPoolv6
$NIC_1 | Set-AzNetworkInterface

#Add an IPv6 IPconfig to NIC_2 and update the NIC on the running VM
$NIC_2 | Add-AzNetworkInterfaceIpConfig -Name MyIPv6Config -Subnet $vnet.Subnets[0]  -PrivateIpAddressVersion IPv6 -LoadBalancerBackendAddressPool $backendPoolv6
$NIC_2 | Set-AzNetworkInterface

#Add an IPv6 IPconfig to NIC_3 and update the NIC on the running VM
$NIC_3 | Add-AzNetworkInterfaceIpConfig -Name MyIPv6Config -Subnet $vnet.Subnets[0]  -PrivateIpAddressVersion IPv6 -LoadBalancerBackendAddressPool $backendPoolv6
$NIC_3 | Set-AzNetworkInterface
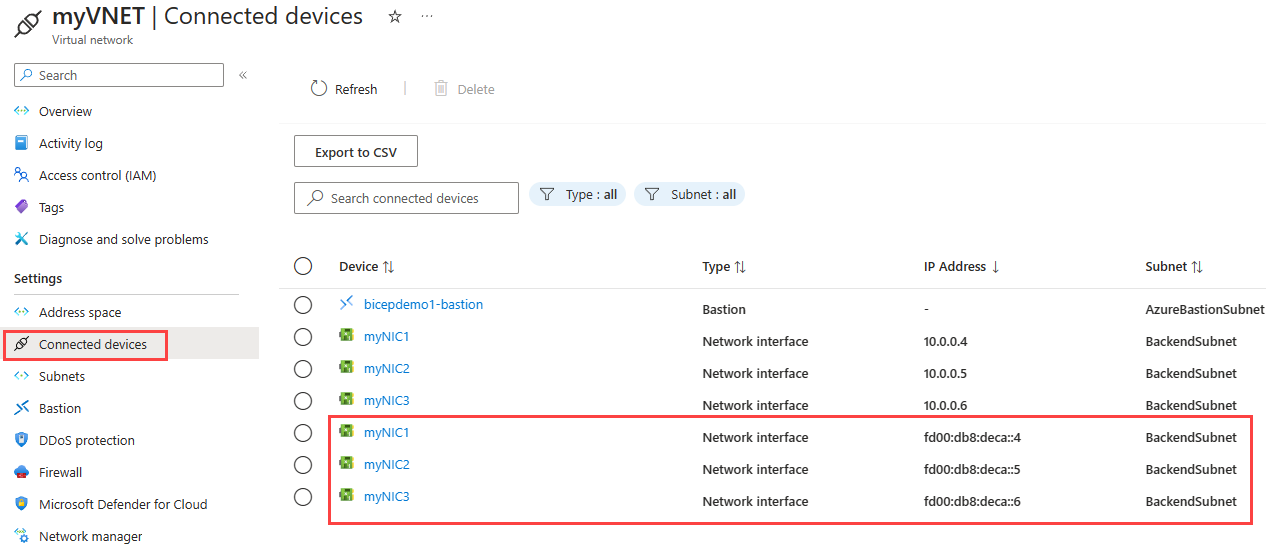
View IPv6 dual-stack virtual network in Azure portal
You can view the IPv6 dual-stack virtual network in Azure portal as follows:
In the portal's search bar, enter virtual networks and
In the Virtual Networks window, select myVNet.
Select Connected devices under Settings to view the attached network interfaces. The dual stack virtual network shows the three NICs with both IPv4 and IPv6 configurations.
Clean up resources
When no longer needed, you can use the Remove-AzResourceGroup command to remove the resource group, VM, and all related resources.
Remove-AzResourceGroup -Name MyAzureResourceGroupSLB
Next steps
In this article, you updated an existing Standard Load Balancer with a IPv4 frontend IP configuration to a dual stack (IPv4 and IPv6) configuration. You also added IPv6 configurations to the NICs of the VMs in the backend pool and to the Virtual Network that hosts them. To learn more about IPv6 support in Azure virtual networks, see What is IPv6 for Azure Virtual Network?