Note
Access to this page requires authorization. You can try signing in or changing directories.
Access to this page requires authorization. You can try changing directories.
Get started with Azure Load Balancer by using the Azure CLI to create an internal load balancer and two virtual machines. Other resources include Azure Bastion, NAT Gateway, a virtual network, and the required subnets.

If you don't have an Azure account, create a free account before you begin.
Prerequisites
Use the Bash environment in Azure Cloud Shell. For more information, see Get started with Azure Cloud Shell.

If you prefer to run CLI reference commands locally, install the Azure CLI. If you're running on Windows or macOS, consider running Azure CLI in a Docker container. For more information, see How to run the Azure CLI in a Docker container.
If you're using a local installation, sign in to the Azure CLI by using the az login command. To finish the authentication process, follow the steps displayed in your terminal. For other sign-in options, see Authenticate to Azure using Azure CLI.
When you're prompted, install the Azure CLI extension on first use. For more information about extensions, see Use and manage extensions with the Azure CLI.
Run az version to find the version and dependent libraries that are installed. To upgrade to the latest version, run az upgrade.
- This quickstart requires version 2.0.28 or later of the Azure CLI. If you're using Azure Cloud Shell, the latest version is already installed.
Create a resource group
An Azure resource group is a logical container into which you deploy and manage your Azure resources.
Create a resource group with az group create.
    az group create \
      --name CreateIntLBQS-rg \
      --location westus2
When you create an internal load balancer, a virtual network is configured as the network for the load balancer.
Create the virtual network
Before you deploy VMs and test your load balancer, create the supporting virtual network and subnet. The virtual network and subnet contain the resources deployed later in this article.
Create a virtual network by using az network vnet create.
  az network vnet create \
    --resource-group CreateIntLBQS-rg \
    --location westus2 \
    --name myVNet \
    --address-prefixes 10.1.0.0/16 \
    --subnet-name myBackendSubnet \
    --subnet-prefixes 10.1.0.0/24
Create an Azure Bastion host
In this example, you create an Azure Bastion host. The Azure Bastion host is used later in this article to securely manage the virtual machines and test the load balancer deployment.
Important
Hourly pricing starts from the moment that Bastion is deployed, regardless of outbound data usage. For more information, see Pricing and SKUs. If you're deploying Bastion as part of a tutorial or test, we recommend that you delete this resource after you finish using it.
Create a bastion public IP address
Use az network public-ip create to create a public IP address for the Azure Bastion host.
az network public-ip create \
    --resource-group CreateIntLBQS-rg  \
    --name myBastionIP \
    --sku Standard \
    --zone 1 2 3
Create a bastion subnet
Use az network vnet subnet create to create a subnet.
az network vnet subnet create \
    --resource-group CreateIntLBQS-rg  \
    --name AzureBastionSubnet \
    --vnet-name myVNet \
    --address-prefixes 10.1.1.0/27
Create the bastion host
Use az network bastion create to create a host.
az config set extension.use_dynamic_install=yes_without_prompt

az network bastion create \
    --resource-group CreateIntLBQS-rg  \
    --name myBastionHost \
    --public-ip-address myBastionIP \
    --vnet-name myVNet \
    --location westus2 \
    --sku Basic \
    --only-show-errors \
    --no-wait
It can take a few minutes for the Azure Bastion host to deploy.
Create the load balancer
This section details how you can create and configure the following components of the load balancer:
A frontend IP pool that receives the incoming network traffic on the load balancer
A backend IP pool where the frontend pool sends the load balanced network traffic
A health probe that determines health of the backend VM instances
A load balancer rule that defines how traffic is distributed to the VMs
Create the load balancer resource
Create an internal load balancer with az network lb create.
  az network lb create \
    --resource-group CreateIntLBQS-rg \
    --name myLoadBalancer \
    --sku Standard \
    --vnet-name myVNet \
    --subnet myBackendSubnet \
    --backend-pool-name myBackEndPool \
    --frontend-ip-name myFrontEnd
Create the health probe
A health probe checks all virtual machine instances to ensure they can send network traffic.
A virtual machine with a failed probe check is removed from the load balancer. The virtual machine is added back into the load balancer when the failure is resolved.
Create a health probe with az network lb probe create.
  az network lb probe create \
    --resource-group CreateIntLBQS-rg \
    --lb-name myLoadBalancer \
    --name myHealthProbe \
    --protocol tcp \
    --port 80
Create a load balancer rule
A load balancer rule defines:
Frontend IP configuration for the incoming traffic
The backend IP pool to receive the traffic
The required source and destination port
Create a load balancer rule with az network lb rule create.
  az network lb rule create \
    --resource-group CreateIntLBQS-rg \
    --lb-name myLoadBalancer \
    --name myHTTPRule \
    --protocol tcp \
    --frontend-port 80 \
    --backend-port 80 \
    --frontend-ip-name myFrontEnd \
    --backend-pool-name myBackEndPool \
    --probe-name myHealthProbe \
    --idle-timeout 15 \
    --enable-tcp-reset true
Create a network security group
For a standard load balancer, the VMs in the backend pool are required to have network interfaces that belong to a network security group.
To create a network security group, use az network nsg create.
  az network nsg create \
    --resource-group CreateIntLBQS-rg \
    --name myNSG
Create a network security group rule
To create a network security group rule, use az network nsg rule create.
  az network nsg rule create \
    --resource-group CreateIntLBQS-rg \
    --nsg-name myNSG \
    --name myNSGRuleHTTP \
    --protocol '*' \
    --direction inbound \
    --source-address-prefix '*' \
    --source-port-range '*' \
    --destination-address-prefix '*' \
    --destination-port-range 80 \
    --access allow \
    --priority 200
Create backend servers
In this section, you create:
Two network interfaces for the virtual machines
Two virtual machines to be used as servers for the load balancer
Create network interfaces for the virtual machines
Create two network interfaces with az network nic create.
  array=(myNicVM1 myNicVM2)
  for vmnic in "${array[@]}"
  do
    az network nic create \
        --resource-group CreateIntLBQS-rg \
        --name $vmnic \
        --vnet-name myVNet \
        --subnet myBackEndSubnet \
        --network-security-group myNSG
  done
Create the virtual machines
Create the virtual machines with az vm create.
  array=(1 2)
  for n in "${array[@]}"
  do
    az vm create \
    --resource-group CreateIntLBQS-rg \
    --name myVM$n \
    --nics myNicVM$n \
    --image win2022datacenter \
    --admin-username azureuser \
    --zone $n \
    --no-wait
  done
It can take a few minutes for the VMs to deploy.
Note
Azure provides a default outbound access IP for VMs that either aren't assigned a public IP address or are in the backend pool of an internal basic Azure load balancer. The default outbound access IP mechanism provides an outbound IP address that isn't configurable.
The default outbound access IP is disabled when one of the following events happens:
- A public IP address is assigned to the VM.
- The VM is placed in the backend pool of a standard load balancer, with or without outbound rules.
- An Azure NAT Gateway resource is assigned to the subnet of the VM.
VMs that you create by using virtual machine scale sets in flexible orchestration mode don't have default outbound access.
For more information about outbound connections in Azure, see Default outbound access in Azure and Use Source Network Address Translation (SNAT) for outbound connections.
Add virtual machines to the backend pool
Add the virtual machines to the backend pool with az network nic ip-config address-pool add.
  array=(VM1 VM2)
  for vm in "${array[@]}"
  do
  az network nic ip-config address-pool add \
   --address-pool myBackendPool \
   --ip-config-name ipconfig1 \
   --nic-name myNic$vm \
   --resource-group CreateIntLBQS-rg \
   --lb-name myLoadBalancer
  done
Create NAT gateway
To provide outbound internet access for resources in the backend pool, create a NAT gateway.
Create public IP
Use az network public-ip create to create a single IP for the outbound connectivity.
  az network public-ip create \
    --resource-group CreateIntLBQS-rg \
    --name myNATgatewayIP \
    --sku Standard \
    --zone 1 2 3
Create NAT gateway resource
Use az network nat gateway create to create the NAT gateway resource. The public IP created in the previous step is associated with the NAT gateway.
  az network nat gateway create \
    --resource-group CreateIntLBQS-rg \
    --name myNATgateway \
    --public-ip-addresses myNATgatewayIP \
    --idle-timeout 10
Associate NAT gateway with subnet
Configure the source subnet in virtual network to use a specific NAT gateway resource with az network vnet subnet update.
  az network vnet subnet update \
    --resource-group CreateIntLBQS-rg \
    --vnet-name myVNet \
    --name myBackendSubnet \
    --nat-gateway myNATgateway
Create test virtual machine
Create the network interface with az network nic create.
  az network nic create \
    --resource-group CreateIntLBQS-rg \
    --name myNicTestVM \
    --vnet-name myVNet \
    --subnet myBackEndSubnet \
    --network-security-group myNSG
Create the virtual machine with az vm create.
  az vm create \
    --resource-group CreateIntLBQS-rg \
    --name myTestVM \
    --nics myNicTestVM \
    --image Win2019Datacenter \
    --admin-username azureuser \
    --no-wait
You might need to wait a few minutes for the virtual machine to deploy.
Install IIS
Use az vm extension set to install IIS on the backend virtual machines and set the default website to the computer name.
  array=(myVM1 myVM2)
    for vm in "${array[@]}"
    do
     az vm extension set \
       --publisher Microsoft.Compute \
       --version 1.8 \
       --name CustomScriptExtension \
       --vm-name $vm \
       --resource-group CreateIntLBQS-rg \
       --settings '{"commandToExecute":"powershell Add-WindowsFeature Web-Server; powershell Add-Content -Path \"C:\\inetpub\\wwwroot\\Default.htm\" -Value $($env:computername)"}'
  done
Test the load balancer
Sign in to the Azure portal.
On the Overview page, find the private IP address for the load balancer. In the menu on the left, select All services > All resources > myLoadBalancer.
In the overview of myLoadBalancer, copy the address next to Private IP Address. If Private IP address isn't visible, select See more.
In the menu on the left, select All services > All resources. From the resources list, in the CreateIntLBQS-rg resource group, select myTestVM.
On the Overview page, select Connect > Bastion.
Enter the username and password that you entered when you created the VM.
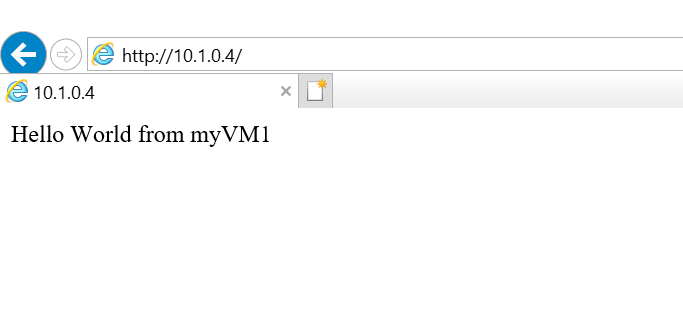
On myTestVM, open Internet Explorer.
Enter the IP address from the previous step into the address bar of the browser. The default page of the IIS web server is shown on the browser.
Clean up resources
When your resources are no longer needed, use the az group delete command to remove the resource group, load balancer, and all related resources.
  az group delete \
    --name CreateIntLBQS-rg
Next steps
In this quickstart:
You created an internal load balancer
Attached two virtual machines
Configured the load balancer traffic rule and health probe
Tested the load balancer
To learn more about Azure Load Balancer, continue to: