Note
Access to this page requires authorization. You can try signing in or changing directories.
Access to this page requires authorization. You can try changing directories.
In many organizations, the need can arise where an Azure Load Balancer isn't associated with a Virtual Machine Scale Set, but needs to be added. Or an existing Virtual Machine Scale Set is deployed with an Azure Load Balancer that requires updating. The Azure portal can be used to add or update an Azure Load Balancer associated with a Virtual Machine Scale Set.
In this tutorial, you learn how to:
- Create a virtual network
- Create a NAT gateway for outbound connectivity
- Create a standard SKU Azure Load Balancer
- Create a virtual machine scale set without a load balancer
- Add a Azure Load Balancer to virtual machine scale set
Prerequisites
- An Azure account with an active subscription. Create an account for free
Create a virtual network and bastion host
In this section, you create a virtual network with a resource subnet, an Azure Bastion subnet, and an Azure Bastion host.
Important
Hourly pricing starts from the moment that Bastion is deployed, regardless of outbound data usage. For more information, see Pricing and SKUs. If you're deploying Bastion as part of a tutorial or test, we recommend that you delete this resource after you finish using it.
In the portal, search for and select Virtual networks.
On the Virtual networks page, select + Create.
On the Basics tab of Create virtual network, enter or select the following information:
Setting Value Project details Subscription Select your subscription. Resource group Select load-balancer-rg from the dropdown or Create new if it doesn't exist.
Enter load-balancer-rg in Name.
Select OK.Instance details Name Enter lb-vnet. Region Select (US) East US. 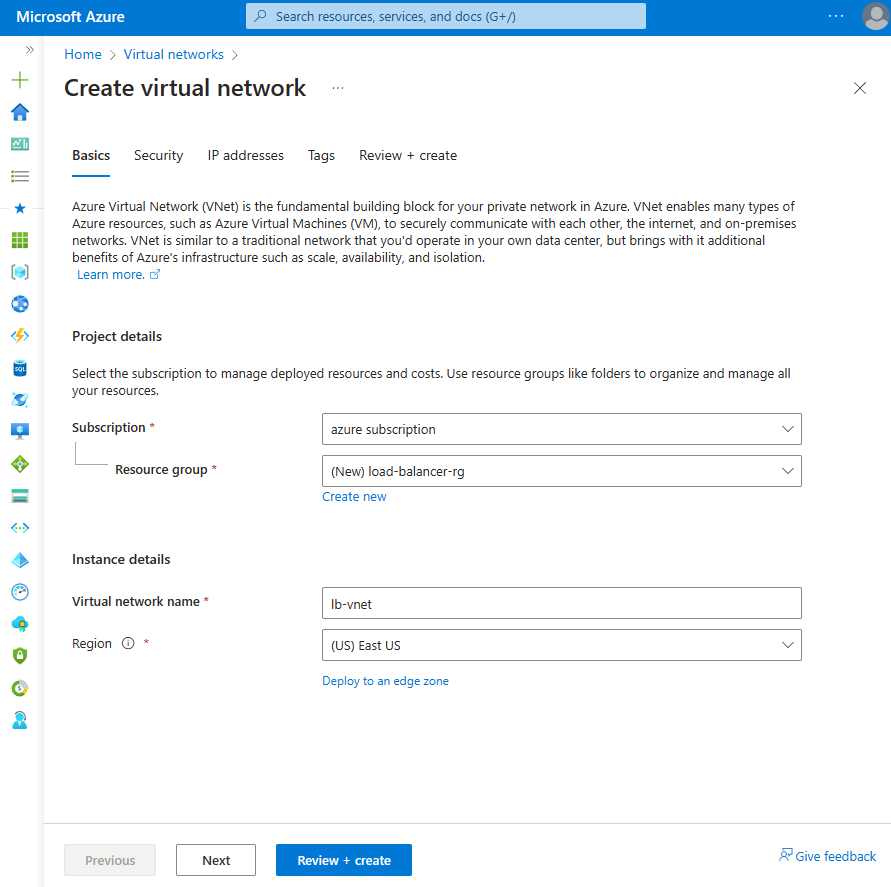
Select the Security tab or Next button at the bottom of the page.
Under Azure Bastion, enter or select the following information:
Setting Value Azure Bastion Enable Azure Bastion Select checkbox. Azure Bastion host name Enter lb-bastion. Azure Bastion public IP address Select Create new.
Enter lb-bastion-ip in Name.
Select OK.Select the IP addresses tab, or Next at the bottom of the page.
On Create virtual network page, enter or select the following information:
Setting Value Add IPv4 address space IPv4 address space Enter 10.0.0.0/16 (65,356 addresses). Subnets Select the default subnet link to edit. Edit subnet Subnet purpose Leave the default Default. Name Enter backend-subnet. Starting address Enter 10.0.0.0. Subnet size Enter /24(256 addresses). Security NAT Gateway Select lb-nat-gateway. 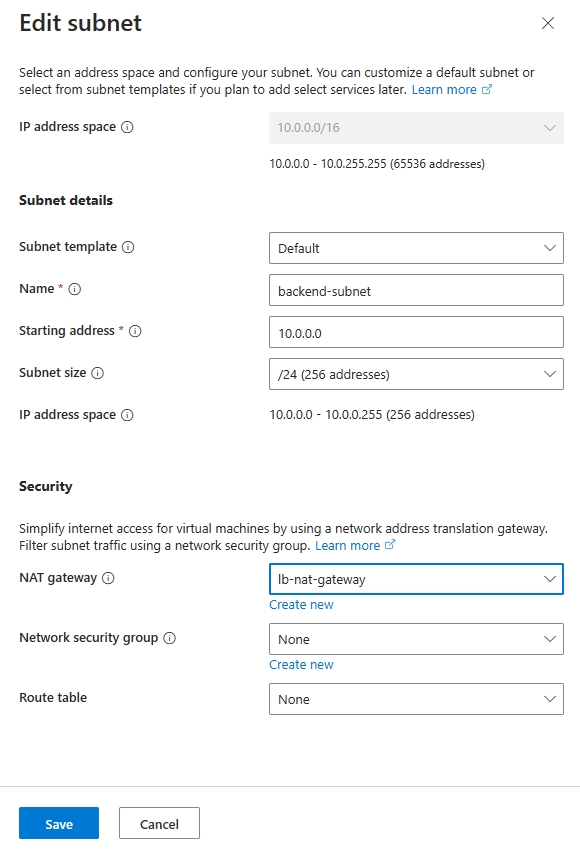
Select Save.
Select Review + create at the bottom of the screen, and when validation passes, select Create.
Create Virtual Machine Scale Set
In this section, you create a Virtual Machine Scale Set that is attached to a load balancer created later.
In the search box at the top of the portal, enter Virtual machine scale, and select Virtual machine scale sets from the search results.
Select Create.
In the Basics tab of Create a virtual machine scale set, enter, or select the following information:
Setting Value Project details Subscription Select your subscription. Resource group Select load-balancer-rg. Scale set details Virtual machine scale set name Enter lb-vmss. Region Select (US) East US. Availability zone Leave the default of None. Orchestration Orchestration mode Leave the default of Uniform: optimized for large-scale stateless workloads with identical instances. Security type Leave the default of Standard Instance details Image Select Windows Server 2022 Datacenter: Azure Edition - x64 Gen2. Azure Spot Instance Leave the default of the box unchecked. Size Select a size. Administrator account Username Enter a username. Password Enter a password. Confirm password Confirm password. Select the Networking tab.
Enter or select the following information in the Networking tab:
Setting Value Virtual network configuration Virtual network Select lb-vnet. Select the Review + create tab, or select the blue Review + create button at the bottom of the page.
Select Create.
Create NAT gateway
In this section, you create a NAT gateway for outbound internet access for resources in the virtual network. For other options for outbound rules, check out Network Address Translation (SNAT) for outbound connections
Sign in to the Azure portal.
In the search box at the top of the portal, enter NAT gateway. Select NAT gateways in the search results.
Select + Create.
In the Basics tab of Create network address translation (NAT) gateway enter or select the following information:
Setting Value Project details Subscription Select your subscription. Resource group Select Create new.
Enter load-balancer-rg in Name.
Select OK.Instance details NAT gateway name Enter lb-nat-gateway. Region Select East US. Availability zone Select No zone. Idle timeout (minutes) Enter 15. 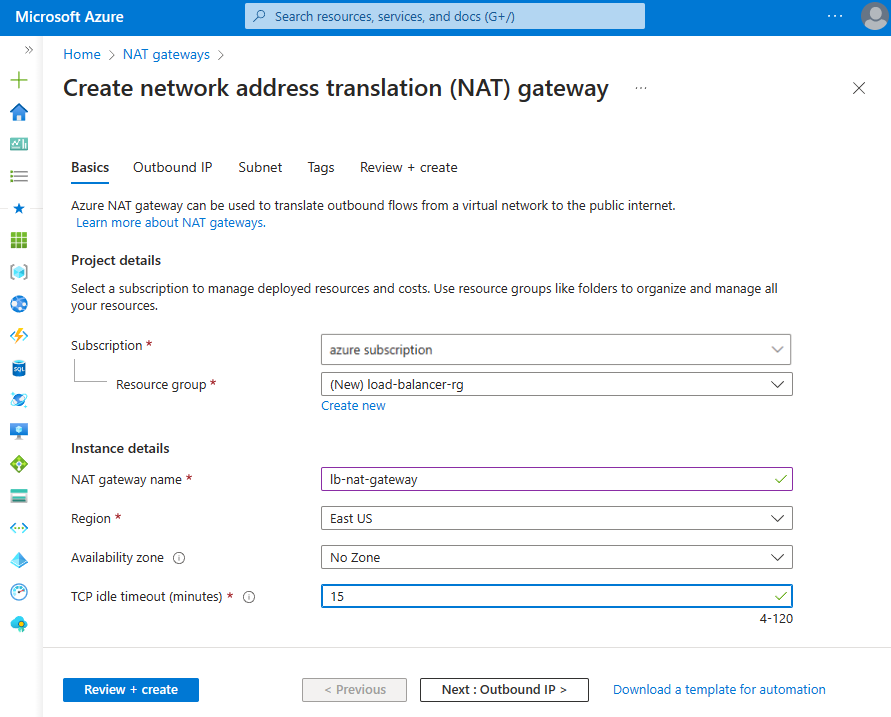
Select the Outbound IP tab or select the Next: Outbound IP button at the bottom of the page.
Select Create a new public IP address under Public IP addresses.
Enter nat-gw-public-ip in Name in Add a public IP address.
Select OK.
Select the blue Review + create button at the bottom of the page, or select the Review + create tab.
Select Create.
Create load balancer
In this section, you create a load balancer in this section. The frontend IP and backend pool are configured as part of the creation.
In the search box at the top of the portal, enter Load balancer. Select Load balancers in the search results.
In the Load balancer page, select Create or the Create load balancer button.
In the Basics tab of the Create load balancer page, enter, or select the following information:
Setting Value Project details Subscription Select your subscription. Resource group Select lb-resource-group. Instance details Name Enter load-balancer Region Select (US) East US. SKU Leave the default Standard. Type Select Public. Tier Leave the default Regional. Select the Frontend IP configuration tab, or select the Next: Frontend IP configuration button at the bottom of the page.
In Frontend IP configuration, select + Add a frontend IP configuration.
Enter lb-frontend-IP in Name.
Select IPv4 or IPv6 for the IP version.
Note
IPv6 isn't currently supported with Routing Preference or Cross-region load-balancing (Global Tier).
Select IP address for the IP type.
Note
For more information on IP prefixes, see Azure Public IP address prefix.
Select Create new in Public IP address.
In Add a public IP address, enter lb-public-IP for Name.
Select Zone-redundant in Availability zone.
Note
In regions with Availability Zones, you have the option to select no zone (default option), a specific zone, or zone-redundant. The choice will depend on your specific domain failure requirements. In regions without Availability Zones, this field won't appear.
For more information on availability zones, see Availability zones overview.Select OK.
Select Add.
Select the Next: Backend pools> button at the bottom of the page.
In the Backend pools tab, select + Add a backend pool.
Enter lb-backend-pool for Name in Add backend pool.
Select lb-VNet in Virtual network.
Select IP Address for Backend Pool Configuration and select Save.
Select the blue Review + create button at the bottom of the page.
Select Create.
Note
In this example we created a NAT gateway to provide outbound Internet access. The outbound rules tab in the configuration is bypassed as it's optional and isn't needed with the NAT gateway. For more information on Azure NAT gateway, see What is Azure Virtual Network NAT? For more information about outbound connections in Azure, see Source Network Address Translation (SNAT) for outbound connections.
Configure load balancer settings
In this section, you create a backend pool for load-balancer. You create a health probe to monitor HTTP and Port 80 to ensure the health of the virtual machines in the backend pool. Additionally, you create a load-balancing rule for Port 80 with outbound SNAT disabled. The outbound connectivity of the virtual machines is handled by the NAT gateway created earlier.
In the search box at the top of the portal, enter Load balancer.
Select Load balancers in the search results.
Select load-balancer.
In load-balancer, select Backend pools in Settings.
Select + Add in Backend pools.
In Add backend pool, enter or select the following information:
Setting Value Name Enter lb-backend-pool. Virtual network Select lb-vnet. Backend Pool Configuration Leave the default of NIC. Select Save.
Select Next: Inbound rules
In Create load balancer page, select + Add a load balancing rule.
Enter or select the following information in Add load-balancing rule:
Setting Value Name Enter lb-HTTP-rule. IP Version Leave the default of IPv4. Frontend IP address Select lb-Frontend-IP. Backend pool Select lb-backend-pool. Protocol Select the default of TCP. Port Enter 80. Backend port Enter 80. Health probe Select Create new.
Enter lb-HTTP-probe for Name.
Select HTTP for Protocol.
Select Ok.Session persistence Leave the default of None. Idle timeout (minutes) Change the slider to 15. TCP reset Select Enabled. Floating IP Leave the default of Disabled. Outbound source network address translation (SNAT) Leave the default of (Recommended) Use outbound rules to provide backend pool members access to the internet. Select Add.
Select Review + Create and Create.
Add load balancer to scale set
In this section, you add a load balancer to the scale set in the Azure portal.
In the search box at the top of the portal, enter Virtual machine scale.
In the search results, select Virtual machine scale sets.
Select lb-vmss.
In the Settings section of lb-vmss, select Networking.
Select the Load balancing tab in the Overview page of the Networking settings of lb-vmss.
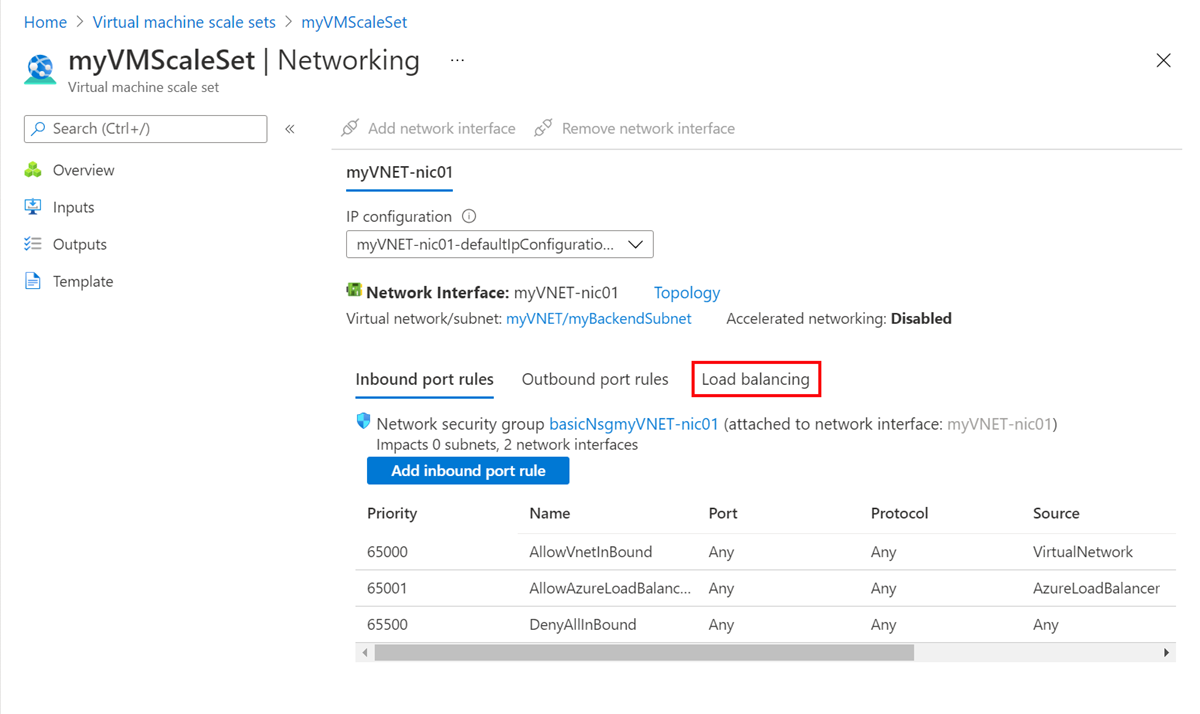
Select the blue Add load balancing button.
In Add load balancing, enter or select the following information:
Setting Value Load balancing options Select Azure load balancer. Select a load balancer Select load-balancer. Backend pool Select Use existing. Select a backend pool Select lb-backend-pool. Select Save.
Clean up resources
If you're not going to continue to use this application, delete the load balancer and the supporting resources with the following steps:
- In the search box at the top of the portal, enter Resource group.
- Select Resource groups in the search results.
- Select load-balancer-rg.
- In the overview page of load-balancer-rg, select Delete resource group.
- Enter load-balancer-rg in TYPE THE RESOURCE GROUP NAME.
- Select Delete.
Next steps
In this tutorial, you:
- Created a virtual network and Azure Bastion host.
- Created an Azure Standard Load Balancer.
- Created a virtual machine scale set.
- Added load balancer to Virtual Machine Scale Set.
Advance to the next article to learn how to create a cross-region Azure Load Balancer: