Note
Access to this page requires authorization. You can try signing in or changing directories.
Access to this page requires authorization. You can try changing directories.
Azure Load Balancer consists of Standard, Basic, and Gateway SKUs. Gateway Load Balancer is used for transparent insertion of Network Virtual Appliances (NVA). Use Gateway Load Balancer for scenarios that require high performance and high scalability of NVAs.
In this tutorial, you learn how to:
- Create virtual network.
- Create network security group.
- Create a gateway load balancer.
- Chain a load balancer frontend to gateway load balancer.
You can choose to create a gateway load balancer using the Azure portal, Azure CLI, or Azure PowerShell.
Prerequisites
- An Azure subscription. If you don’t have an Azure subscription, create a free account before you begin.
- Two standard sku Azure Load Balancers with backend pools deployed in two different Azure regions.
- For information on creating a regional standard load balancer and virtual machines for backend pools, see Quickstart: Create a public load balancer to load balance VMs using the Azure portal.

Create a virtual network and associated resources
The following procedure creates a virtual network with a resource subnet, an Azure Bastion subnet, and an Azure Bastion host.
Important
Hourly pricing starts from the moment that Bastion is deployed, regardless of outbound data usage. For more information, see Pricing and SKUs. If you're deploying Bastion as part of a tutorial or test, we recommend that you delete this resource after you finish using it.
In the portal, search for and select Virtual networks.
On the Virtual networks page, select + Create.
On the Basics tab of Create virtual network, enter, or select the following information:
Setting Value Project details Subscription Select your subscription. Resource group Select Create new.
Enter load-balancer-rg in Name.
Select OK.Instance details Name Enter lb-vnet. Region Select East US. Select the Security tab or Next button at the bottom of the page.
Under Azure Bastion, enter or select the following information:
Setting Value Azure Bastion Enable Azure Bastion Select checkbox. Azure Bastion host name Enter lb-bastion. Azure Bastion public IP address Select Create new.
Enter lb-bastion-ip in Name.
Select OK.Select the IP addresses tab, or Next at the bottom of the page.
On Create virtual network page, enter or select the following information:
Setting Value Add IPv4 address space IPv4 address space Enter 10.0.0.0/16 (65,356 addresses). Subnets Select the default subnet link to edit. Subnet template Leave the default Default. Name Enter backend-subnet. Starting address Enter 10.0.0.0. Subnet size Enter /24(256 addresses). Security NAT Gateway Select None. Select Save.
Select Review + create at the bottom of the screen, and when validation passes, select Create.
Create and configure a gateway load balancer
In this section, you create the configuration and deploy the gateway load balancer.
In the search box at the top of the portal, enter Load balancer. Select Load balancers in the search results.
In the Load Balancer page, select Create.
In the Basics tab of the Create load balancer page, enter, or select the following information:
Setting Value Project details Subscription Select your subscription. Resource group Select load-balancer-rg. Instance details Name Enter gateway-load-balancer Region Select (US) East US. SKU Select Gateway. Type Select Internal. 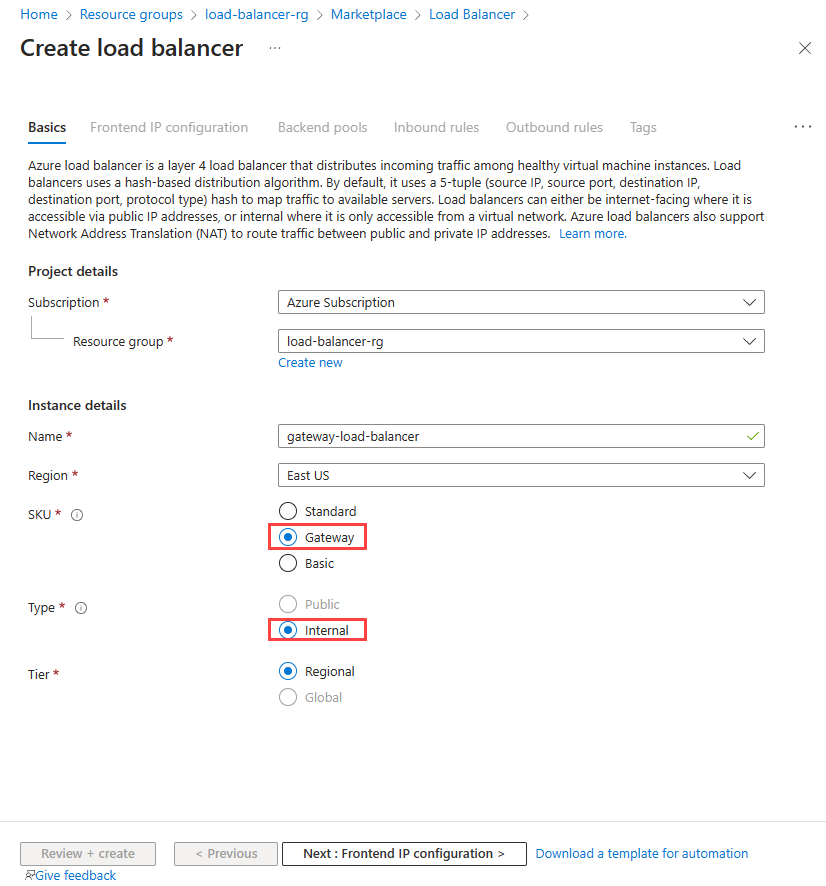
Select Next: Frontend IP configuration at the bottom of the page.
In Frontend IP configuration, select + Add a frontend IP.
In Add frontend IP configuration, enter or select the following information:
Setting Value Name Enter lb-frontend-IP. Virtual network Select lb-vnet. Subnet Select backend-subnet. Assignment Select Dynamic Select Save.
Select Next: Backend pools at the bottom of the page.
In the Backend pools tab, select + Add a backend pool.
In Add backend pool, enter or select the following information.
Setting Value Name Enter lb-backend-pool. Backend Pool Configuration Select NIC. Gateway load balancer configuration Type Select Internal and External. Internal port Leave the default of 10800. Internal identifier Leave the default of 800. External port Leave the default of 10801. External identifier Leave the default of 801. Select Save.
Select the Next: Inbound rules button at the bottom of the page.
In Load balancing rule in the Inbound rules tab, select + Add a load balancing rule.
In Add load balancing rule, enter or select the following information:
Setting Value Name Enter lb-rule IP Version Select IPv4 or IPv6 depending on your requirements. Frontend IP address Select lb-frontend-IP. Backend pool Select lb-backend-pool. Health probe Select Create new.
In Name, enter lb-health-probe.
Select TCP in Protocol.
Leave the rest of the defaults, and select Save.Session persistence Select None. Enable TCP reset Leave default of unchecked. Enable floating IP Leave default of unchecked. 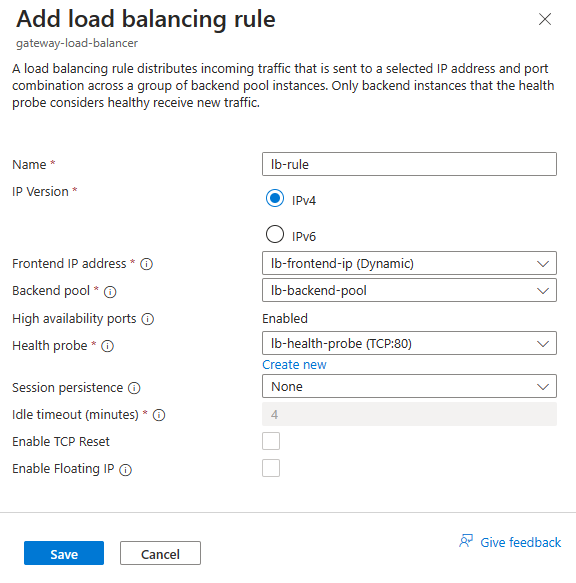
Select Save.
Select the blue Review + create button at the bottom of the page.
Select Create.
Add network virtual appliances to the Gateway Load Balancer backend pool
Note
If leveraging your own custom network virtual appliance in the backend pool of a Gateway Load Balancer, please ensure the MTU of all NVA virtual machines are raised to a minimum of 1550 bytes to accommodate for the VXLAN encapsulated headers. This will allow source packets up to the limit of 1500 byte packets in Azure, avoiding fragmentation.
Deploy NVAs through the Azure Marketplace. Once deployed, add the NVA virtual machines to the backend pool of the gateway load balancer. To add the virtual machines, go to the backend pools tab of your gateway load balancer.
Chain load balancer frontend to Gateway Load Balancer
In this example, you'll chain the frontend of a standard load balancer to the gateway load balancer.
You add the frontend to the frontend IP of an existing load balancer in your subscription.
In the search box in the Azure portal, enter Load balancer. In the search results, select Load balancers.
In Load balancers, select load-balancer or your existing load balancer name.
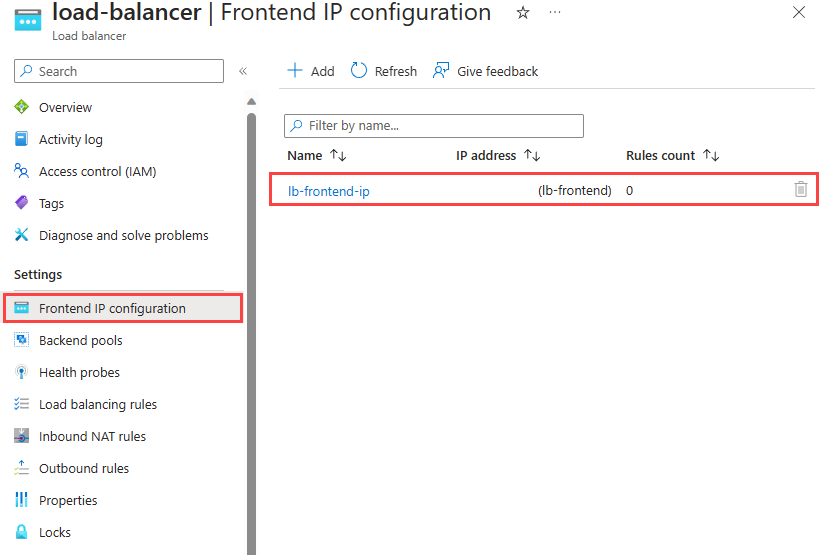
In the load balancer page, select Frontend IP configuration in Settings.
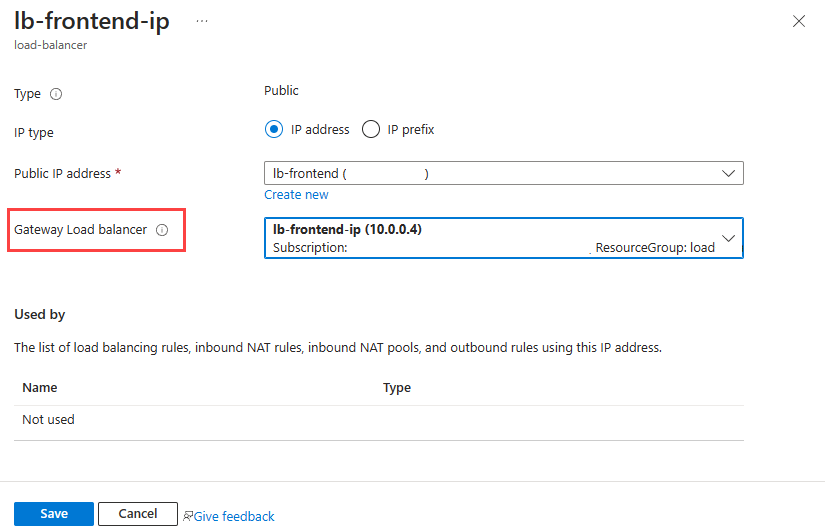
Select the frontend IP of the load balancer. In this example, the name of the frontend is lb-frontend-IP.
Select lb-frontend-IP (10.1.0.4) in the pull-down box next to Gateway load balancer.
Select Save.
Chain virtual machine to Gateway Load Balancer
Alternatively, you can chain a VM's NIC IP configuration to the gateway load balancer.
You add the gateway load balancer's frontend to an existing VM's NIC IP configuration.
Important
A virtual machine must have a public IP address assigned before attempting to chain the NIC configuration to the frontend of the gateway load balancer.
In the search box in the Azure portal, enter Virtual machine. In the search results, select Virtual machines.
In Virtual machines, select the virtual machine that you want to add to the gateway load balancer. In this example, the virtual machine is named myVM1.
In the overview of the virtual machine, select Networking in Settings.
In Networking, select the name of the network interface attached to the virtual machine. In this example, it's myvm1229.
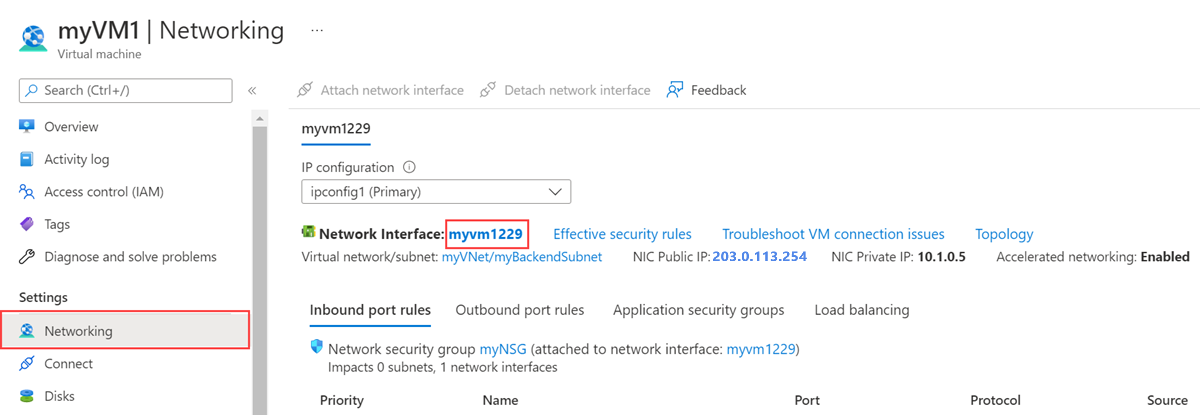
In the network interface page, select IP configurations in Settings.
Select lb-frontend-IP in Gateway Load balancer.
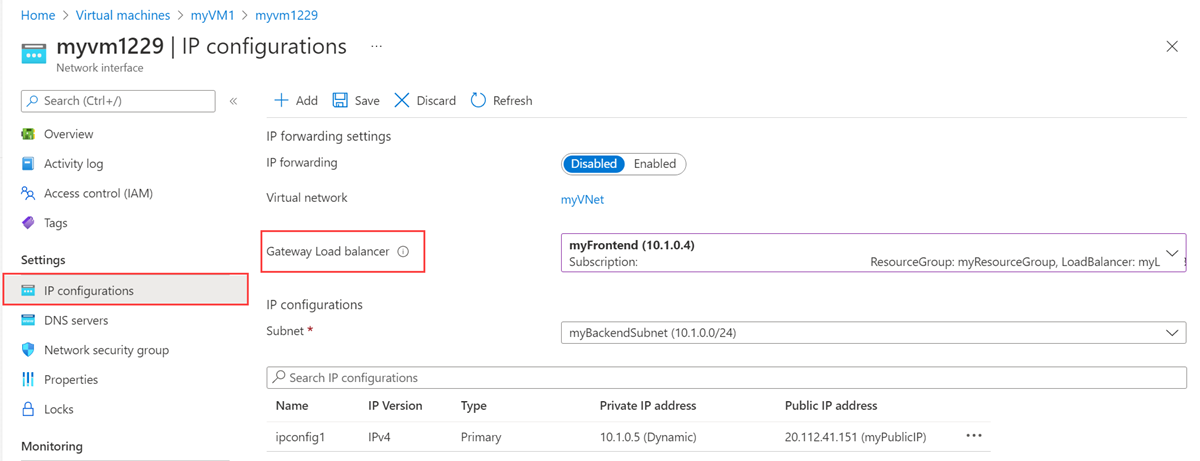
Select Save.
Clean up resources
When no longer needed, delete the resource group, load balancer, and all related resources. To do so, select the resource group load-balancer-rg that contains the resources and then select Delete.
Next steps
Create Network Virtual Appliances in Azure.
When creating the NVAs, choose the resources created in this tutorial:
Virtual network
Subnet
Network security group
Gateway load balancer
Advance to the next article to learn how to create a cross-region Azure Load Balancer.